SSD Relocation Experience
Last week, the manager gave the green light to upgrade the machine from HDD to SSD to all four of my colleagues including me. My indignant letter about the dangers of a long compilation and Resharper's brakes on the developer's nerves helped. He told me that launching a studio is a non-trivial task, and even compiling and restarting ASP.NET is generally extremely painful.
In principle, the configuration is good, the Xeon W3503 with 4GB of memory, and the computer should fly in theory (not in games, of course, but in an office setting). But unfortunately all this stuff is inhibited by the most common 250 gigabyte ciget. Therefore, resolving the money issue, I began to choose the appropriate SSD. To minimize downtime, I decided to just clone my drive. Looking at the current busy volume, I settled on a 100GB drive. At a local store, Corsair 115GB SSDs were purchased for $ 170 in the amount of 4 pieces and handed out to everyone. It would be cheaper to take on newegg, but the time constraints involved the purchase "today", so I took what was. At the same time, I bought up to 8 gigs of memory.
So, as the most proactive, I had to transfer my system, as well as help my colleagues. For cloning I used Clonezilla. To manipulate partitions, I also downloaded Gparted . And Clonezilla and Gparted need to burn on discs or flash drives, as you find it easier.
Since I have Win 7, the Internet recommends that you clone the entire disk as a whole so that all hidden system partitions created by the Windows installer are copied. Here is the algorithm I followed:
My second colleague still has XP SP2 x64, and his disk is divided into two, so I could not apply the above algorithm, because couldn't just copy the whole disk. In addition, the size of the partition with the axis was slightly less than one hundred gigabytes, so you do not need to reduce it. Therefore, for this option, here is what I did:
So I updated four computers in a few hours of trial and error. Of course, if you work out this procedure to a shine, then it will not take so much time and so many steps. But experience, as they say, is priceless. :)
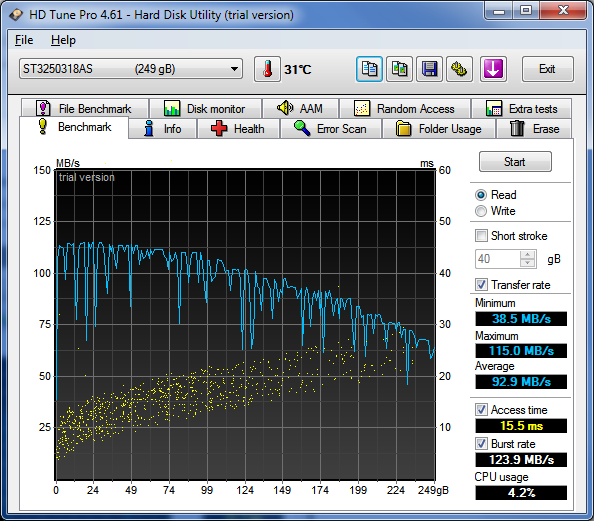
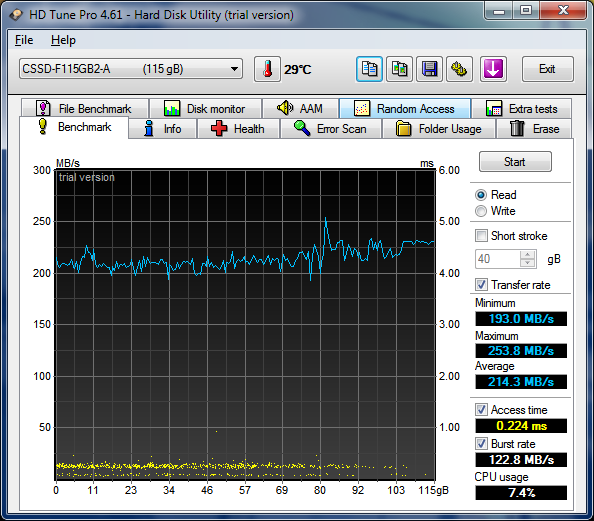
Here is a comparison in reading speeds:
But the sensations are not transmitted at all, Windows starts instantly, projects are compiled twice as fast (detected), Resharper does not blunt, in short beauty!
UPDATE: What to do after cloning .
In principle, the configuration is good, the Xeon W3503 with 4GB of memory, and the computer should fly in theory (not in games, of course, but in an office setting). But unfortunately all this stuff is inhibited by the most common 250 gigabyte ciget. Therefore, resolving the money issue, I began to choose the appropriate SSD. To minimize downtime, I decided to just clone my drive. Looking at the current busy volume, I settled on a 100GB drive. At a local store, Corsair 115GB SSDs were purchased for $ 170 in the amount of 4 pieces and handed out to everyone. It would be cheaper to take on newegg, but the time constraints involved the purchase "today", so I took what was. At the same time, I bought up to 8 gigs of memory.
So, as the most proactive, I had to transfer my system, as well as help my colleagues. For cloning I used Clonezilla. To manipulate partitions, I also downloaded Gparted . And Clonezilla and Gparted need to burn on discs or flash drives, as you find it easier.
Since I have Win 7, the Internet recommends that you clone the entire disk as a whole so that all hidden system partitions created by the Windows installer are copied. Here is the algorithm I followed:
- Clean the source disk so that the occupied space is less than the volume of the SSD. For example, empty the trash, delete temporary files, reduce the swap file.
- Check disk for fragmentation. I had 0%, and my colleague had 1% and had problems in the next step.
- Reboot into Gparted, and reduce the size of the main partition to the size of the SSD or less. For example, I reduced it from 235GB to 100GB. A colleague managed to reduce only to 106GB. The main thing is to fit into the volume of the final disk.
- Reboot into Windows and wait for the end of the disk check (chkdsk) that will start automatically. Without it, there will be problems in the next step.
- Turn off the computer, connect the SSD, and boot into Clonezilla. There you need to select device-device mode, beginner mode, disk_to_local_disk, select the correct source disk and destination disk (from HDD to SSD). Give the green light to all warnings and leaning back to wait 15-20 minutes (in the case of 100GB).
- You can stop at this step, but I wanted to have a second disk in the system for backup and just storing data. Therefore, we are overloaded into Windows. The old version will load, and the new disk will be disconnected due to collisions.
- Now you need to delete the boot record of the old disk. Or a shaman with bcdedit or download Google EasyBCD . We make backup records just in case and demolish everything that is. Upon exit, the program will warn that the system will not boot next time. We don’t need to.
- We reboot the system, this time the system should boot from a new disk. Much faster.
- Open the Control Panel-Administrative Tools-Computer Management-Disk Management. We click on the old disk which is Offline and select Online. A new disk appears in the system. Here you can also correct the letters of the volumes (for example, move the old section to the letter D).
- There you can increase the sections to the maximum. Rebooting to GParted, no need for this. You need to right-click on the section and select Expand Volume.
My second colleague still has XP SP2 x64, and his disk is divided into two, so I could not apply the above algorithm, because couldn't just copy the whole disk. In addition, the size of the partition with the axis was slightly less than one hundred gigabytes, so you do not need to reduce it. Therefore, for this option, here is what I did:
- Turn off the computer, connect the SSD.
- Enable, go to Control Panel-Administrative Tools-Computer Management-Disk management. Select a new disk, initialize it and create a new partition exactly the same size as the cloned one. That is, if the cloned partition occupies 104,855,655,624 bytes, then the new partition should be the same size. Otherwise, strange glitches crawled out in a tilted section (the indicated volumes in Explorer and Disk management were different) and Gparted cursed at errors in NTFS, but chkdsk couldn’t find anything.
- Reboot into Clonezilla, select device-device mode, beginner mode, part_to_local_part mode and select the correct source and final partitions (the same volume, but on different disks). Give the green light to all warnings and leaning back to wait 15-20 minutes (in the case of 100GB).
- Reboot to Clonezilla again, select the same options from the previous step, but at the partition selection stage, write down the names of the mounted disks (for example sda for HDD, and sdb for SDD) and press Cancel until the “Enter shell command” menu appears (or something like that). Here you need to enter two magic commands:
where sda is your original HDD, and sdb is an SDD clone. These two teams (which in principle can be combined into one) will copy the MBR from the HDD to the SSD (since the MBR was not cloned in the previous step). Also, if you have a Win XP installation disk, you can run fixmbr which will do the same (write the correct mbr).
sudo dd if=/dev/sda of=mbr1.img bs=446 count=1

sudo dd if=mbr1.img of=/dev/sdb bs=446 count=1 - Reboot into Gparted and increase the volume of the new partition to the volume of the disk (for example, I had 10 extra gigabytes).
- Reboot into the old Windows, go to Disk management, right-click on the new partition on the new disk and select Mark Partition as Active. This step can most likely be done from Clonezilla, but I don’t know how.
- In order not to shamanize with boot.ini, you can reboot into the BIOS and remove the old disk from the list of boot options.
So I updated four computers in a few hours of trial and error. Of course, if you work out this procedure to a shine, then it will not take so much time and so many steps. But experience, as they say, is priceless. :)
Was this upgrade worth it?
Here is a comparison in reading speeds:
But the sensations are not transmitted at all, Windows starts instantly, projects are compiled twice as fast (detected), Resharper does not blunt, in short beauty!
UPDATE: What to do after cloning .