Self-replacement screen reader Pocketbook 301
Hello. I want to share the experience of replacing a crashed screen with the PocketBook 301+ e-book. In the article, the process is described from and to: starting with ordering a screen and ending with a description of the feeling of universal joy in connection with the return of your favorite gadget to life. For this, neither soldering skills, nor especially straight arms, nor special tools (such as a soldering station or medical defibrillator) are needed - everything is quite simple. I must say right away that this manual is most likely suitable only for this particular model (but, by the way, as far as I know, it most often breaks the screen), and I did not really understand the intricacies of the upcoming work, but simply ordered the screen and acted according to the circumstances, so I will be glad if someone points out inaccuracies and offers the best solutions.
So, if you have such a “cullet” lying around for a long time, and spending a half of the price of a device for service repair is stifled by a toad, or it’s just interesting to look at the insides of such a wonderful device, then welcome to cat (and yes, there are a lot of photos, which, by the way quite clickable).
First, I’ll say a few words about the difficult fate of my pocketbook, about why I decided to change the screen myself, what are the alternatives and how I got this screen, then, without being distracted by lengthy reflections on the meaning of being, clearly and clearly step by step I will describe the process of replacing the display, and finally I will give a stack of links on the topic, I will think a bit about why these damn screens beat so often, upsetting their owners, and wish everyone good luck. I recommend that you read the entire manual at least once (well, perhaps the harrowing story of how my book was mutilated, you can probably skip it) and look through the pages from the links in the "basement" before you get down to business, although if in general you are in the know problems, you can limit yourself only to the item "Actually, change the screen." Let's go!
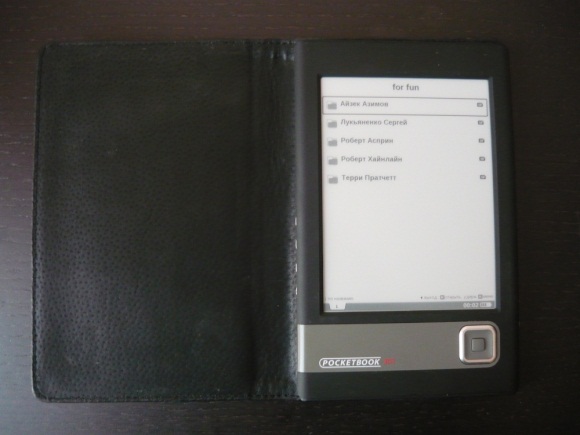
Almost a year ago, I scraped my savings and with trembling hands I placed an order for this e-book. I have long dreamed of such a device, without even really knowing what these e-books are like, weighed all the pros and cons, read reviews, compared prices and specifications, chose PocketBook 301+ as standard, ordered (then he cost me 11,000 p.) and after 10 days he was in my hands. Needless to say, I just shone with happiness - now I could read anything, the gadget was completely fine with me, even PDF and DJVU could be read quite well. It took 3 months and somehow, having come home, I found that the screen is streaked with black oblique lines. I immediately realized - the screen is broken and its replacement will cost me a pretty penny (read about cullet cases, not a rare problem, I knew what the screen looked like and how much the repair cost). Most likely, in the crush of the subway, the screen skewed in a tightly packed backpack, but not the point. Of course, I was very upset, because this penny (at least 5000 rubles; UPD: in the comments suggest that hereherecan be repaired for ~ 4000 p.) I didn’t have, and it was a pity to give such money. But just throwing the book away was even more offensive, so I decided to somehow give it up for repair. So about 9 months passed, during this time Nook and Amazon Kindle appeared on the market, which could be purchased for the price of repairing my pocketbook (even a little cheaper) and I began to look in their direction, also hoping that some kind of turning point would occur in the industry electronic ink and screen replacement will become cheaper. And so it seemed that I had some money and I just decided to google out of interest on the topic of “self-repairing the screen”, I found a little information, but the main thing came across this: 1) you can change the screen yourself and it will be cheaper than 5000 r. 2) the screen can be ordered in Russia, and not just from Chinese auctions. Then the obvious decision was made:
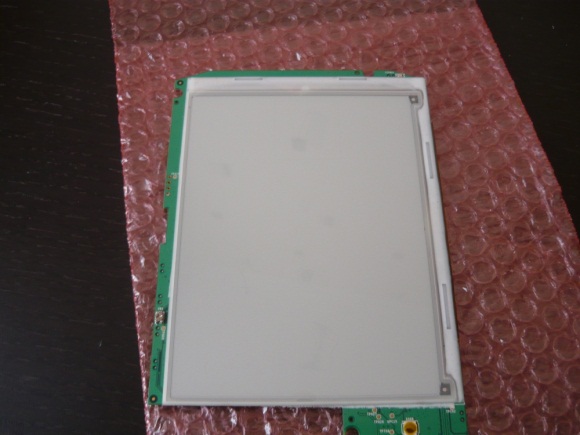
The screen (PVI ED060SC4 (LF) (800x600)) ordered here , for 3690 rubles. + ~ 150 p. delivery to St. Petersburg (by the way, a very sensible store, and service, and site, and attitude to the client). It is still cheaper than service repairs. You can also order a screen, for example from China, for the price it will come out about the same or a little cheaper, more about this in one of the links at the end of the article. And by the way, in my book there was a screen from LG, which is cheaper than the new-found, but also less contrasting. Well, let's say we have a screen, but we don’t need almost anything else, let's get to work!
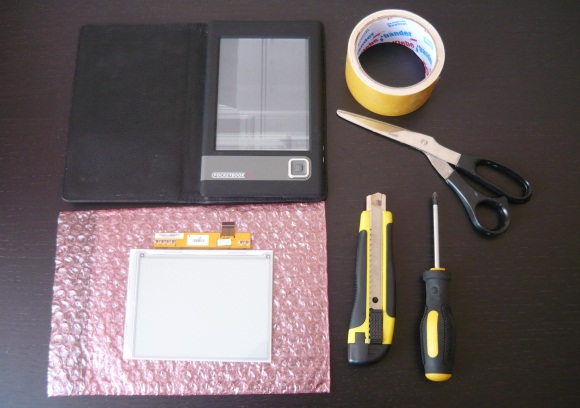
We will need:
1) a broken pocketbook (but one with only a screen broken and the electronic “filling” intact)
2) a suitable screen
3) a very small screwdriver (the picture below is not a perfect copy)
4) a stationery knife (it seems to be better narrow, but I also managed wide)
5) double-sided tape (it is advised to take the thinnest, I just used the one I found at home)
6) scissors (cut the tape)
7) alcohol or solvent (wash this scum, megaloupous, viscous glue from the native riderovskogo scotch; better still alcohol)
8) * * optional - direct hand
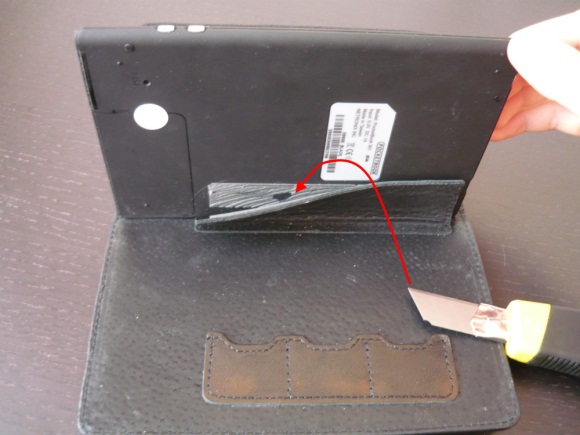
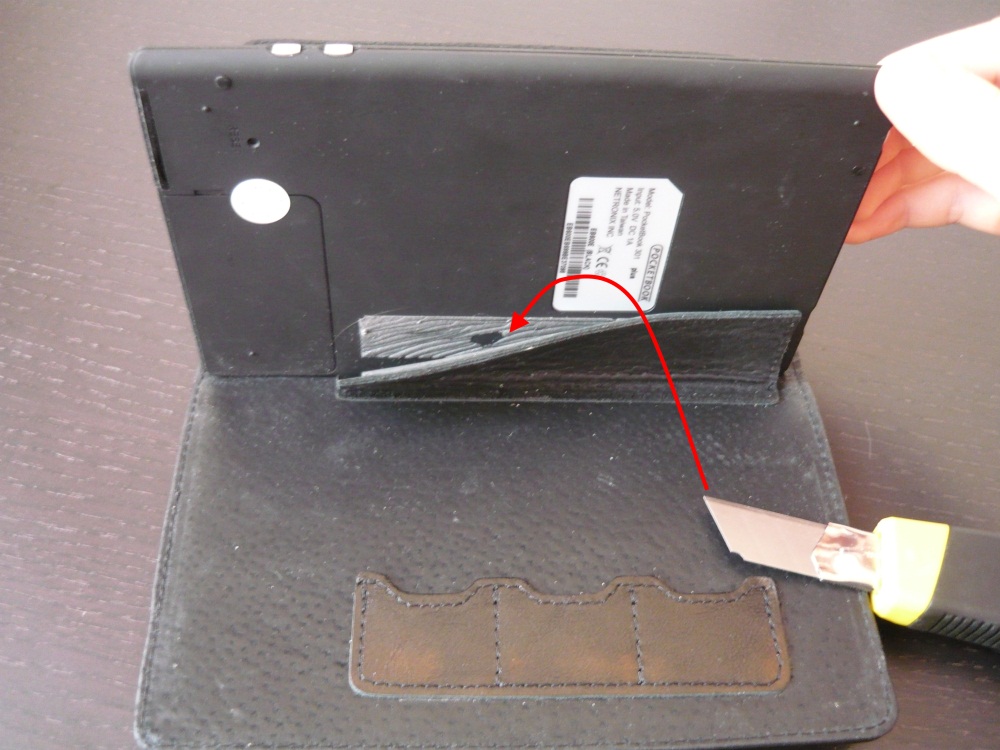
First, check whether the battery is charged and if the reader is working at all - turn it on, see if the indicator is on, if necessary, charge the battery and move on. If the reader is glued to the standard cover, then it seems difficult to tear it off without tearing the cover or breaking the device in half. Therefore, I carefully cut my pocketbook from this sticky material onto which it was glued:
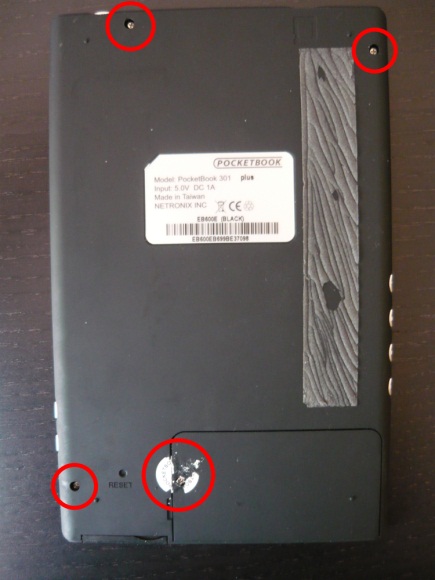
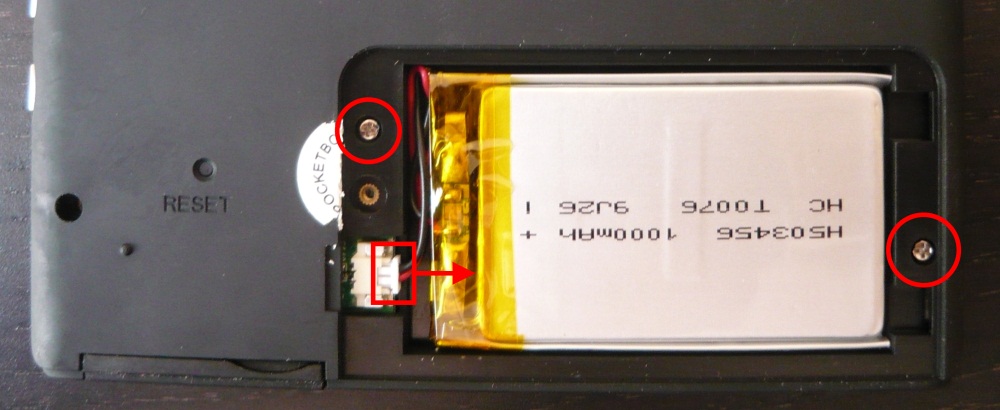
Now we turn over the reader, torn from the cover, with the screen facing down and pick out 3 rubber plugs above the screws (bottom left, top left and top right), and we also find another screw under the license (?) Sticker on the edge of the battery cover. We unscrew all the screws:
We remove the battery cover, disconnect the battery itself and see 2 more screws (left and right), and we unscrew them:

We take out the USB flash drive, if there is one, turn the reader upside down (so that the buttons do not spill) and carefully “grind” it. We remove the buttons (3 pieces):

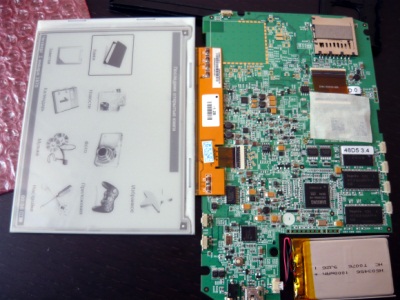
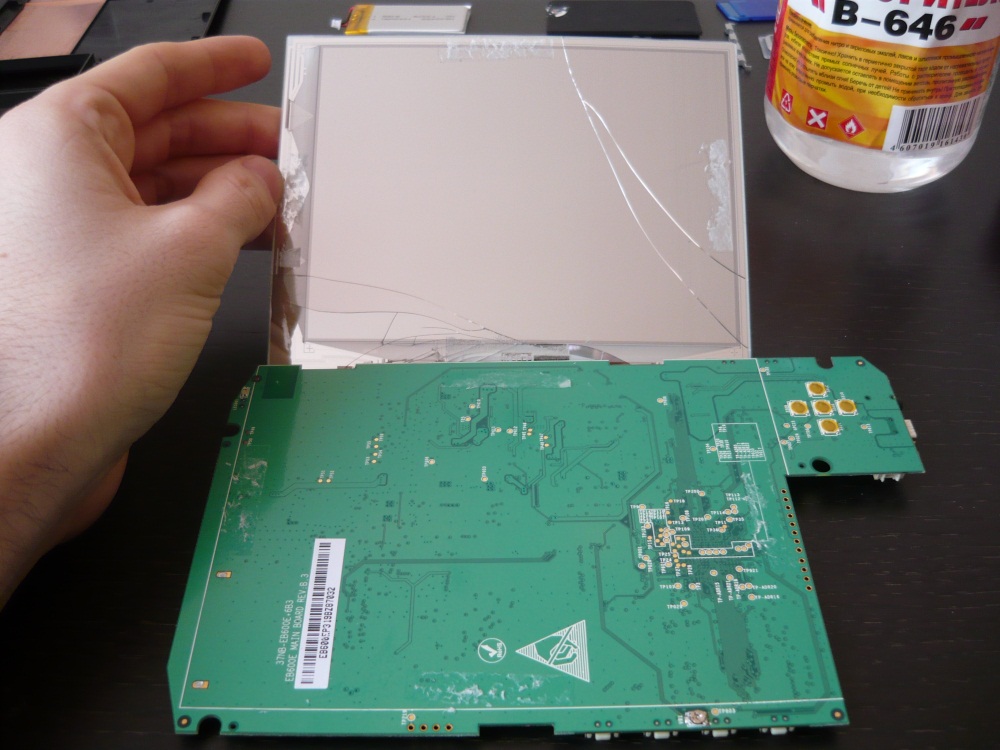
Now we take out the filling, turn it face down and see something beautiful and complex:

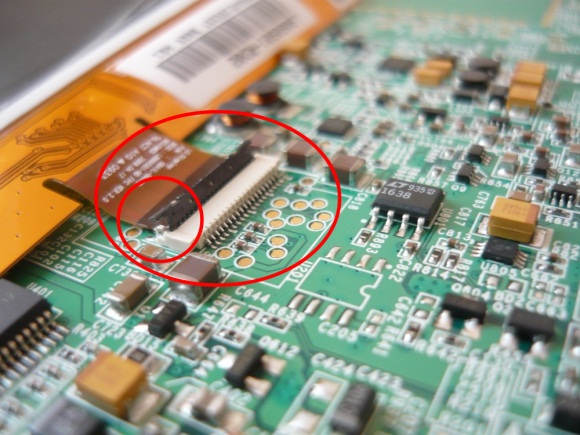
Of all this good, we are primarily interested in the cable coming from the screen - you need to remove it, but for this you need to snap off the black latch. At first he didn’t want to get up from me, but you just need to pry him off normally, in the raised state he looks like this:
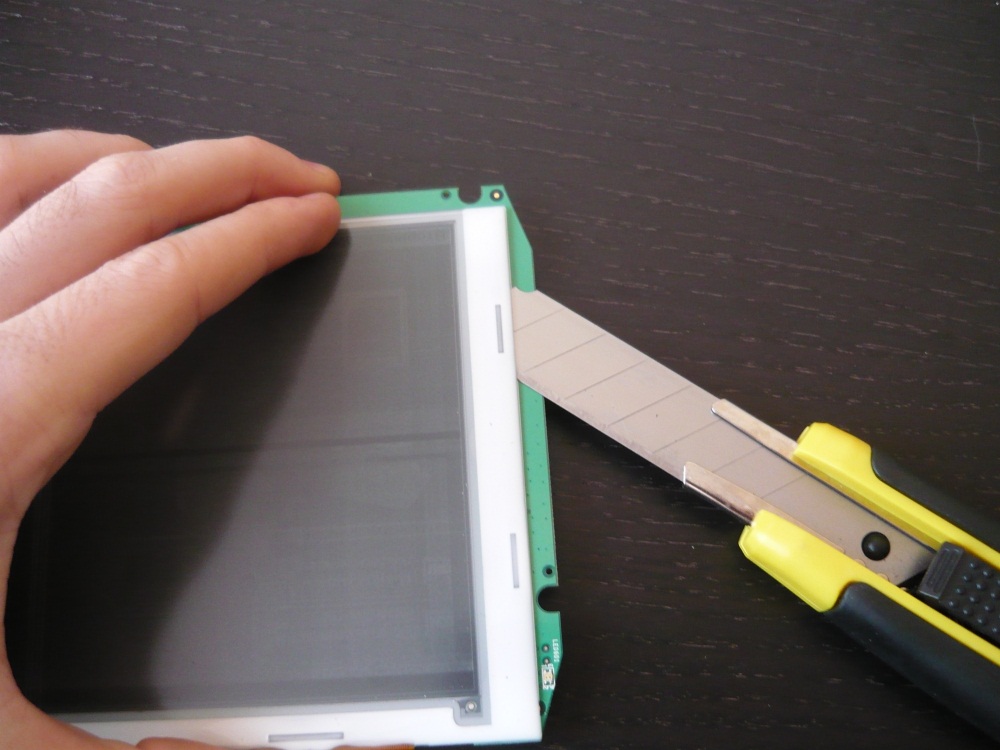
Now the train can be pulled out. Next, in my opinion, the most “dumb” stage will be in our entire undertaking - you need to cut the screen off its mount (it is glued directly to the board with something like a double-sided tape). To do this, we need a clerical knife and alcohol or solvent. Alcohol is needed in order to periodically wipe the knife, since the glue of the original adhesive tape is unrealistically sticky and viscous and instantly slaps the entire knife, which becomes impossible to work with. I could not get alcohol (in pharmacies it is sold only by prescription, it turns out), so I used what I found at home - solvent B-646. I was afraid that he might corrode / rinse something on the board (I don’t bother with this at all), but it seems to have worked out. By the way, this solvent looks like this

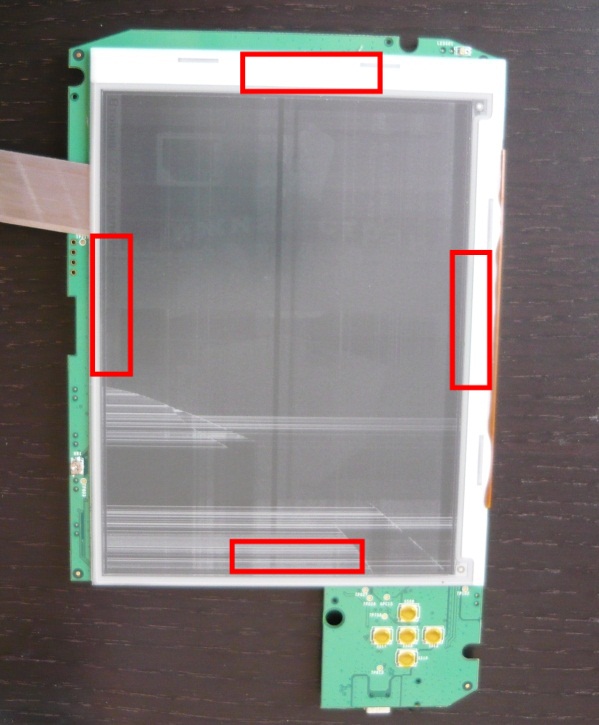
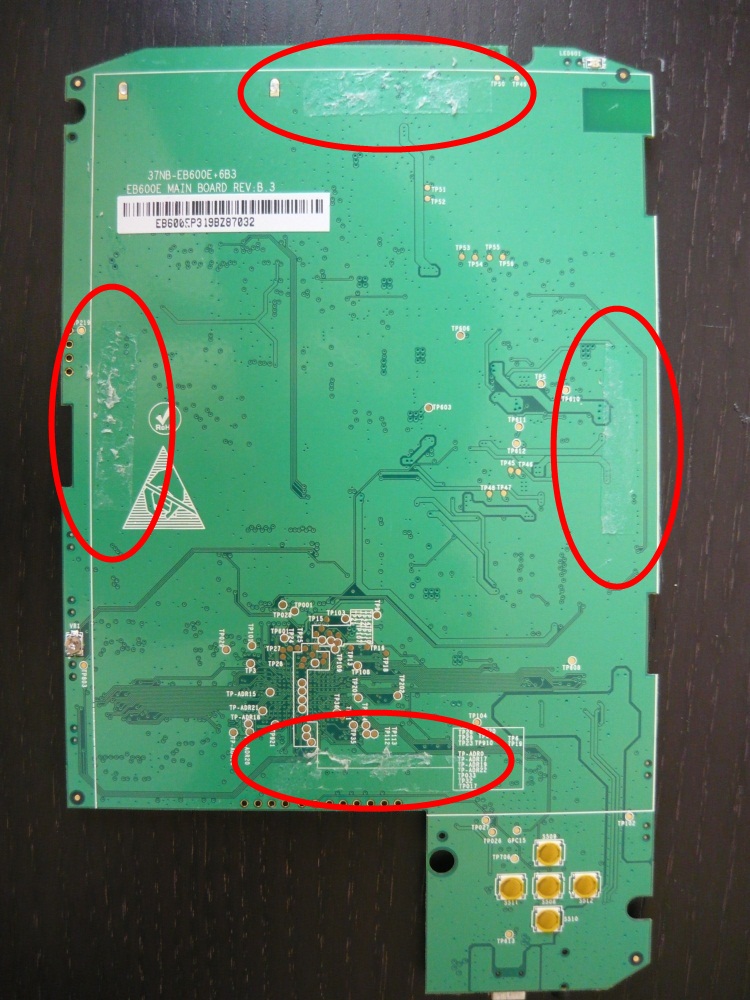
The knife goes quite freely between the screen and the circuit in those places where there is no glue. Wielding a knife, I was worried about how not to scratch or cut something on the board, but, again, everything seemed to work out (although I managed to break off a piece of the only protruding detail on the left side of the board, but fortunately it turned out not critical). In the places marked with red rectangles under the screen there is an adhesive tape that needs to be cut:

I acted like this: I did a couple of deep reciprocating movements with a knife, then I pulled it out, wiped it with solvent and repeated the procedure. Be extremely careful here, as the knife is very tight and strives to break and cut off any part of the reader or user :)

I could not immediately cut off the piece of adhesive tape that was on the side of the loop, either interfered with the loop, or something else, so I parted the screen and the board a bit and, in this position, cutting the last piece of tape completely disconnected them from each other.


Set the screen aside. I tried my own a bit on the subject of strength, but more on that later. So we got a board without a screen, in theory we should stick our cooked new screen on it, but first we need to clean it of the old glue.

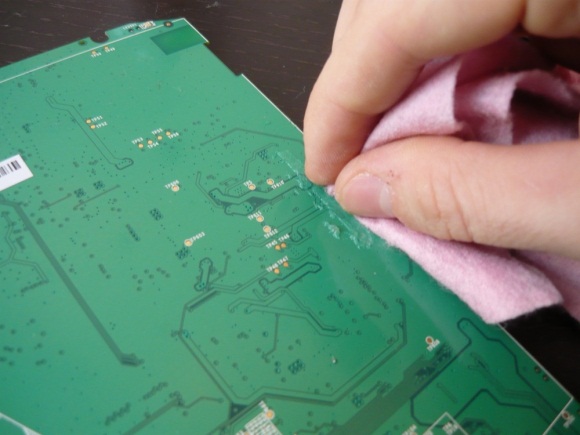
We will use the same alcohol or solvent and clean the board a little. Again, I seem to have dissolved nothing with my solvent except glue. Well, good.
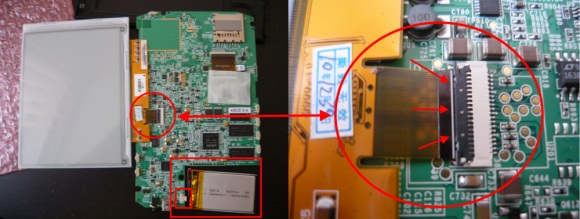
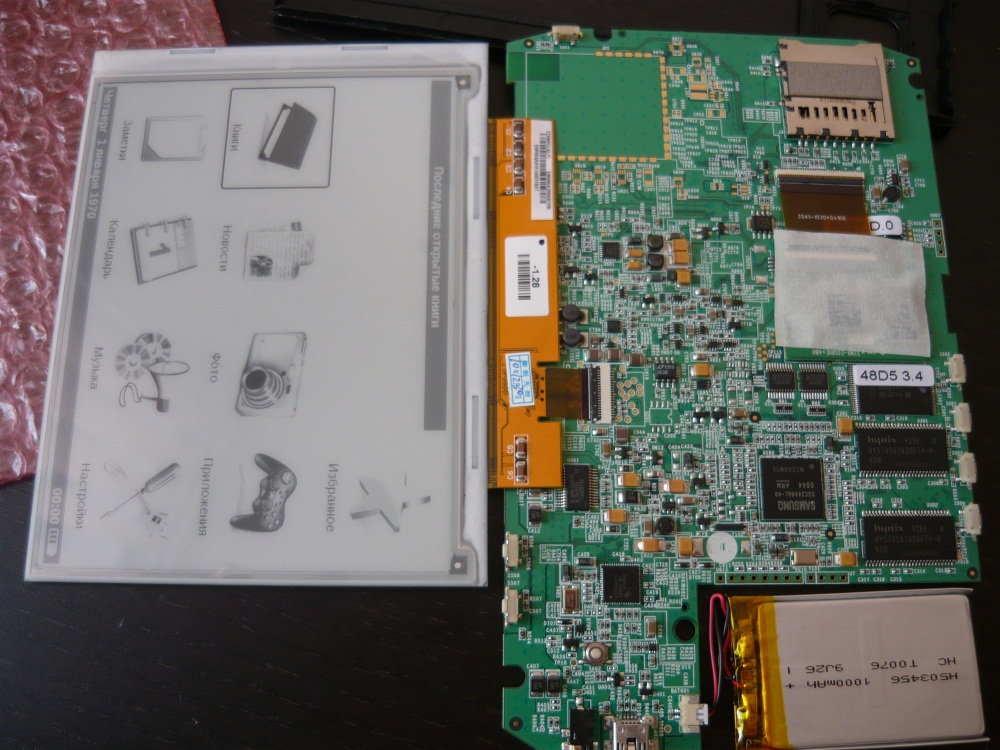
There comes a rather exciting moment - we’ll try to connect a new screen and battery and see what comes of it ... So, we stick the cable loop where necessary, connect the battery, find the power button and ... and nothing. Hmm, okay, many have come across this, maybe the screen cable hasn’t fully entered, we’ll check. Indeed, if you make a little effort, then it is significantly immersed in its connector. As I understand it, an indicator that the train has sat down tightly is a white strip on it, which should be almost under the latch-lock:
Well, try again - turn it on, wait a second or two and ... WORKS !!! Damn it, this is an incredibly nice feeling! Works! Hurrah!

Well, turn off the battery and screen, remove them for a while to the side. We will think how to glue the screen to its rightful place. This may help one of the links in the basement, which describes the mounting of screens in different readers. I decided to generally seal the entire surface with which the screen comes into contact with a regular double-sided tape. For some reason, it seemed to me that this would increase the strength and / or design flexibility, but I'm not sure about that. I would like to clarify that such a solution practically does not leave you a chance for an error when gluing the screen and will greatly complicate the work if you decide to change this screen in the future. But I decided for myself that I could not see another screen for this reader and burned all the bridges. So, glue tape:

Now we connect the screen, the cable to the connector, we have already passed this, just spit.
Remove the top layer of adhesive tape and glue the screen. Brrrrr ... Now everything depends only on you and your accuracy. I was lucky, although I almost ruined everything, but in the end everything stuck smoothly and beautifully:
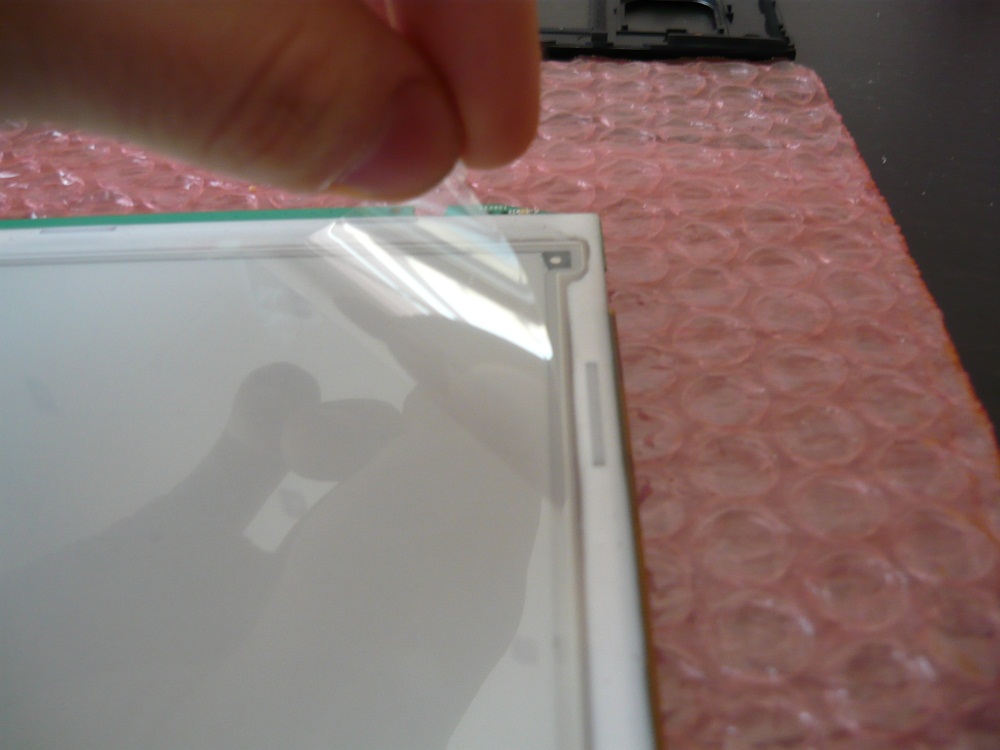
Well, great. Most likely there is a film on the new screen (directly on the working surface of the screen) - it must be removed before assembling the case:

Well, now you can assemble everything back: put the board with the screen in the lower half of the case, place the buttons, cover it with the upper part of the case, turn it over, tighten the screws in the battery compartment, install the battery, close the cover over it, screw the remaining 4 screws, insert rubber plugs on a place. If we want, we glue the book to the old cover (I just pasted a strip of double-sided tape to where I pulled the reader, and everything sat down perfectly on it). We turn on and with a sense of accomplishment and awareness of our coolness we recline in a chair ...
Done! Cool, we are great, we saved some money for ourselves, did something with our own hands and didn’t fix it anywhere along the way. Everything works, everything worked out. Happinnes exists :)
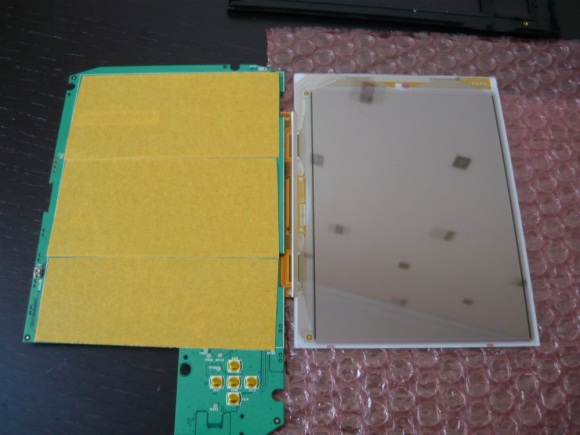
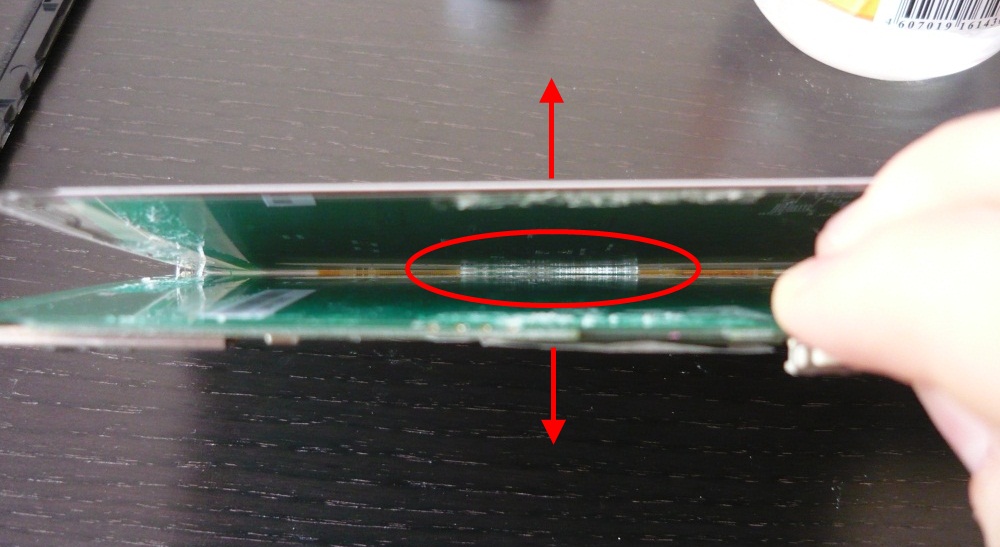
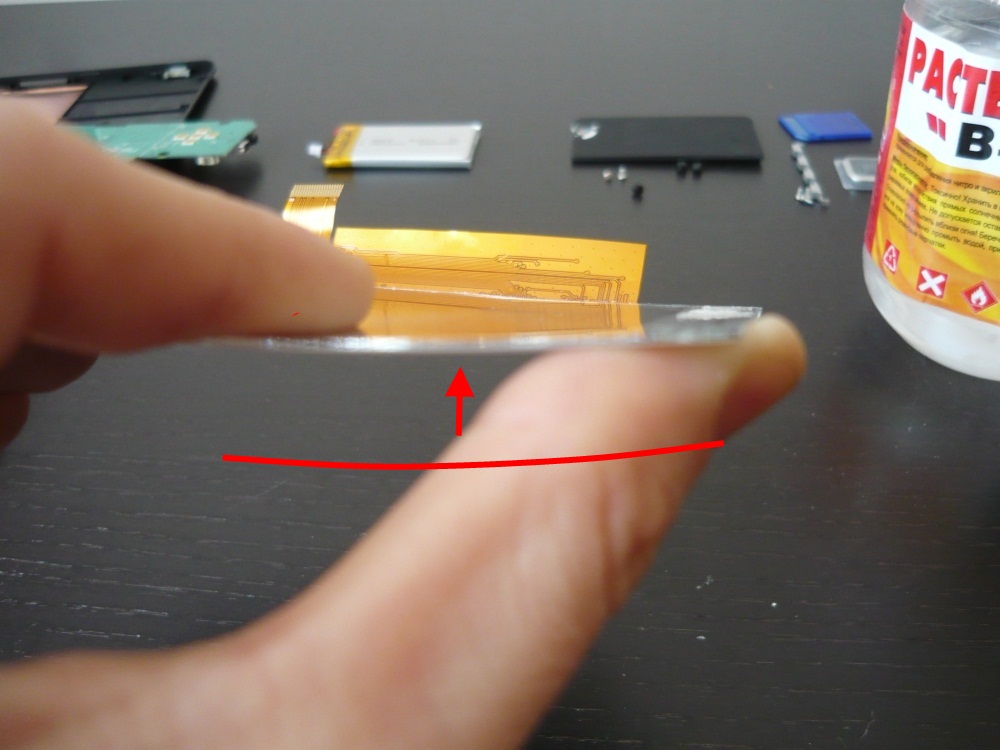
Are these screens really so fragile that they crack even from the slightest overload? Let's try to find out. What he really is? One side of the screen is shiny, the other is dull gray. The shiny side is essentially pure glass (thickness is less than a millimeter, about 0.7 mm), in theory, something could be glued on it, to increase strength, if it is theoretically justified. The thickness of the glass certainly does not inspire confidence, a rather fragile thing in appearance. On this glass, something like plastic and some other identifiable materials that apparently form the basis of “electronic ink”. In fact, as it seemed to me, the screen is quite flexible, it does not break immediately after bending, from light (and not quite) hits on the edge of the table - it does not beat! He dropped it several times to the floor from a meter height (the screen itself is really quite light) - a new crack appeared only after 3-4 drops and then with a clearly unsuccessful hit on the floor. I tried to bend it in my hand - it bends unexpectedly well:

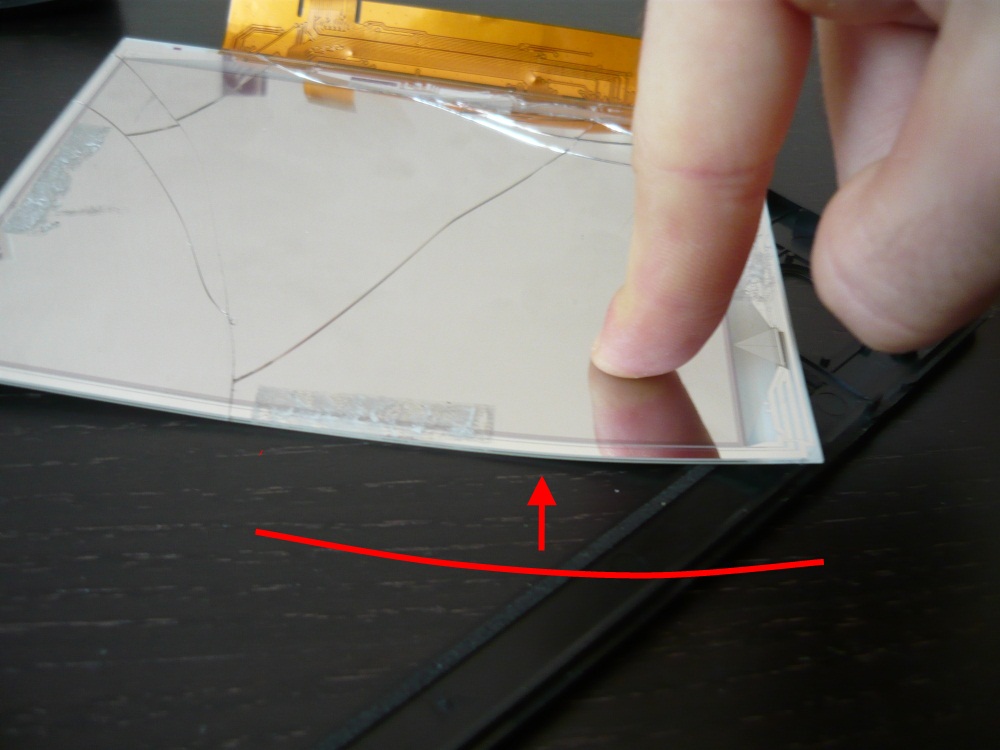
From a simple press - it does not crack: we try to put it on the frame and press with a finger - it bends completely ...

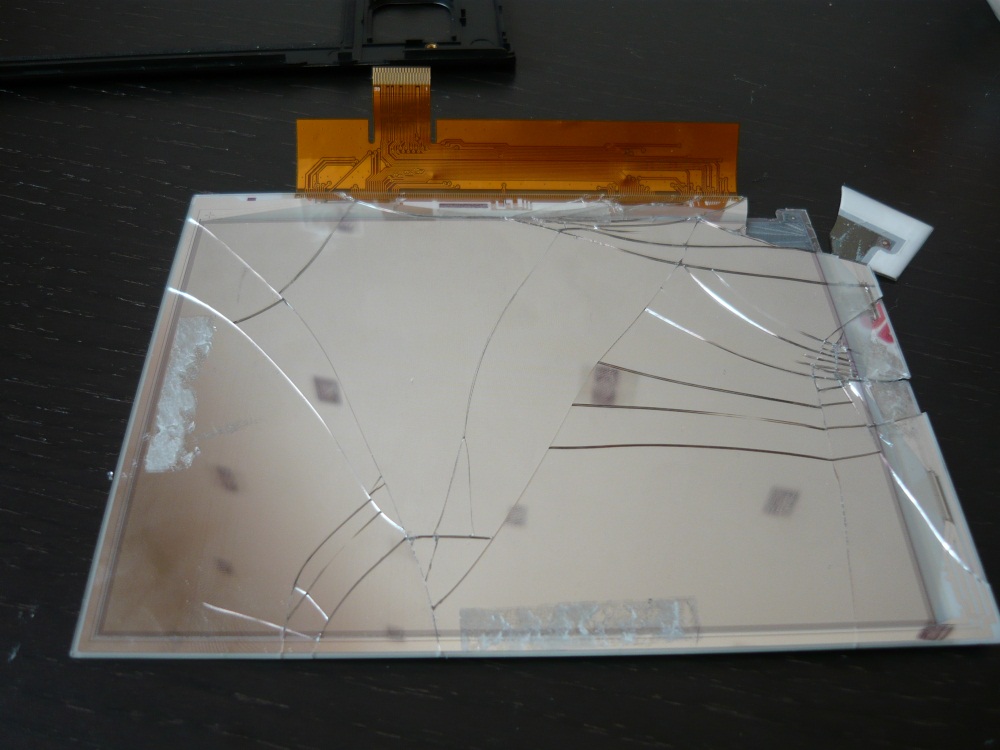
Probably the fact is that when the screen is large and whole - is it easier to break it? Then we can assume that readers with small screens are more viable than their multi-inch counterparts. But with torsion and corresponding distortions - the screen crumbles at a time! Interesting. Well, this screen will not help me anymore (the last numerous cracks are just the result of light torsion):

Useful links and facts:
the-sony.org/forum/viewtopic.php?p=507935&sid=6611014003972750498dbf9e37c107be#507935 - VERY interesting post. It turns out that there is a chance of returning money for the reader during a cullet, even if the service center said that the case is not a guarantee. And this seems to be true, because we must make claims on the goods to the seller?
www.the-ebook.org/forum/viewtopic.php?t=15118 - features of mounting screens in different readers. A brief summary of the frequent cullet in bagbooks: 1) design flaws - too pliable body, easy to twist / bend 2) very mediocre screen mount - on 4 pathetic pieces of adhesive tape to a flimsy textolite board. Generally speaking, a rather interesting topic. There are worse solutions than in pocketbooks.
bagdan.livejournal.com/83253.html , bagdan.livejournal.com/83669.html - without these posts, I would hardly have decided on such an adventure, thanks to the author.
www.the-ebook.org/forum/viewtopic.php?t=15184 some more useful information on the topic, the initiator of the discussion is the same
www.the-ebook.org/forum/viewtopic.php?t=10118 - selling screens, and in parallel with this discussion of some issues directly related to them
And finally, I’ll say that for some types of screens it may be necessary to configure waveforms (I didn’t really understand the issue myself), and this was once an almost insoluble task for an ordinary user, as I understand it. So in pursuit of the cheapness of the screen from China, do not forget to deal with these waveforms (for example, a topic on the topic: the-sony.org/forum/viewtopic.php?p=422246 ).
Thank you all, good luck to everyone!
So, if you have such a “cullet” lying around for a long time, and spending a half of the price of a device for service repair is stifled by a toad, or it’s just interesting to look at the insides of such a wonderful device, then welcome to cat (and yes, there are a lot of photos, which, by the way quite clickable).
Introduction
First, I’ll say a few words about the difficult fate of my pocketbook, about why I decided to change the screen myself, what are the alternatives and how I got this screen, then, without being distracted by lengthy reflections on the meaning of being, clearly and clearly step by step I will describe the process of replacing the display, and finally I will give a stack of links on the topic, I will think a bit about why these damn screens beat so often, upsetting their owners, and wish everyone good luck. I recommend that you read the entire manual at least once (well, perhaps the harrowing story of how my book was mutilated, you can probably skip it) and look through the pages from the links in the "basement" before you get down to business, although if in general you are in the know problems, you can limit yourself only to the item "Actually, change the screen." Let's go!
My reader, standard breakdown, screen order
Almost a year ago, I scraped my savings and with trembling hands I placed an order for this e-book. I have long dreamed of such a device, without even really knowing what these e-books are like, weighed all the pros and cons, read reviews, compared prices and specifications, chose PocketBook 301+ as standard, ordered (then he cost me 11,000 p.) and after 10 days he was in my hands. Needless to say, I just shone with happiness - now I could read anything, the gadget was completely fine with me, even PDF and DJVU could be read quite well. It took 3 months and somehow, having come home, I found that the screen is streaked with black oblique lines. I immediately realized - the screen is broken and its replacement will cost me a pretty penny (read about cullet cases, not a rare problem, I knew what the screen looked like and how much the repair cost). Most likely, in the crush of the subway, the screen skewed in a tightly packed backpack, but not the point. Of course, I was very upset, because this penny (at least 5000 rubles; UPD: in the comments suggest that hereherecan be repaired for ~ 4000 p.) I didn’t have, and it was a pity to give such money. But just throwing the book away was even more offensive, so I decided to somehow give it up for repair. So about 9 months passed, during this time Nook and Amazon Kindle appeared on the market, which could be purchased for the price of repairing my pocketbook (even a little cheaper) and I began to look in their direction, also hoping that some kind of turning point would occur in the industry electronic ink and screen replacement will become cheaper. And so it seemed that I had some money and I just decided to google out of interest on the topic of “self-repairing the screen”, I found a little information, but the main thing came across this: 1) you can change the screen yourself and it will be cheaper than 5000 r. 2) the screen can be ordered in Russia, and not just from Chinese auctions. Then the obvious decision was made:
The screen (PVI ED060SC4 (LF) (800x600)) ordered here , for 3690 rubles. + ~ 150 p. delivery to St. Petersburg (by the way, a very sensible store, and service, and site, and attitude to the client). It is still cheaper than service repairs. You can also order a screen, for example from China, for the price it will come out about the same or a little cheaper, more about this in one of the links at the end of the article. And by the way, in my book there was a screen from LG, which is cheaper than the new-found, but also less contrasting. Well, let's say we have a screen, but we don’t need almost anything else, let's get to work!
Actually, we change the screen
We will need:
1) a broken pocketbook (but one with only a screen broken and the electronic “filling” intact)
2) a suitable screen
3) a very small screwdriver (the picture below is not a perfect copy)
4) a stationery knife (it seems to be better narrow, but I also managed wide)
5) double-sided tape (it is advised to take the thinnest, I just used the one I found at home)
6) scissors (cut the tape)
7) alcohol or solvent (wash this scum, megaloupous, viscous glue from the native riderovskogo scotch; better still alcohol)
8) * * optional - direct hand

First, check whether the battery is charged and if the reader is working at all - turn it on, see if the indicator is on, if necessary, charge the battery and move on. If the reader is glued to the standard cover, then it seems difficult to tear it off without tearing the cover or breaking the device in half. Therefore, I carefully cut my pocketbook from this sticky material onto which it was glued:
Now we turn over the reader, torn from the cover, with the screen facing down and pick out 3 rubber plugs above the screws (bottom left, top left and top right), and we also find another screw under the license (?) Sticker on the edge of the battery cover. We unscrew all the screws:

We remove the battery cover, disconnect the battery itself and see 2 more screws (left and right), and we unscrew them:
We take out the USB flash drive, if there is one, turn the reader upside down (so that the buttons do not spill) and carefully “grind” it. We remove the buttons (3 pieces):
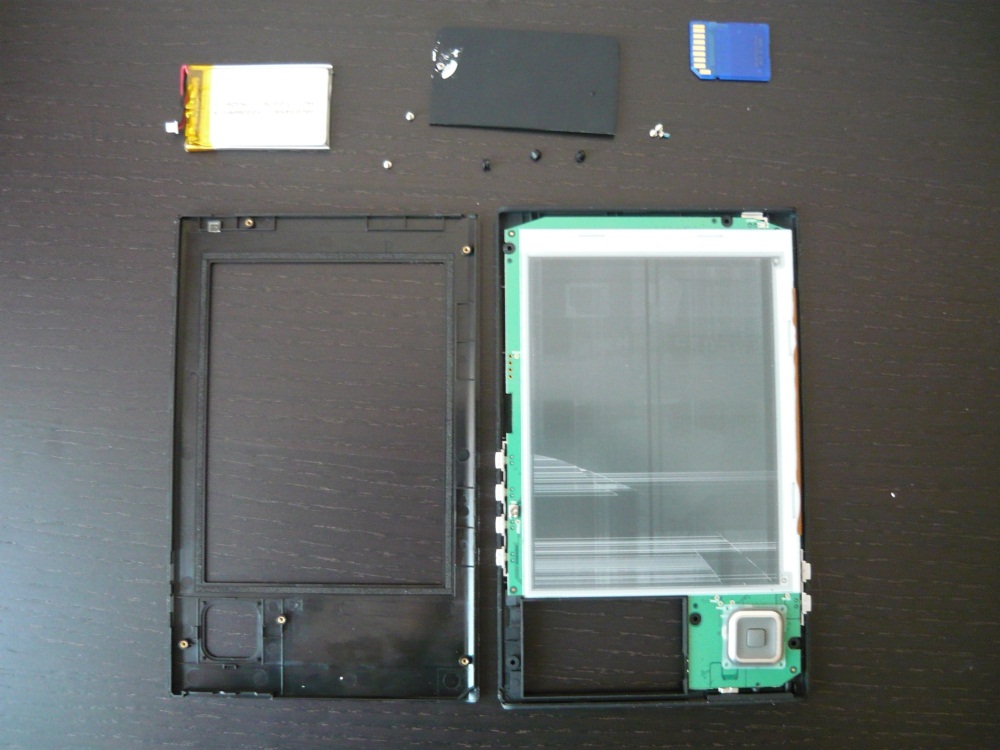
Now we take out the filling, turn it face down and see something beautiful and complex:

Of all this good, we are primarily interested in the cable coming from the screen - you need to remove it, but for this you need to snap off the black latch. At first he didn’t want to get up from me, but you just need to pry him off normally, in the raised state he looks like this:

Now the train can be pulled out. Next, in my opinion, the most “dumb” stage will be in our entire undertaking - you need to cut the screen off its mount (it is glued directly to the board with something like a double-sided tape). To do this, we need a clerical knife and alcohol or solvent. Alcohol is needed in order to periodically wipe the knife, since the glue of the original adhesive tape is unrealistically sticky and viscous and instantly slaps the entire knife, which becomes impossible to work with. I could not get alcohol (in pharmacies it is sold only by prescription, it turns out), so I used what I found at home - solvent B-646. I was afraid that he might corrode / rinse something on the board (I don’t bother with this at all), but it seems to have worked out. By the way, this solvent looks like this

The knife goes quite freely between the screen and the circuit in those places where there is no glue. Wielding a knife, I was worried about how not to scratch or cut something on the board, but, again, everything seemed to work out (although I managed to break off a piece of the only protruding detail on the left side of the board, but fortunately it turned out not critical). In the places marked with red rectangles under the screen there is an adhesive tape that needs to be cut:
I acted like this: I did a couple of deep reciprocating movements with a knife, then I pulled it out, wiped it with solvent and repeated the procedure. Be extremely careful here, as the knife is very tight and strives to break and cut off any part of the reader or user :)
I could not immediately cut off the piece of adhesive tape that was on the side of the loop, either interfered with the loop, or something else, so I parted the screen and the board a bit and, in this position, cutting the last piece of tape completely disconnected them from each other.
Set the screen aside. I tried my own a bit on the subject of strength, but more on that later. So we got a board without a screen, in theory we should stick our cooked new screen on it, but first we need to clean it of the old glue.
We will use the same alcohol or solvent and clean the board a little. Again, I seem to have dissolved nothing with my solvent except glue. Well, good.

There comes a rather exciting moment - we’ll try to connect a new screen and battery and see what comes of it ... So, we stick the cable loop where necessary, connect the battery, find the power button and ... and nothing. Hmm, okay, many have come across this, maybe the screen cable hasn’t fully entered, we’ll check. Indeed, if you make a little effort, then it is significantly immersed in its connector. As I understand it, an indicator that the train has sat down tightly is a white strip on it, which should be almost under the latch-lock:

Well, try again - turn it on, wait a second or two and ... WORKS !!! Damn it, this is an incredibly nice feeling! Works! Hurrah!
Well, turn off the battery and screen, remove them for a while to the side. We will think how to glue the screen to its rightful place. This may help one of the links in the basement, which describes the mounting of screens in different readers. I decided to generally seal the entire surface with which the screen comes into contact with a regular double-sided tape. For some reason, it seemed to me that this would increase the strength and / or design flexibility, but I'm not sure about that. I would like to clarify that such a solution practically does not leave you a chance for an error when gluing the screen and will greatly complicate the work if you decide to change this screen in the future. But I decided for myself that I could not see another screen for this reader and burned all the bridges. So, glue tape:

Now we connect the screen, the cable to the connector, we have already passed this, just spit.

Remove the top layer of adhesive tape and glue the screen. Brrrrr ... Now everything depends only on you and your accuracy. I was lucky, although I almost ruined everything, but in the end everything stuck smoothly and beautifully:
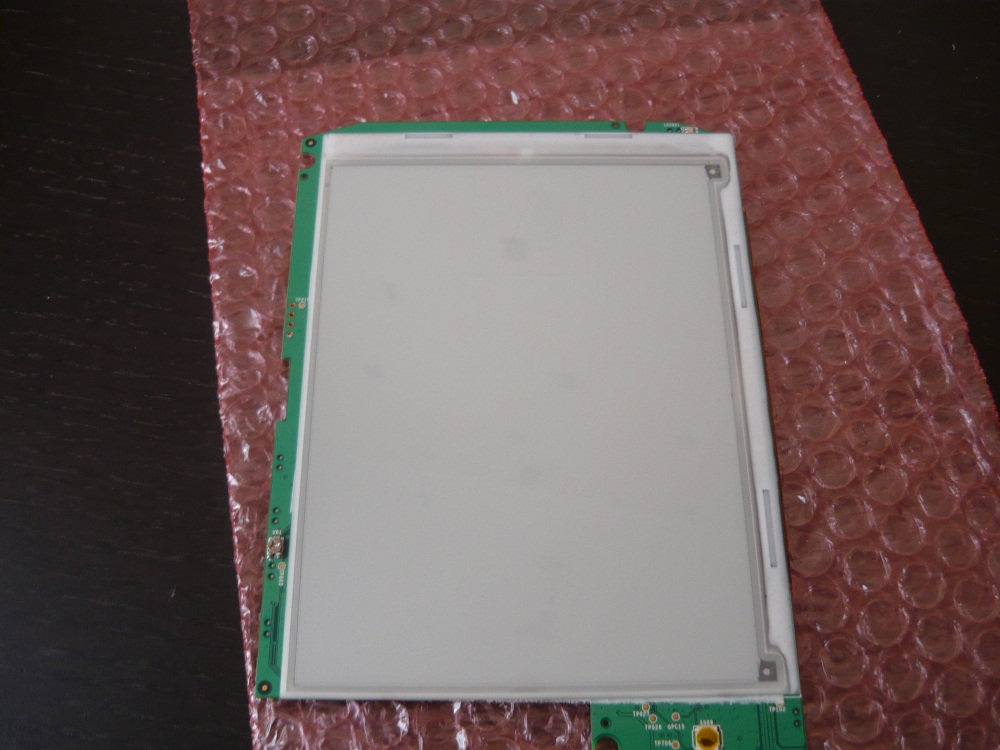
Well, great. Most likely there is a film on the new screen (directly on the working surface of the screen) - it must be removed before assembling the case:
Well, now you can assemble everything back: put the board with the screen in the lower half of the case, place the buttons, cover it with the upper part of the case, turn it over, tighten the screws in the battery compartment, install the battery, close the cover over it, screw the remaining 4 screws, insert rubber plugs on a place. If we want, we glue the book to the old cover (I just pasted a strip of double-sided tape to where I pulled the reader, and everything sat down perfectly on it). We turn on and with a sense of accomplishment and awareness of our coolness we recline in a chair ...

Done! Cool, we are great, we saved some money for ourselves, did something with our own hands and didn’t fix it anywhere along the way. Everything works, everything worked out. Happinnes exists :)
Let's try a little old screen
Are these screens really so fragile that they crack even from the slightest overload? Let's try to find out. What he really is? One side of the screen is shiny, the other is dull gray. The shiny side is essentially pure glass (thickness is less than a millimeter, about 0.7 mm), in theory, something could be glued on it, to increase strength, if it is theoretically justified. The thickness of the glass certainly does not inspire confidence, a rather fragile thing in appearance. On this glass, something like plastic and some other identifiable materials that apparently form the basis of “electronic ink”. In fact, as it seemed to me, the screen is quite flexible, it does not break immediately after bending, from light (and not quite) hits on the edge of the table - it does not beat! He dropped it several times to the floor from a meter height (the screen itself is really quite light) - a new crack appeared only after 3-4 drops and then with a clearly unsuccessful hit on the floor. I tried to bend it in my hand - it bends unexpectedly well:
From a simple press - it does not crack: we try to put it on the frame and press with a finger - it bends completely ...
Probably the fact is that when the screen is large and whole - is it easier to break it? Then we can assume that readers with small screens are more viable than their multi-inch counterparts. But with torsion and corresponding distortions - the screen crumbles at a time! Interesting. Well, this screen will not help me anymore (the last numerous cracks are just the result of light torsion):
Basement
Useful links and facts:
the-sony.org/forum/viewtopic.php?p=507935&sid=6611014003972750498dbf9e37c107be#507935 - VERY interesting post. It turns out that there is a chance of returning money for the reader during a cullet, even if the service center said that the case is not a guarantee. And this seems to be true, because we must make claims on the goods to the seller?
www.the-ebook.org/forum/viewtopic.php?t=15118 - features of mounting screens in different readers. A brief summary of the frequent cullet in bagbooks: 1) design flaws - too pliable body, easy to twist / bend 2) very mediocre screen mount - on 4 pathetic pieces of adhesive tape to a flimsy textolite board. Generally speaking, a rather interesting topic. There are worse solutions than in pocketbooks.
bagdan.livejournal.com/83253.html , bagdan.livejournal.com/83669.html - without these posts, I would hardly have decided on such an adventure, thanks to the author.
www.the-ebook.org/forum/viewtopic.php?t=15184 some more useful information on the topic, the initiator of the discussion is the same
www.the-ebook.org/forum/viewtopic.php?t=10118 - selling screens, and in parallel with this discussion of some issues directly related to them
And finally, I’ll say that for some types of screens it may be necessary to configure waveforms (I didn’t really understand the issue myself), and this was once an almost insoluble task for an ordinary user, as I understand it. So in pursuit of the cheapness of the screen from China, do not forget to deal with these waveforms (for example, a topic on the topic: the-sony.org/forum/viewtopic.php?p=422246 ).
Thank you all, good luck to everyone!