Photo mosaic. How to make quality and beautiful
I want to share with my Habra community my hobby, which, to be honest, even brings me some profit.
I'll start over. About 6-7 years ago, such a thing as a photo mosaic became very interesting to me. At the very beginning, I tried to do it manually. An immense number of layers in Photoshop and a lot of time spent stopping me for three years. But over time, only excitement appeared.
And so I began my research of software for creating photo mosaics, of which a huge amount was tried. And ultimately the best is chosen.
The best will be discussed.
In the beginning I will tell you which programs I tried.
AndreaMosaic www.andreaplanet.com/andreamosaic
Metapixel www.complang.tuwien.ac.at/schani/metapixel/examples.html
Imosaic www.imosaic.net/gallery.htm
MOSAnICk www.radivarl.demon.co.uk/nick/mosanick /mosanick.htm
And many more different programs that I don’t even remember now. All of the above are quite adequate applications that have a place to be. But to create high-quality photo mosaics, they are not enough.
Somewhere in the beginning of 2008 I came across a share-ware program aolej Mosaic Creator . It was just a super find. Now I’ll tell you how to use it to create real masterpieces.
The most important thing is the idea. The idea of a photo mosaic determines the way it is created and the tools to be used.
I will give a few examples of specific mosaics that I personally did.
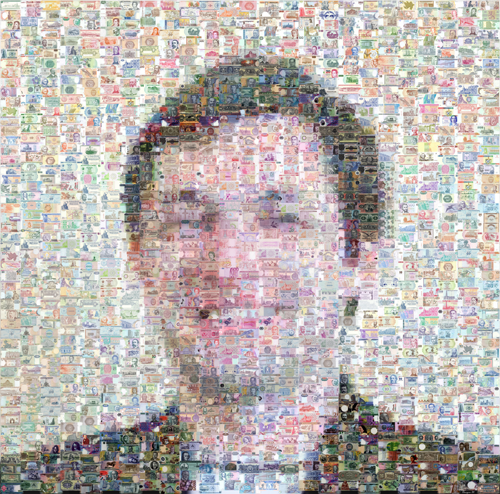
As a gift, one banker made a 1.1-meter-by-1.1-meter mosaic. Where his portrait was composed of modern banknotes from 160 countries.
The logo of the institute measuring 3.5 m by 1.5 m is composed of photographs of 2,000 graduates of the institute.
The logo of the fertilization clinic of 2000 images of infants under 1 year old.
There may be many options. Turn on your imagination.
It is necessary to collect a database of photographs or pictures that will be used as mosaic cells. I will describe some of the requirements that I myself have derived in an experimental way.
Basic picture or photograph. The quality of the mosaic also depends on her choice.
The requirements for it are as follows:
If you have prepared all three points, you can start creating mosaics.
You take the application from this site www.aolej.com/mosaic/download.htm
How to install, etc. I will not tell. I think anyone can figure it out.
I will not describe all the functions of the program. And there are a huge number of them. Therefore, I’ll just tell you how to make a simple and beautiful mosaic. There are two important points in this mosaic - an interesting idea and a mosaic pattern (which, in essence, is my favorite pattern).
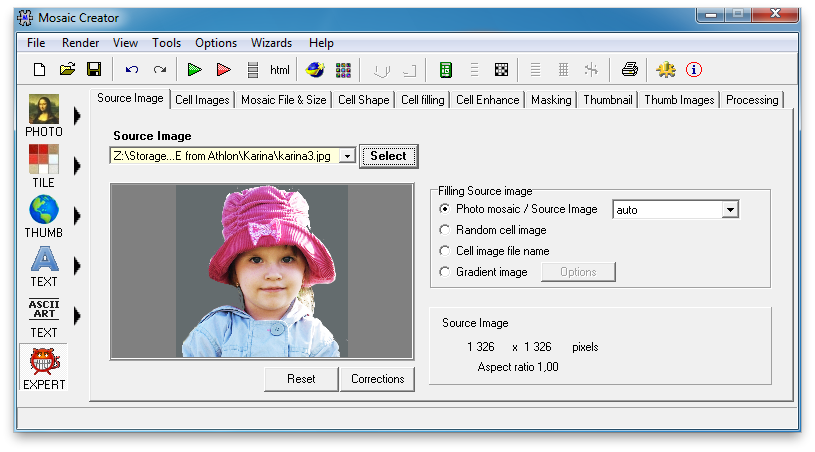
We believe that the basic image is ready for us. We drop it in the Source Image insert.
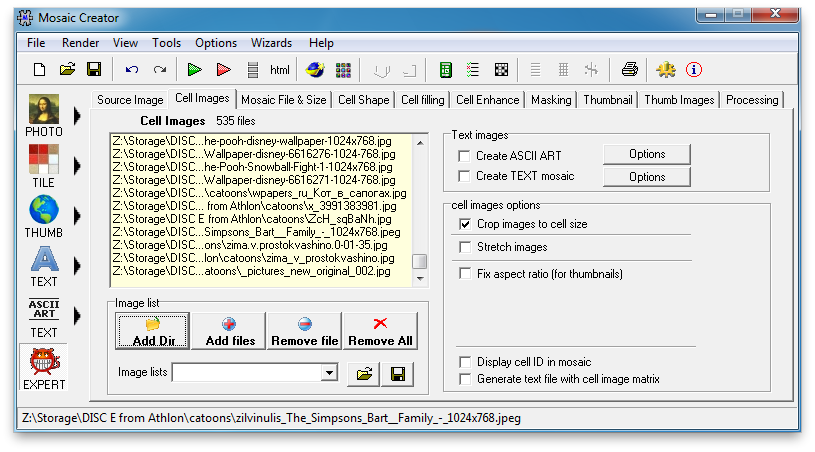
Next step. The entire database of images for the mosaic should be in one place, preferably even in one folder. We make Add Dir and thus add all our pictures or photos to the database.
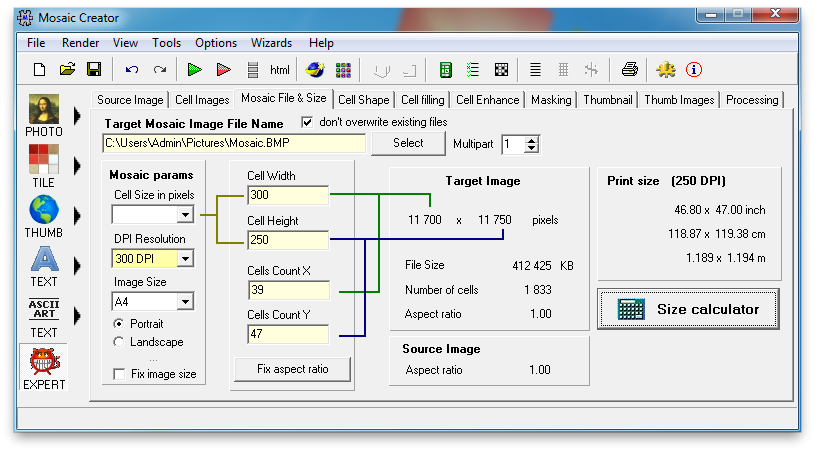
Next, you need to configure the size of the mosaic and the number of cells vertically and horizontally. To do this, there is a cool tool Size Calculator. We set the size in it (I usually do this in centimeters), and the number of columns and rows. It is best to set the cell sizes in pixels, based on the aspect ratio of the pictures from your database, and based on this, already count the rows and columns.

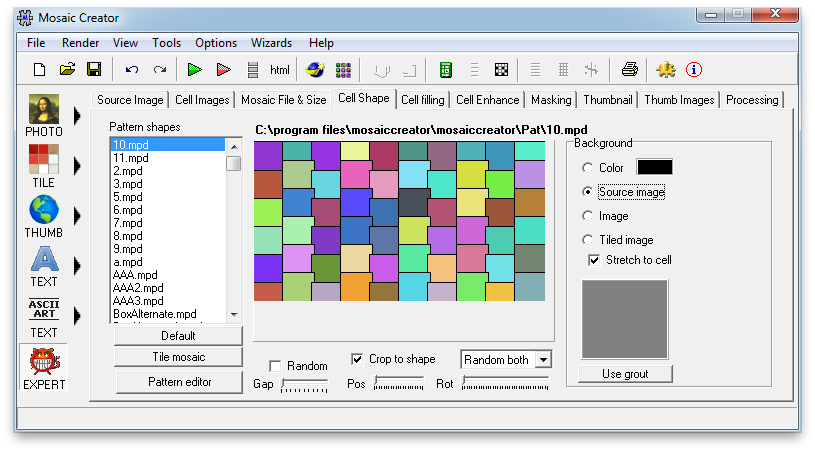
In the next tab, select the mosaic pattern. Here you can turn on your imagination to the fullest. I recommend using the pattern editor. I also recommend including Background - Source Image on the left. This will fill the gaps between the cells (if provided for in the pattern) with the base picture.
The following insert contains key settings that affect the quality of the mosaic.
Cell recognition quality- for good quality, it is desirable that the value is above 150. The higher the value, the longer the mosaic will be generated and the higher the quality.
Minimal distance between the same image - it is desirable to set the maximum - 9.
Max cell image repetition - it must be counted. If our mosaic has 1833 cells, and we have 534 pictures in the base, then the number should be 4 (1833/534 with rounding up).
Filling grid is a tool if you need to make a mosaic of a certain shape (for example, a heart). Or for different areas of the mosaic, use different pictures.

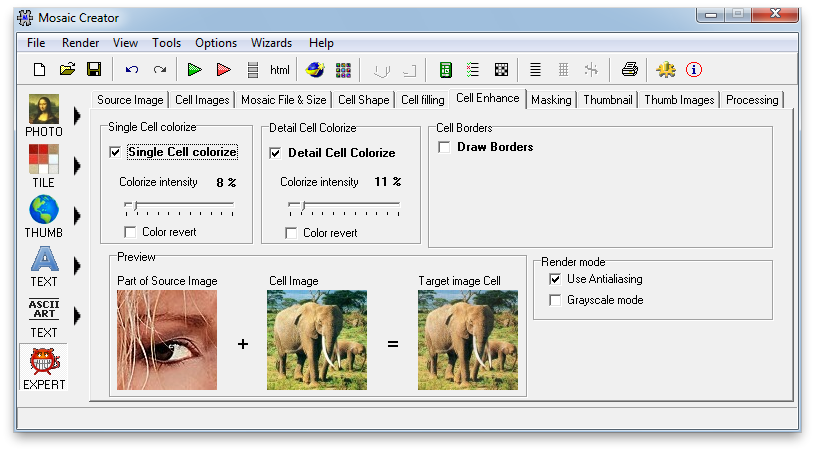
In the Cell Enhance insert, you need to set two parameters:
Single Cell colorize- level of tinting of the whole picture. More than 15% should not be used, because the quality of the mosaic is greatly reduced.
Detail Cell colorize - level of tinting of parts of the picture. More than 10% should not be used, because the details of the base image begin to appear.
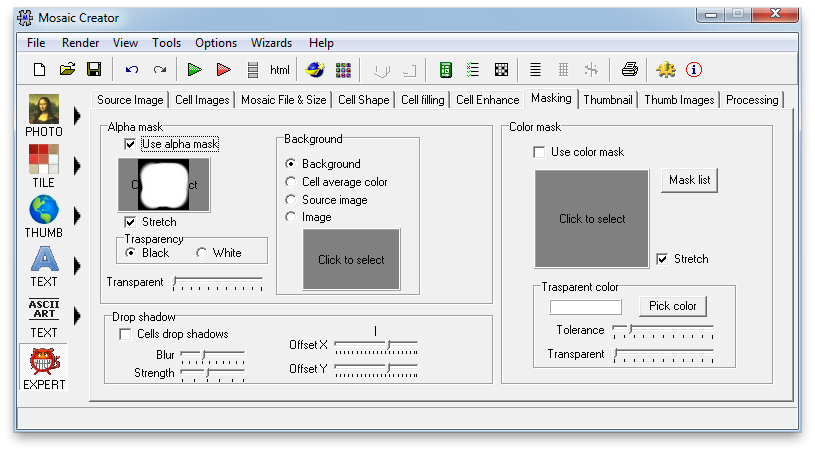
Next is the Masking liner. Here, in order for the edges of the cell of our mosaic to be smoother, with transitions, we use an alpha mask. The program has a bunch of different masks, a large selection, if some does not fit, it can be edited in Photoshop.
So all the tinctures are made. Now you can proceed to the generation of the mosaic. Depending on the size of the mosaic, the processor on the computer, and the amount of memory this process can take up to 30 minutes. At the same time, the result image can even have a size of 1.2 GB (I had this; the developers claim that the upper size is limited only by the size of the disk). It should be noted that the mosaic is generated in bmp format without any compression, etc.
Well, click on the green Play and wait.
I’ll say from experience that to get a high-quality result, you need at least 10-15 calls with different settings. This is if the picture base is already verified. If the base is new, you will need to catch duplicates.
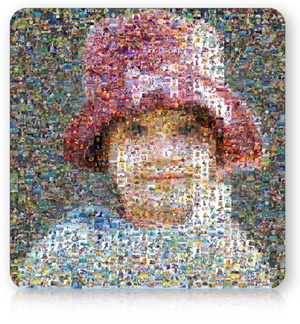
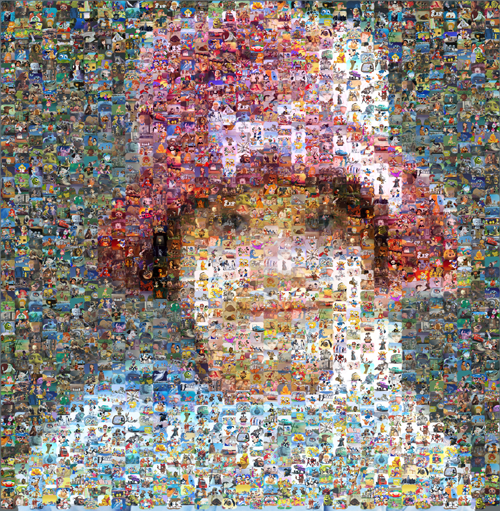
I spread the mosaic, which I did for an example. The image is clickable and large (2.4 mb). And one more thing: The image is clickable and large (2.4 mb).
Some practical advice:
1. If there are not enough photos, try diluting them with other photos of similar subjects. Just do not use photos of left people. It raises a lot of questions.
2. Goggle Picassa has a face recognition feature. If you have a lot of group photos of decent quality in the database, then you can use it to collect faces and replenish the database with unique photos.
Good luck.
I'll start over. About 6-7 years ago, such a thing as a photo mosaic became very interesting to me. At the very beginning, I tried to do it manually. An immense number of layers in Photoshop and a lot of time spent stopping me for three years. But over time, only excitement appeared.
And so I began my research of software for creating photo mosaics, of which a huge amount was tried. And ultimately the best is chosen.
The best will be discussed.
Prehistory
In the beginning I will tell you which programs I tried.
AndreaMosaic www.andreaplanet.com/andreamosaic
Metapixel www.complang.tuwien.ac.at/schani/metapixel/examples.html
Imosaic www.imosaic.net/gallery.htm
MOSAnICk www.radivarl.demon.co.uk/nick/mosanick /mosanick.htm
And many more different programs that I don’t even remember now. All of the above are quite adequate applications that have a place to be. But to create high-quality photo mosaics, they are not enough.
Somewhere in the beginning of 2008 I came across a share-ware program aolej Mosaic Creator . It was just a super find. Now I’ll tell you how to use it to create real masterpieces.
Where to begin?
First
The most important thing is the idea. The idea of a photo mosaic determines the way it is created and the tools to be used.
I will give a few examples of specific mosaics that I personally did.
As a gift, one banker made a 1.1-meter-by-1.1-meter mosaic. Where his portrait was composed of modern banknotes from 160 countries.
The logo of the institute measuring 3.5 m by 1.5 m is composed of photographs of 2,000 graduates of the institute.
The logo of the fertilization clinic of 2000 images of infants under 1 year old.
There may be many options. Turn on your imagination.
Second
It is necessary to collect a database of photographs or pictures that will be used as mosaic cells. I will describe some of the requirements that I myself have derived in an experimental way.
- Depending on which mosaic pattern (pattern) you choose, it is necessary that the entire library of photographs be either in vertical or horizontal orientation (I usually use horizontal).
- It is desirable that all the pictures are with approximately the same aspect ratio. Ideally, this is 3x4. But it depends on the pattern.
- If you have many photos of different orientations, you need to crop them to the desired format. It is worth doing manually.
- Image quality may not be very high. It was experimentally established that the best mosaics are obtained with the size of one element no more than 3 cm. Considering that the sufficient print resolution that is used for this type of work is 300 dpi., The picture size is 400px. at 300 px. quite sufficient.
- Probably the most important thing. It is important that the pictures or photographs are not repeated and are not very similar. The most nasty thing is when a couple of clones are on the mosaic side by side.
- The optimal number of photos for one project is about 2000 thousand. Although it depends on the type of mosaic and size. Less than 500 results in very poor quality.
- With portrait photographs, you need to tinker more so that the faces are closer to the center of the photo, because when a person’s face in a cell is cut in half, it doesn’t look very beautiful.
Third
Basic picture or photograph. The quality of the mosaic also depends on her choice.
The requirements for it are as follows:
- Clear lines in the photo are important. If this is a logo or picture, then you can increase the contrast in Photoshop. If this is a photo, then it is desirable that it be of the type of passport option, but more fun.
- If the picture or logo is made of thin lines, then it is worth remaking it a bit to make the lines thicker.
- If text is used in the base picture, it is desirable that the font of the text be without a scarlet. Arial, Verdana and the like fit perfectly.
- If a portrait photograph with some kind of heterogeneous background, then it is desirable to cut the background.
If you have prepared all three points, you can start creating mosaics.
Creature
You take the application from this site www.aolej.com/mosaic/download.htm
How to install, etc. I will not tell. I think anyone can figure it out.
I will not describe all the functions of the program. And there are a huge number of them. Therefore, I’ll just tell you how to make a simple and beautiful mosaic. There are two important points in this mosaic - an interesting idea and a mosaic pattern (which, in essence, is my favorite pattern).
We believe that the basic image is ready for us. We drop it in the Source Image insert.
Next step. The entire database of images for the mosaic should be in one place, preferably even in one folder. We make Add Dir and thus add all our pictures or photos to the database.
Next, you need to configure the size of the mosaic and the number of cells vertically and horizontally. To do this, there is a cool tool Size Calculator. We set the size in it (I usually do this in centimeters), and the number of columns and rows. It is best to set the cell sizes in pixels, based on the aspect ratio of the pictures from your database, and based on this, already count the rows and columns.
In the next tab, select the mosaic pattern. Here you can turn on your imagination to the fullest. I recommend using the pattern editor. I also recommend including Background - Source Image on the left. This will fill the gaps between the cells (if provided for in the pattern) with the base picture.
The following insert contains key settings that affect the quality of the mosaic.
Cell recognition quality- for good quality, it is desirable that the value is above 150. The higher the value, the longer the mosaic will be generated and the higher the quality.
Minimal distance between the same image - it is desirable to set the maximum - 9.
Max cell image repetition - it must be counted. If our mosaic has 1833 cells, and we have 534 pictures in the base, then the number should be 4 (1833/534 with rounding up).
Filling grid is a tool if you need to make a mosaic of a certain shape (for example, a heart). Or for different areas of the mosaic, use different pictures.
In the Cell Enhance insert, you need to set two parameters:
Single Cell colorize- level of tinting of the whole picture. More than 15% should not be used, because the quality of the mosaic is greatly reduced.
Detail Cell colorize - level of tinting of parts of the picture. More than 10% should not be used, because the details of the base image begin to appear.
Next is the Masking liner. Here, in order for the edges of the cell of our mosaic to be smoother, with transitions, we use an alpha mask. The program has a bunch of different masks, a large selection, if some does not fit, it can be edited in Photoshop.
So all the tinctures are made. Now you can proceed to the generation of the mosaic. Depending on the size of the mosaic, the processor on the computer, and the amount of memory this process can take up to 30 minutes. At the same time, the result image can even have a size of 1.2 GB (I had this; the developers claim that the upper size is limited only by the size of the disk). It should be noted that the mosaic is generated in bmp format without any compression, etc.
Well, click on the green Play and wait.
Result
I’ll say from experience that to get a high-quality result, you need at least 10-15 calls with different settings. This is if the picture base is already verified. If the base is new, you will need to catch duplicates.
I spread the mosaic, which I did for an example. The image is clickable and large (2.4 mb). And one more thing: The image is clickable and large (2.4 mb).


PS
Some practical advice:
1. If there are not enough photos, try diluting them with other photos of similar subjects. Just do not use photos of left people. It raises a lot of questions.
2. Goggle Picassa has a face recognition feature. If you have a lot of group photos of decent quality in the database, then you can use it to collect faces and replenish the database with unique photos.
Good luck.