Cisco Router Terminal Server
In the article I want to tell how to configure a cisco-based terminal server for console access to other cisco or any other equipment with the rs-232 console port
Cisco 1841 Router
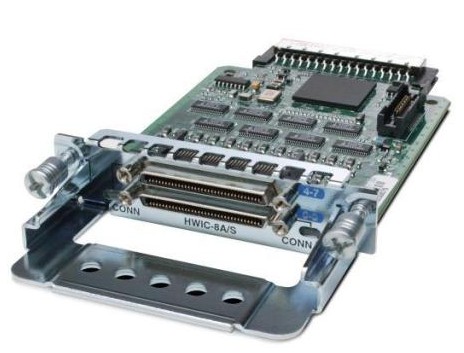
hwic-8a / s-rs232 module
cab-hd8-async

cable This module requires a cab-hd4-rs232 cable , on one side of which is a VHDCI 68 pin male connector, and on the other hand, 4 cables with a DB- connector 25 to which the consoles are connected.

But we could not find such a cable for adequate money (220 bucks for such a cable on ebay without delivery is not adequate money). We decided to do it ourselves, but finding even a wiring was an impossible task. And on one forum I got information that for this module you can use the cab-hd8-async cable , on the one hand which is the same VHDCI 68 pin male, and on the other - 8 wires with RJ-45 at the end, the only caveat is that it works there will only be even lines 0,2,4,6.
So, we connect the cable to one of the module slots, and turn on the corresponding RJ-45 in the console ports of the tsiska, which we want to configure remotely.
Since the hwic-8a / s module works both in synchronous and in asynchronous mode, the default transmission mode for it is synchronous. To transfer data to console lines, all serial interfaces must be configured to operate in asynchronous mode. For asynchronous modules, such as hwic-16a, nm-32a, nm-16a, this can be omitted.
Unfortunately, the range command does not work for serial interfaces, so the above line will have to be driven on all interfaces.
After such an operation, asynchronous interfaces will appear in the list of lines by the command show line
Configure the lines, you can configure a group of lines at once. The no exec command was found on one of the forums and is needed so that the overruns parameter does not grow and the line does not go into an occupied state.
We create a loopback interface that will be used as the IP address for connections
In fact, after that you can connect to the console another tsiska.
The port number that is used for connection depends on the line number according to the following scheme
port 20xx - where xx is the line number that can be seen in the show line listing. The
important point is that if you rearrange the module from slot 0 to slot 1, the line numbering will also change, for example , for slot 1 on the Cisco 1841 there will be the following situation:
As you can see, the line numbers have changed, so to connect to the 1st console on the s0 / 1/0 interface, you must use the telnet 172.16.1.1 command. 2018
For the convenience of working with a terminal server, you can add a menu to it that will be displayed when connecting remotely.
Create a menu header
then define the menu items:
and the commands that will be executed:
In conclusion, you need to define several menu options:
and also fill out the host table for ease of use:
Check the menu:
A choice of 1 to 4 connects to the corresponding console port, you can return to the menu with CTRL + SHIFT + 6, then x .
Configure the vty line so that when connected to the terminal server, the menu starts automatically:
We find / buy this kind of lace

at a price as lucky, I found on ebay 2 pieces for $ 25, I brought to Ukraine a friend who was in the States at that time, for which special thanks to him.
We cut off one side of such a lace and according to the following wiring: we call the
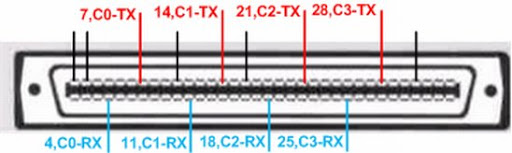
necessary wires.
On the tsiska itself, the pinout is as follows:
3 - RX
4,5 - GND
6 - TX
We hammered the necessary wires from the cable to the patch panel and connect it to the tsiska with ordinary roll-over cables, it turned out quite conveniently.
Based on 1841 with two such modules, a console server with 16 consoles was obtained.
1. Components of the circuit:
Cisco 1841 Router
hwic-8a / s-rs232 module
cab-hd8-async
cable This module requires a cab-hd4-rs232 cable , on one side of which is a VHDCI 68 pin male connector, and on the other hand, 4 cables with a DB- connector 25 to which the consoles are connected.
But we could not find such a cable for adequate money (220 bucks for such a cable on ebay without delivery is not adequate money). We decided to do it ourselves, but finding even a wiring was an impossible task. And on one forum I got information that for this module you can use the cab-hd8-async cable , on the one hand which is the same VHDCI 68 pin male, and on the other - 8 wires with RJ-45 at the end, the only caveat is that it works there will only be even lines 0,2,4,6.
So, we connect the cable to one of the module slots, and turn on the corresponding RJ-45 in the console ports of the tsiska, which we want to configure remotely.
2. The basic configuration of the router:
Since the hwic-8a / s module works both in synchronous and in asynchronous mode, the default transmission mode for it is synchronous. To transfer data to console lines, all serial interfaces must be configured to operate in asynchronous mode. For asynchronous modules, such as hwic-16a, nm-32a, nm-16a, this can be omitted.
interface s0/0/0

physical-layer async
Unfortunately, the range command does not work for serial interfaces, so the above line will have to be driven on all interfaces.
After such an operation, asynchronous interfaces will appear in the list of lines by the command show line
TermServer#sh line
   Tty Line Typ     Tx/Rx    A Modem  Roty AccO AccI  Uses  Noise Overruns  Int
*    0    0 CTY              -    -      -    -    -     1      0    0/0      -
     1    1 AUX   9600/9600  -    -      -    -    -     0      0    0/0      -
 0/0/0    2 TTY   9600/9600  -    -      -    -    -     1      0    0/0    Se0/0/0
 0/0/1    3 TTY   9600/9600  -    -      -    -    -     0      0    0/0    Se0/0/1
 0/0/2    4 TTY   9600/9600  -    -      -    -    -     0      0    0/0    Se0/0/2
 0/0/3    5 TTY   9600/9600  -    -      -    -    -     0      0    0/0    Se0/0/3
   194  194 VTY              -    -      -    -    -     0      0    0/0      -
   195  195 VTY              -    -      -    -    -     0      0    0/0      -
   196  196 VTY              -    -      -    -    -     0      0    0/0      -
   197  197 VTY              -    -      -    -    -     0      0    0/0      -
   198  198 VTY              -    -      -    -    -     0      0    0/0      -
Configure the lines, you can configure a group of lines at once. The no exec command was found on one of the forums and is needed so that the overruns parameter does not grow and the line does not go into an occupied state.
line 0/0/0 0/0/3

transport input all

no exec
We create a loopback interface that will be used as the IP address for connections
interface loopback0

ip address
In fact, after that you can connect to the console another tsiska.
TermServer#telnet 172.16.1.1 2002

Trying 172.16.1.1, 2002 ... Open


Router>
The port number that is used for connection depends on the line number according to the following scheme
port 20xx - where xx is the line number that can be seen in the show line listing. The
important point is that if you rearrange the module from slot 0 to slot 1, the line numbering will also change, for example , for slot 1 on the Cisco 1841 there will be the following situation:
Router#sh line
   Tty Line Typ     Tx/Rx    A Modem  Roty AccO AccI  Uses  Noise Overruns  Int
*    0    0 CTY              -    -      -    -    -     1      0    0/0      -
     1    1 AUX   9600/9600  -    -      -    -    -     0      0    0/0      -
 0/1/0   18 TTY   9600/9600  -    -      -    -    -     0      0    0/0    Se0/1/0
 0/1/0   19 TTY   9600/9600  -    -      -    -    -     0      0    0/0    Se0/1/1
 0/1/0   20 TTY   9600/9600  -    -      -    -    -     0      0    0/0    Se0/1/2
 0/1/0   21 TTY   9600/9600  -    -      -    -    -     0      0    0/0    Se0/1/3
 0/1/0   22 TTY   9600/9600  -    -      -    -    -     0      0    0/0    Se0/1/4
 0/1/0   23 TTY   9600/9600  -    -      -    -    -     0      0    0/0    Se0/1/5
 0/1/0   24 TTY   9600/9600  -    -      -    -    -     0      0    0/0    Se0/1/6
 0/1/0   25 TTY   9600/9600  -    -      -    -    -     0      0    0/0    Se0/1/7
   194  194 VTY              -    -      -    -    -     0      0    0/0      -
   195  195 VTY              -    -      -    -    -     0      0    0/0      -
   196  196 VTY              -    -      -    -    -     0      0    0/0      -
   197  197 VTY              -    -      -    -    -     0      0    0/0      -
   198  198 VTY              -    -      -    -    -     0      0    0/0      -
As you can see, the line numbers have changed, so to connect to the 1st console on the s0 / 1/0 interface, you must use the telnet 172.16.1.1 command. 2018
3. Additional settings and decorations:
For the convenience of working with a terminal server, you can add a menu to it that will be displayed when connecting remotely.
Create a menu header
menu TS title ^

**********************************************************

Kharkov National University of Radioelectronics

Regional Cisco Academy

To exit from a device, use CTRL+SHIFT+6 then press x

**********************************************************

^
then define the menu items:
menu TS prompt ^ Your selection : ^

menu TS text 1 Connect to Console 1

menu TS text 2 Connect to Console 2

menu TS text 3 Connect to Console 3

menu TS text 4 Connect to Console 4

menu TS text s show all established sessions

menu TS text c(no) clear the session by number ie: c4

menu TS text e menu-exit

menu TS text q Quit terminal server session
and the commands that will be executed:
menu TS command 1 resume c1 /connect telnet c1

menu TS command 2 resume c2 /connect telnet c2

menu TS command 3 resume c3 /connect telnet c3

menu TS command 4 resume c4 /connect telnet c4

menu TS command s show sessions

menu TS command e menu-exit

menu TS command q exit

menu TS command c1 disconnect c1

menu TS command c2 disconnect c2

menu TS command c3 disconnect c3

menu TS command c4 disconnect c4
In conclusion, you need to define several menu options:
menu TS line-mode

menu TS single-space

menu TS options s pause
and also fill out the host table for ease of use:
ip host c1 2002 172.16.1.1

ip host c2 2003 172.16.1.1

ip host c3 2004 172.16.1.1

ip host c4 2005 172.16.1.1
Check the menu:
TermServer#menu TS


**********************************************************

Kharkov National University of Radioelectronics

Regional Cisco Academy

To exit from a device, use CTRL+SHIFT+6 then press x

**********************************************************

 1 Connect to Console 1

 2 Connect to Console 2

 3 Connect to Console 3

 4 Connect to Console 4

 s show all established sessions

 c(no) clear the session by number ie: c5

 e menu-exit

 q Quit terminal server session


Your selection : 1

Trying c1 (172.16.1.1, 2002)... Open


Router>
A choice of 1 to 4 connects to the corresponding console port, you can return to the menu with CTRL + SHIFT + 6, then x .
Configure the vty line so that when connected to the terminal server, the menu starts automatically:
line vty 0 4

autocommand menu TS
4. DIY :)
We find / buy this kind of lace
at a price as lucky, I found on ebay 2 pieces for $ 25, I brought to Ukraine a friend who was in the States at that time, for which special thanks to him.
We cut off one side of such a lace and according to the following wiring: we call the
necessary wires.
On the tsiska itself, the pinout is as follows:
3 - RX
4,5 - GND
6 - TX
We hammered the necessary wires from the cable to the patch panel and connect it to the tsiska with ordinary roll-over cables, it turned out quite conveniently.
Based on 1841 with two such modules, a console server with 16 consoles was obtained.