XML Tools in Visual Studio 2008
- Transfer
XML is used everywhere from web services, databases, configuration files, to office documents. This article will introduce you to the tooling support offered by Visual Studio 2008, which makes working with XML easier. This article discusses editing XML files, working with XML schemas, debugging XSLT style sheets, and expanding Visual Studio by writing your own XML designers.
When you open an XML file in Visual Studio 2008 (for example .xml, .xsd, .xslt, .svg or .config), you start the built-in XML editor. The XML editor comes with the full range of features you would expect from a Visual Studio editor, including IntelliSense, code coloring, parenthesis highlighting, folding / unfolding, and code formatting. It provides full XML 1.0 syntax checking, tag completion, as well as real-time validation of XML schema support.
Editing XML files
Admittedly, manually editing XML files can be very tedious and time-consuming. To help with this, the XML editor in Visual Studio 2008 comes with many features to improve performance. One of these functions is an expandable library of fragments of XML code - XML files that contain configurable sections of code that act as templates for use during document editing. Visual Studio installs many XML snippet files that help developers write XML schemas and XSLT style pages. To invoke a fragment while editing an XML file, select “Insert Snippet” from the menu “Edit> IntelliSense” (“Edit> IntelliSense”). Once you have inserted the fragment, You can move between highlighted fields, which you can change with the TAB key to enter data. On theFigure 1 shows an example of inserting a fragment.
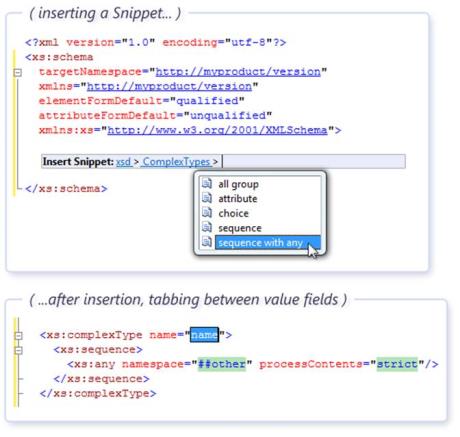
Figure 1 : Invoking a snippet of XML code in Visual Studio 2008.
You can also record your own snippets. If you want to create a simple fragment, follow these steps:
Create an XML file and type in it:
Press ESCAPE to close the IntelliSense window.
Press TAB .
Enter value.
Press ENTER to complete.
For more details, I recommend the Visual Studio editor
Code Snippet - Schema Description for a blog post .
What will you do when there are no ready-made fragments of XML code, and you need to create an XML file based on the existing schema? The XML editor offers a wide range of possibilities with which you can associate your XML documents with XML schemas. IntelliSense schema-based, real-time validation, and error reporting are just a few of them. In addition to the above, an XML editor can dynamically generate code fragments based on an existing schema. After you provide the name of the element you want to add, the XML editor can analyze the schema for the required information, generate a code fragment and paste it for you. To call the functions of dynamically constructing fragments of XML code, all you need to do is type the element name as shown in the following example:
and press the TAB key . The XML editor will create a piece of code that looks very similar to what was already shown in Figure 1 , except that you will not need to do anything in advance. This is a very powerful feature, especially when you need to create documents with large content models.
By default, the XML editor generates only the required content, but this behavior can be overridden using annotations in XML schemas. You will find more information on MSDN under the heading, “How to: Generate an XML Snippet From an XML Schema”.
Schema Cache and Schema Catalogs
For advanced users, the XML editor offers features such as schema cache schema file directories. Schema cache is a folder that contains many well-known W3C schemes, as well as many schemes specifically created by Microsoft or related to their technologies. It serves as a repository of commonly used schemas that do not usually change. You will find the default schema location in% vsinstalldir% \ xml \ schemas, where "% vsinstalldir%" is a variable representing the location in which Visual Studio is installed. When you declare one of the namespaces defined by these schemas in your XML files, the editor will automatically associate the appropriate schemas from the cache location and quickly provide IntelliSense and validation for that schema.
The schema catalog is the XML files located in the schema cache directory (catalog.xml file by default). They give advanced users more precise control over the various namespaces that they may use. For example, you can associate certain namespaces with external sources: You can also use directory files to create associations between schema files and file extensions. It can be useful sometimes when a schema does not have targetNamespace: Innovation in Visual Studio 2008, you can also add conditions: This condition means that the dotNetConfig30.xsd schema should only be associated when the current project uses the .NET Framework version 3.0.
Finally, you can create a chain by referencing from one directory file to another:
Working with large files
Another important editing function that I would like to mention is the XML editor support for large files. Although you could work with large files in previous versions, Visual Studio 2008 supports incremental parsing of XML documents. Now, if you are working with a 10 MB file, you do not need to wait until Visual Studio analyzes the entire file every time you make changes. The XML editor isolates edits and re-analyzes only those parts that are required, thus offering better performance and responsiveness.
I have described only a few interesting functions of the XML editor, but obviously, you cannot consider all of them here. Table 1 shows some of the features that are available to users of Visual Studio.
Debugging XSLT Style Sheets
XSLT is a standard W3C-approved transformation language that is very popular among a large group of developers. Visual Studio Professional Edition provides support for editing and debugging XSLT style sheets. Editing XSLT files is similar to editing XML files. When it comes to debugging XSLT, Visual Studio supports two main scenarios:
Debugging a single transformation, which is useful when your initial interest is the input document, the actual transformation and the output document.
CLR-integrated debugging, which is useful for debugging transformations in the context of your CLR application.
Debugging individual transformations
Figure 2demonstrates the debugging environment when you are working with XSLT transformations. In the default configuration, you can see the XSLT file and tabs of the types of document input and document output. You can also configure Visual Studio to display all three documents at once. When you go through the transformation code, you can see the input data, the transformation that processes this input and generates the output file.
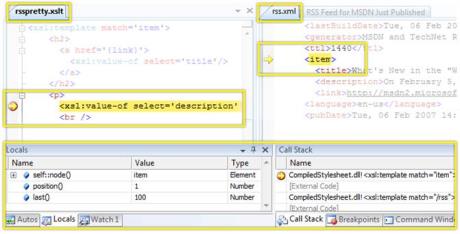
Figure 2 : Debugging individual XSLT transformations.
If you use the C # or Visual Basic debugging environment, you will notice that debugging XSLT looks very similar to debugging other programs using the CLR language. All control methods and key combinations remain the same. In Figure 2you can also see the Locals window in which XSLT hidden variables (self, position, and last) can be displayed, just like the variables defined in your template. You can also see the call stack window, which you can use to navigate to different XSLT templates at the top and bottom of the stack. You can also use the XSLT debugger to set breakpoints in both XSLT code and XML documents.
CLR integrated debugging
Although debugging individual transformations is useful, sometimes you need to debug XSLT as part of your C # or Visual Basic application. The XSLT debugger, which is tightly integrated with other CLR debuggers, allows you to seamlessly switch from C # to XSLT and then to Visual Basic while debugging the application. The following example shows a C # code snippet that uses the XslCompiledTransform class to initialize an XSLT transformation:
If you set a breakpoint on a method call and pass into it, the debugger will show you the XSLT style sheet ( Figure 3 ). All the functions described in the debugging section of a separate style sheet are also applicable here. The one exception is the ability to set breakpoints in data files. This feature is not available when you switch from to XSLT from another CLR program. Everything else will behave exactly as described above.
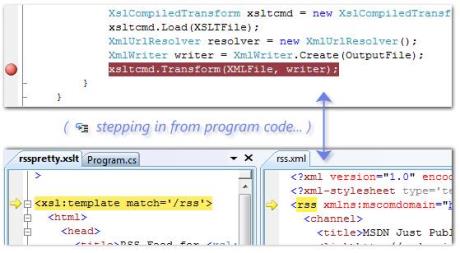
Figure 3 : Debugging XSLT transformations from a C # application.
Table 2 provides a summary of the various functions available during debugging of XSLT transformations.
Extending XML tools The XML
editor provides a good foundation for developers to create custom designers on top of it. Figure 4 how this was done in a previous version of Visual Studio (Visual Studio 2005). Developers could build the extension on top of the XML Editor through buffer sharing. They should have beaten up creating custom designers by sharing the IVsTextLines buffer and parsing XML using System.Xml.XmlReader or XmlDocument. Don Demsak uses this method when creating XPathmania and XPath add-ons for Visual Studio (for more information on XPathmania, see http://www.donxml.com) However, since integration occurs at the buffer level, this method creates many large buffer edits. In addition to this, it has some limitations because the System.Xml parser accepts only valid XML, while designers, by definition, should work with invalid files.

Figure 4 : The old way to create custom XML designers on top of an XML editor.
On the other hand, the XML editor has its own parser with error recovery. She also creates her own analysis tree representing the contents of the buffer. In Visual Studio 2008, Microsoft opened this LINQ to XML tree to third-party developers. The new architecture is shown in Figure 5. The new API allows developers to create custom views on top of the XML editor analysis tree, providing them with error recovery logic for the XML editor and LINQ to XML analysis tree with update transactions, the results of which appear in the buffer by the integrated Visual Studio UndoManager. These changes make it easier for developers to create XML tools on top of Visual Studio 2008.
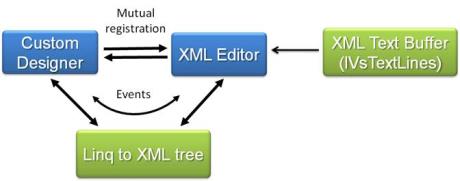
Figure 5 : How to extend the XML editor in Visual Studio 2008.
When you open an XML file in Visual Studio 2008 (for example .xml, .xsd, .xslt, .svg or .config), you start the built-in XML editor. The XML editor comes with the full range of features you would expect from a Visual Studio editor, including IntelliSense, code coloring, parenthesis highlighting, folding / unfolding, and code formatting. It provides full XML 1.0 syntax checking, tag completion, as well as real-time validation of XML schema support.
Editing XML files
Admittedly, manually editing XML files can be very tedious and time-consuming. To help with this, the XML editor in Visual Studio 2008 comes with many features to improve performance. One of these functions is an expandable library of fragments of XML code - XML files that contain configurable sections of code that act as templates for use during document editing. Visual Studio installs many XML snippet files that help developers write XML schemas and XSLT style pages. To invoke a fragment while editing an XML file, select “Insert Snippet” from the menu “Edit> IntelliSense” (“Edit> IntelliSense”). Once you have inserted the fragment, You can move between highlighted fields, which you can change with the TAB key to enter data. On theFigure 1 shows an example of inserting a fragment.
Figure 1 : Invoking a snippet of XML code in Visual Studio 2008.
You can also record your own snippets. If you want to create a simple fragment, follow these steps:
Create an XML file and type in it:
Press TAB .
Enter value.
Press ENTER to complete.
For more details, I recommend the Visual Studio editor
Code Snippet - Schema Description for a blog post .
What will you do when there are no ready-made fragments of XML code, and you need to create an XML file based on the existing schema? The XML editor offers a wide range of possibilities with which you can associate your XML documents with XML schemas. IntelliSense schema-based, real-time validation, and error reporting are just a few of them. In addition to the above, an XML editor can dynamically generate code fragments based on an existing schema. After you provide the name of the element you want to add, the XML editor can analyze the schema for the required information, generate a code fragment and paste it for you. To call the functions of dynamically constructing fragments of XML code, all you need to do is type the element name as shown in the following example:
and press the TAB key . The XML editor will create a piece of code that looks very similar to what was already shown in Figure 1 , except that you will not need to do anything in advance. This is a very powerful feature, especially when you need to create documents with large content models.
By default, the XML editor generates only the required content, but this behavior can be overridden using annotations in XML schemas. You will find more information on MSDN under the heading, “How to: Generate an XML Snippet From an XML Schema”.
Schema Cache and Schema Catalogs
For advanced users, the XML editor offers features such as schema cache schema file directories. Schema cache is a folder that contains many well-known W3C schemes, as well as many schemes specifically created by Microsoft or related to their technologies. It serves as a repository of commonly used schemas that do not usually change. You will find the default schema location in% vsinstalldir% \ xml \ schemas, where "% vsinstalldir%" is a variable representing the location in which Visual Studio is installed. When you declare one of the namespaces defined by these schemas in your XML files, the editor will automatically associate the appropriate schemas from the cache location and quickly provide IntelliSense and validation for that schema.
The schema catalog is the XML files located in the schema cache directory (catalog.xml file by default). They give advanced users more precise control over the various namespaces that they may use. For example, you can associate certain namespaces with external sources: You can also use directory files to create associations between schema files and file extensions. It can be useful sometimes when a schema does not have targetNamespace: Innovation in Visual Studio 2008, you can also add conditions: This condition means that the dotNetConfig30.xsd schema should only be associated when the current project uses the .NET Framework version 3.0.
 href="mylocation/myschema.xsd"

 targetNamespace="http://myschema"/>
 extension="config"

 schema="xml/schemas/dotNetConfig.xsd"/>
 extension="config"

 schema="xml/schemas/dotNetConfig30.xsd"

 condition="%TargetFrameworkVersion% = 3.0" />
Finally, you can create a chain by referencing from one directory file to another:
Working with large files
Another important editing function that I would like to mention is the XML editor support for large files. Although you could work with large files in previous versions, Visual Studio 2008 supports incremental parsing of XML documents. Now, if you are working with a 10 MB file, you do not need to wait until Visual Studio analyzes the entire file every time you make changes. The XML editor isolates edits and re-analyzes only those parts that are required, thus offering better performance and responsiveness.
I have described only a few interesting functions of the XML editor, but obviously, you cannot consider all of them here. Table 1 shows some of the features that are available to users of Visual Studio.
| Function | Support in Visual Studio 2008 |
| Autocompletion | X |
| Syntax highlighting | X |
| Collapse / Expand Code | X |
| IntelliSense | X |
| Extensible Code Snippet Library | X |
| Dynamic snippets of code | X |
| Transition to definition (from XML to XSD) | X |
| Backward / forward navigation | X |
| Project and user profile support | X |
| Real time validation | X |
| Full XSD Support | X |
| Namespace support | X |
| DTD Support | X |
| XML Generation XSD | X |
| Convert DTD to XSD | X |
| Unicode Support | X |
| Support for large files (10 MB +) | X |
Debugging XSLT Style Sheets
XSLT is a standard W3C-approved transformation language that is very popular among a large group of developers. Visual Studio Professional Edition provides support for editing and debugging XSLT style sheets. Editing XSLT files is similar to editing XML files. When it comes to debugging XSLT, Visual Studio supports two main scenarios:
Debugging a single transformation, which is useful when your initial interest is the input document, the actual transformation and the output document.
CLR-integrated debugging, which is useful for debugging transformations in the context of your CLR application.
Debugging individual transformations
Figure 2demonstrates the debugging environment when you are working with XSLT transformations. In the default configuration, you can see the XSLT file and tabs of the types of document input and document output. You can also configure Visual Studio to display all three documents at once. When you go through the transformation code, you can see the input data, the transformation that processes this input and generates the output file.
Figure 2 : Debugging individual XSLT transformations.
If you use the C # or Visual Basic debugging environment, you will notice that debugging XSLT looks very similar to debugging other programs using the CLR language. All control methods and key combinations remain the same. In Figure 2you can also see the Locals window in which XSLT hidden variables (self, position, and last) can be displayed, just like the variables defined in your template. You can also see the call stack window, which you can use to navigate to different XSLT templates at the top and bottom of the stack. You can also use the XSLT debugger to set breakpoints in both XSLT code and XML documents.
CLR integrated debugging
Although debugging individual transformations is useful, sometimes you need to debug XSLT as part of your C # or Visual Basic application. The XSLT debugger, which is tightly integrated with other CLR debuggers, allows you to seamlessly switch from C # to XSLT and then to Visual Basic while debugging the application. The following example shows a C # code snippet that uses the XslCompiledTransform class to initialize an XSLT transformation:
XslCompiledTransform xsltcmd =

new XslCompiledTransform(true);

xsltcmd.Load(XSLTFile);

XmlUrlResolver resolver = new XmlUrlResolver();

XmlWriter writer = XmlWriter.Create(OutputFile);


xsltcmd.Transform(XMLFile, writer);


* This source code was highlighted with Source Code Highlighter.
If you set a breakpoint on a method call and pass into it, the debugger will show you the XSLT style sheet ( Figure 3 ). All the functions described in the debugging section of a separate style sheet are also applicable here. The one exception is the ability to set breakpoints in data files. This feature is not available when you switch from to XSLT from another CLR program. Everything else will behave exactly as described above.
Figure 3 : Debugging XSLT transformations from a C # application.
Table 2 provides a summary of the various functions available during debugging of XSLT transformations.
| Feature | Visual Studio 2008 Support |
| Browser view | X |
| Locals, watch, call stack | X |
| Viewing input XML, output, and XLST during debugging | X |
| Breakpoints in XML | X |
| Breakpoints in xslt | X |
| CLR language debugger integration | X |
Extending XML tools The XML
editor provides a good foundation for developers to create custom designers on top of it. Figure 4 how this was done in a previous version of Visual Studio (Visual Studio 2005). Developers could build the extension on top of the XML Editor through buffer sharing. They should have beaten up creating custom designers by sharing the IVsTextLines buffer and parsing XML using System.Xml.XmlReader or XmlDocument. Don Demsak uses this method when creating XPathmania and XPath add-ons for Visual Studio (for more information on XPathmania, see http://www.donxml.com) However, since integration occurs at the buffer level, this method creates many large buffer edits. In addition to this, it has some limitations because the System.Xml parser accepts only valid XML, while designers, by definition, should work with invalid files.
Figure 4 : The old way to create custom XML designers on top of an XML editor.
On the other hand, the XML editor has its own parser with error recovery. She also creates her own analysis tree representing the contents of the buffer. In Visual Studio 2008, Microsoft opened this LINQ to XML tree to third-party developers. The new architecture is shown in Figure 5. The new API allows developers to create custom views on top of the XML editor analysis tree, providing them with error recovery logic for the XML editor and LINQ to XML analysis tree with update transactions, the results of which appear in the buffer by the integrated Visual Studio UndoManager. These changes make it easier for developers to create XML tools on top of Visual Studio 2008.
Figure 5 : How to extend the XML editor in Visual Studio 2008.