Backlit keyboard
I work as a programmer and like many programmers I work / refine at home at night (and when else). But the problem is that I don’t like working without light (talking in ICQ or playing games is another), but I can’t turn on the light for the reason that my wife goes to bed.
On the Internet and on Habré there are many articles ( example 1 , example 2 ) on how to make the backlight for the keyboard, but everywhere in the examples you need to spoil either the keyboard or the table, but this does not smile at me.
And having stumbled upon an article about an LED lamp for small jobs that plows from a tablet battery, I had the idea of making a mobile backlight for a keyboard that would be powered by the same tablet.
What we need
First of all, of course, desire. Perhaps it will be caused by inspiration and the desire to create something, or perhaps with some fatigue to write programs in the dark, but still without it in any way.
Further details: 2 LEDs (better than white), 2 3V tablet batteries, 2 office clothespins (you can buy at any stationery store, and I understand that I bought the biggest ones; anyway, when buying, imagine how these clothespins will hold onto the keyboard) .

And also a piece of twisted pair, a soldering iron, solder, wire cutters, a matchbox (or a piece of another thin cardboard) and of course an electrical tape (well, how could it be without it).
Given the foregoing and checking the correct location of the hands, you can safely proceed to the manufacture of the device.
Get to work
First, we take one of the wide sides of the matchbox, bend it in half, but do not press it firmly, the battery should lie inside, and cut the cardboard so that (from the side opposite the bend) the battery is hidden about half as in the picture.
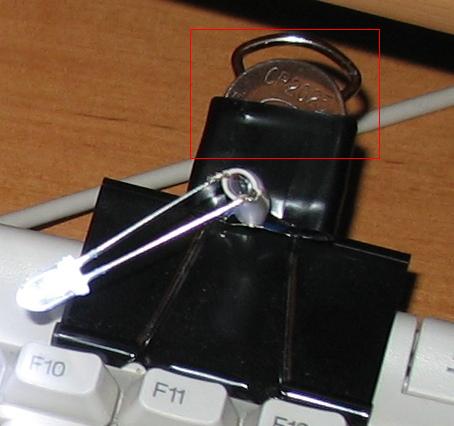
The other two sides should be slightly longer than the tablet itself, so as to cut the cardboard along the fold and wrap it up - a pocket is obtained. Next, you need to wrap the pocket with electrical tape, while it is desirable that the battery is inside, otherwise then it risks not fit in its place, but it must also enter / exit tightly but without a hammer.
Then, at the bend, we pierce 2 holes in opposite sides and insert the wires from the twisted pair into it, previously cleared of insulation in the place where the wire will be in your pocket. We bend the ends of the wires to the edges of the pocket so that the battery touches these wires with different poles.
Now you need to wrap the entire pocket with wires with electrical tape several times for strength and wrap, all the same miracle tape, the pocket to the clothespin:
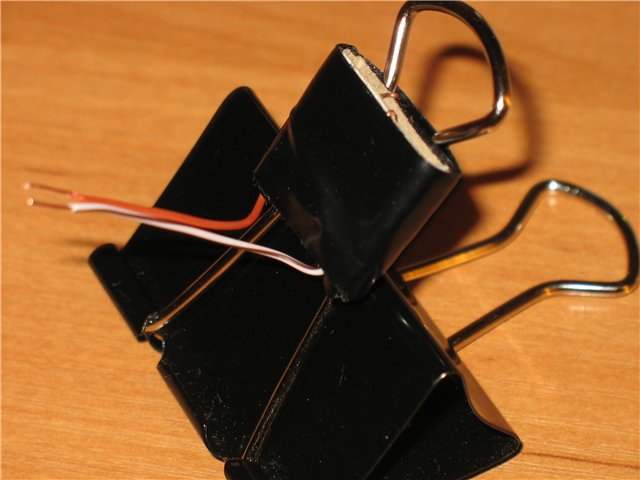
and solder the LED to the ends of the wires. True, I stillhave nothing to do for beauty, dressed the wires in a twisted pair casing. The second is by analogy.
Test
They say that testing something done with your own hands is worth doing it with your own hands.And of course, one cannot ignore pride in oneself.
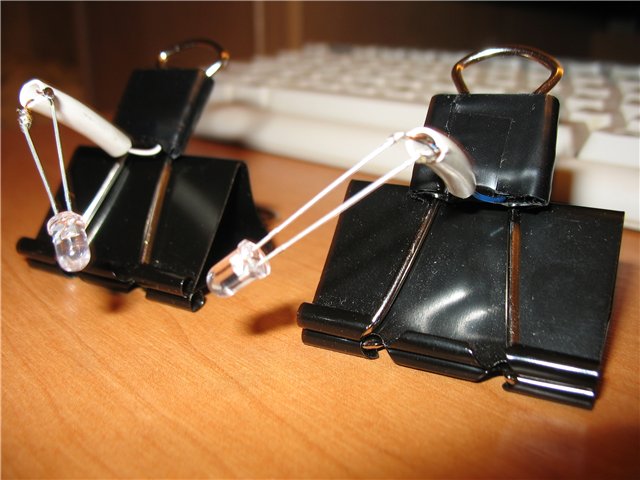
What can I say. I like it. Conveniently. In the eye does not hit. The lighting is adequate. At any time, you can remove the clothespin from the keyboard and turn off the device by removing the battery.

And stationery clothespins can be used like this:

On the Internet and on Habré there are many articles ( example 1 , example 2 ) on how to make the backlight for the keyboard, but everywhere in the examples you need to spoil either the keyboard or the table, but this does not smile at me.
And having stumbled upon an article about an LED lamp for small jobs that plows from a tablet battery, I had the idea of making a mobile backlight for a keyboard that would be powered by the same tablet.
What we need
First of all, of course, desire. Perhaps it will be caused by inspiration and the desire to create something, or perhaps with some fatigue to write programs in the dark, but still without it in any way.
Further details: 2 LEDs (better than white), 2 3V tablet batteries, 2 office clothespins (you can buy at any stationery store, and I understand that I bought the biggest ones; anyway, when buying, imagine how these clothespins will hold onto the keyboard) .
And also a piece of twisted pair, a soldering iron, solder, wire cutters, a matchbox (or a piece of another thin cardboard) and of course an electrical tape (well, how could it be without it).
Given the foregoing and checking the correct location of the hands, you can safely proceed to the manufacture of the device.
Get to work
First, we take one of the wide sides of the matchbox, bend it in half, but do not press it firmly, the battery should lie inside, and cut the cardboard so that (from the side opposite the bend) the battery is hidden about half as in the picture.
The other two sides should be slightly longer than the tablet itself, so as to cut the cardboard along the fold and wrap it up - a pocket is obtained. Next, you need to wrap the pocket with electrical tape, while it is desirable that the battery is inside, otherwise then it risks not fit in its place, but it must also enter / exit tightly but without a hammer.
Then, at the bend, we pierce 2 holes in opposite sides and insert the wires from the twisted pair into it, previously cleared of insulation in the place where the wire will be in your pocket. We bend the ends of the wires to the edges of the pocket so that the battery touches these wires with different poles.
Now you need to wrap the entire pocket with wires with electrical tape several times for strength and wrap, all the same miracle tape, the pocket to the clothespin:
and solder the LED to the ends of the wires. True, I still
Test
They say that testing something done with your own hands is worth doing it with your own hands.
What can I say. I like it. Conveniently. In the eye does not hit. The lighting is adequate. At any time, you can remove the clothespin from the keyboard and turn off the device by removing the battery.
And stationery clothespins can be used like this: