Homemade rack for home appliances
Quite a long time ago, in connection with a large amount of computer equipment at home, I had a question how it is compact and convenient to store.
I wanted something like a server cabinet, but quite homely and pretty. As a result, this resulted in a completely home-made locker.
First thoughts were spinning around the version with a normal 19 "server cabinet or rack Cons -. Stand it is ugly, and the cabinet -. Krupnovat and again to keep the room as something not aesthetically Plus they are hard to find on sale for cash.
For something on sale there 19 "music racks. They are prettier, quite fit into the interior. However, they usually have bearing perforations only in the front, and I need shelves to fasten the shelves on both sides.
In the end, all of these searches had to be abandoned. In connection with the emergency move, I decided to make a computer "locker" on my own. There was no money, and for this reason I just figured out what kind of boards I needed, bought them in a large building, and there they sawed me off according to my layout.
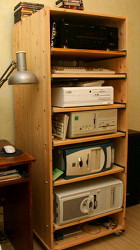
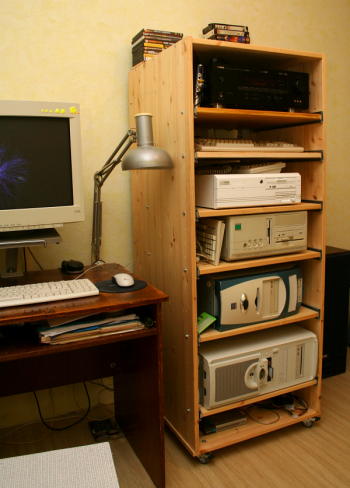
Here's what happened: The reserve for different wiring is left below. In the closet: Modern comp, Pentium2 / VFX1, 486, Amiga 4000, Amiga 1200, Yamaha receiver and tv-tuner. The cabinet is mounted on wheels and it can easily be rolled around the room (after disconnecting the wires). A simple hub is visible below, it is necessary to exchange it for something more rack-based, but so far no good options have come across. All shelves are mounted on retractable rails, perforations are made in the side racks,

shelves can be set at any height. Holes were marked and drilled every 2U in the side walls. The truth later turned out that 2U is too rare, a lot of space disappears between the shelves, and each 1U is drilled.

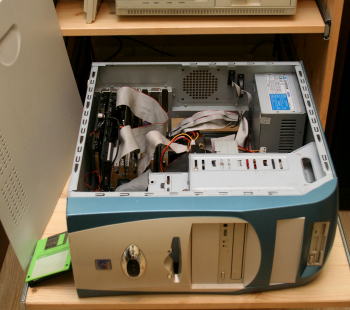
Any of them can be put forward to connect to the computer cable,
dig into the insides, etc.
To ensure that the shelf can be easily pulled out, all cables connected to computers have a rear cable reserve. I would like to make a “management arm” for cables, like for servers, but so far there hasn’t been a good solution from materials at hand, so the
cable was fixed on the shelf in front of it and sagged in the middle.
Shelves in the cabinet should not be at full depth, as from the back of the cabinet, to the two sides of the shelves is all the wiring. On one side, only the power cable:

On the opposite side, all data cables are wired:
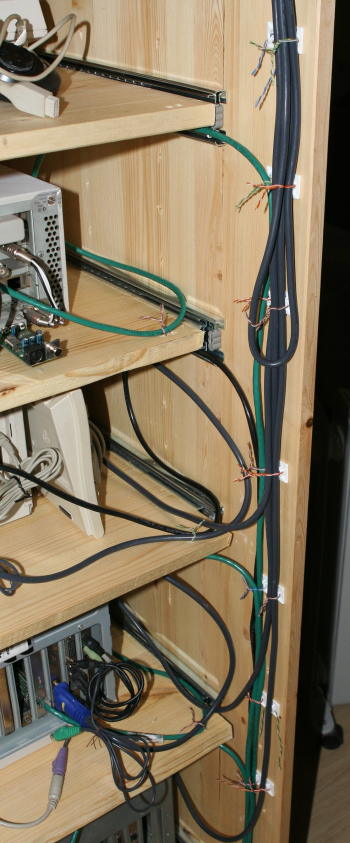
Separate hardware for network and separately for audio / video cables.
Platforms for screeds are installed, but so far there are no reusable screeds on hand, this is simply twisted by wires.
Inside there is a small KVM Switch, it has one good advantage - in addition to the keyboard, video and mouse, it also switches the sound.
Creation: We
bought identical sheets with a width of 600mm and a thickness of 18mm.
At the base of the board is 630 * 600, sidewalls 600 * 1500, shelves 550 * 500.
Purchased in fact for one run to the store.
At home, painting with the cheapest varnish, half a day for drying, a couple of hours for marking and drilling holes, a couple of hours for assembly and fitting.
The sides to the base are screwed on the corners, the top cover on furniture screws.
For fastening the shelves, I took retractable rails for drawers with a depth of 500 mm. For this, the shelves did the same 500mm in depth. Fastened to the side walls with bolts m5.
Bottom line: The
maximum of the equipment is less than a square meter of housing. Minimum wires - only power is supplied to the cabinet, one keyboard / mouse / monitor and two wires for large speakers.
Plus, the color cabinet is well suited to the rest of the interior in the room - wooden shelves for books, a desk, etc.
It is worth noting that this is not a finished option: First of all, I want to find a suitable piece of plexiglass and make a front door. Also, there is a lot of dust in residential buildings, so there is an idea to make a window for air with a filter at the bottom, and put a couple of large fans at low speeds on top.
Ideas and criticism are welcome.
I wanted something like a server cabinet, but quite homely and pretty. As a result, this resulted in a completely home-made locker.
First thoughts were spinning around the version with a normal 19 "server cabinet or rack Cons -. Stand it is ugly, and the cabinet -. Krupnovat and again to keep the room as something not aesthetically Plus they are hard to find on sale for cash.
For something on sale there 19 "music racks. They are prettier, quite fit into the interior. However, they usually have bearing perforations only in the front, and I need shelves to fasten the shelves on both sides.
In the end, all of these searches had to be abandoned. In connection with the emergency move, I decided to make a computer "locker" on my own. There was no money, and for this reason I just figured out what kind of boards I needed, bought them in a large building, and there they sawed me off according to my layout.
Here's what happened: The reserve for different wiring is left below. In the closet: Modern comp, Pentium2 / VFX1, 486, Amiga 4000, Amiga 1200, Yamaha receiver and tv-tuner. The cabinet is mounted on wheels and it can easily be rolled around the room (after disconnecting the wires). A simple hub is visible below, it is necessary to exchange it for something more rack-based, but so far no good options have come across. All shelves are mounted on retractable rails, perforations are made in the side racks,

shelves can be set at any height. Holes were marked and drilled every 2U in the side walls. The truth later turned out that 2U is too rare, a lot of space disappears between the shelves, and each 1U is drilled.
Any of them can be put forward to connect to the computer cable,
dig into the insides, etc.
To ensure that the shelf can be easily pulled out, all cables connected to computers have a rear cable reserve. I would like to make a “management arm” for cables, like for servers, but so far there hasn’t been a good solution from materials at hand, so the
cable was fixed on the shelf in front of it and sagged in the middle.
Shelves in the cabinet should not be at full depth, as from the back of the cabinet, to the two sides of the shelves is all the wiring. On one side, only the power cable:
On the opposite side, all data cables are wired:
Separate hardware for network and separately for audio / video cables.
Platforms for screeds are installed, but so far there are no reusable screeds on hand, this is simply twisted by wires.
Inside there is a small KVM Switch, it has one good advantage - in addition to the keyboard, video and mouse, it also switches the sound.
Creation: We
bought identical sheets with a width of 600mm and a thickness of 18mm.
At the base of the board is 630 * 600, sidewalls 600 * 1500, shelves 550 * 500.
Purchased in fact for one run to the store.
At home, painting with the cheapest varnish, half a day for drying, a couple of hours for marking and drilling holes, a couple of hours for assembly and fitting.
The sides to the base are screwed on the corners, the top cover on furniture screws.
For fastening the shelves, I took retractable rails for drawers with a depth of 500 mm. For this, the shelves did the same 500mm in depth. Fastened to the side walls with bolts m5.
Bottom line: The
maximum of the equipment is less than a square meter of housing. Minimum wires - only power is supplied to the cabinet, one keyboard / mouse / monitor and two wires for large speakers.
Plus, the color cabinet is well suited to the rest of the interior in the room - wooden shelves for books, a desk, etc.
It is worth noting that this is not a finished option: First of all, I want to find a suitable piece of plexiglass and make a front door. Also, there is a lot of dust in residential buildings, so there is an idea to make a window for air with a filter at the bottom, and put a couple of large fans at low speeds on top.
Ideas and criticism are welcome.