Making a Wi-Fi Antenna
A few months ago, I and my colleagues at work faced the challenge of connecting an access point from a remote home and a wheelbarrow at work with a net, so that it worked well and the packages were not lost. Following the old adage, “Copper!”, It was decided to connect by air. For that reason, a pretty cheap WiFi card was purchased quite well. But bad luck, the house is not close to the end, although not a kilometer, but still not nearby, but in direct visibility, somewhere around 150 meters. Of course there was a connection, but still the percentage was small. We climbed into the Internet on the site of a local store, looked at the prices of antennas ... a toad came here :) With the words, “Oh, figs, I can do it myself” I laid the foundation for a pre-long, but entertaining and fascinating work :)
An Internet was flashed on the subject of antenna circuits, on the move, the basics of physics, wavelength, polarization, etc. were studied and recalled. A pair of antennas was made from improvised materials, which turned out to be baboons from under the blanks. But over time, they ceased to satisfy us, so I will not delve into the manufacture of these antennas.
It was decided to engage in an adult way and make a wave channel, or rather two at once, so that it would beat on both sides.
We found a scheme, thought about the material, and did not find anything better than how to use polymer pipes :) Here is a short photo report with comments.
1) A 16-element wave channel circuit was found.

2) I bought a pipe, cut it

3) I cut the elements. It was important to do exactly the same with the scheme, because we would not measure the wavelength on our own.
I dragged the ram from the house, cut the elements, then stubbornly grind the extra millimeters and tenths of them

4) Measured and made holes in the pipes
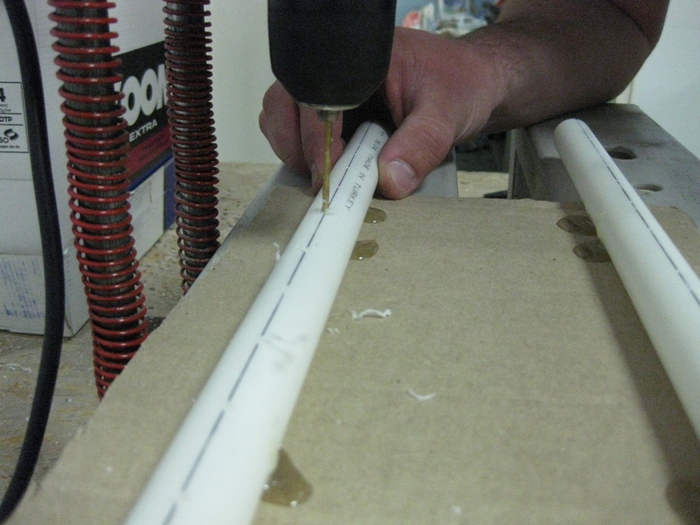
Then carefully and not effortlessly stuck each element into the holes, aligned
Then a 50 Ohm coaxial cable and connectors were purchased the most expensive of all the crafts). Then everything was compressed and the antenna was ready :)

(after the photo was taken, the cable was cut in half in order to avoid losses)
By the way, yes! Two wave channels were made in one working day, and it was Radio Day!
ps percent doubled, we don’t lose packets, we have stable communication ...
before the antenna was ready, the speed was 24 mbps, after 48 mbps
UPD: scheme of the wave channel with dimensions

A good site with all sorts of different types of
UPD2 antennas : the
materials that were involved:
- polypropylene pipe
- copper wire
- 50 ohm coaxial cable
- SMA connectors
An Internet was flashed on the subject of antenna circuits, on the move, the basics of physics, wavelength, polarization, etc. were studied and recalled. A pair of antennas was made from improvised materials, which turned out to be baboons from under the blanks. But over time, they ceased to satisfy us, so I will not delve into the manufacture of these antennas.
It was decided to engage in an adult way and make a wave channel, or rather two at once, so that it would beat on both sides.
We found a scheme, thought about the material, and did not find anything better than how to use polymer pipes :) Here is a short photo report with comments.
1) A 16-element wave channel circuit was found.
2) I bought a pipe, cut it
3) I cut the elements. It was important to do exactly the same with the scheme, because we would not measure the wavelength on our own.
I dragged the ram from the house, cut the elements, then stubbornly grind the extra millimeters and tenths of them
4) Measured and made holes in the pipes
Then carefully and not effortlessly stuck each element into the holes, aligned
Then a 50 Ohm coaxial cable and connectors were purchased the most expensive of all the crafts). Then everything was compressed and the antenna was ready :)
(after the photo was taken, the cable was cut in half in order to avoid losses)
By the way, yes! Two wave channels were made in one working day, and it was Radio Day!
ps percent doubled, we don’t lose packets, we have stable communication ...
before the antenna was ready, the speed was 24 mbps, after 48 mbps
UPD: scheme of the wave channel with dimensions

A good site with all sorts of different types of
UPD2 antennas : the
materials that were involved:
- polypropylene pipe
- copper wire
- 50 ohm coaxial cable
- SMA connectors