How to disassemble the Dell Inspiron 1525 and not break anything;)
The end is already contained in the beginning. George Orwell, 1948
This is not an ordinary review of a laptop, but rather an overview of some technical features and, most importantly, some kind of instruction for a complete painless disassembly / assembly.
During the review we will try to consider its advantages and disadvantages.
The experimental Dell Inspiron 1525 laptop

(carefully, more than 30 photos)
Since there will be many instruction photos, we will immediately explain some notation on them:
- the red triangle - the place where you need to unscrew the screw;
- a red circle and a square - the same thing, but for another detail in the same photo (to make it easier to distinguish);
- the red arrow indicates the direction in which some movement is necessary;
- red oval - a place to pay attention to.
First you need to turn off the laptop and disconnect it from the mains. Then turn it over and remove the battery.
We take out the hard drive (2 screws, red circle), the laser drive (1 screw, red square) and unscrew the bottom cover (red triangles). It is worth paying attention that the screws on the cover are not completely unscrewed, they remain fixed on the cover, which is undoubtedly convenient.

We remove the bottom cover by slightly prying it in a special recess on the right, in addition to its screws, several more latches hold it. We see the inside of a laptop.
Unscrew the 2 screws under the battery to get further to the screws holding the keyboard.

We turn over our laptop and gently pry up the panel located above the keyboard. Dell laptops are characterized by such a panel, sometimes it is not even fixed to the screws and can be easily removed in order to get to the keyboard screws.

!!! Attention: this operation must be performed without jerking and as carefully as possible, as the panel is connected to the motherboard by a cable that can be damaged.

After raising the bar above the keyboard, 2 screws will be available that secure the keyboard itself. We unscrew them, after which we raise the keyboard by the upper edge by moving degrees 25 ° towards ourselves and moving it up we take it out of the case.

!!! Attention: the keyboard is also connected to the motherboard by a loop.
Top panel and keyboard loop connectors are now available.
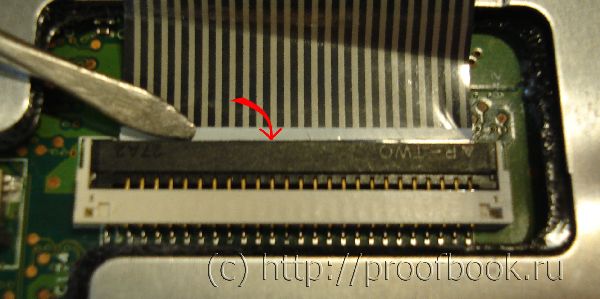
The cable for the top panel is mounted in a special connector. To remove it, it is necessary to move the mount brown (preferably simultaneously on both sides). Most of the cables in laptops are attached in this way.

The keyboard cable is mounted in a similar connector, but it is removed a little differently: you need to slightly pry the brown pressure plate, turn around, it will release the cable.

Now you need to release the cover with the screen from all the wires of the antennas and loops.
The cable for transferring the image to the screen is located under the keyboard (already removed), on the left. It is enough to pull slightly on the special “tail” (in our case, blue) and disconnect it from the laptop motherboard.

Now you need to disconnect the wires leading to the antennas of the wireless devices. Turn the laptop upside down again and disconnect the antenna connectors from the devices. In our case, there was only a wi-fi adapter. In other slots, you can put a couple more different devices, for example, a WiMax module, a 3G modem, a couple of gigabytes Turbo Memory ... This greatly expands the possibilities for further upgrading the laptop.
It is worth noting that, regardless of the configuration, antennas for all 3 pci-e slots are routed.

Carefully remove the wires from the grooves (they are fixed with special protrusions).


After all the wires and the cable have been disconnected, we proceed to disconnect the laptop screen from the main body.
At the bottom of the case, unscrew one screw on each side, the mounting brackets of the screen (marked with the letter D on the case)

To the right and left of the keyboard, unscrew the 4 screws with a large cap (2 on each side) and the fifth one for the future (brackets cover he does not hold, but you still have to twist it).

Safely remove the screen by pulling it up, and set it aside.
In this laptop configuration, there is no bluetooth module, but the prudent manufacturer did not deprive the laptop of the corresponding cable, leaving the possibility of independent improvement (if you buy a bluetooth adapter). It is located under the keyboard. left. We simply remove the wire from behind the “ears” and remove the cable from the connector.

For further analysis, you need to unscrew the 2 screws under the keyboard, disconnect the touchpad cable, the cable of the display unit (indicators on the front panel) and the speaker connector.

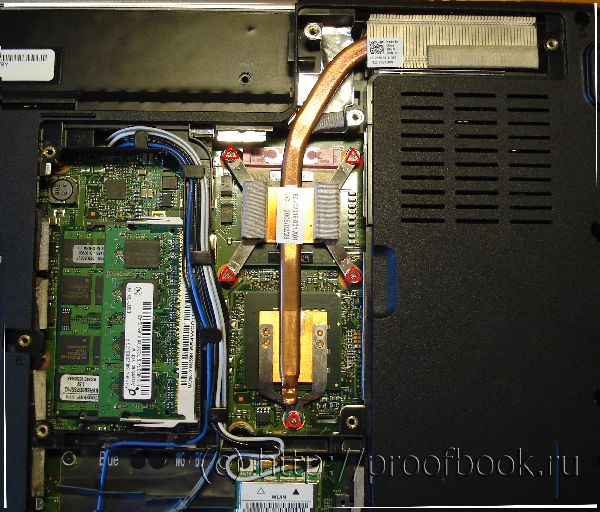
Turn the laptop over. Now you can remove the radiator from the processor.
Unscrew the 5 screws and carefully lift the radiator.

!!! Attention: while unscrewing these screws, do not use large physical force and press on the motherboard. Strong pressing and deflection (deformation) can damage it!
In our configuration, the laptop was equipped with a Celeron processor installed in socket P, which allows you to install the Core 2 Duo processor on the Merom core (Santa Rosa), for example, T7250 2.0 GHz.
Unscrew the remaining screws located below.

After all the screws are unscrewed, you can open the laptop case by simply lifting the upper silver part.
!!! Attention: in the place where the drive was, there are several latches that must be carefully snapped off without breaking.


Next, we remove the bar of the front panel, on which there are openings for headphones, a microphone and a card reader and behind which a microphone and an infrared port (IrDA) are hidden.

Finally, we got to the laptop motherboard, remove it.
First, disconnect the cable connecting the board of the power buttons of the laptop to the motherboard (highlighted in red oval). We will divide further actions into 3 parts (see the designations in the photo)

1. Disconnect the expresscard slot by unscrewing the 4 screws, and the cable of the board for the wireless button. It is worth noting that the switch is not simple, in conjunction with the Wi-Fi Catcher function, it allows you to detect a wireless network signal without turning on the power of the computer.

2. We move to the left side, unscrew one screw and disconnect the cooler connector that cools the processor heatsink.

3. In the upper right corner, unscrew the 2 screws securing the board with two usb connectors and s-video output

Now you can separate the motherboard from the bottom of the case. Carefully remove the board from the case, considering that all the connectors are slightly deepened in the sides of the case. We bring out the motherboard so that these connectors painlessly get out of their grooves.
The cooler remains on the case, remove it by unscrewing 2 screws.

If necessary, remove the speakers and the wireless switch board.

The board with the laptop’s power buttons is glued, or rather, fixed to a double-sided tape.
Here we see the laptop motherboard, if necessary (or if desired), unscrewing 3 more screws, you can disconnect the additional power connector board and the USB port and s-video output board.

We proceed to analyze the laptop screen.
At each of the four corners are rubber plugs covering the screws. Most often they are glued on double-sided tape, but it can also just stay in the recess. Slightly pry them, and the screws that are unscrewed become available.

The following is a somewhat time-consuming procedure for detaching the screen frame. This frame is held on latches located around the perimeter. Sometimes there is, in addition to the latches, double-sided tape. By acute movements, we remove the frame from the latches, prying it from the inside.

!!! Caution: it is necessary to act without pressure on the matrix, so as not to damage it.
It is convenient to use an auxiliary tool for this operation, such as a plastic card.

So, the frame is safely removed, the screws that secure the matrix with side strips on the lid become available. Unscrew one screw on each side, at the bottom (marked with a triangle).

Remove the matrix with the loop. Also on the matrix housing is fixed an inverter board supplying the matrix backlight. A 30pin cable is plugged into the matrix connector and secured with tape.

Under the matrix, on the screen cover you can see 3 antennas for wireless devices installed in pci-e slots.


Also, in the upper corner you can see a magnet. It is necessary for the reaction of the laptop to closing the lid (in the lower part of the case, to the left of the touchpad, there is a corresponding sensor).

That's how we completely disassembled the Dell Inspiron 1525 laptop. In order to assemble it back, it is enough to go through all the steps in the reverse order, no difficulties should arise. The only thing you need to do is not to confuse the screws, for this you can pre-remember which one they unscrewed from where, or put them in separate heaps.
Let's try to summarize.
Advantages:
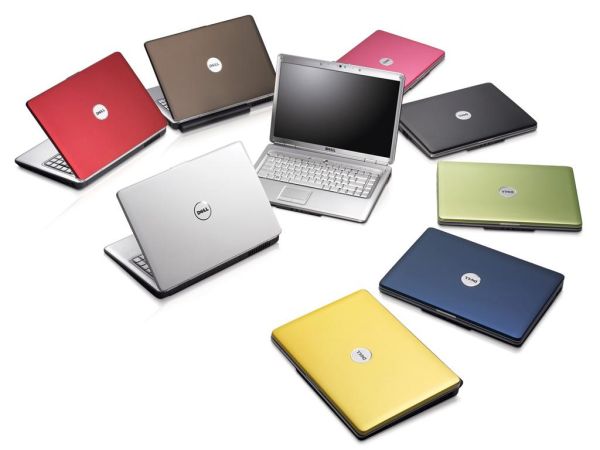
- a large selection of color schemes;
- a wide selection of configurations;
- the possibility of modernization thanks to 3m pci-e slots, a slot for a SIM card and a place for bluetooth;
- The Wi-Fi Catcher function allows you to detect a wireless network signal without turning on the computer power;
- A wide range of ports (hdmi, s-video, IrDA, ExpressCard, etc.)
Advantages:
- "amateur" design;
- short battery life;
...
In fact, the advantages and disadvantages are purely subjective, and it is not worth discussing it.
