A 3D printed egg carrier for only $ 15. Recipe
Hello!

Easter ends and the theme of printing various patterns on the eggs becomes a little less relevant, but this does not make the eggboot less important, necessary for everyone and always year round :)
For those who are not aware of eggboat, this is a machine that can draw on any spherical marker objects: eggs, tennis balls, Christmas decorations. The concept of the mechanism was invented by the designer Bruce Shapiro in the distant 1990 year, and not long ago the famous company Evil Mad Scientist Laboratories released for sale a version called The EggBot. We must pay tribute to Evil Mad Scientist Laboratories made its project open and allows the use of software for other eggbots, even in commercial projects.
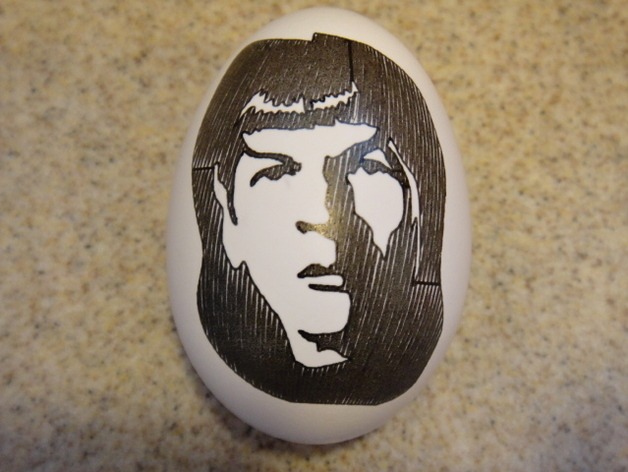
These are the works of art obtained at the exit:
Simple pictures can be drawn in any vector editor, and complex geometric objects can be created, for example, on python.
But the resulting image is already on the egg:

Enthusiasts create even pictures with a stroboscopic effect during rotation:
When creating my eggboat, I didn’t set myself a goal of meeting $ 15, but that’s what happened :). For comparison, the original Eggbot Pro costs $ 325, which is an order of magnitude more expensive. The main cost of any eggboat - stepper motors. I used the most affordable - 28BYJ-48-12V, hence the final price tag of 15 bucks.
So for the preparation of my egg work, you will need:
1. 110 grams of ABS or PLA plastic. I printed the black parts with ABS, the yellow PLA. Painfully PLA is beautiful when printing on glass :)
2. Electronics in stock:
3. What we can not print, but we can buy in almost any hardware store:
We put the plastic in the 3D printer and print the parts, the models of which I carefully put here .
Details about what and how much to print, where exactly to get the electronics, how much and what kind of bolts you need to look here .
Those who have not yet purchased a 3D printer, but really want to cook their egg work, I can print all the details and send by mail. Contact in a personal, everything will be at its best! I guarantee it!
After printing, you can proceed to assembly. Assembling the device looks like this:

In order for you to succeed, I spent a lot of time and prepared instructions for assembling and connecting electronics in pictures. Download instructions here .
After printing and assembly, you should have such a device:

After the end of the assembly, you need to put the firmware in the eggboat. Since the device’s brain is the usual Arduino, you should have no problems with it.
Inkscape with a plugin written by Evil Mad Scientist Laboratories is used as a control program. The plugin allows you to customize the eggboot, manage it manually and send pictures to print. I carefully added the plugin to Inkscape and placed the finished archive here .
If you already have Inkscape, but there is no plug-in, then you can take it separately here .
Download, install and run Inkscape. Go to the menu with plugins, look for the EggBot submenu there. Open the plug-in, adjust the height of the raising of the marker and print on the egg anything.
If you have Inkscape when trying to control a bot, it gives an error “Failed to connect to EggBot”, then do not despair. The problem can be easily solved. Look in the list of connected equipment, then what is the name of your board. Then in the ebb_serial.py file of the plug-in for Inkscape, replace in line 52 the text “USB-SERIAL CH340” with your name.
I also collected and laid out a small collection with examples. You can see it here .
As a result, the eggboot should work like this:
I posted my project on githab . Fork, put asterisks, modify and so on. I did n't forget about thingiverse.com either .
Thanks for attention!
Easter ends and the theme of printing various patterns on the eggs becomes a little less relevant, but this does not make the eggboot less important, necessary for everyone and always year round :)
For those who are not aware of eggboat, this is a machine that can draw on any spherical marker objects: eggs, tennis balls, Christmas decorations. The concept of the mechanism was invented by the designer Bruce Shapiro in the distant 1990 year, and not long ago the famous company Evil Mad Scientist Laboratories released for sale a version called The EggBot. We must pay tribute to Evil Mad Scientist Laboratories made its project open and allows the use of software for other eggbots, even in commercial projects.
These are the works of art obtained at the exit:
Simple pictures can be drawn in any vector editor, and complex geometric objects can be created, for example, on python.
Here is an example of such a program:
# Generate a 3200 x 800 geometrical pattern for Eggbot plotting# See http://www.egg-bot.com/ for info on the Eggbot## Dan Newman, 2 January 2011# dan dot newman at mtbaldy dot us# Public domain (http://creativecommons.org/licenses/publicdomain/)
HEIGHT = float( 800.0 )
WIDTH = float( 3200.0 )
scale = WIDTH / ( 16.0 * 3 )  # 16 horizontal repeats
epsilon = float(1.0e-5)
# Relative moves for drawing the vertical elements
DOWN  = [[0.0, scale], [scale, 2*scale], [0.0, scale], [-scale, 2*scale]]
UP    = [[0.0, -scale], [scale, -2*scale], [0.0, -scale], [-scale, -2*scale]]
# How to switch to going up when you stop going down after DOWN[i]
DU_switch = [scale, -scale, -scale, scale]
# Relative moves for drawing the horizontal elements (L2R = left-to-right)
L2R = [[scale, 0.0], [2*scale, scale], [scale, 0.0], [2*scale, -scale]]
R2L = [[-scale, 0.0], [-2*scale, scale], [-scale, 0.0], [-2*scale, -scale]]
# How to switch to R2L after stopping in L2R at index i
LR_switch = [scale, -scale, -scale, scale]
# Compute the intersection of two lines# See eggbot_hatch.py for complete detailsdefintersect( P1, P2, P3, P4 ):'''
	Determine if two line segments defined by the four points P1 & P2 and
	P3 & P4 intersect.  If they do intersect, then return the fractional
	point of intersection "sa" along the first line at which the
	intersection occurs.
	'''# Precompute these values -- note that we're basically shifting from##		P = P1 + s (P2 - P1)## to## 		P = P1 + s D## where D is a direction vector.  The solution remains the same of# course.  We'll just be computing D once for each line rather than# computing it a couple of times.
	D21x = P2[0] - P1[0]
	D21y = P2[1] - P1[1]
	D43x = P4[0] - P3[0]
	D43y = P4[1] - P3[1]
	# Denominator
	d = D21x * D43y - D21y * D43x
	# Return now if the denominator is zeroif d == 0:
		return float( -1 )
	# For our purposes, the first line segment given# by P1 & P2 is the LONG hatch line running through# the entire drawing.  And, P3 & P4 describe the# usually much shorter line segment from a polygon.# As such, we compute sb first as it's more likely# to indicate "no intersection".  That is, sa is# more likely to indicate an intersection with a# much a long line containing P3 & P4.
	nb = ( P1[1] - P3[1] ) * D21x - ( P1[0] - P3[0] ) * D21y
	# Could first check if abs(nb) > abs(d) or if# the signs differ.
	sb = float( nb ) / float( d )
	if ( sb < 0 ) or ( sb > 1 ):
		return float( -1 )
	na = ( P1[1] - P3[1] ) * D43x -  ( P1[0] - P3[0] ) * D43y
	sa = float( na ) / float( d )
	if ( sa < 0 ) or ( sa > 1 ):
		return float( -1 )
	return sa
# Determine whether a line segment needs to be clipped to# fit within the drawing pagedefclip( x1, y1, x2, y2 ):if ( x1 >= 0.0 ) and ( x1 <= WIDTH ) and ( x2 >= 0.0 ) and ( x2 <= WIDTH ) and \
			( y1 >= 0.0 ) and ( y1 <= HEIGHT ) and ( y2 >= 0.0 ) and ( y2 <= HEIGHT ):
		return float( -1.0 )
	if ( x1 < 0.0 ) or ( x2 < 0.0 ):
		s = intersect( [x1, y1], [x2, y2], [0.0, 0.0], [0.0, HEIGHT] )
		if ( s > 0.0 ):
			return s
	if ( x1 > WIDTH ) or ( x2 > WIDTH ):
		# We allow going an extra pixel across in case there is drawing error
		s = intersect( [x1, y1], [x2, y2], [WIDTH+1.0, 0.0], [WIDTH+1.0, HEIGHT] )
		if ( s > 0.0 ):
			return s
	if ( y1 < 0.0 ) or ( y2 < 0.0 ):
		s = intersect( [x1, y1], [x2, y2], [0.0, 0.0], [WIDTH, 0.0] )
		if ( s > 0.0 ):
			return s
	if ( y1 > HEIGHT ) or ( y2 > HEIGHT ):
		s = intersect( [x1, y1], [x2, y2], [0.0, HEIGHT], [WIDTH, HEIGHT] )
		if ( s > 0.0 ):
			return s
	return float( -1.0 )
# Plot a collection of line segmentsdefplot( points, color='black' ):# First line segment
	s = clip( points[0][0], points[0][1], points[1][0], points[1][1] )
	if ( s < 0.0 ):
		p = 'M %f,%f' % ( points[0][0], points[0][1] )
	else:
		p = 'M %f,%f' % ( points[0][0] + s * ( points[1][0] - points[0][0] ),
						  points[0][1] + s * ( points[1][1] - points[0][1] ) )
	x0 = points[1][0]
	y0 = points[1][1]
	p += ' L %f,%f' % ( x0, y0 )
	# Intermediate line segmentsfor i in range(2, len( points ) - 1):
		x0 = points[i][0]
		y0 = points[i][1]
		p += ' L %f,%f' % ( x0, y0 )
	# Final line segment
	x = points[-1][0]
	y = points[-1][1]
	s = clip( x0, y0, x, y )
	if ( s < 0.0 ):
		p += ' L %f,%f' % ( x, y )
	else:
		p += ' L %f,%f' % ( x0 + s * ( x - x0 ), y0 + s * ( y - y0 ) )
	print'<path stroke="%s" stroke-width="1" fill="none" d="%s"/>' % ( color, p )
# Draw the vertical elementsdefvertical( x, y, color, down, up ):if ( y > ( scale + epsilon ) ):
		i = len( down ) - 1while ( y > ( scale + epsilon) ):
			x -= down[i][0]
			y -= down[i][1]
			i -= 1if ( i < 0 ):
				i = len( down ) - 1else:
		i = -1
	points = [[x, y]]
	while ( y < ( HEIGHT - epsilon ) ):
		i += 1if ( i >= len( down ) ):
			i = 0
		x += down[i][0]
		y += down[i][1]
		points.append( [x, y] )
	plot( points, color )
	x += DU_switch[i]
	points = [[x, y]]
	while ( y > epsilon ):
		x += up[i][0]
		y += up[i][1]
		points.append( [x, y] )
		i -= 1if ( i < 0 ):
			i = len( up ) - 1
	plot( points, color )
# Draw the horizontal elementsdefhorizontal( x, y, color, l2r, r2l ):if ( x > ( scale + epsilon ) ):
		i = len( l2r ) - 1while ( x > ( scale + epsilon ) ):
			x -= l2r[i][0]
			y -= l2r[i][1]
			i -= 1if ( i < 0 ):
				i = len( l2r ) - 1else:
		i = -1
	points = [[x, y]]
	while ( x < ( WIDTH - epsilon ) ):
		i += 1if ( i >= len( l2r ) ):
			i = 0
		x += l2r[i][0]
		y += l2r[i][1]
		points.append( [x, y] )
	plot( points, color )
	y += LR_switch[i]
	points = [[x, y]]
	while ( x > epsilon ):
		x += r2l[i][0]
		y += r2l[i][1]
		points.append( [x, y] )
		i -= 1if ( i < 0 ):
			i = len( r2l ) - 1
	plot( points, color )
print'<svg xmlns:inkscape="http://www.inkscape.org/namespaces/inkscape" width="%d" height="%d">' % ( int( WIDTH ), int( HEIGHT ) )
print'<g inkscape:groupmode="layer" inkscape:label="1 - vertical">'
Color = 'green'
x1 = 0.0
y1 = 0.0
x2 = 1.5 * scale
y2 = 1.5 * scale
while ( x1 < ( WIDTH - epsilon ) ):
	vertical( x1, y1, 'green', DOWN, UP )
	if ( x2 < ( WIDTH - epsilon ) ):
		vertical( x2, y2, 'green', DOWN, UP )
	x1 += 3 * scale
	x2 += 3 * scale
print'</g>'print'<g inkscape:groupmode="layer" inkscape:label="2 - horizontal">'
x1 = 0.0
y1 = 0.0
x2 = 1.5 * scale
y2 = 1.5 * scale
while ( y1 < ( HEIGHT - epsilon ) ):
	horizontal( x1, y1, 'blue', L2R, R2L)
	if ( y2 < ( HEIGHT - epsilon ) ):
		horizontal( x2, y2, 'blue', L2R, R2L)
	y1 += 3 * scale
	y2 += 3 * scale
print'</g>'print'<g inkscape:groupmode="layer" inkscape:label="3 - border">'print'<path stroke="black" stroke-width="1" fill="none" d="M 0,0 l %d,0"/>' % ( int( WIDTH ) )
print'<path stroke="black" stroke-width="1" fill="none" d="M 0,%d l %d,0"/>' % ( int( HEIGHT ), int( WIDTH ) )
print'</g>'print'</svg>'
But the resulting image is already on the egg:
Enthusiasts create even pictures with a stroboscopic effect during rotation:
When creating my eggboat, I didn’t set myself a goal of meeting $ 15, but that’s what happened :). For comparison, the original Eggbot Pro costs $ 325, which is an order of magnitude more expensive. The main cost of any eggboat - stepper motors. I used the most affordable - 28BYJ-48-12V, hence the final price tag of 15 bucks.
So for the preparation of my egg work, you will need:
1. 110 grams of ABS or PLA plastic. I printed the black parts with ABS, the yellow PLA. Painfully PLA is beautiful when printing on glass :)
2. Electronics in stock:
- 1 x Chinese Arduino UNO c Aliexpress with a cable for a computer for 250 rub.
- 2 x 28BYJ-48-12V Stepper Motor + ULN2003 Stepper Motor Driver for 100 rub.
- 1 x SG90 Micro servo motor 100 rub.
- 1 x 12V Power supply (you can not buy if there is).
3. What we can not print, but we can buy in almost any hardware store:
- spring.
- bolts, screws, nuts, washers.
- rubber gasket (can be printed if you have flex).
- bearing 608.
We put the plastic in the 3D printer and print the parts, the models of which I carefully put here .
Details about what and how much to print, where exactly to get the electronics, how much and what kind of bolts you need to look here .
Those who have not yet purchased a 3D printer, but really want to cook their egg work, I can print all the details and send by mail. Contact in a personal, everything will be at its best! I guarantee it!
After printing, you can proceed to assembly. Assembling the device looks like this:
In order for you to succeed, I spent a lot of time and prepared instructions for assembling and connecting electronics in pictures. Download instructions here .
After printing and assembly, you should have such a device:
After the end of the assembly, you need to put the firmware in the eggboat. Since the device’s brain is the usual Arduino, you should have no problems with it.
- Download and unpack the firmware from here .
- We load Arduino IDE , we install and we start.
- We connect the eggboot to the computer, select the board model and COM port in the Arduino IDE.
- Open the file Eggduino.ino from the folder with the firmware and load it into the Arduino.
Inkscape with a plugin written by Evil Mad Scientist Laboratories is used as a control program. The plugin allows you to customize the eggboot, manage it manually and send pictures to print. I carefully added the plugin to Inkscape and placed the finished archive here .
If you already have Inkscape, but there is no plug-in, then you can take it separately here .
Download, install and run Inkscape. Go to the menu with plugins, look for the EggBot submenu there. Open the plug-in, adjust the height of the raising of the marker and print on the egg anything.
If you have Inkscape when trying to control a bot, it gives an error “Failed to connect to EggBot”, then do not despair. The problem can be easily solved. Look in the list of connected equipment, then what is the name of your board. Then in the ebb_serial.py file of the plug-in for Inkscape, replace in line 52 the text “USB-SERIAL CH340” with your name.
I also collected and laid out a small collection with examples. You can see it here .
As a result, the eggboot should work like this:
I posted my project on githab . Fork, put asterisks, modify and so on. I did n't forget about thingiverse.com either .
Thanks for attention!