Testing of LoRa / LoRaWAN RN2483 radio modems. Part 2, LoRaWAN
- Tutorial
The previous part explained how to connect RN2483 modems in LoRa mode. We now turn to the next, more difficult part - connecting to the LoRaWAN network.

LoRaWAN is a conditionally global network consisting of end nodes (nodes) sending data to a hub (gateway). Each hub has access to the Internet, and sends the received data to the server, which in turn sends them to the subscribed clients. Network on the one hand, “global”, because data can be received by any nearby gateway, on the other hand, it is “conditionally global” because without Internet / Intranet, it will not work anyway (although no one bothers to have its own gateway and server within the organization).
The RN2483 modem will be used as a “node”, a free service will be used to connect . Continued under the cut.
The www.thethingsnetwork.org service is an open community whose users can create, register devices and hubs, experiment with how it all works, etc. As they say, free and without SMS. We will use them for testing.
Anyone can register both node and gateway on the network. The Things Network is completely free; many enthusiasts buy equipment at their own expense.
The coverage map at the time of this writing is as follows:
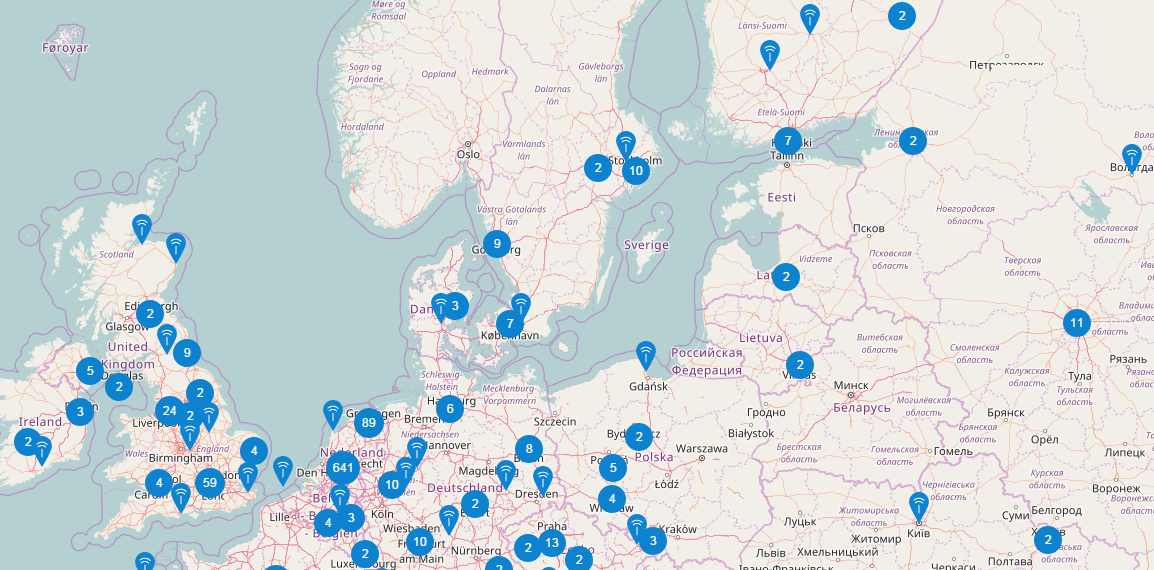
As you can see, the Russian segment of coverage leaves much to be desired, but it still exists. There is a positive side to this - in London or Amsterdam a new hub will surprise no one, and in Russia there is a chance to be the first.
Unlike simple p2p connections, LoRaWAN is much more complicated - devices are registered on the network, traffic is encrypted with various keys, and so on. Because the network is public and public, data protection issues are very relevant here.
There are 2 types of authentication in the LoRaWAN network:
- Over-the-Air Activation ( OTAA) authentication . Devices register with the network and get the key needed for operation.
- Activation of ABP (Activation by Personalization). Settings are pre-registered in the device, additional authentication is not required. This mode is simpler, but there is a minus - the data is simply sent on the air, there is no guarantee that they were received by the hub.
Important: Many cheap single-channel hubs only support ABP mode, so the first method may not work.
The first thing you need to do is go to staging.thethingsnetwork.org and register an “application”. I called it Raspberry Pi Home. When registering the application, the user receives the first key, which is useful later.

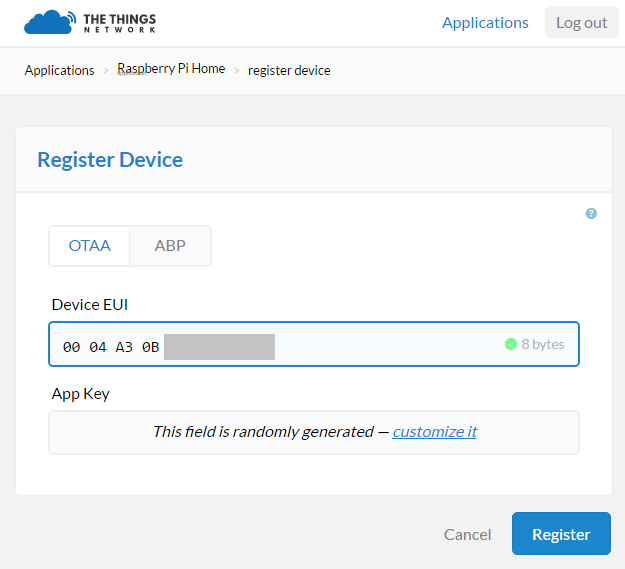
Next we see the Devices tab, where you can add our modem (there may be several). Click "register device" and select the OTAA mode. A window appears in which you need to enter the device ID.
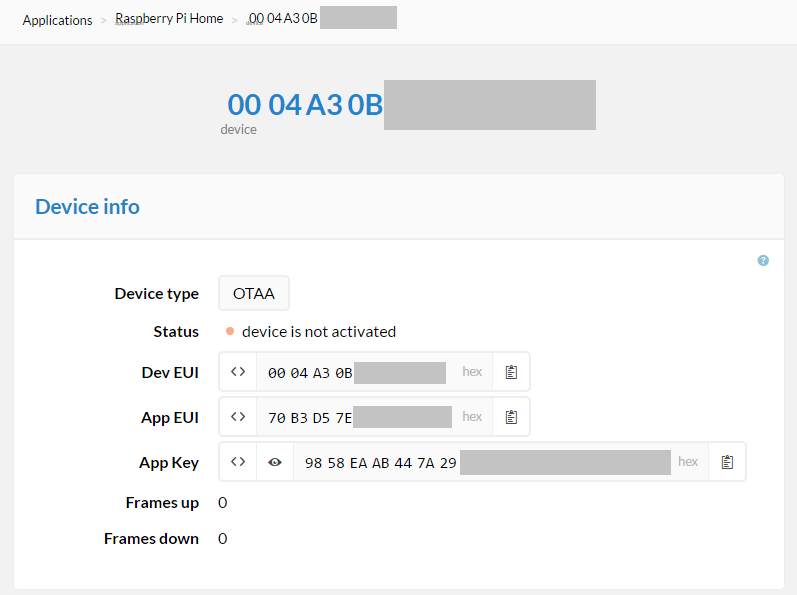
This identifier can be obtained by sending the sys get hweui command to the modem. At this registration is completed, as promised, free of charge and without SMS.
Having opened the device parameters, you can see all the keys, you need to register them in the program.
To simplify the code, I used the python-loranode library , the source code for sending data is shown below. As you can see, the code has 3 lines appkey, appeui and deveui, which are used for authentication.
In this example, packets containing the current time (hhmm) are sent to the server. This is convenient for controlling which packet was received.
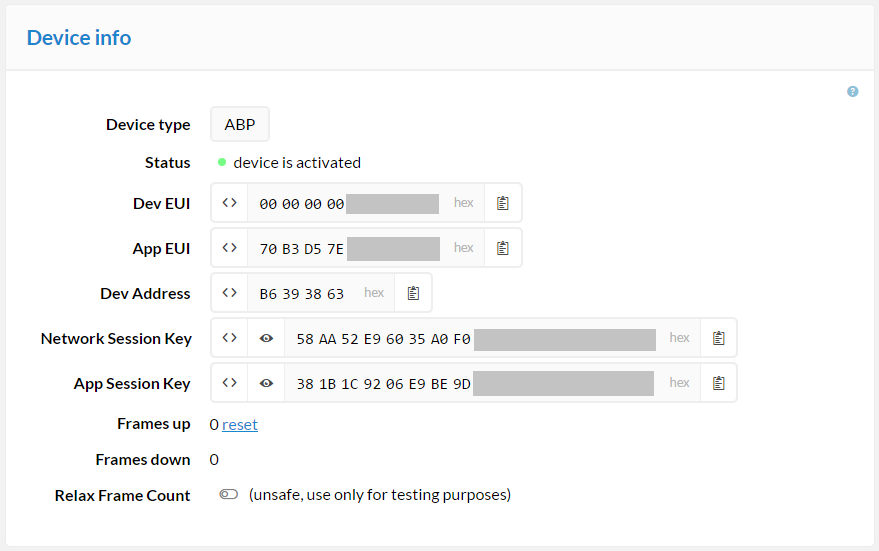
Everything is easier here - we register the device as ABP, and we get several keys that need to be registered in the program.
The modem sends the data "as is", there is no guarantee that the authentication was successful.
To send data, you need to insert in the code keys nwkskey, appskey, devaddr. The source code is below.
The last step, one thing remains - take a laptop (or Arduino or Raspberry Pi) with a modem with you and go (go, fly) to the place where the coverage area of the nearest gateway is located. I get to the nearest coverage area about half an hour by tram, so the process is not so long and expensive.
In case of successful data reception, the packets will be displayed on the server.

The server itself does not do anything with the data; you can configure your own code on the server to process the received data. This example is only a test, nothing is done with the data, in a real application they can be added to the database, send notifications, etc., it all depends on the task.
Ideally, the LoRaWAN network provides the user with a ready-to-use data transfer service that works out of the box. All you need is to connect the device, and the data will be sent and processed by the nearest hub (of course, if the user is within the network coverage area). Applications are quite extensive, from sensors opening the door, temperature or water level in the country, to the gps-beacon on an animal or model aircraft.
Several videos (in English).
LoRa Alliance Introduction:
The Things Network Introduction:
However, if we talk about The Things Network, then this is an "amateur" service, which of course does not guarantee a permanent connection. Whether there are commercial providers LoRaWAN, I still do not know.
A quite reasonable question may arise - what to do if the nearest gateway is a couple of days by train or a couple of hours by plane? This is a plus - you can be the first. You can create your own gateway and register it on The Things Network server, the issue price varies depending on the functionality - from> 1000EUR for “branded” multi-channel hubs, up to $ 15 for home-made devices based on SX1276 and Raspberry Pi. There is a comparative table of different routers, anyone can learn it in more detail.
The last option will be discussed in the next section.
What is LoRaWAN?
LoRaWAN is a conditionally global network consisting of end nodes (nodes) sending data to a hub (gateway). Each hub has access to the Internet, and sends the received data to the server, which in turn sends them to the subscribed clients. Network on the one hand, “global”, because data can be received by any nearby gateway, on the other hand, it is “conditionally global” because without Internet / Intranet, it will not work anyway (although no one bothers to have its own gateway and server within the organization).
The RN2483 modem will be used as a “node”, a free service will be used to connect . Continued under the cut.
The Things Network
The www.thethingsnetwork.org service is an open community whose users can create, register devices and hubs, experiment with how it all works, etc. As they say, free and without SMS. We will use them for testing.
Anyone can register both node and gateway on the network. The Things Network is completely free; many enthusiasts buy equipment at their own expense.
The coverage map at the time of this writing is as follows:
As you can see, the Russian segment of coverage leaves much to be desired, but it still exists. There is a positive side to this - in London or Amsterdam a new hub will surprise no one, and in Russia there is a chance to be the first.
Connection RN2483 to LoRaWAN
Unlike simple p2p connections, LoRaWAN is much more complicated - devices are registered on the network, traffic is encrypted with various keys, and so on. Because the network is public and public, data protection issues are very relevant here.
There are 2 types of authentication in the LoRaWAN network:
- Over-the-Air Activation ( OTAA) authentication . Devices register with the network and get the key needed for operation.
- Activation of ABP (Activation by Personalization). Settings are pre-registered in the device, additional authentication is not required. This mode is simpler, but there is a minus - the data is simply sent on the air, there is no guarantee that they were received by the hub.
Important: Many cheap single-channel hubs only support ABP mode, so the first method may not work.
1. Device Registration - OTAA
The first thing you need to do is go to staging.thethingsnetwork.org and register an “application”. I called it Raspberry Pi Home. When registering the application, the user receives the first key, which is useful later.
Next we see the Devices tab, where you can add our modem (there may be several). Click "register device" and select the OTAA mode. A window appears in which you need to enter the device ID.
This identifier can be obtained by sending the sys get hweui command to the modem. At this registration is completed, as promised, free of charge and without SMS.
Having opened the device parameters, you can see all the keys, you need to register them in the program.
To simplify the code, I used the python-loranode library , the source code for sending data is shown below. As you can see, the code has 3 lines appkey, appeui and deveui, which are used for authentication.
Source
from loranode import RN2483Controller
from commands import *
import time
# LoRaController OTAA based join and message testif __name__ == "__main__":
    set_debug_level(Level.DEBUG)
    port = "COM3"
    appkey = "58FF3007CAED02xxxxxxxxxxxxxxxxxxxx"
    appeui = "70B3D57Exxxxxxxxxxxxxx"
    deveui = "0004A30xxxxxxxxxxx"# Test controller
    lc = RN2483Controller(port)
    if lc.test():
        printd("[+] Connected to LoRa RN2483 device", Level.INFO)
        lc.serial_sr(CMD_GET_VERSION)
        lc.serial_sr(CMD_GET_HWEUI)
        lc.get_freq()
    else:
        printd(clr(Color.YELLOW, "[-] Failed to get version from LoRa device"), Level.WARNING)
    lc.set_pwr(15)
    lc.set_adr(False)
    lc.serial_sr(CMD_SET_SF, "sf7") # sf12, sf7# Join and send a messageif lc.join_otaa(appkey, appeui, deveui):
        printd("[+] Connected to gateway", Level.INFO)
        # Data-1
        printd("[+] Sending packet #1", Level.INFO)
        timeStr = time.strftime("%H%M", time.gmtime())
        if lc.send(timeStr, ack=False):
            printd(clr(Color.GREEN, "[+] Send-1 succeeded"), Level.CRITICAL)
        else:
            printd(clr(Color.RED, "[+] Send-1 failed"), Level.CRITICAL)
        time.sleep(15)
        # Data-2
        printd("[+] Sending packet #2", Level.INFO)
        timeStr = time.strftime("%H%M", time.gmtime())
        if lc.send(timeStr, ack=False):
          printd(clr(Color.GREEN, "[+] Send-2 succeeded"), Level.CRITICAL)
        else:
          printd(clr(Color.RED, "[+] Send-2 failed"), Level.CRITICAL)
        time.sleep(15)
        del lc
        exit()
    del lc
    printd(clr(Color.RED, "[-] Test failed"), Level.CRITICAL)
In this example, packets containing the current time (hhmm) are sent to the server. This is convenient for controlling which packet was received.
2. Device Registration - ABP
Everything is easier here - we register the device as ABP, and we get several keys that need to be registered in the program.
The modem sends the data "as is", there is no guarantee that the authentication was successful.
To send data, you need to insert in the code keys nwkskey, appskey, devaddr. The source code is below.
Source
from loranode import RN2483Controller
import platform
from commands import *
import time
# LoRaController ABP based join and ACK testif __name__ == "__main__":
    set_debug_level(Level.DEBUG)
    port = "COM3"
    nwkskey = "58AA52E96035Axxxxxxxxxxxxxxxxxxxx"
    appskey = "381B1C9206E9BE9xxxxxxxxxxxxxxxxxxx"
    devaddr = "B639xxxx"
    lc = Nonetry:
      # Test controller
      lc = RN2483Controller(port)
      if lc.test():
        printd("[+] Connected to LoRa RN2483 device", Level.INFO)
        lc.serial_sr(CMD_GET_VERSION)
        lc.serial_sr(CMD_GET_HWEUI)
        lc.get_freq()
      else:
        printd(clr(Color.YELLOW, "[-] Failed to get version from LoRa device"), Level.WARNING)
    except Exception, e:
      print"Error: " + str(e)
    if lc isNone:
      printd(Color.YELLOW, "Error: cannot connect to device")
      exit()
    lc.set_adr(False)
    lc.set_pwr(15)
    lc.serial_sr(CMD_MAC_PAUSE)
    lc.serial_sr(CMD_SET_SF, "sf12") # sf12, sf7
    lc.serial_sr(CMD_MAC_RESUME)
    # Join and send a messageif lc.join_abp(nwkskey, appskey, devaddr):
        printd("[+] Connected to gateway", Level.INFO)
        # Data-1
        printd("[+] Sending packet #1", Level.INFO)
        timeStr = time.strftime("%H%M", time.gmtime())
        if lc.send(timeStr, ack=False):
          printd(clr(Color.GREEN, "[+] Send-1 succeeded"), Level.CRITICAL)
        else:
          printd(clr(Color.RED, "[+] Send-1 failed"), Level.CRITICAL)
        time.sleep(15)
        # Data-2
        printd("[+] Sending packet #2", Level.INFO)
        timeStr = time.strftime("%H%M", time.gmtime())
        if lc.send(timeStr, ack=False):
          printd(clr(Color.GREEN, "[+] Send-2 succeeded"), Level.CRITICAL)
        else:
          printd(clr(Color.RED, "[+] Send-2 failed"), Level.CRITICAL)
        time.sleep(15)
        del lc
        exit()
    printd(clr(Color.RED, "[-] Test failed"), Level.CRITICAL)
    del lc
Testing
The last step, one thing remains - take a laptop (or Arduino or Raspberry Pi) with a modem with you and go (go, fly) to the place where the coverage area of the nearest gateway is located. I get to the nearest coverage area about half an hour by tram, so the process is not so long and expensive.
In case of successful data reception, the packets will be displayed on the server.
The server itself does not do anything with the data; you can configure your own code on the server to process the received data. This example is only a test, nothing is done with the data, in a real application they can be added to the database, send notifications, etc., it all depends on the task.
Why is this necessary?
Ideally, the LoRaWAN network provides the user with a ready-to-use data transfer service that works out of the box. All you need is to connect the device, and the data will be sent and processed by the nearest hub (of course, if the user is within the network coverage area). Applications are quite extensive, from sensors opening the door, temperature or water level in the country, to the gps-beacon on an animal or model aircraft.
Several videos (in English).
LoRa Alliance Introduction:
The Things Network Introduction:
However, if we talk about The Things Network, then this is an "amateur" service, which of course does not guarantee a permanent connection. Whether there are commercial providers LoRaWAN, I still do not know.
What to do if there is no coverage?
A quite reasonable question may arise - what to do if the nearest gateway is a couple of days by train or a couple of hours by plane? This is a plus - you can be the first. You can create your own gateway and register it on The Things Network server, the issue price varies depending on the functionality - from> 1000EUR for “branded” multi-channel hubs, up to $ 15 for home-made devices based on SX1276 and Raspberry Pi. There is a comparative table of different routers, anyone can learn it in more detail.
The last option will be discussed in the next section.