Inexpensive designer 3D-printer Aurora. Will there be a revolution?
JGAURORA 3D printers have long been known to printers in the market; this company produces both inexpensive home and office printers and professional printers. Today our younger brother from the JGAURORA family, the model 605S DIY, came to our review as an assembly kit on an acrylic frame. It is from this set of parts that one has to create something that will embody the intangible in tangible.
So meet - set to build a 3D-printer from JGAurora.
The assembly process is described in great detail in the instructions that are recorded on the SD card that comes with the kit. With the card in the set is a card reader, a trifle, but nice. We will not go into the details of the assembly, but in the process we will try to describe those points that are different from other similar sets of
Packaging.

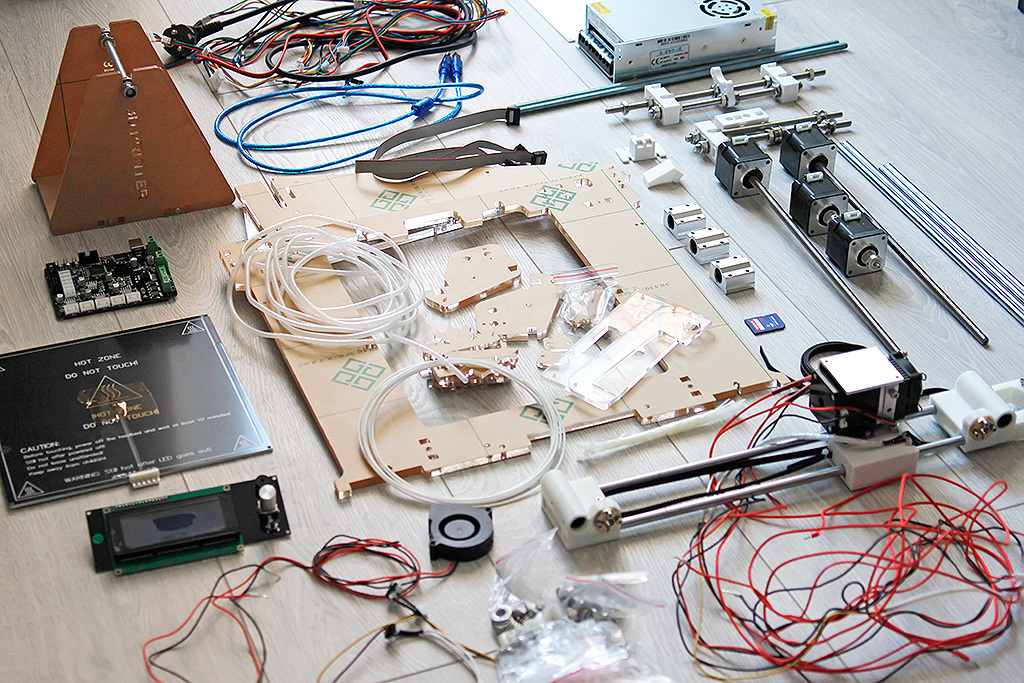
In general, the packaging, created by the well-known scheme of all sets of printers sent from China. The first sets were packed in foam plates, which is why during the opening everything was in foam balls. Yes, and the packaging material itself often cracked during shipment and the contents suffered. Everything is as it should be, all parts are packed in polyurethane foam compartments reliably protecting the components of the future printer.
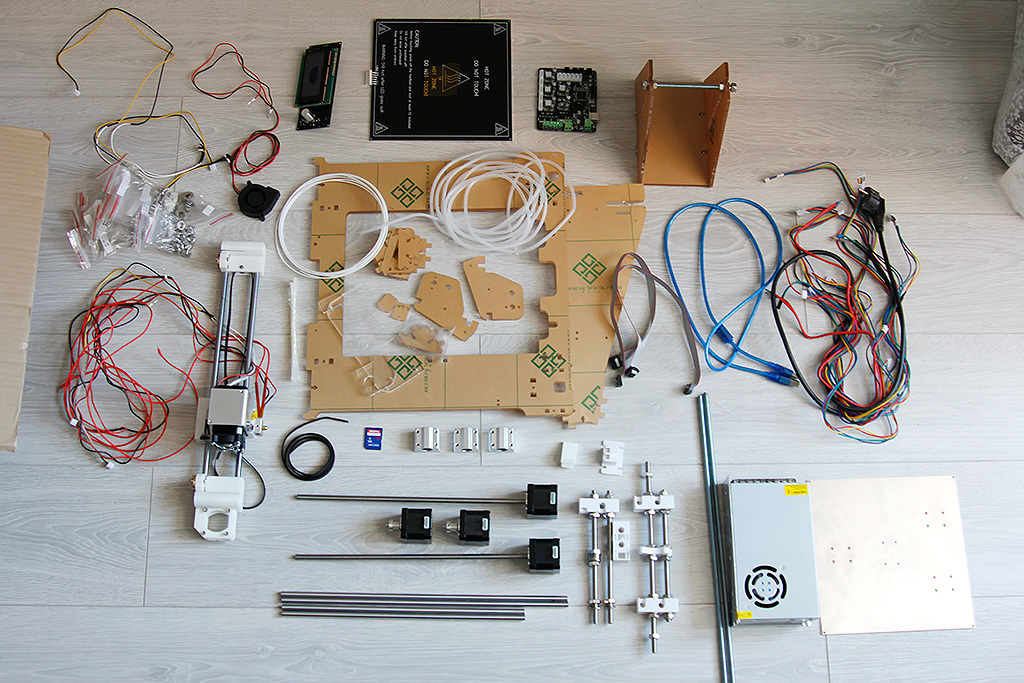
At first glance, a bunch of wires and parts does not resemble the future high-tech tool.

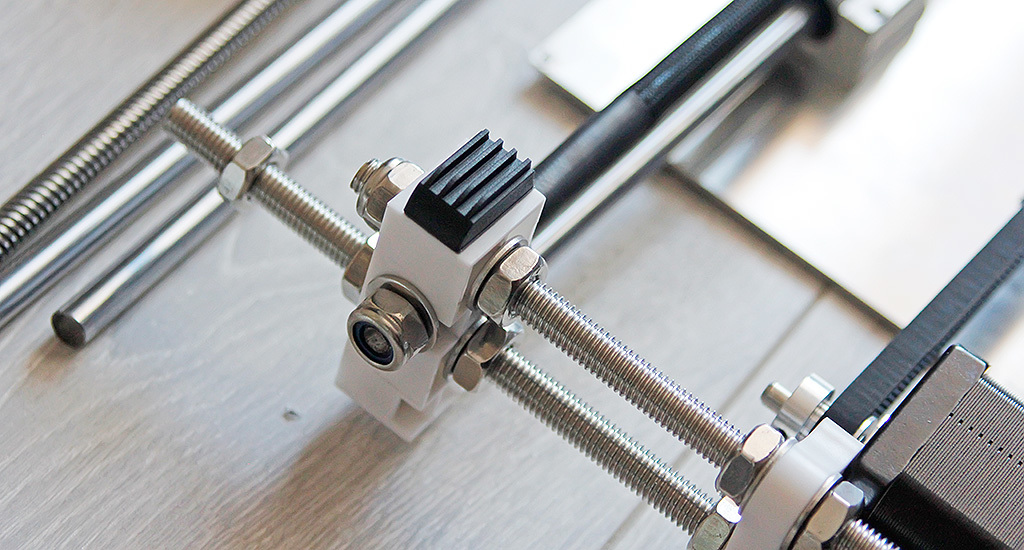
First of all we collect the base of the printer. It is made on the prototype RepRap Prusa i3 of the studs, only the printed nodes here are replaced by production casting, which is good. But the fact that all of the studs is not very successful, you need to put a little more effort to withstand a 90 degree angle between the studs when tightening than on the same acrylic version with two long studs. Another strange moment, the fact that the long studs are galvanized, and short stainless steel. Well, this is already, so aesthetic quibbles. You can see different shades of metal.

Fix it with snake skin.

It turned out even very good. Go to the table.

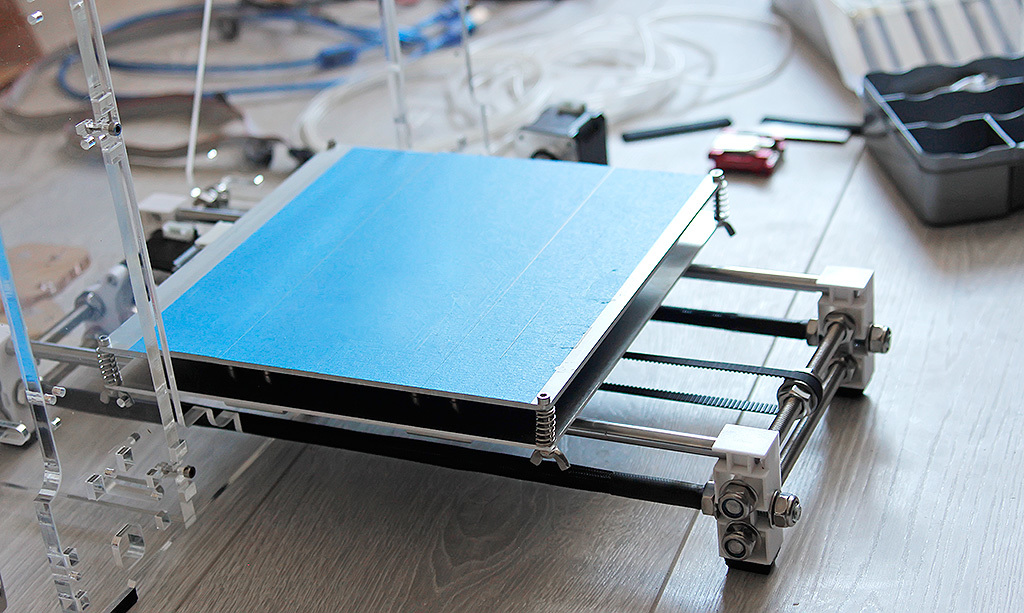
And the table here is quite good. There is no acrylic base due to which many people are worried that it can lead from heating. The table is a 3mm aluminum plate mounted on the same aluminum bearing blocks.
The belt is also attached to the factory cast ABS plastic part. Again, cast parts are better printed as they are stronger.

And here is another small drawback - there is no belt tensioner. If it stretches, it will be inconvenient to pull it up. Although not so often it is stretched from the experience of using such structures.

Add a little more “custom” - self-adhesive rubber seals from IKEA for curtains. Let us put them on the legs for the printer, thus the vibrations will be damped and its movement will be turned off in the process of printing a particularly intricate G-code.
This is how it looks after the sticker.

Screw acrylic parts. And here is a good solution. Acrylic is not used 8mm, and 10mm. You can safely lift it by the upper crossbar. True, it still does not save from cracks as a result of the tightening of the nuts, be careful.

A heating element. Very decent sample. True, it is immediately integrated into aluminum, some like to print on glass. It would be ideal, in that case to use textolite, but it is someone like that.

The table is already plastered with 3M blue tape, that's cool. For PLA printing generally perfect. 3M adhesive tape is a material well-known in the circles of printers; it holds the layers of plastic perfectly and does not deteriorate with temperature. Scotch tape can be used repeatedly, for a dozen stamps it just enough.
We screw the spring-loaded bolts with sheep. Lambs are more convenient than round knurled nuts, as they are easier to turn. The truth here is that the table goes very close to the frame and distant lambs must be set along the movement, otherwise they touch the frame with edges.

Motors. They immediately with a trapezoidal screw and without dampers. This is not very correct, but we will see later how it affects the printing process. Mounting motors to the frame duplicated. There are 2 spare corners. These are the parts that most often burst when tightened. Feels caring Chinese sellers :)

Wires. The wires are all labeled and signed by what they are. It is very convenient. Well, for aesthetic peace we send them to the womb of the snake.

That was it. And after ten minutes, it became like this:

Beauty.

Reel holder Convenient, hell, just a stand, on the edge of the coil is not very good, when the coil is full, then it constantly jumps off. And with such a holder no problems. Well, except that, for convenience, you should print a universal holder for the axis of the coil.

The holder on the bearing, I recommend. ( Robotnik on Thingiverse )

Meanwhile, all the wires turned into a black mambo. Go ahead.


We hang axis X. And here already - hello printed parts! A pair of mounts printed. Printed well, but still ...
And even if printed parts are confused and there is a chance that they can crack across layers, there is an archive of all plastic parts on the same SD card, even those that are cast in the factory. Apparently earlier this printer contained more printed parts, and now there are only a couple of them left.

But the bearings themselves are already in the factory molded box, and even collapsible. Inside it is also hidden fastening the belt, again without a tensioner, by the way.

Fix the shafts upper part. On the right you can see that the trapezoid screw does not reach the hole, although it seems as if it should. In fact, it should not be fixed, it saves from the possible curvature of this screw and, accordingly, wobbling in the printing process. the hole here is more likely to not squeeze anything. Maybe the red flags there print out to spin with screws? Ok then, maybe.
With mechanics like everything. Go to the wires.

And they are almost all here with a good margin, it is necessary to shorten. And by the way, all the wires in the silicone sheath, it's just really cool.

A bunch of snakes waiting in the wings.

The screen is standard, inexpensive, but effective with a built-in card reader and a twister with a button. Here is the truth. The 2 blue diodes on the right are shining very straight, you need to think of something, but then. Can not wait to collect to the end.

By the way, the screen is very well fixed here, it sits firmly and does not falter. On printers of other brands, it is often necessary to hold it by pressing a button.

The control board here uses MKS base v1.4 Its plus is compactness. It is the most compact in the MKS lineup. There is still a true mini version, but there is an exact copy of the Arduin, and there is already a standalone fee. Minus one - soldered drivers, though not the cheapest drivers. Still, there are signs of savings. Do not solder the driver to the second extruder. Although this is not a hindrance if you use a two-headed extruder.


Mount the power supply.

It uses a standard power supply for LED designs at 25A. The body is used as a radiator. Someone likes radiators without coolers - they are quieter, someone uses with active adaptive cooling. Here the fan just blows always. Noise, yes, but the same machine :)

Wires are laid.


It turned out beautifully.

We bring the ends to the board, at the same time we use translucent noodles from the set. Snake skin was added to the editorial, finally using it to the fullest.

Almost final. we trim a couple of long ends ...


Everything is ready.
Go to print.


And here we are in for a surprise. Turn on the printer and he writes Mendel ready. Hm It looks like an old firmware. Well, for sure. Everything works, the “house” is exposed, the axes are driven, but the extruder just buzzes a little but does not twist. We try to adjust the potentiometer in the hope that the problem is in it, but no, it only gets worse. We remove the wire from another motor and move the axis - plastic presses. Damn, exactly the firmware.

In general, they asked for technical support, wrote to the factory. And while waiting, we decided to fill in the firmware from another printer, since we have it. And while tech support advised to install a newer version of the slicer, and the plant was silent, the printer has already begun to adequately give signs of life. The extruder started working right away, although it was set up as Geared, but in fact it is direct-driven. The axis turned necessary to flip.

We turn over the Z axis and the Y axis.
We try to print, at the same time in the firmware we change the name of the printer;)

The first pancake is lumpy.

Left option. Extruder also need to "flip" in the firmware, damn it. Crushed so hands)))
On the right, the result after the changes.

It seems everything is smooth, there are some flaws, but this is most likely due to the test plastic.

But something cube some small. It seems to be 2 cm, and it is smaller. For sure. It is necessary to change the number of steps. The drivers here are 32 steps, but when you try to set this value, the scale has outgrown.
I had to pick up at random, according to the formula, something was not very good.

So now ok. It remains to shift the coordinates of the "Home position", since the limit switches are outside the table.
Speaking of limit switches. The gap between the table and the nozzle is regulated here with the help of the same small wings. Adjusting the position of the limit switch is not provided.
And the link to the printer itself: JGAURORA Z - 605S . The price until the end of May is very democratic, but without delivery. But the delivery should choose priority direct mail and then it will cost only $ 73. $ 73 is the delivery via SDEK to Russia, $ 117 to Ukraine - delivery by mail of Ukraine.
PS: while you were busy with this printer, cheaper options appeared in the store: www.gearbest.com/3d-printers-3d-printer-kits/pp_337314.html?utm_source=geektimes&utm_medium=yulia&utm_campaign=g16
The assembly process is described in great detail in the instructions that are recorded on the SD card that comes with the kit. With the card in the set is a card reader, a trifle, but nice. We will not go into the details of the assembly, but in the process we will try to describe those points that are different from other similar sets of
Packaging.
In general, the packaging, created by the well-known scheme of all sets of printers sent from China. The first sets were packed in foam plates, which is why during the opening everything was in foam balls. Yes, and the packaging material itself often cracked during shipment and the contents suffered. Everything is as it should be, all parts are packed in polyurethane foam compartments reliably protecting the components of the future printer.
At first glance, a bunch of wires and parts does not resemble the future high-tech tool.
First of all we collect the base of the printer. It is made on the prototype RepRap Prusa i3 of the studs, only the printed nodes here are replaced by production casting, which is good. But the fact that all of the studs is not very successful, you need to put a little more effort to withstand a 90 degree angle between the studs when tightening than on the same acrylic version with two long studs. Another strange moment, the fact that the long studs are galvanized, and short stainless steel. Well, this is already, so aesthetic quibbles. You can see different shades of metal.
Fix it with snake skin.
It turned out even very good. Go to the table.
And the table here is quite good. There is no acrylic base due to which many people are worried that it can lead from heating. The table is a 3mm aluminum plate mounted on the same aluminum bearing blocks.
The belt is also attached to the factory cast ABS plastic part. Again, cast parts are better printed as they are stronger.
And here is another small drawback - there is no belt tensioner. If it stretches, it will be inconvenient to pull it up. Although not so often it is stretched from the experience of using such structures.
Add a little more “custom” - self-adhesive rubber seals from IKEA for curtains. Let us put them on the legs for the printer, thus the vibrations will be damped and its movement will be turned off in the process of printing a particularly intricate G-code.
This is how it looks after the sticker.
Screw acrylic parts. And here is a good solution. Acrylic is not used 8mm, and 10mm. You can safely lift it by the upper crossbar. True, it still does not save from cracks as a result of the tightening of the nuts, be careful.
A heating element. Very decent sample. True, it is immediately integrated into aluminum, some like to print on glass. It would be ideal, in that case to use textolite, but it is someone like that.
The table is already plastered with 3M blue tape, that's cool. For PLA printing generally perfect. 3M adhesive tape is a material well-known in the circles of printers; it holds the layers of plastic perfectly and does not deteriorate with temperature. Scotch tape can be used repeatedly, for a dozen stamps it just enough.
We screw the spring-loaded bolts with sheep. Lambs are more convenient than round knurled nuts, as they are easier to turn. The truth here is that the table goes very close to the frame and distant lambs must be set along the movement, otherwise they touch the frame with edges.
Motors. They immediately with a trapezoidal screw and without dampers. This is not very correct, but we will see later how it affects the printing process. Mounting motors to the frame duplicated. There are 2 spare corners. These are the parts that most often burst when tightened. Feels caring Chinese sellers :)
Wires. The wires are all labeled and signed by what they are. It is very convenient. Well, for aesthetic peace we send them to the womb of the snake.
That was it. And after ten minutes, it became like this:
Beauty.
Reel holder Convenient, hell, just a stand, on the edge of the coil is not very good, when the coil is full, then it constantly jumps off. And with such a holder no problems. Well, except that, for convenience, you should print a universal holder for the axis of the coil.
The holder on the bearing, I recommend. ( Robotnik on Thingiverse )
Meanwhile, all the wires turned into a black mambo. Go ahead.
We hang axis X. And here already - hello printed parts! A pair of mounts printed. Printed well, but still ...
And even if printed parts are confused and there is a chance that they can crack across layers, there is an archive of all plastic parts on the same SD card, even those that are cast in the factory. Apparently earlier this printer contained more printed parts, and now there are only a couple of them left.
But the bearings themselves are already in the factory molded box, and even collapsible. Inside it is also hidden fastening the belt, again without a tensioner, by the way.
Fix the shafts upper part. On the right you can see that the trapezoid screw does not reach the hole, although it seems as if it should. In fact, it should not be fixed, it saves from the possible curvature of this screw and, accordingly, wobbling in the printing process. the hole here is more likely to not squeeze anything. Maybe the red flags there print out to spin with screws? Ok then, maybe.
With mechanics like everything. Go to the wires.
And they are almost all here with a good margin, it is necessary to shorten. And by the way, all the wires in the silicone sheath, it's just really cool.
A bunch of snakes waiting in the wings.
The screen is standard, inexpensive, but effective with a built-in card reader and a twister with a button. Here is the truth. The 2 blue diodes on the right are shining very straight, you need to think of something, but then. Can not wait to collect to the end.
By the way, the screen is very well fixed here, it sits firmly and does not falter. On printers of other brands, it is often necessary to hold it by pressing a button.
The control board here uses MKS base v1.4 Its plus is compactness. It is the most compact in the MKS lineup. There is still a true mini version, but there is an exact copy of the Arduin, and there is already a standalone fee. Minus one - soldered drivers, though not the cheapest drivers. Still, there are signs of savings. Do not solder the driver to the second extruder. Although this is not a hindrance if you use a two-headed extruder.
Mount the power supply.
It uses a standard power supply for LED designs at 25A. The body is used as a radiator. Someone likes radiators without coolers - they are quieter, someone uses with active adaptive cooling. Here the fan just blows always. Noise, yes, but the same machine :)
Wires are laid.
It turned out beautifully.
We bring the ends to the board, at the same time we use translucent noodles from the set. Snake skin was added to the editorial, finally using it to the fullest.
Almost final. we trim a couple of long ends ...
Everything is ready.
Go to print.
And here we are in for a surprise. Turn on the printer and he writes Mendel ready. Hm It looks like an old firmware. Well, for sure. Everything works, the “house” is exposed, the axes are driven, but the extruder just buzzes a little but does not twist. We try to adjust the potentiometer in the hope that the problem is in it, but no, it only gets worse. We remove the wire from another motor and move the axis - plastic presses. Damn, exactly the firmware.
In general, they asked for technical support, wrote to the factory. And while waiting, we decided to fill in the firmware from another printer, since we have it. And while tech support advised to install a newer version of the slicer, and the plant was silent, the printer has already begun to adequately give signs of life. The extruder started working right away, although it was set up as Geared, but in fact it is direct-driven. The axis turned necessary to flip.
We turn over the Z axis and the Y axis.
We try to print, at the same time in the firmware we change the name of the printer;)
The first pancake is lumpy.
Left option. Extruder also need to "flip" in the firmware, damn it. Crushed so hands)))
On the right, the result after the changes.
It seems everything is smooth, there are some flaws, but this is most likely due to the test plastic.
But something cube some small. It seems to be 2 cm, and it is smaller. For sure. It is necessary to change the number of steps. The drivers here are 32 steps, but when you try to set this value, the scale has outgrown.
I had to pick up at random, according to the formula, something was not very good.
So now ok. It remains to shift the coordinates of the "Home position", since the limit switches are outside the table.
Speaking of limit switches. The gap between the table and the nozzle is regulated here with the help of the same small wings. Adjusting the position of the limit switch is not provided.
And the link to the printer itself: JGAURORA Z - 605S . The price until the end of May is very democratic, but without delivery. But the delivery should choose priority direct mail and then it will cost only $ 73. $ 73 is the delivery via SDEK to Russia, $ 117 to Ukraine - delivery by mail of Ukraine.
PS: while you were busy with this printer, cheaper options appeared in the store: www.gearbest.com/3d-printers-3d-printer-kits/pp_337314.html?utm_source=geektimes&utm_medium=yulia&utm_campaign=g16