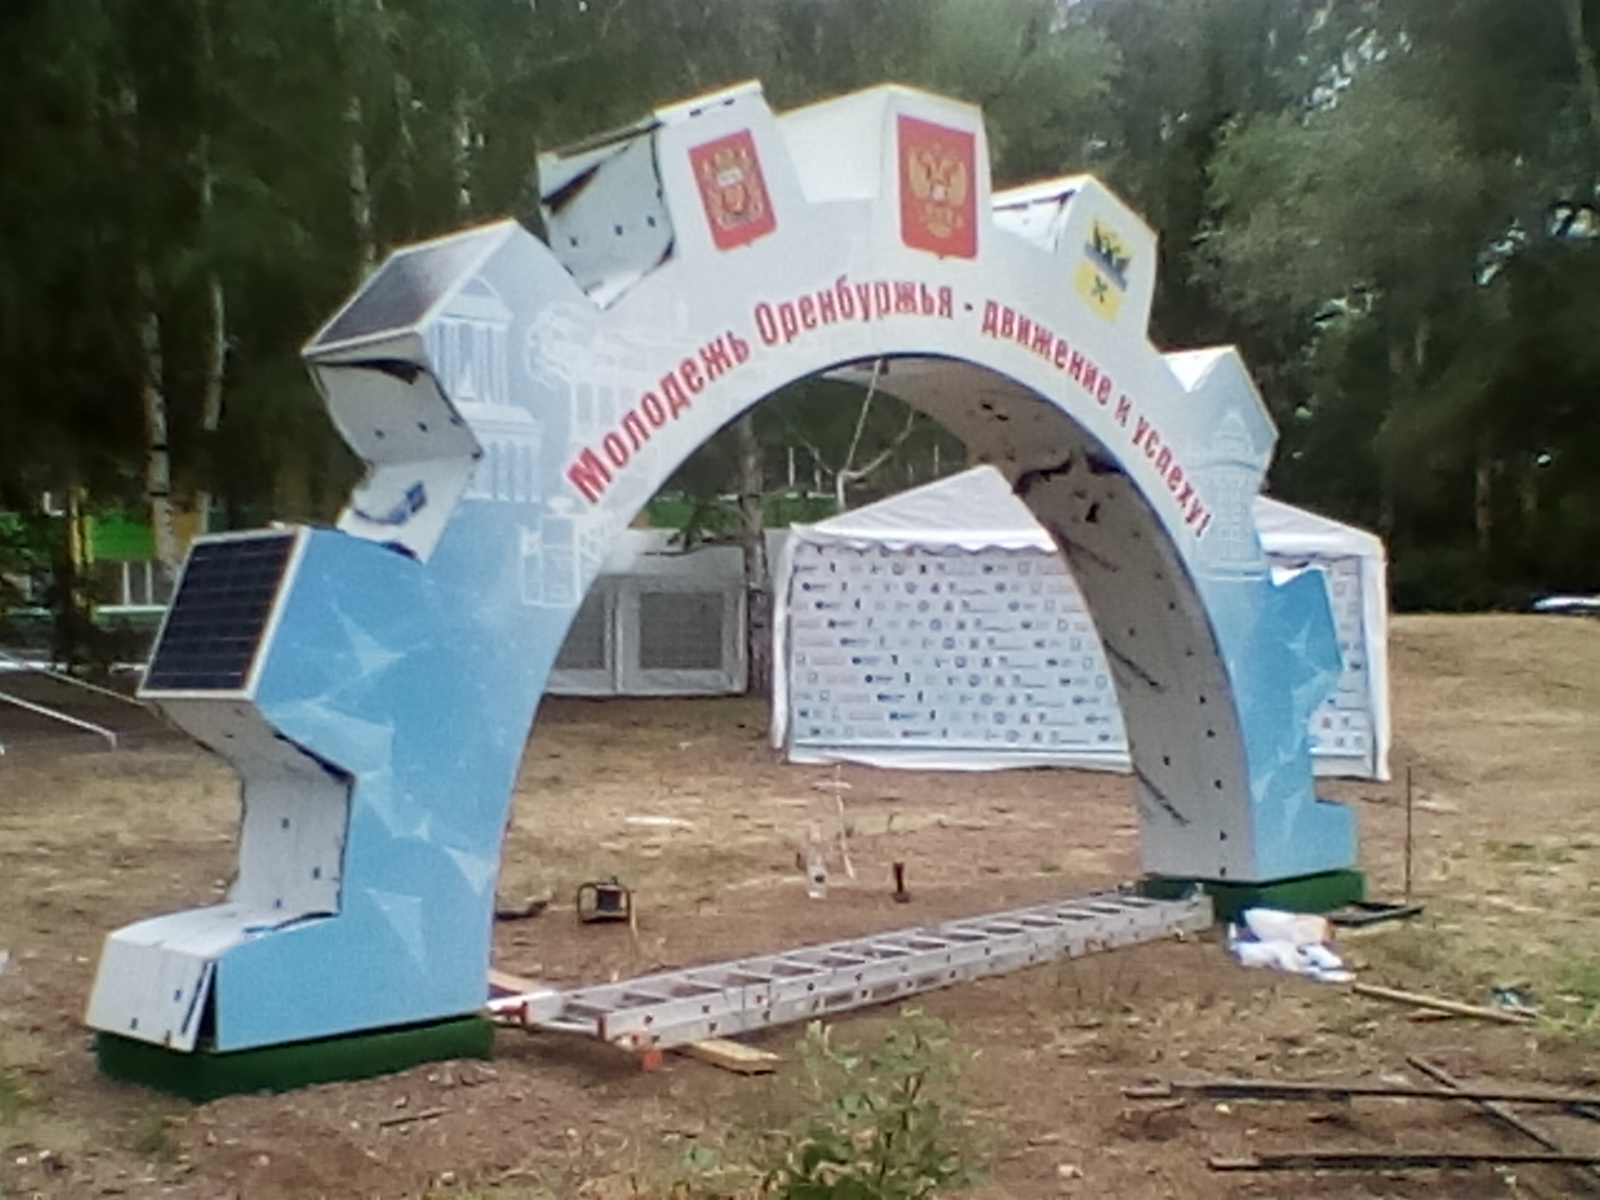
Made a large half gear on solar panels for 250,000 rubles (2 part)
Hello to all! Finally, we completed and installed an art object with solar panels for the “Engineers of the Future 2019” forum yesterday. In the first part I already described the whole idea with calculations, estimates with drawings.
It began, oddly enough, not from welding the frame, but from receiving and assembling the lighting component - the solar panels were received before they had time to buy metal - the Russian post is happy.
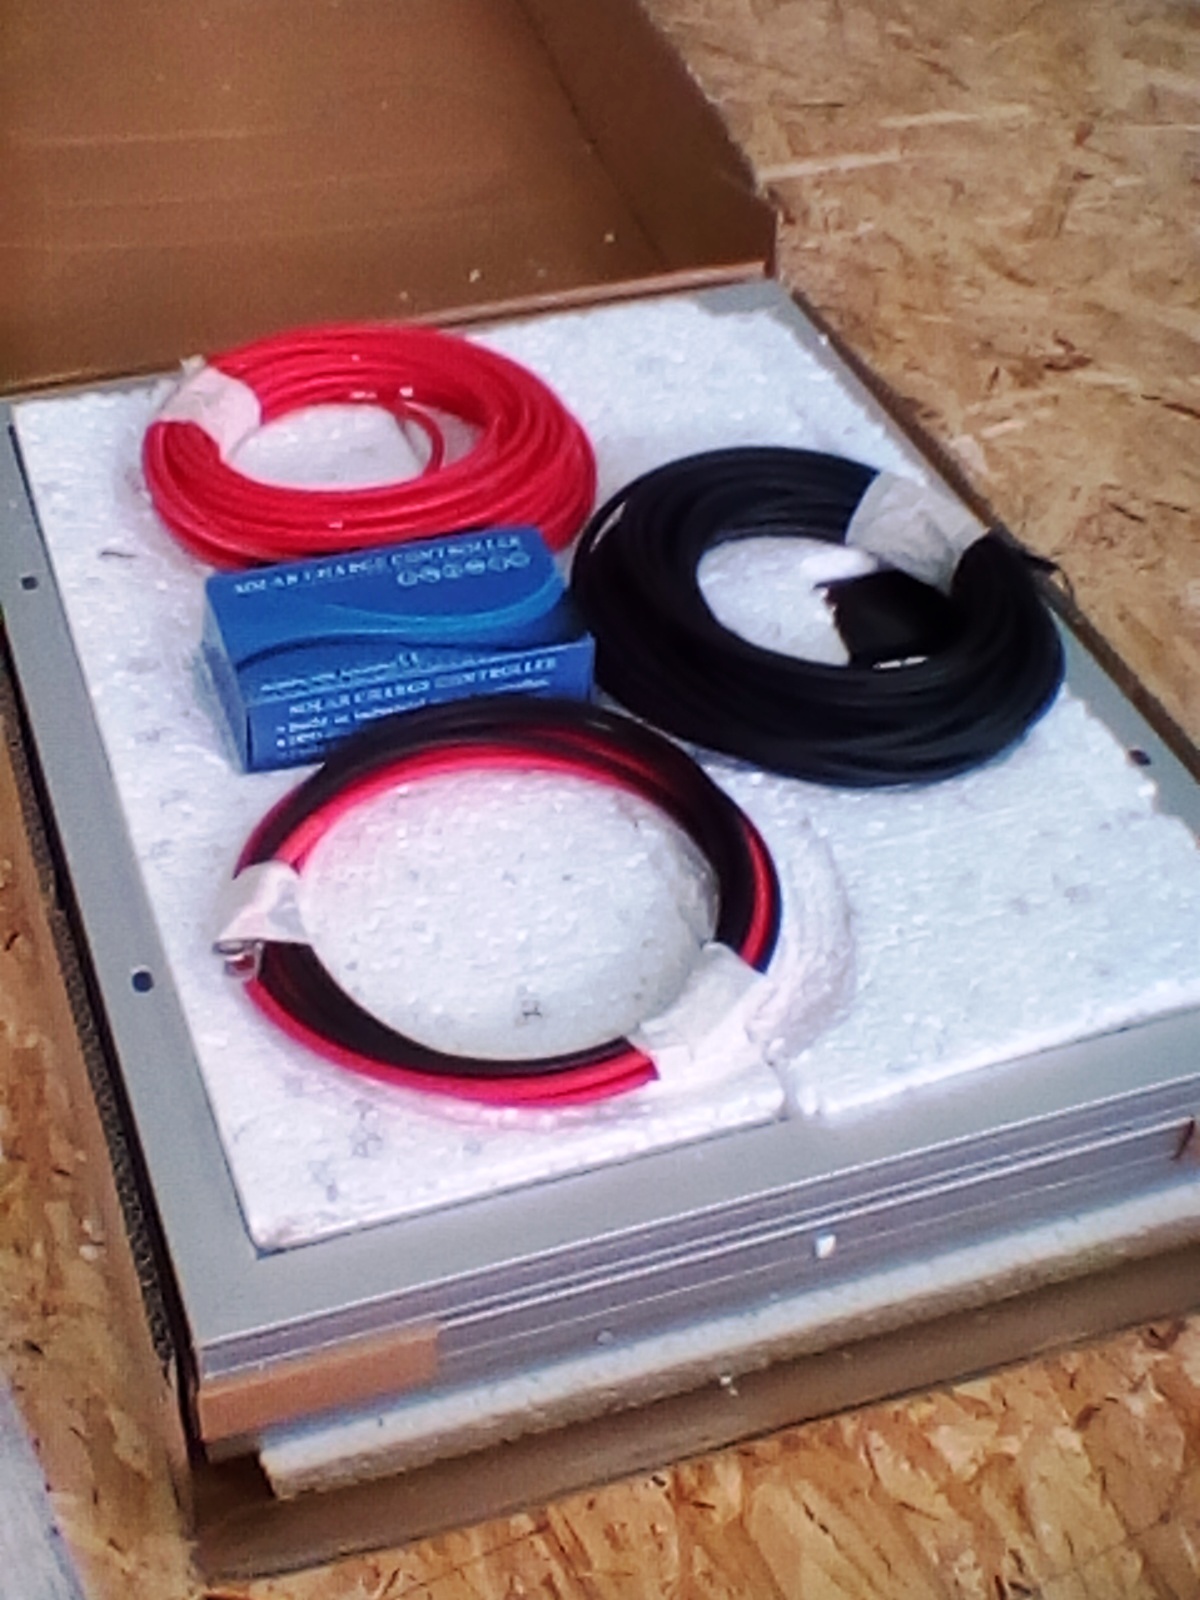
In the photo, unpacking a parcel from Vladivostok, which arrived in 3 days via EMS. Everything was packed neatly.

And here I was waiting for a small bummer: the supplier’s website did not specify a profile photo panel. Rather, the profile itself. It turns out to be "n" -shaped.


I had to "collective farm" with the installation of panels.

The next surprise: having opened the junction box of the 50-watt panel, I found some kind of diode or resistor. I did not understand what it is. It seems that Schottky diodes should be soldered sequentially into a positive wire, and here the contacts are tied directly. Maybe some kind of ballast from a short circuit I decided and ... still soldered the diodes (will not be superfluous).

Oddly enough, on a 30-watt solar panel this is not in the box I was

pleased with the anti-reflective texture of the protective glass.

Wiring box for 30-watt panels.
After connecting the wires, I just filled it with hot glue for reliability and took up the Schottky diodes. The fact is that in our Orenburg such a problem we found diodes for a current of 5 amperes, that I had to take 30 amperes to two channels and bite off the extra leg after soldering.

So another day passed, and the trade union pipes for the frame were never brought. Well, but there is a base plate, so we can do mortgages for now! I cut the “twenties” hairpins, screwed them to the drilled plate and “tied” them with fittings, welded them to the support frame.

Important: before cutting the studs, screw the nuts in advance, otherwise it will then be hard to fit onto the jammed thread.
The whole next day went to the assembly of formwork and pouring concrete.

Another of my "cant" - I forgot that the base plate will sit on top, which means the mounting ears from the fittings are superfluous. Then I had to cut them.
That's what happened after the concrete hardened and I, having broken the formwork, threw on top a decorative case made of artificial grass, glued in an hour.

Meanwhile, another contractor printed the front and back parts of milled composite sheets with UV paint.
And the next day, all the stars came together and we still got hold of the metal, including a bent professional pipe. Oddly enough, this time the contractor did not fail and bent the pipes exactly and in size.

Our welder was welding according to the printed template, so that certainly would not be mistaken even by a millimeter. And even in this case, after we put the sectors together and threw the composite, we saw discrepancies of several centimeters. They did not take into account that during welding the metal seemed to “play” from heating.

I had to, in fact, adjust, straighten, digest, push apart, etc. This day took another fit.

Here, the main works are completed, the frame is exposed and the tedious, long lining of the composite has begun. First threw the front and back parts.


As planned, PVC chopsticks were glued onto the cosmophene to the composite on the reverse side, and only then screwed onto the pipe with screws.

Here's what it looks like from the inside:

A square chopper made of 8-10 mm PVC holds the composite panel, and the upper ones like a pattern create support for future rolled end panels.

The sheathing of the frame itself took almost 4 (!) Days. Time was running out. Installation time has moved a bit. It's good that they took with a margin.

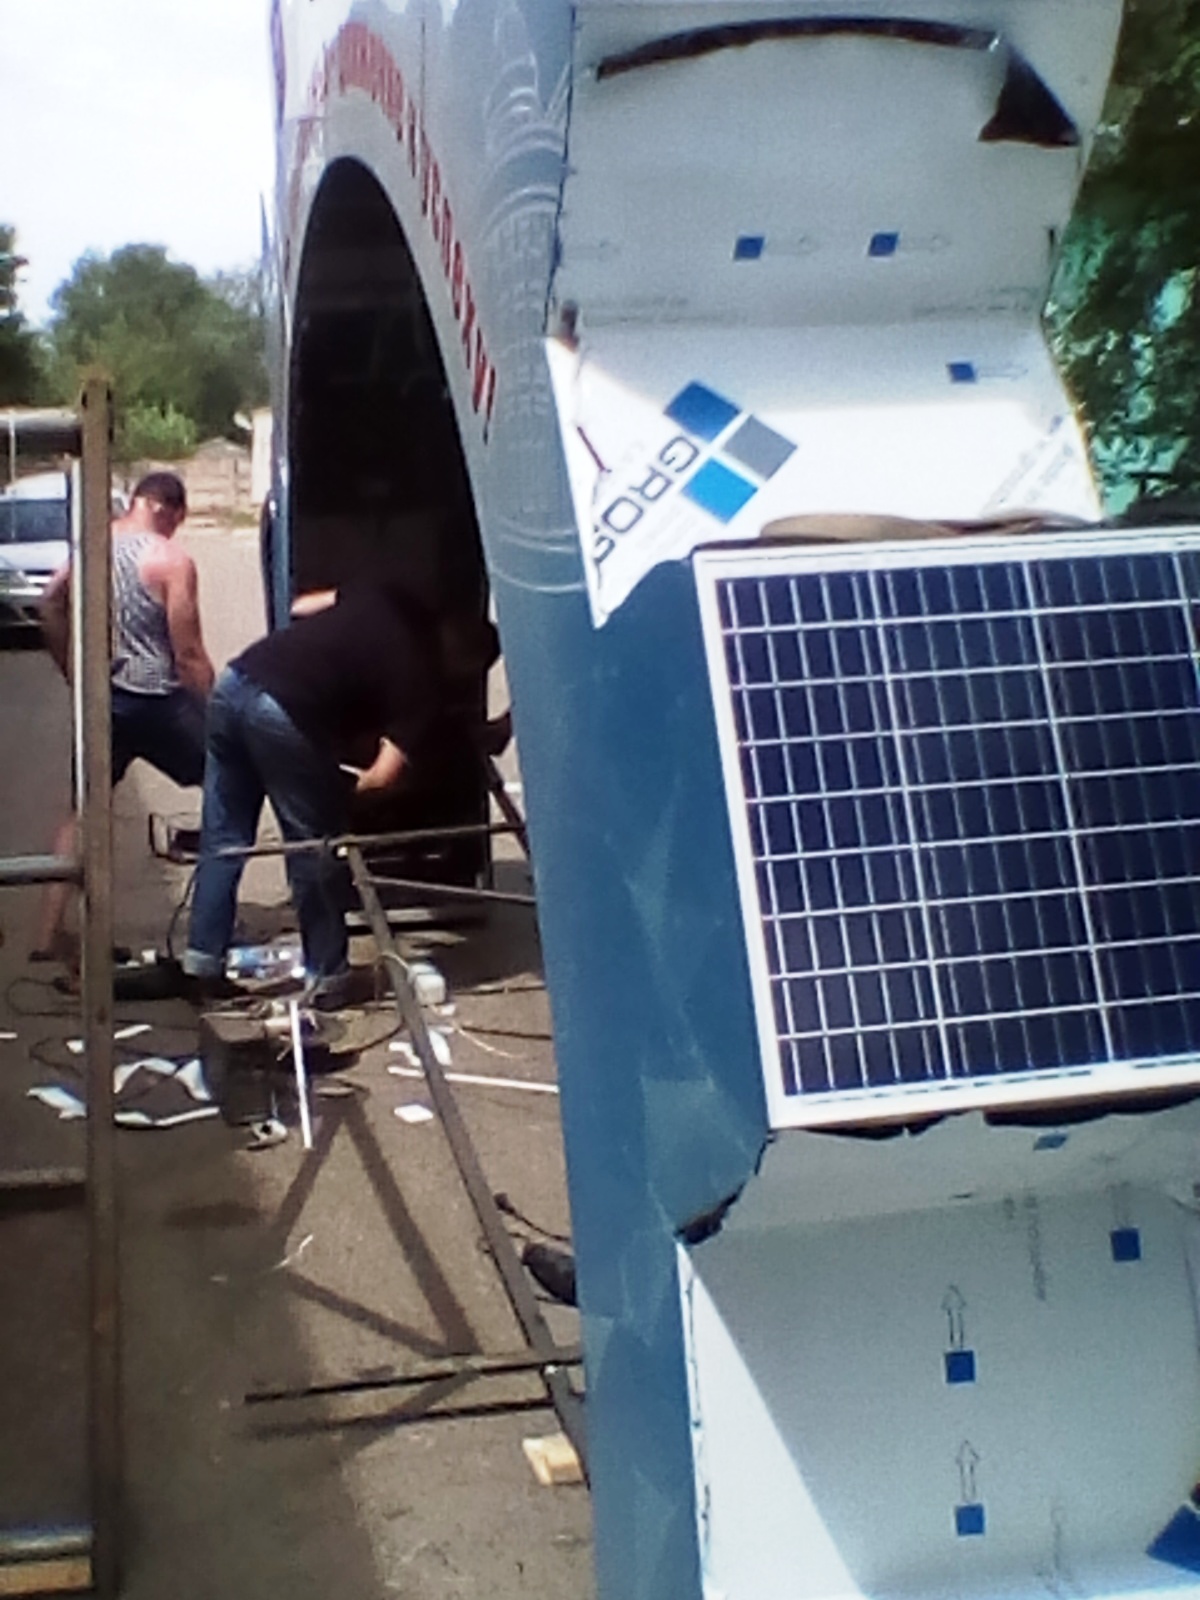
Meanwhile, while the guys sheathed the frame so as not to waste time in vain, I decided to throw solar panels on the teeth. I cut 0.8 mm thick galvanized strips and screwed them to the wrong side of the panel profile, these are the brackets.

I was afraid that it would be very flimsy and not anti-vandal, but after I screwed it from the inside, pulling it to the frame, I did not tear off the panel. Everything is holding very tightly.


The upper solar panels, 30-watt, and therefore narrow, were placed in the center of the tooth, as planned, making “additions” from the same white composite.

The photo below shows that I collected all the wiring on the WAGO terminals. It is very convenient at installation and dismantle. After all, the design should be quick-detachable (2 hours), since it will go in 3 weeks to the exhibition of art objects in Samara.

The on / off button for the lamps was hidden under the lower tooth.

And on the reverse side I just poured it with the same hot-melt adhesive, so that it certainly wouldn’t fall out, no matter how much they pressed it.

That's all. The great montage day has come. And here (well, how could it be without this) one more CANNOT! The fact is that I have a design of 3.2 m in height. But it turns out that there is a standard for the transportation of bulky goods. No more than 3 m (this is taking into account the height of the body of the manipulator) to move around the city.
I had to cook a support frame to the frame and hang one “leg” outside the body. So they drove, grabbing with stockings.

When our “product” was being taken around the city, they were afraid of passing the next intersection: no matter how hard the trolleybus wires were touched.

But, having arrived at the installation site in the Yantar children's camp, everything went like clockwork. We unload the supports on the prepared soil, put our half gear on them, bait the studs and fasten with nuts and now, it remains only to adjust the level and connect everything as it should.
Pay attention to one “paw”: this is the door for removing the battery “for the winter”.

He dusted the base frames with the PGS-ohm and connected the battery - it worked. The charge current is on. All lights are on, USB ports charge the mobile.
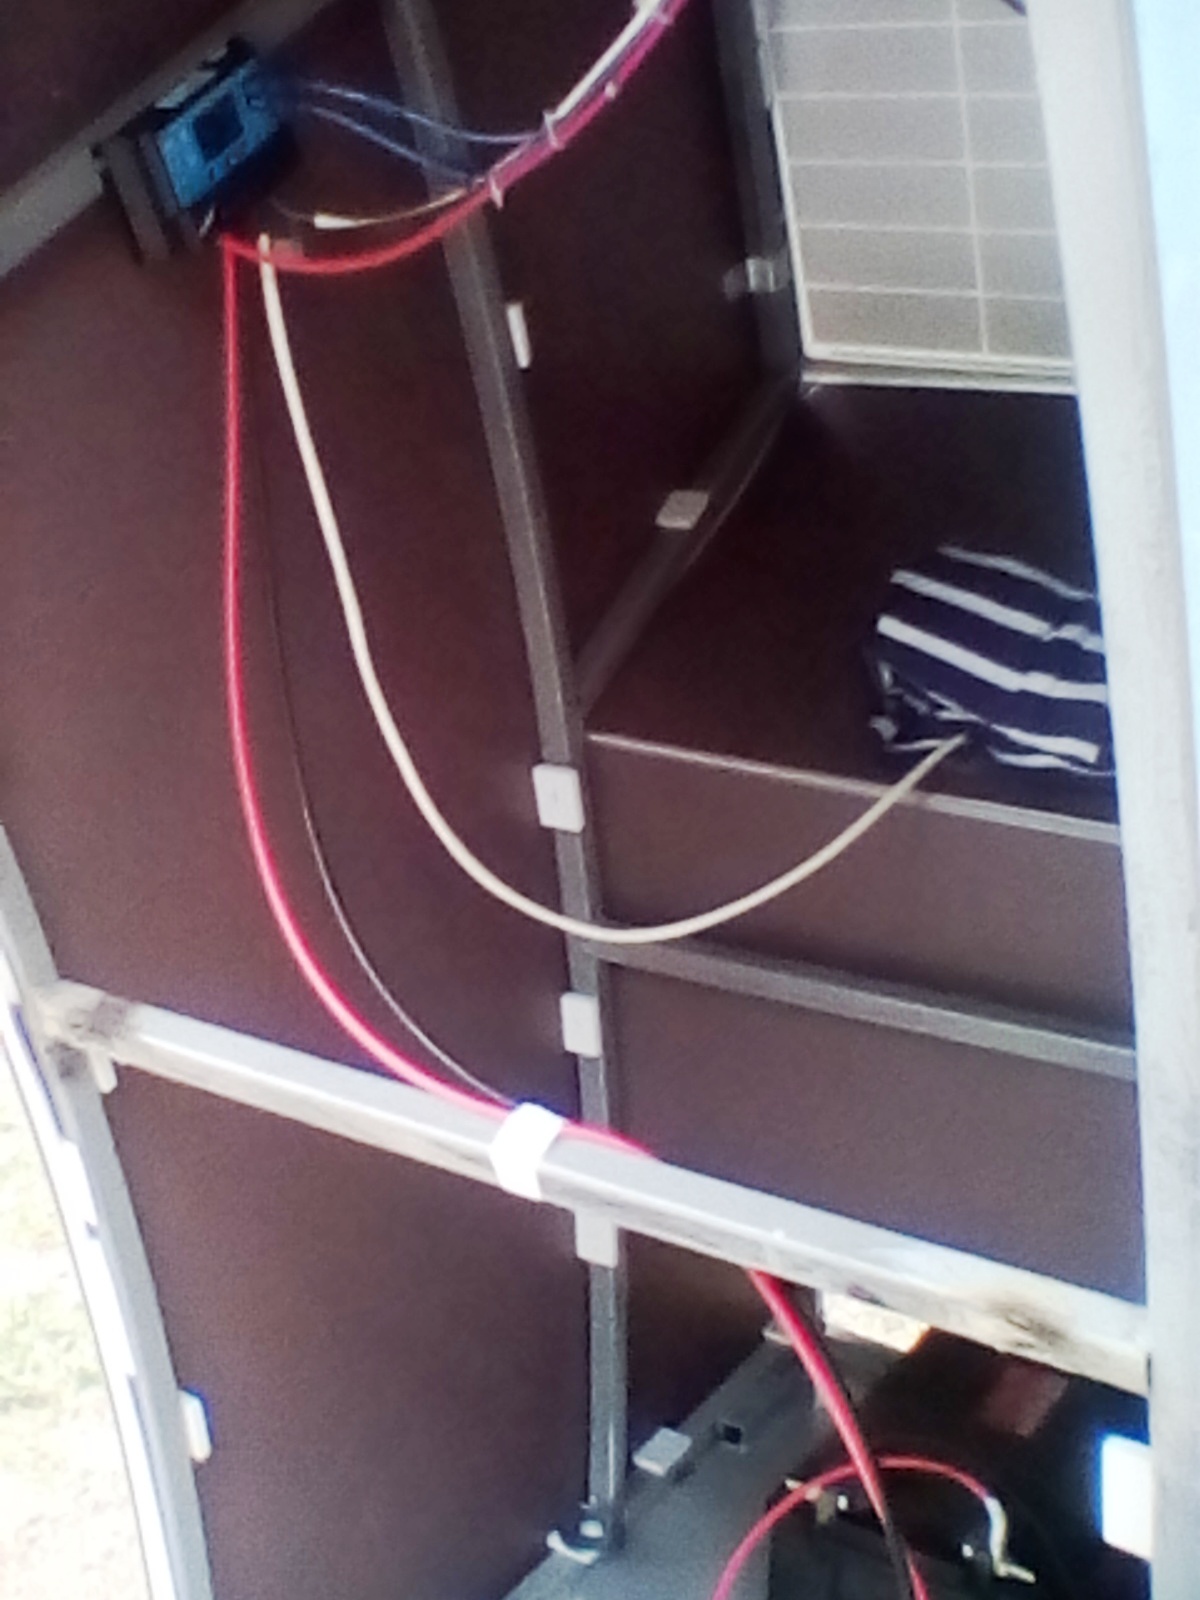
I did not measure real power, but according to calculations, even if it is not a very sunny day, the charge should be enough for two nights of power supply of 5 pcs of 7 watt, 12 volt bulbs.

After the final “closing” of the panels of the art object, I walked through the joints with a sealant and removed the protective film from the composite ...

... and sprinkled all the supporting arcs once again with a sand and gravel mixture, so that it would not be evident. Some commentators in the first part of the story expressed doubts about the stability of this design. I'll tell you - it is monolithic. Each of the concrete supports weighs about 250 kg - the four of us, tearing themselves, barely barely moved them. Further, the frame itself weighs about 250 kg. According to the calculations of wind loads - all the rules.

In addition, I was afraid that they would climb onto the “gear” to take selfies and swing, but it turned out to be so uncomfortable to jump onto it.
And even the organizers of the forum really hung video cameras on almost every birch. So I'm calm.

So that is all. I ask you not to kick much, in my opinion it turned out very badly, but constructive criticism is welcome. I will continue to continue to promote alternative energy to the masses. Now you need to try something to stir up with a windmill. Fortunately, they are being made near us near Orenburg. Waiting for your hottest comments.
It began, oddly enough, not from welding the frame, but from receiving and assembling the lighting component - the solar panels were received before they had time to buy metal - the Russian post is happy.
In the photo, unpacking a parcel from Vladivostok, which arrived in 3 days via EMS. Everything was packed neatly.
And here I was waiting for a small bummer: the supplier’s website did not specify a profile photo panel. Rather, the profile itself. It turns out to be "n" -shaped.
I had to "collective farm" with the installation of panels.
The next surprise: having opened the junction box of the 50-watt panel, I found some kind of diode or resistor. I did not understand what it is. It seems that Schottky diodes should be soldered sequentially into a positive wire, and here the contacts are tied directly. Maybe some kind of ballast from a short circuit I decided and ... still soldered the diodes (will not be superfluous).
Oddly enough, on a 30-watt solar panel this is not in the box I was
pleased with the anti-reflective texture of the protective glass.
Wiring box for 30-watt panels.
After connecting the wires, I just filled it with hot glue for reliability and took up the Schottky diodes. The fact is that in our Orenburg such a problem we found diodes for a current of 5 amperes, that I had to take 30 amperes to two channels and bite off the extra leg after soldering.
So another day passed, and the trade union pipes for the frame were never brought. Well, but there is a base plate, so we can do mortgages for now! I cut the “twenties” hairpins, screwed them to the drilled plate and “tied” them with fittings, welded them to the support frame.
Important: before cutting the studs, screw the nuts in advance, otherwise it will then be hard to fit onto the jammed thread.
The whole next day went to the assembly of formwork and pouring concrete.
Another of my "cant" - I forgot that the base plate will sit on top, which means the mounting ears from the fittings are superfluous. Then I had to cut them.
That's what happened after the concrete hardened and I, having broken the formwork, threw on top a decorative case made of artificial grass, glued in an hour.
Meanwhile, another contractor printed the front and back parts of milled composite sheets with UV paint.
And the next day, all the stars came together and we still got hold of the metal, including a bent professional pipe. Oddly enough, this time the contractor did not fail and bent the pipes exactly and in size.
Our welder was welding according to the printed template, so that certainly would not be mistaken even by a millimeter. And even in this case, after we put the sectors together and threw the composite, we saw discrepancies of several centimeters. They did not take into account that during welding the metal seemed to “play” from heating.
I had to, in fact, adjust, straighten, digest, push apart, etc. This day took another fit.
Here, the main works are completed, the frame is exposed and the tedious, long lining of the composite has begun. First threw the front and back parts.
As planned, PVC chopsticks were glued onto the cosmophene to the composite on the reverse side, and only then screwed onto the pipe with screws.
Here's what it looks like from the inside:
A square chopper made of 8-10 mm PVC holds the composite panel, and the upper ones like a pattern create support for future rolled end panels.
The sheathing of the frame itself took almost 4 (!) Days. Time was running out. Installation time has moved a bit. It's good that they took with a margin.
Meanwhile, while the guys sheathed the frame so as not to waste time in vain, I decided to throw solar panels on the teeth. I cut 0.8 mm thick galvanized strips and screwed them to the wrong side of the panel profile, these are the brackets.
I was afraid that it would be very flimsy and not anti-vandal, but after I screwed it from the inside, pulling it to the frame, I did not tear off the panel. Everything is holding very tightly.
The upper solar panels, 30-watt, and therefore narrow, were placed in the center of the tooth, as planned, making “additions” from the same white composite.
The photo below shows that I collected all the wiring on the WAGO terminals. It is very convenient at installation and dismantle. After all, the design should be quick-detachable (2 hours), since it will go in 3 weeks to the exhibition of art objects in Samara.
The on / off button for the lamps was hidden under the lower tooth.
And on the reverse side I just poured it with the same hot-melt adhesive, so that it certainly wouldn’t fall out, no matter how much they pressed it.
That's all. The great montage day has come. And here (well, how could it be without this) one more CANNOT! The fact is that I have a design of 3.2 m in height. But it turns out that there is a standard for the transportation of bulky goods. No more than 3 m (this is taking into account the height of the body of the manipulator) to move around the city.
I had to cook a support frame to the frame and hang one “leg” outside the body. So they drove, grabbing with stockings.
When our “product” was being taken around the city, they were afraid of passing the next intersection: no matter how hard the trolleybus wires were touched.
But, having arrived at the installation site in the Yantar children's camp, everything went like clockwork. We unload the supports on the prepared soil, put our half gear on them, bait the studs and fasten with nuts and now, it remains only to adjust the level and connect everything as it should.
Pay attention to one “paw”: this is the door for removing the battery “for the winter”.
He dusted the base frames with the PGS-ohm and connected the battery - it worked. The charge current is on. All lights are on, USB ports charge the mobile.
I did not measure real power, but according to calculations, even if it is not a very sunny day, the charge should be enough for two nights of power supply of 5 pcs of 7 watt, 12 volt bulbs.
After the final “closing” of the panels of the art object, I walked through the joints with a sealant and removed the protective film from the composite ...
... and sprinkled all the supporting arcs once again with a sand and gravel mixture, so that it would not be evident. Some commentators in the first part of the story expressed doubts about the stability of this design. I'll tell you - it is monolithic. Each of the concrete supports weighs about 250 kg - the four of us, tearing themselves, barely barely moved them. Further, the frame itself weighs about 250 kg. According to the calculations of wind loads - all the rules.
In addition, I was afraid that they would climb onto the “gear” to take selfies and swing, but it turned out to be so uncomfortable to jump onto it.
And even the organizers of the forum really hung video cameras on almost every birch. So I'm calm.
So that is all. I ask you not to kick much, in my opinion it turned out very badly, but constructive criticism is welcome. I will continue to continue to promote alternative energy to the masses. Now you need to try something to stir up with a windmill. Fortunately, they are being made near us near Orenburg. Waiting for your hottest comments.
Only registered users can participate in the survey. Please come in.
How did it happen?
- 18.3% collective farm, but I would improve 61
- 33% of the norm and so come down 110
- 15.6% Clearly done 52
- 33% I am not in the subject of why it is needed, money and time wasted ... 110