Node.js authentication guide without passport.js and third-party services
- Transfer
The author of the article, the translation of which we are publishing today, says that now you can observe the growing popularity of authentication services such as Google Firebase Authentication, AWS Cognito and Auth0. Generic solutions like passport.js have become the industry standard. But, given the current situation, it has become commonplace that developers never fully understand what kind of mechanisms are involved in the operation of authentication systems.
This material is devoted to the problem of organizing user authentication in Node.js. In it, on a practical example, the organization of user registration in the system and the organization of their entry into the system are considered. It will raise issues such as working with JWT technology and user impersonation. Also pay attention to this

A github repository containing the code for a Node.js project, some examples of which are given in this article. You can use this repository as the basis for your own experiments.
Here are the requirements for the project that we will deal with here:
At the moment when I am writing this material, I believe that the best of the existing cryptographic algorithms is Argon2. I ask you not to use simple cryptographic algorithms like SHA256, SHA512 or MD5.
In addition, I suggest you take a look at this wonderful material, in which you can find details about choosing an algorithm for hashing passwords.
When a new user is created in the system, his password must be hashed and stored in the database. The password is stored in the database along with the email address and other information about the user (for example, among them may be the user profile, registration time, and so on).
The user account information should look something like the following.

User data retrieved from MongoDB using Robo3T
Here is a diagram of the actions performed when a user tries to log in.

User Login
This is what happens when a user logs in:
JWT is a temporary key. The client must send this key to the server with each request to the authenticated endpoint.
Password verification is performed using the argon2 library. This is to prevent the so-called “ time attacks ”. When performing such an attack, an attacker tries to crack the password by brute force, based on an analysis of how much time the server needs to form a response.
Now let's talk about how to generate JWT.
JSON Web Token (JWT) is a JSON object encoded in string form. Tokens can be taken as a substitute for cookies, which has several advantages over them.
The token consists of three parts. This is the header, payload, and signature. The following figure shows its appearance.
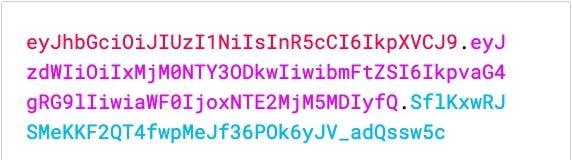
JWT
Token data can be decoded on the client side without the use of a secret key or signature.
This can be useful for transferring, for example, metadata encoded inside the token. Such metadata can describe the role of the user, his profile, the duration of the token, and so on. They can be intended for use in front-end applications.
Here's what a decoded token might look like.

Decoded Token
Let's create the function
You can create JWT using the jsonwebtoken library. You can find this library in npm.
The most important thing here is the encoded data. Do not send secret user information in tokens.
A signature (here is a constant
Now the client code needs to send a JWT in every request to a secure endpoint.
It is recommended that you include JWT in the request headers. They are usually included in the Authorization header.

Authorization Header
Now, on the server, you need to create code that is middleware for express routes. Put this code in the file
It is useful to be able to obtain complete information about the user account from the database and attach them to the request. In our case, this feature is implemented using middleware from a file
After implementing this mechanism, routes will be able to receive information about the user who is executing the request:
Now the route is
After reading about using JWT, you may ask yourself the following question: “If JWT data can be decoded on the client side, is it possible to process the token in such a way as to change the user ID or other data?”.
Token decoding - the operation is very simple. However, you cannot “redo” this token without having that signature, that secret data that was used when signing the JWT on the server.
That is why the protection of this sensitive data is so important.
Our server verifies the signature in the isAuth middleware. The express-jwt library is responsible for checking.
Now, after we figured out how the JWT technology works, let's talk about some interesting additional features that it gives us.
User impersonation is a technique used to log into a system as a specific user without knowing his password.
This feature is very useful for super administrators, developers, or support staff. Impersonation allows them to solve problems that appear only in the course of users working with the system.
You can work with the application on behalf of the user without knowing his password. To do this, it is enough to generate a JWT with the correct signature and with the necessary metadata that describes the user.
Create an endpoint that can generate tokens for entering the system under the guise of specific users. Only the super-administrator of the system can use this endpoint.
For starters, we need to assign this user a role with a higher privilege level than other users. This can be done in many different ways. For example, simply adding a field
It may look like the one shown below.

New field in user information
The
Next, you need to create a new middleware that checks the user role:
It should be placed after isAuth and attachCurrentUser. Now create the endpoint that generates the JWT for the user on behalf of whom the super-administrator wants to log in:
As you can see, there is nothing mysterious. The super administrator knows the email address of the user on behalf of whom you want to log in. The logic of the above code is very reminiscent of how the code works, providing an input to the system of ordinary users. The main difference is that the password is not checked here.
The password is not verified here due to the fact that it is simply not needed here. Endpoint security is provided by middleware.
There is nothing wrong with relying on third-party authentication services and libraries. This helps developers save time. But they also need to know about the principles on which the operation of authentication systems is based, and what ensures the functioning of such systems.
In this article, we explored the possibilities of JWT authentication, talked about the importance of choosing a good cryptographic algorithm for hashing passwords. We examined the creation of a user impersonation mechanism.
Doing the same thing with something like passport.js is far from easy. Authentication is a huge topic. Perhaps we will return to her.
Dear readers! How do you create authentication systems for your Node.js projects?

This material is devoted to the problem of organizing user authentication in Node.js. In it, on a practical example, the organization of user registration in the system and the organization of their entry into the system are considered. It will raise issues such as working with JWT technology and user impersonation. Also pay attention to this
A github repository containing the code for a Node.js project, some examples of which are given in this article. You can use this repository as the basis for your own experiments.
Project requirements
Here are the requirements for the project that we will deal with here:
- The presence of a database in which the user's email address and password will be stored, either clientId and clientSecret, or something like a combination of private and public keys.
- Using a strong and efficient cryptographic algorithm to encrypt a password.
At the moment when I am writing this material, I believe that the best of the existing cryptographic algorithms is Argon2. I ask you not to use simple cryptographic algorithms like SHA256, SHA512 or MD5.
In addition, I suggest you take a look at this wonderful material, in which you can find details about choosing an algorithm for hashing passwords.
Registration of users in the system
When a new user is created in the system, his password must be hashed and stored in the database. The password is stored in the database along with the email address and other information about the user (for example, among them may be the user profile, registration time, and so on).
import * as argon2 from 'argon2';
class AuthService {
  public async SignUp(email, password, name): Promise {
    const passwordHashed = await argon2.hash(password);
    const userRecord = await UserModel.create({
      password: passwordHashed,
      email,
      name,
    });
    return {
      // Никогда не передавайте куда-либо пароль!!!
      user: {
        email: userRecord.email,
        name: userRecord.name,
      },
}
The user account information should look something like the following.
User data retrieved from MongoDB using Robo3T
User Login
Here is a diagram of the actions performed when a user tries to log in.
User Login
This is what happens when a user logs in:
- The client sends the server a combination of the public identifier and the user's private key. This is usually an email address and password.
- The server searches for the user in the database by email address.
- If the user exists in the database, the server hashes the password sent to it and compares what happened with the password hash stored in the database.
- If the verification is successful, the server generates a so-called token or authentication token - JSON Web Token (JWT).
JWT is a temporary key. The client must send this key to the server with each request to the authenticated endpoint.
import * as argon2 from 'argon2';
class AuthService {
  public async Login(email, password): Promise {
    const userRecord = await UserModel.findOne({ email });
    if (!userRecord) {
      throw new Error('User not found')
    } else {
      const correctPassword = await argon2.verify(userRecord.password, password);
      if (!correctPassword) {
        throw new Error('Incorrect password')
    return {
      user: {
        email: userRecord.email,
        name: userRecord.name,
      },
      token: this.generateJWT(userRecord),
}
Password verification is performed using the argon2 library. This is to prevent the so-called “ time attacks ”. When performing such an attack, an attacker tries to crack the password by brute force, based on an analysis of how much time the server needs to form a response.
Now let's talk about how to generate JWT.
What is a JWT?
JSON Web Token (JWT) is a JSON object encoded in string form. Tokens can be taken as a substitute for cookies, which has several advantages over them.
The token consists of three parts. This is the header, payload, and signature. The following figure shows its appearance.
JWT
Token data can be decoded on the client side without the use of a secret key or signature.
This can be useful for transferring, for example, metadata encoded inside the token. Such metadata can describe the role of the user, his profile, the duration of the token, and so on. They can be intended for use in front-end applications.
Here's what a decoded token might look like.
Decoded Token
Generating JWT in Node.js
Let's create the function
generateTokenthat we need to complete the work on the user authentication service. You can create JWT using the jsonwebtoken library. You can find this library in npm.
import * as jwt from 'jsonwebtoken'
class AuthService {
  private generateToken(user) {
    const data =  {
      _id: user._id,
      name: user.name,
      email: user.email
    };
    const signature = 'MySuP3R_z3kr3t';
    const expiration = '6h';
    return jwt.sign({ data, }, signature, { expiresIn: expiration });
}
The most important thing here is the encoded data. Do not send secret user information in tokens.
A signature (here is a constant
signature) is the secret data that is used to generate the JWT. It is very important to ensure that the signature does not fall into the wrong hands. If the signature is compromised, the attacker will be able to generate tokens on behalf of users and steal their sessions.Endpoint Protection and JWT Validation
Now the client code needs to send a JWT in every request to a secure endpoint.
It is recommended that you include JWT in the request headers. They are usually included in the Authorization header.
Authorization Header
Now, on the server, you need to create code that is middleware for express routes. Put this code in the file
isAuth.ts:import * as jwt from 'express-jwt';
// Мы исходим из предположения о том, что JWT приходит на сервер в заголовке Authorization, но токен может быть передан и в req.body, и в параметре запроса, поэтому вам нужно выбрать тот вариант, который подходит вам лучше всего.
const getTokenFromHeader = (req) => {
if (req.headers.authorization && req.headers.authorization.split(' ')[0] === 'Bearer') {
return req.headers.authorization.split(' ')[1];
}
export default jwt({
secret: 'MySuP3R_z3kr3t', // Тут должно быть то же самое, что использовалось при подписывании JWT
userProperty: 'token', // Здесь следующее промежуточное ПО сможет найти то, что было закодировано в services/auth:generateToken -> 'req.token'
getToken: getTokenFromHeader, // Функция для получения токена аутентификации из запроса
})It is useful to be able to obtain complete information about the user account from the database and attach them to the request. In our case, this feature is implemented using middleware from a file
attachCurrentUser.ts. Here is its simplified code:export default (req, res, next) => {
const decodedTokenData = req.tokenData;
const userRecord = await UserModel.findOne({ _id: decodedTokenData._id })
req.currentUser = userRecord;
if(!userRecord) {
return res.status(401).end('User not found')
} else {
return next();
}After implementing this mechanism, routes will be able to receive information about the user who is executing the request:
import isAuth from '../middlewares/isAuth';
  import attachCurrentUser from '../middlewares/attachCurrentUser';
  import ItemsModel from '../models/items';
  export default (app) => {
    app.get('/inventory/personal-items', isAuth, attachCurrentUser, (req, res) => {
      const user = req.currentUser;
      const userItems = await ItemsModel.find({ owner: user._id });
      return res.json(userItems).status(200);
    })
Now the route is
inventory/personal-itemsprotected. To access it, the user must have a valid JWT. A route, in addition, can use user information to search the database for the information it needs.Why are tokens protected from intruders?
After reading about using JWT, you may ask yourself the following question: “If JWT data can be decoded on the client side, is it possible to process the token in such a way as to change the user ID or other data?”.
Token decoding - the operation is very simple. However, you cannot “redo” this token without having that signature, that secret data that was used when signing the JWT on the server.
That is why the protection of this sensitive data is so important.
Our server verifies the signature in the isAuth middleware. The express-jwt library is responsible for checking.
Now, after we figured out how the JWT technology works, let's talk about some interesting additional features that it gives us.
How to impersonate a user?
User impersonation is a technique used to log into a system as a specific user without knowing his password.
This feature is very useful for super administrators, developers, or support staff. Impersonation allows them to solve problems that appear only in the course of users working with the system.
You can work with the application on behalf of the user without knowing his password. To do this, it is enough to generate a JWT with the correct signature and with the necessary metadata that describes the user.
Create an endpoint that can generate tokens for entering the system under the guise of specific users. Only the super-administrator of the system can use this endpoint.
For starters, we need to assign this user a role with a higher privilege level than other users. This can be done in many different ways. For example, simply adding a field
roleto the user information stored in the database is sufficient . It may look like the one shown below.
New field in user information
The
rolesuper-admin field value will be super-admin. Next, you need to create a new middleware that checks the user role:
export default (requiredRole) => {
  return (req, res, next) => {
    if(req.currentUser.role === requiredRole) {
      return next();
    } else {
      return res.status(401).send('Action not allowed');
}
It should be placed after isAuth and attachCurrentUser. Now create the endpoint that generates the JWT for the user on behalf of whom the super-administrator wants to log in:
  import isAuth from '../middlewares/isAuth';
  import attachCurrentUser from '../middlewares/attachCurrentUser';
  import roleRequired from '../middlwares/roleRequired';
  import UserModel from '../models/user';
  export default (app) => {
    app.post('/auth/signin-as-user', isAuth, attachCurrentUser, roleRequired('super-admin'), (req, res) => {
      const userEmail = req.body.email;
      const userRecord = await UserModel.findOne({ email: userEmail });
      if(!userRecord) {
        return res.status(404).send('User not found');
      return res.json({
        user: {
          email: userRecord.email,
          name: userRecord.name
        },
        jwt: this.generateToken(userRecord)
      })
      .status(200);
    })
As you can see, there is nothing mysterious. The super administrator knows the email address of the user on behalf of whom you want to log in. The logic of the above code is very reminiscent of how the code works, providing an input to the system of ordinary users. The main difference is that the password is not checked here.
The password is not verified here due to the fact that it is simply not needed here. Endpoint security is provided by middleware.
Summary
There is nothing wrong with relying on third-party authentication services and libraries. This helps developers save time. But they also need to know about the principles on which the operation of authentication systems is based, and what ensures the functioning of such systems.
In this article, we explored the possibilities of JWT authentication, talked about the importance of choosing a good cryptographic algorithm for hashing passwords. We examined the creation of a user impersonation mechanism.
Doing the same thing with something like passport.js is far from easy. Authentication is a huge topic. Perhaps we will return to her.
Dear readers! How do you create authentication systems for your Node.js projects?