iOS Storyboards: analysis of the pros and cons, best practices

Apple created Storyboards so that developers can visualize the screens of iOS applications and the relationships between them. Not everyone liked this tool, and for good reason. I have met many articles criticizing Storyboards, but I have not found a detailed and unbiased analysis of all the pros and cons, taking into account best practices. In the end, I decided to write such an article myself.
I will try to analyze in detail the disadvantages and advantages of using Storyboards. After weighing them, you can make a meaningful decision whether they are needed in the project or not. This decision does not have to be radical. If in some situations Storyboards create problems, in others their use is justified: it helps to solve tasks effectively and write simple, easily maintained code.
Let's start with the shortcomings and analyze whether all of them are still relevant.
disadvantages
1. Storyboards have a hard time managing conflicts when merging changes
Storyboard is an XML file. It is less readable than code, so resolving conflicts in it is more difficult. But this complexity also depends on how we work with the Storyboard. You can greatly simplify your task if you follow the rules below:
- Do not put the entire UI in one single Storyboard, divide it into several smaller ones. This will allow distributing work on Storyboards among developers without the risk of conflicts, and in the event of their inevitability will simplify the task of resolving them.
- If you need to use the same View in several places, select it in a separate subclass with its own Xib file.
- Make commits more often, since it is much easier to work with changes coming in small pieces.
Using multiple Storyboards instead of one makes it impossible for us to see the entire map of the application in one file. But often this is not necessary - just the specific part we are working on at the moment is enough.
2. Storyboards prevent code reuse
If we are talking about using only Storyboards without Xibs in the project, then problems will surely arise. However, Xibs, in my opinion, are necessary elements when working with Storyboards. Thanks to them, you can easily create reusable Views, which are also convenient to work with in code.
First, create a base class
XibViewthat is responsible for rendering UIViewcreated in Xib in the Storyboard:@IBDesignable
class XibView: UIView {
var contentView: UIView?
}XibViewwill load UIViewfrom Xib in contentViewand add it as its subview. Let's do it in the method setup():private func setup() {
guard let view = loadViewFromNib() else { return }
view.frame = bounds
view.autoresizingMask = [.flexibleWidth, .flexibleHeight]
addSubview(view)
contentView = view
}The method
loadViewFromNib()looks like this:private func loadViewFromNib() -> UIView? {
let nibName = String(describing: type(of: self))
let nib = UINib(nibName: nibName, bundle: Bundle(for: XibView.self))
return nib.instantiate(withOwner: self, options: nil).first as? UIView
}The method
setup()should be called in initializers:override init(frame: CGRect) {
super.init(frame: frame)
setup()
}
required init?(coder aDecoder: NSCoder) {
super.init(coder: aDecoder)
setup()
}The class is
XibViewready. Reused Views whose appearance is rendered in a Xib file will inherit from XibView:final class RedView: XibView {
}

If you now add a new one
UIViewto the Storyboard and set its class to RedView, then everything will be successfully displayed: 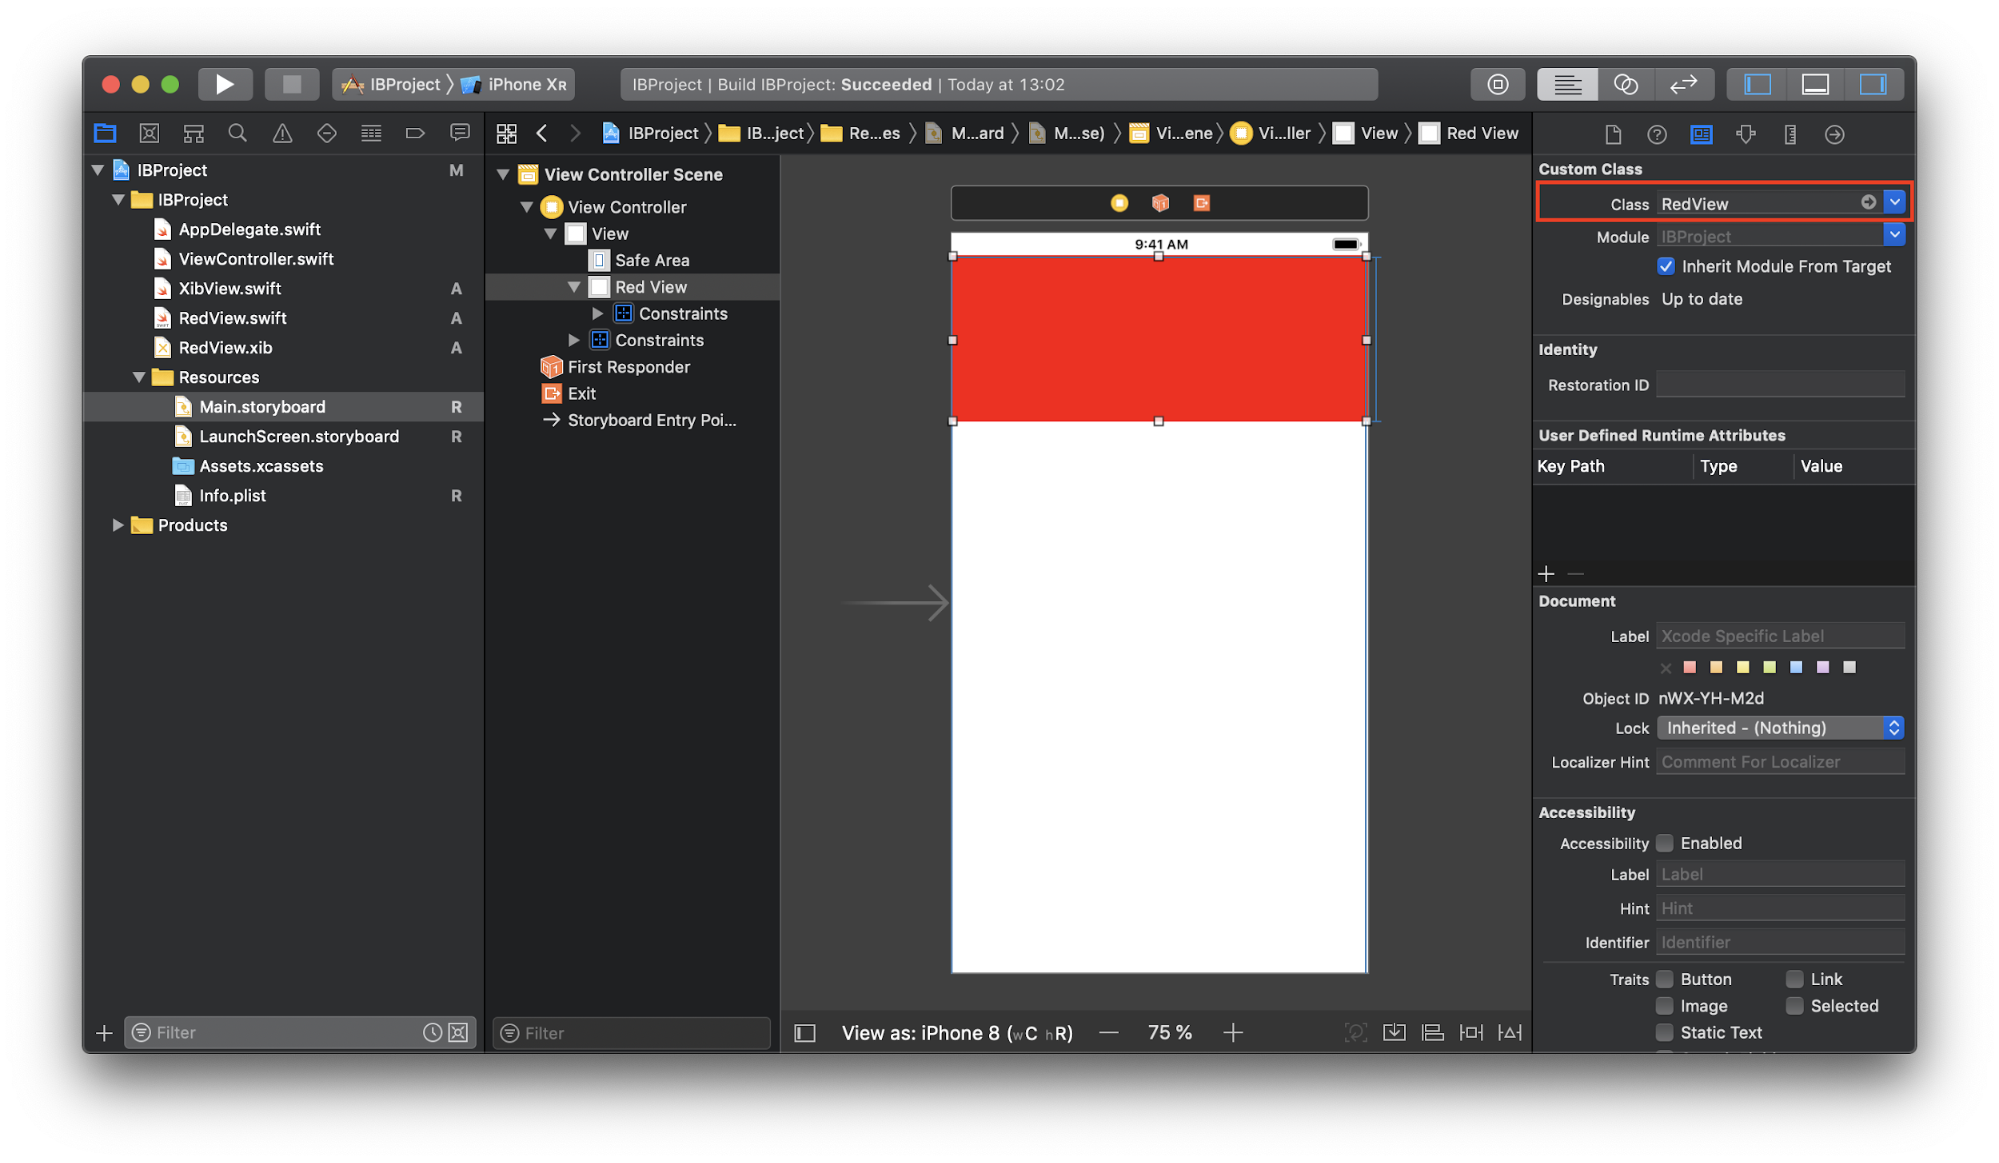
Creating an instance
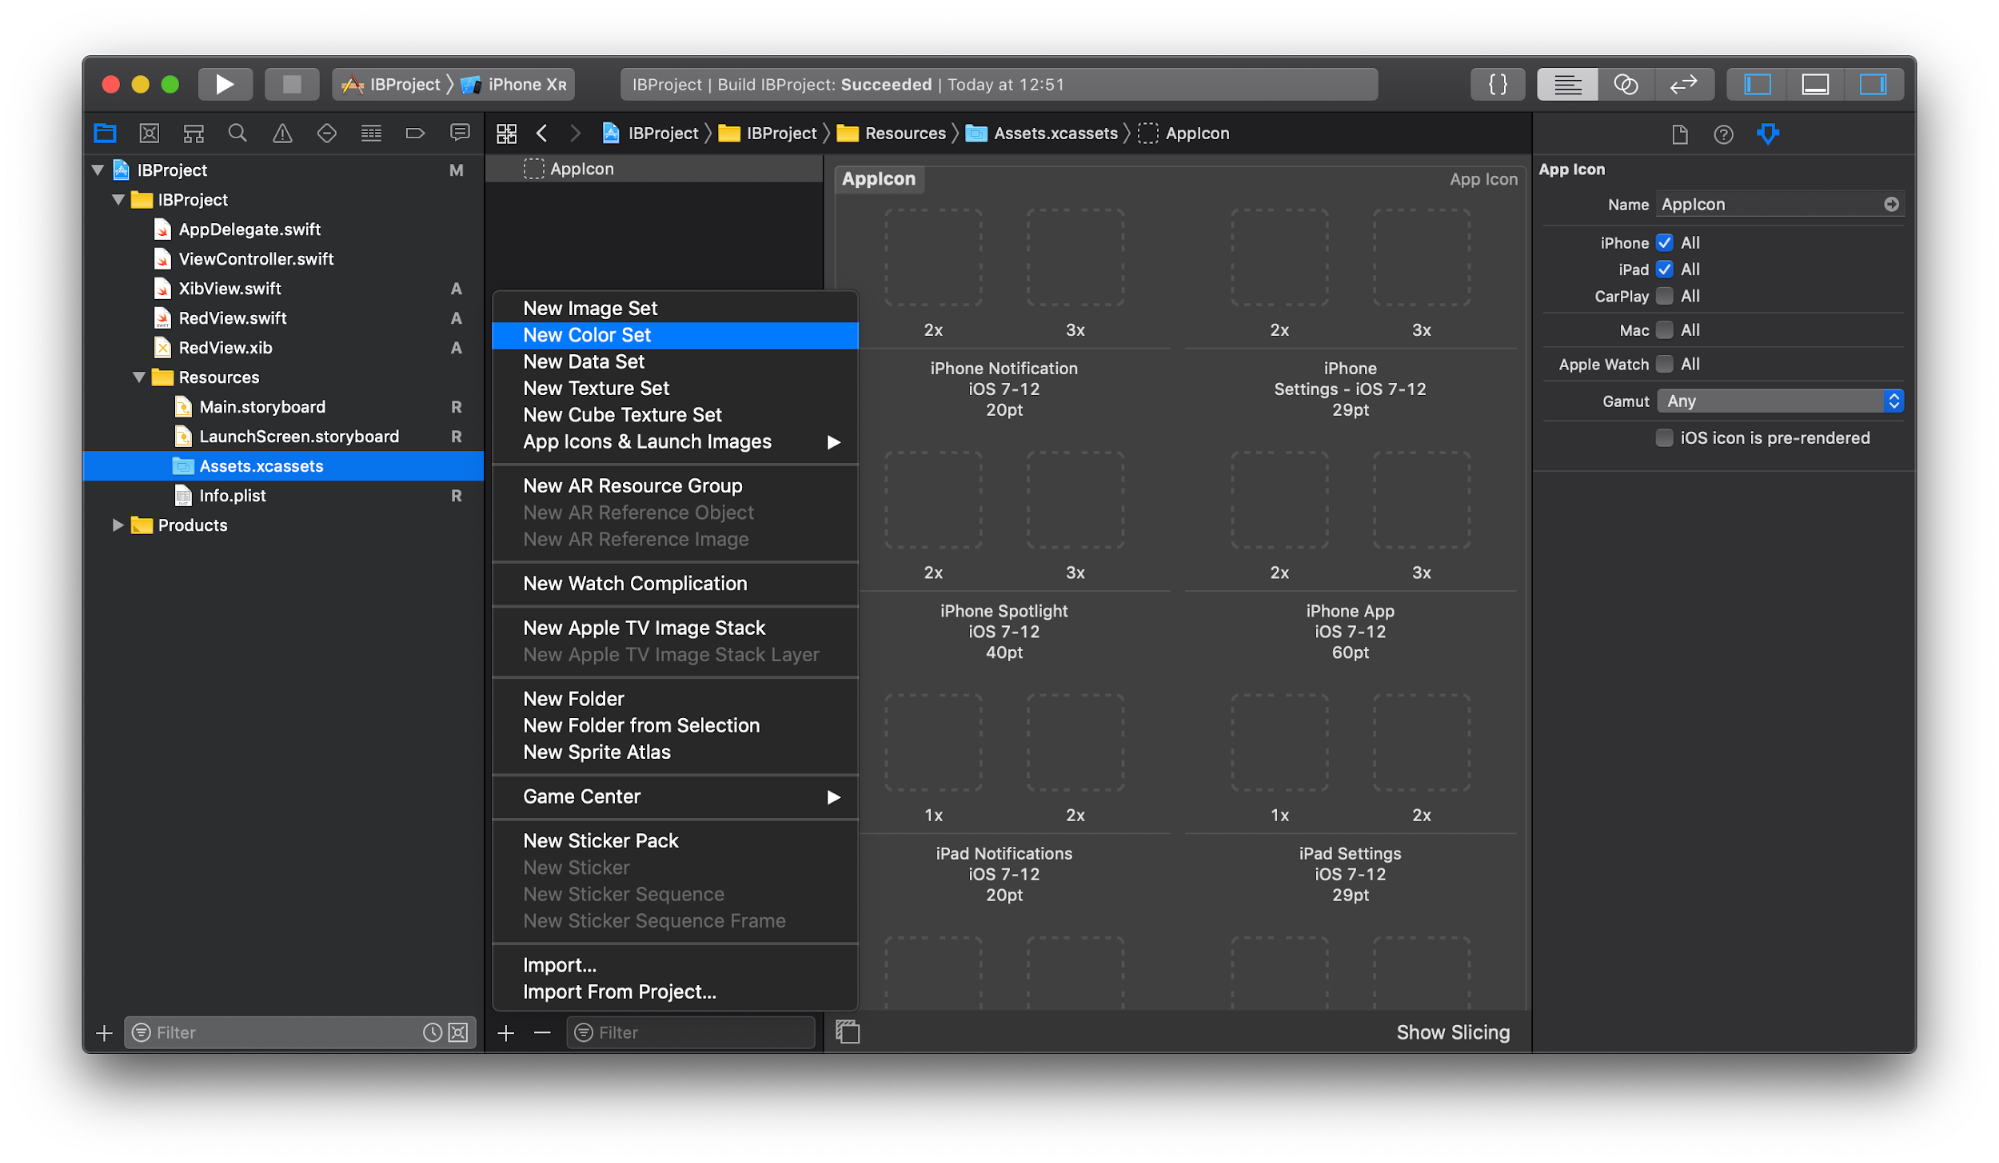
RedViewin the code occurs in the usual way:let redView = RedView()Another useful detail that not everyone can know about is the ability to add colors to the .xcassets directory . This allows you to change them globally in all Storyboards and Xibs where they are used.
To add color, click “+” at the bottom left and select “New Color Set”:
Specify the desired name and color:
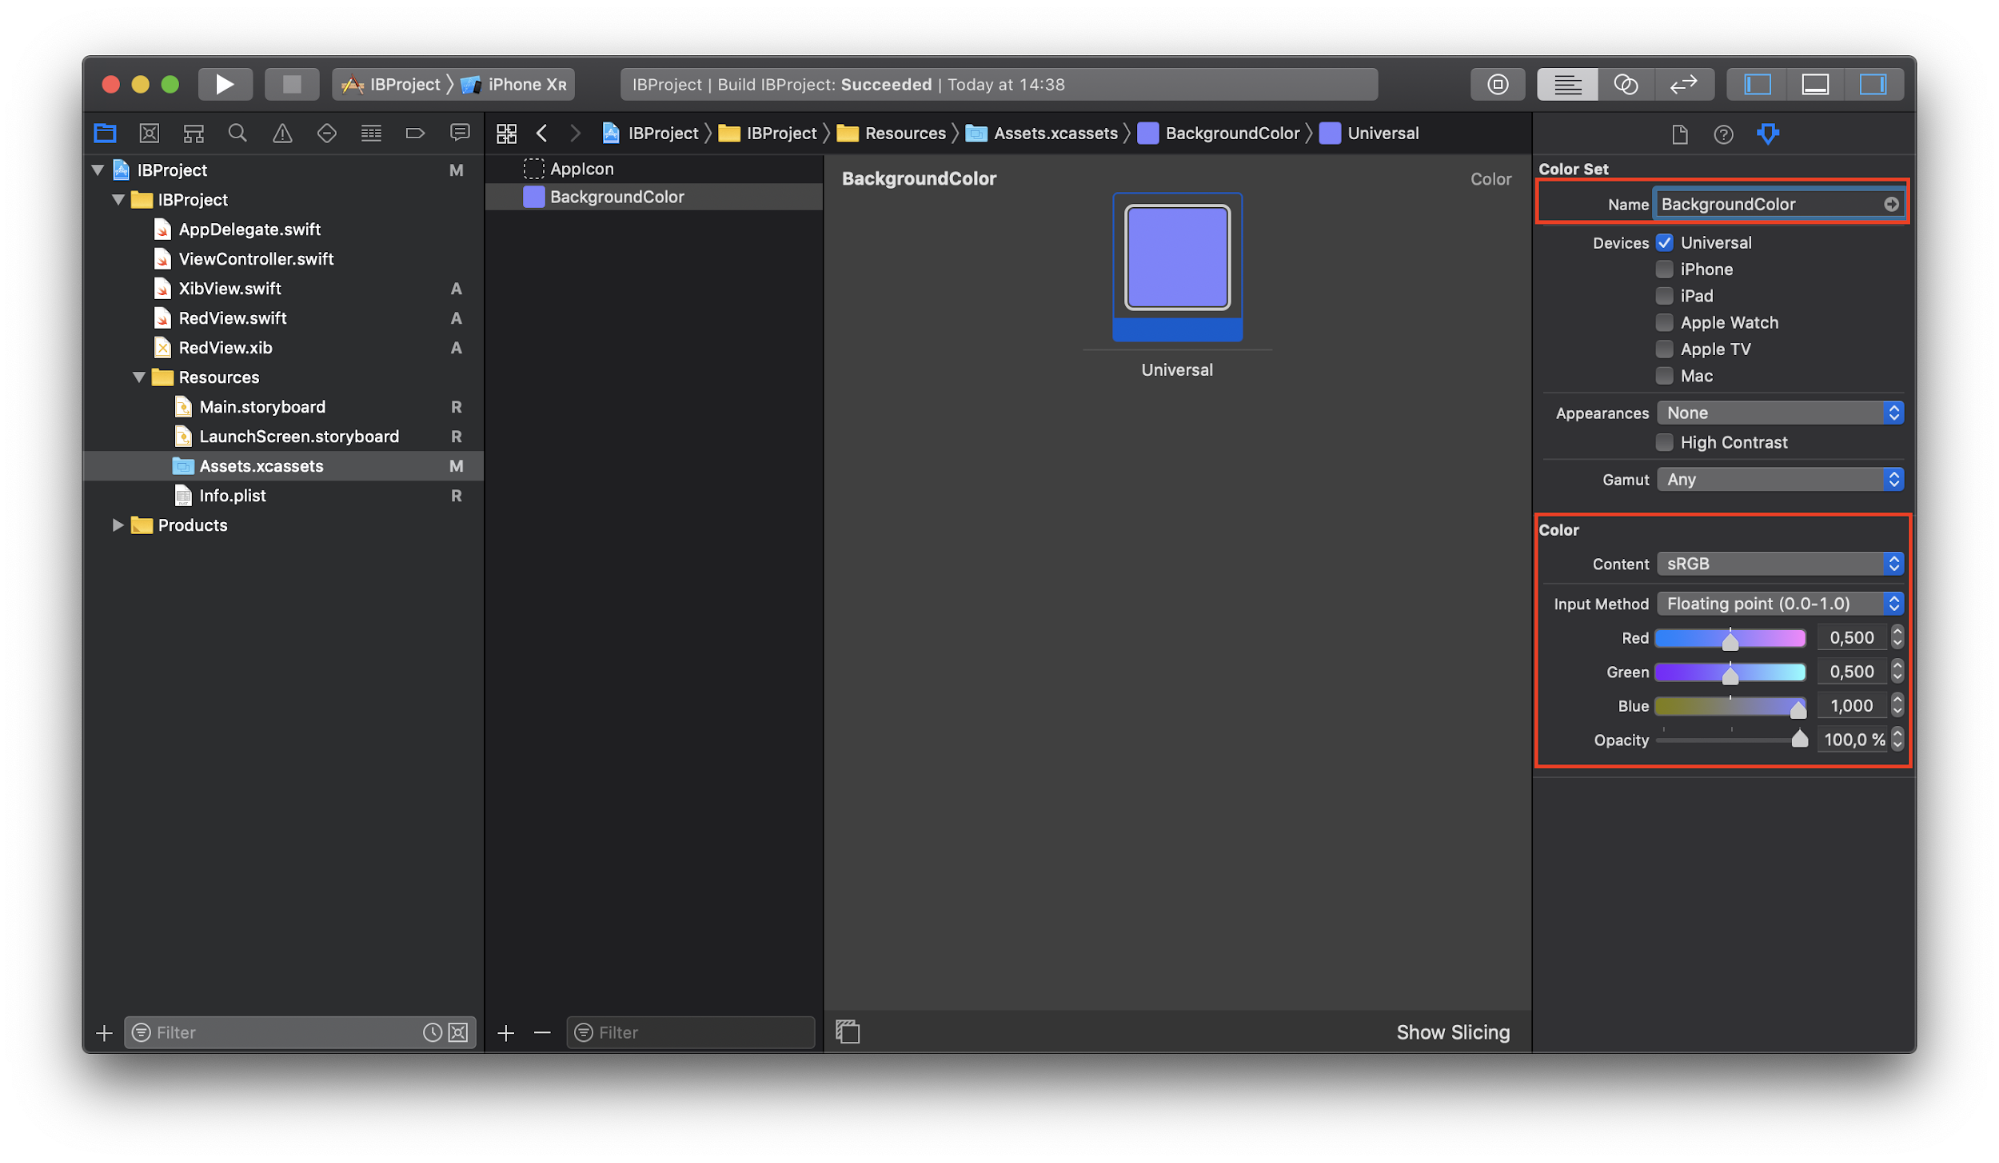
The created color will appear in the “Named Colors” section:
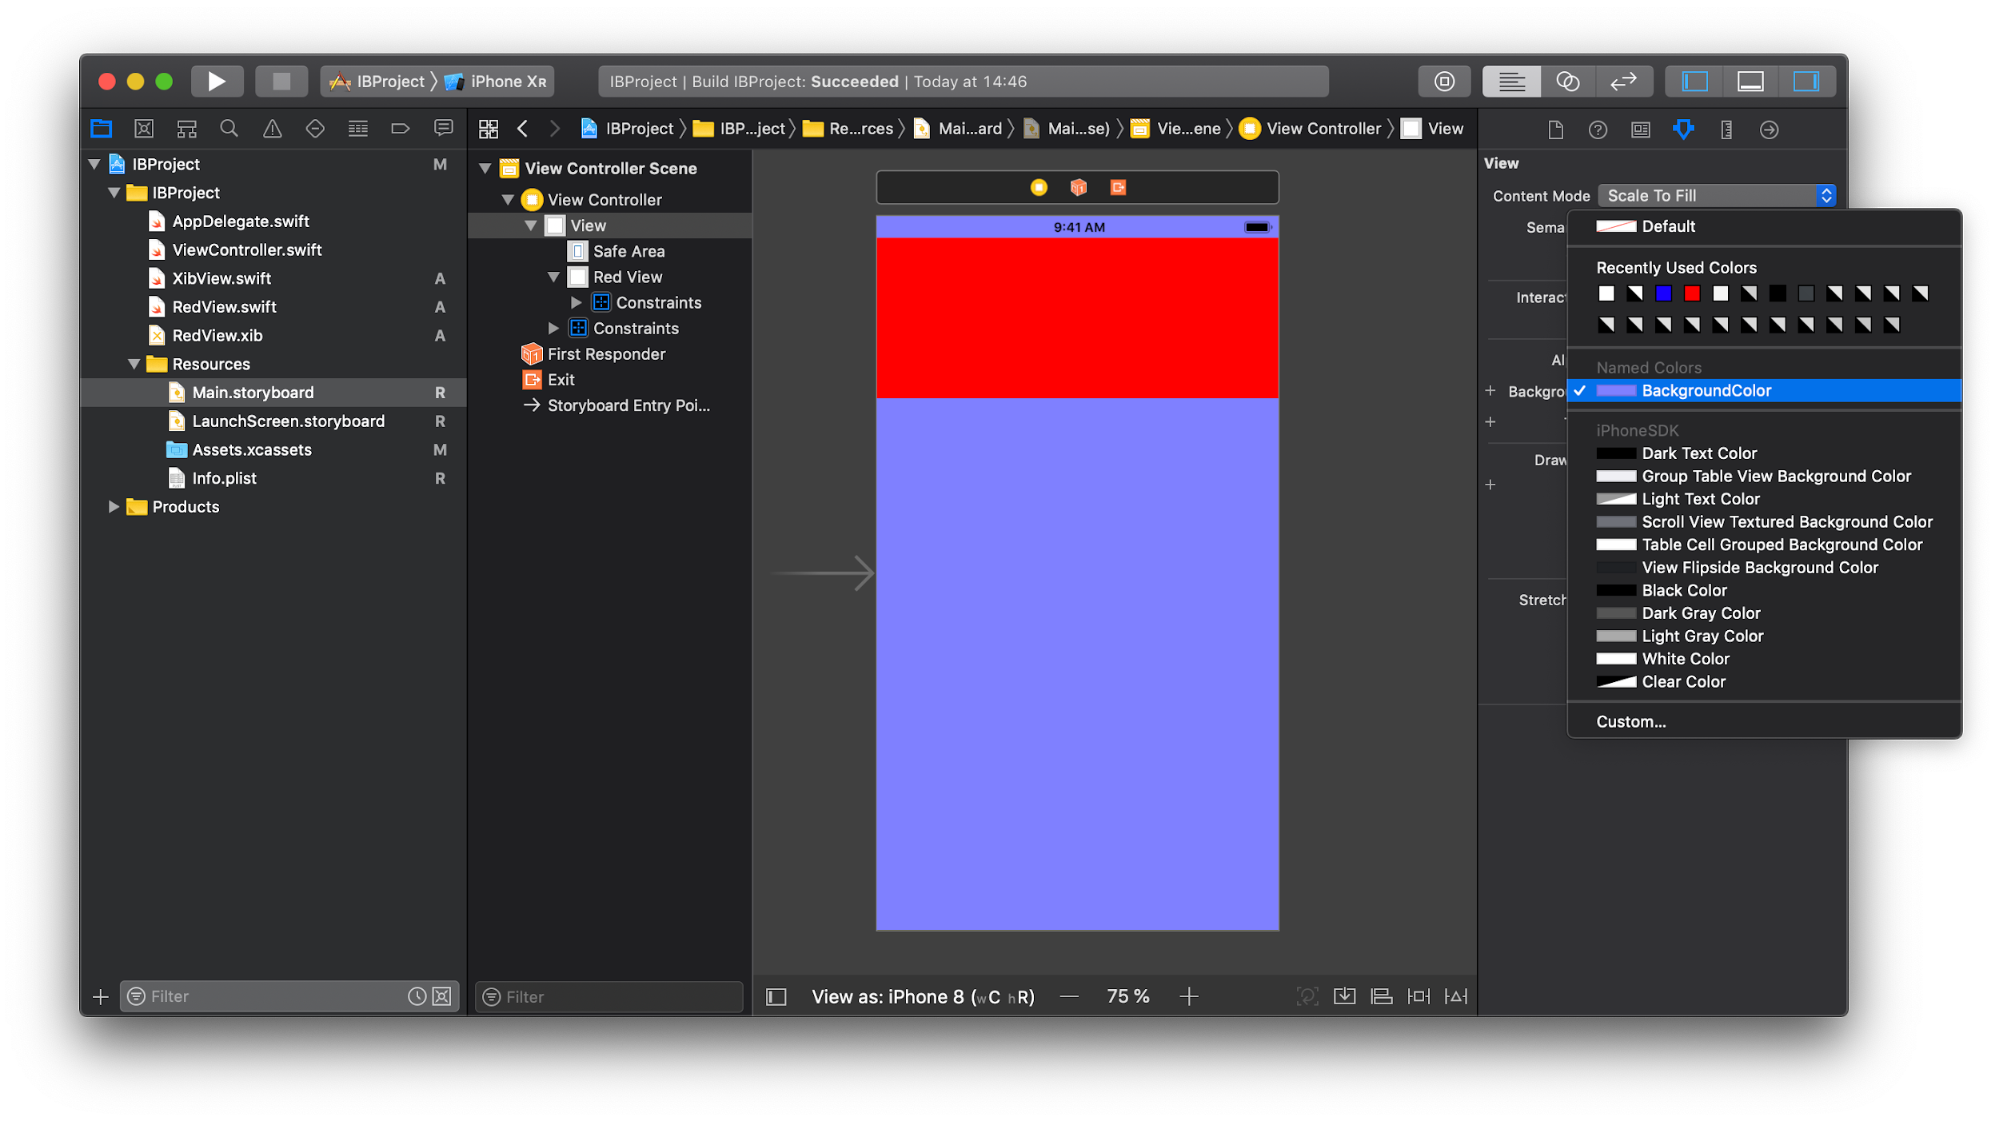
In addition, it can also be obtained in the code:
innerView.backgroundColor = UIColor(named: "BackgroundColor")
3. You cannot use custom initializers for those UIViewControllerscreated in the Storyboard
In the case of Storyboard, we cannot pass dependencies in initializers
UIViewControllers. Usually it looks like this:override func prepare(for segue: UIStoryboardSegue, sender: Any?) {
guard segue.identifier == "detail", let detailVC = segue.destination as? DetailViewController else {
return
}
let object = Object()
detailVC.object = object
}This code can be better done using some kind of constant to represent identifiers or tools like SwiftGen and R.swift , or maybe even Perform . But in this way we only get rid of string literals and add syntactic sugar, and do not solve the problems that arise:
- How do I know how to configure in the example above
DetailViewController? If you are new to the project and do not have this knowledge, you will have to open a file with a description of this controller and study it. - Properties
DetailViewControllerare set after initialization, which means they must be optional. It is necessary to handle cases when a property is equalnil, otherwise the application may crash at the most inopportune moment. You can mark properties as implicitly expanded optional (var object: Object!), but the essence will not change. - Properties must be marked as
var, notlet. So a situation is possible when someone from outside wants to change them.DetailViewControllermust handle such situations.
One solution is described in this article .
4. As the Storyboard grows, navigation in it becomes more difficult
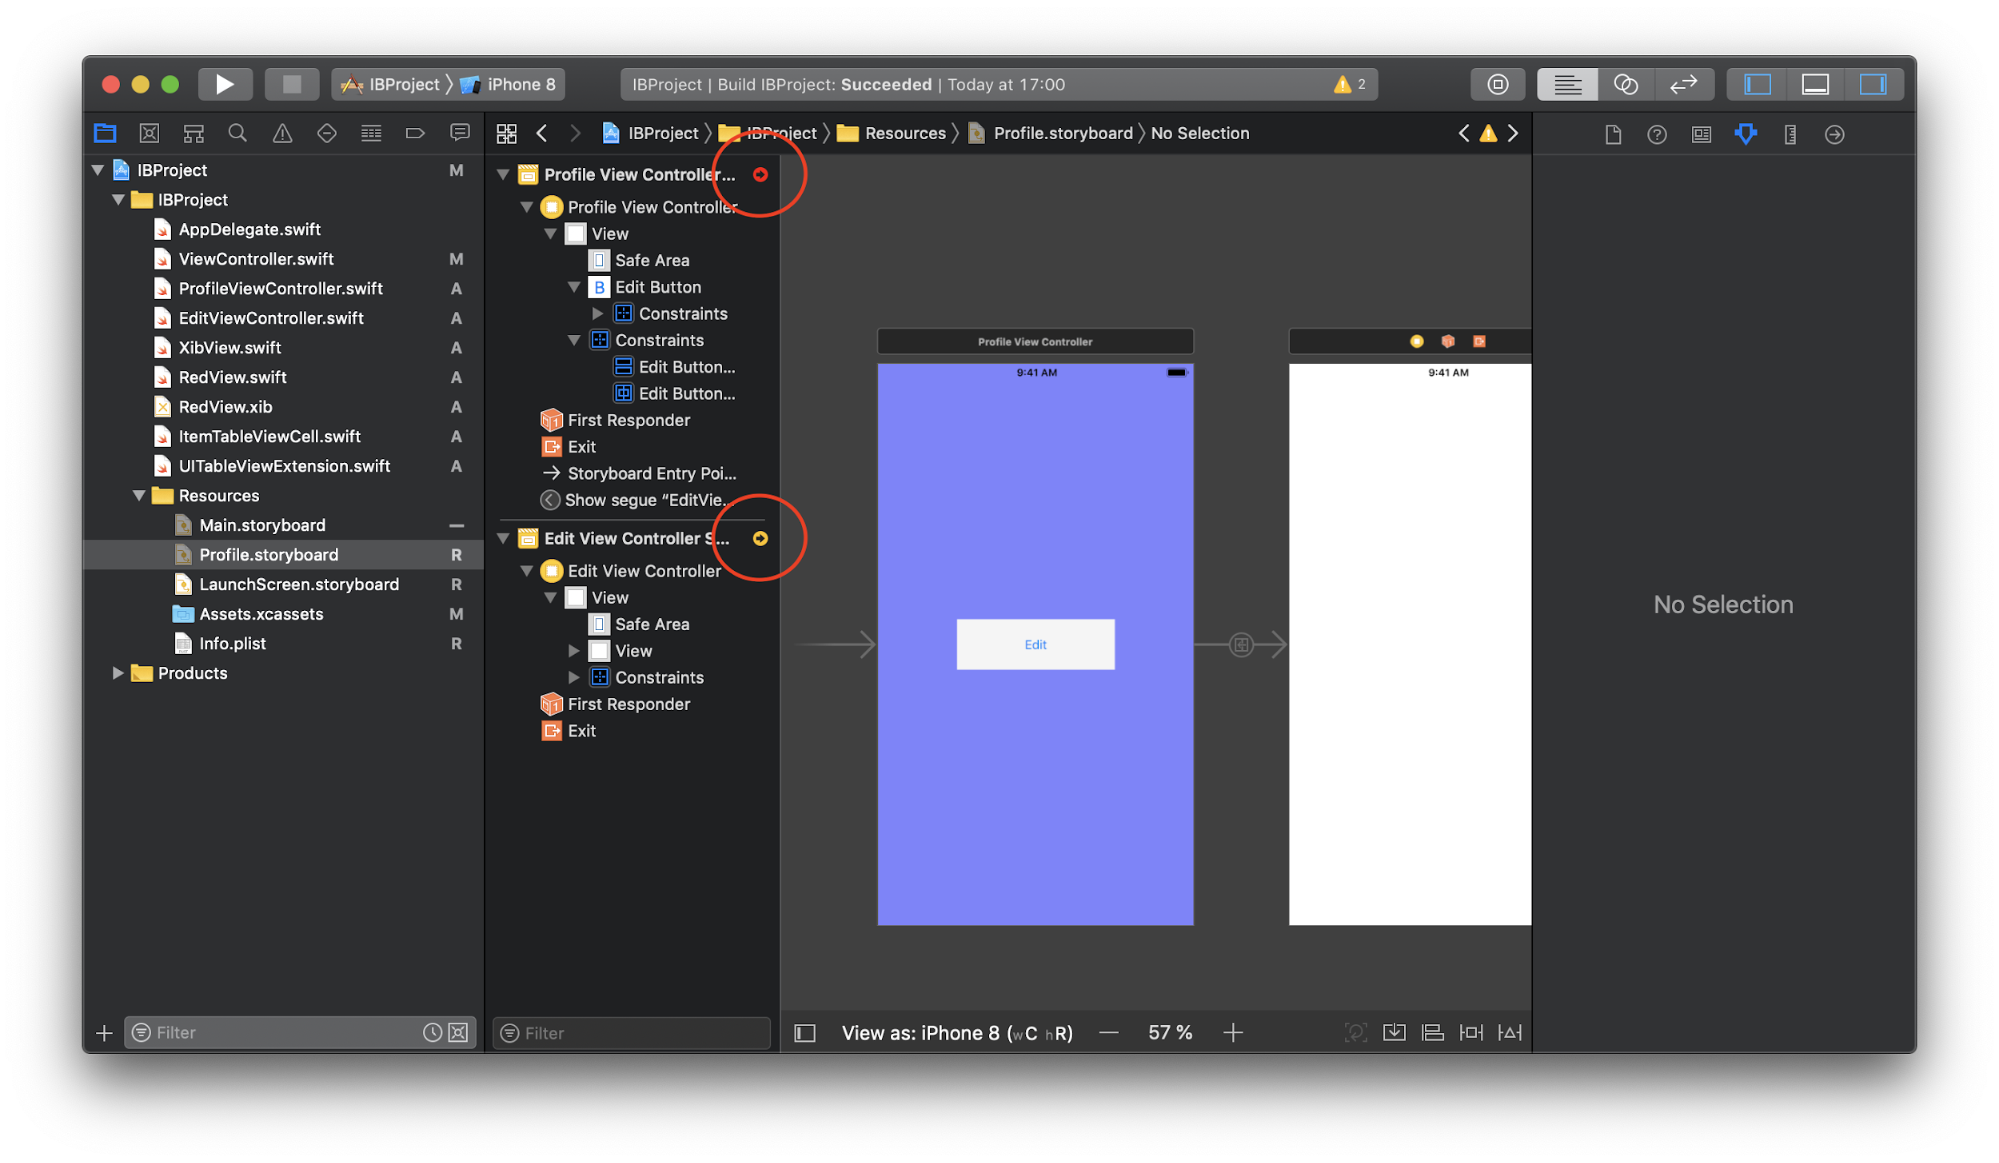
As we noted earlier, you do not need to put everything in one Storyboard, it is better to break it into several smaller ones. With the advent of the Storyboard Reference, it has become very simple.
Add the Storyboard Reference from the library of objects in the Storyboard:
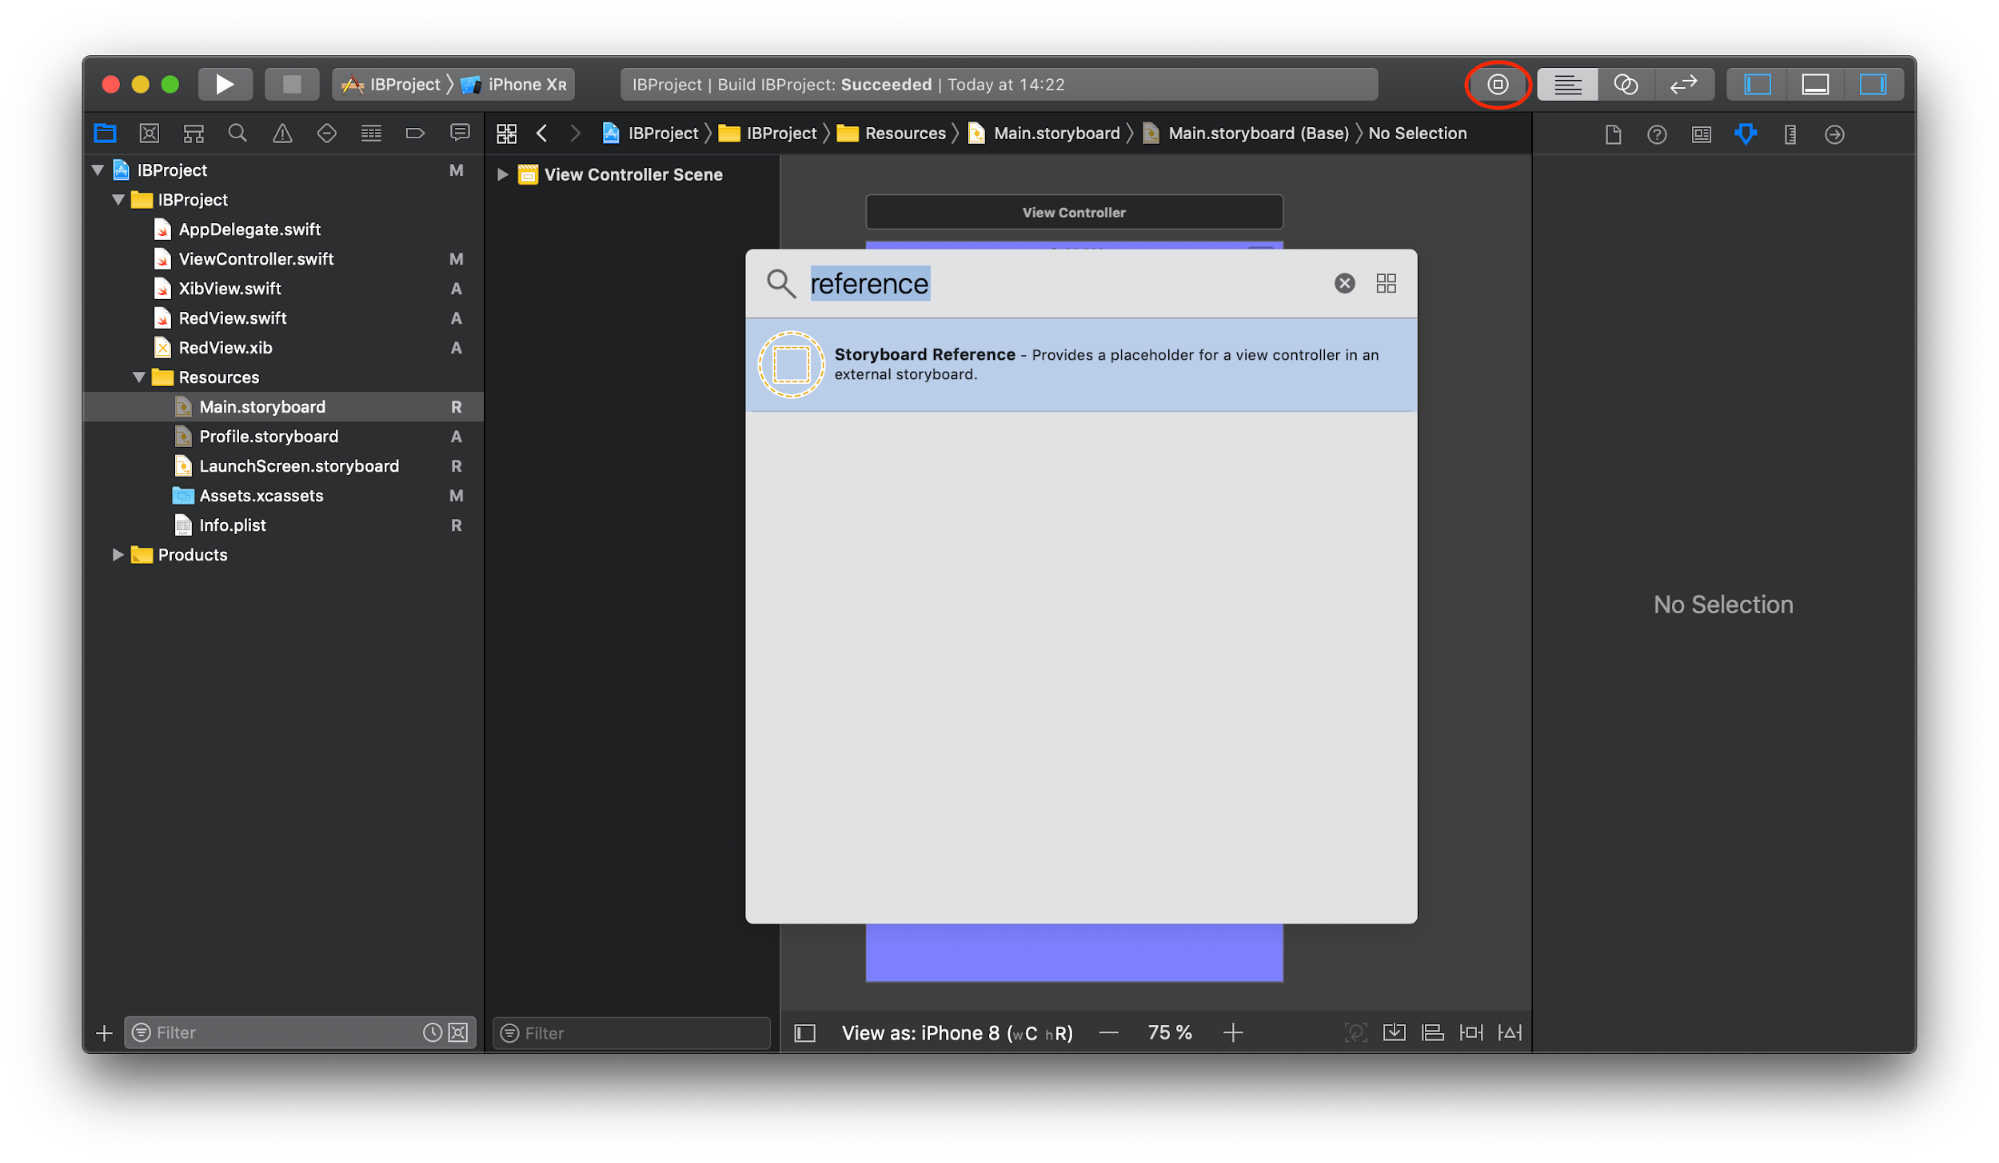
Set the required field values in the Attributes Inspector - this is the name of the Storyboard file and, if necessary, the Referenced ID , which corresponds to the Storyboard ID of the desired screen. By default, the Initial View Controller will be loaded :

If you specify an incorrect name in the Storyboard field or refer to a non-existent Storyboard ID, Xcode will warn about this at the compilation stage.
5. Xcode slows down when loading storyboards
If the Storyboard contains a large number of screens with numerous constraints, then loading it will really take some time. But then again, it’s better to split the large Storyboard into smaller ones. Separately, they load much faster and it becomes more convenient to work with them.
6. Storyboards are fragile, a bug can cause the application to crash at runtime
The main weak points:
- Errors in identifiers
UITableViewCellandUICollectionViewCell. - Errors in segues identifiers.
- Using a subclass
UIViewthat no longer exists. - Synchronization
IBActionsandIBOutletscode.
All this and some other problems can lead to the crash of the application at runtime, which means that it is likely that such errors will fall into the release build. For example, when we set cell identifiers or segues in the Storyboard, they should be copied to the code wherever they are used. By changing the identifier in one place, it must be changed in all the rest. There is a possibility that you will simply forget about it or make a typo, but only learn about the error while the application is running.
You can reduce the likelihood of errors by getting rid of string literals in your code. For this, identifiers can
UITableViewCellalso UICollectionViewCellbe assigned the names of the cell classes themselves: for example, the identifier ItemTableViewCellis the string “ItemTableViewCell”. In the code, we get the cell like this:let cell = tableView.dequeueReusableCell(withIdentifier: String(describing: ItemTableViewCell.self)) as! ItemTableViewCellYou can add to the
UITableViewappropriate generic function:extension UITableView {
open func dequeueReusableCell() -> T where T: UITableViewCell {
return dequeueReusableCell(withIdentifier: String(describing: T.self)) as! T
}
} And then it becomes easier to get the cell:
let cell: ItemTableViewCell = tableView.dequeueReusableCell()If you suddenly forget to specify the value of the cell identifier in the Storyboard, Xcode will display a warning, so you should not ignore them.
As for segues identifiers, you can use enumerations for them. Let's create a special protocol:
protocol SegueHandler {
    associatedtype SegueIdentifier: RawRepresentable
}UIViewControllerthat supports this protocol will need to define a nested type with the same name. It lists all segues identifiers that this one UIViewControllercan process:extension StartViewController: SegueHandler {
enum SegueIdentifier: String {
case signIn, signUp
}
}In addition, in the protocol extension,
SegueHandlerwe define two functions: one accepts UIStoryboardSegueand returns the value corresponding to it SegueIdentifier, and the other simply calls performSegue, accepting the input SegueIdentifier:extension SegueHandler where Self: UIViewController, SegueIdentifier.RawValue == String {
func performSegue(withIdentifier segueIdentifier: SegueIdentifier, sender: AnyObject?) {
performSegue(withIdentifier: segueIdentifier.rawValue, sender: sender)
}
func segueIdentifier(for segue: UIStoryboardSegue) -> SegueIdentifier {
guard let identifier = segue.identifier, let identifierCase = SegueIdentifier(rawValue: identifier) else {
fatalError("Invalid segue identifier \(String(describing: segue.identifier)).")
}
return identifierCase
}
}And now in
UIViewController, supporting the new protocol, prepare(for:sender:)you can work with as follows:extension StartViewController: SegueHandler {
enum SegueIdentifier: String {
case signIn, signUp
}
override func prepare(for segue: UIStoryboardSegue, sender: Any?) {
switch segueIdentifier(for: segue) {
case .signIn:
print("signIn")
case .signUp:
print("signUp")
}
}
}And run segue like this:
performSegue(withIdentifier: .signIn, sender: nil)If you add a new identifier to
SegueIdentifier, then Xcode will force it to process in switch/case. Another option to get rid of string literals like identifiers segues and others is to use code generation tools like R.swift .
7. Storyboards are less flexible than code.
Yes this is true. If the task is to create a complex screen with animations and effects that the Storyboard cannot handle, then you need to use the code!
8. Storyboards do not allow changing the type of special UIViewControllers
For example, when you need to change the type
UITableViewControllerto UICollectionViewController, you have to delete the object, add a new one with another type and reconfigure it again. Although this is not a frequent case, it is worth noting that such changes are made faster in the code.9. Storyboards add two additional dependencies to the project. They may contain errors that the developer cannot fix.
This is Interface Builder and the Storyboards parser. Such cases are rare and can often be circumvented by other solutions.
10. Sophisticated code review
Keep in mind that code review is not really a bug search. Yes, they are found in the process of viewing the code, but the main goal is to identify weaknesses that can create problems in the long run. For Storyboards, this is primarily the work of Auto Layout . There should not be any ambiguous and misplaced . To find them, just use the search in the Storyboard XML for the lines “ambiguous =“ YES ”” and “misplaced =“ YES ”” or just open the Storyboard in Interface Builder and look for red and yellow dots:
However, this may not be enough. Conflicts between constraints can also be detected while the application is running. If a similar situation occurs, information about this is displayed in the console. Such cases are not uncommon, therefore, their search should also be taken seriously.
Everything else is the correspondence of the position and size of elements with the design, the correct binding
IBOutletsand IBActions- not for code review. In addition, it is important to make commits more often, then it will be easier for the reviewer to view the changes in small pieces. He will be better able to delve into the details without missing anything. This, in turn, will have a positive effect on the quality of the code review.
Total
In the list of Storyboards flaws, I left 4 items (in descending order of their value):
- Storyboards have a hard time managing conflicts when merging changes.
- Storyboards are less flexible than code.
- Storyboards are fragile, an error can lead to a crash at runtime.
- You cannot use custom initializers for those
UIViewControllerscreated in the Storyboard.
Benefits
1. Visualization of the user interface and constraints
Even if you are a beginner and just started an unfamiliar project, you can easily find the entry point to the application and how to get to the desired screen from it. You know what each button, label or text field will look like, what position they will take, how constraints affect them, how they interact with other elements. With a few clicks, you can easily create a new one
UIView, customize its appearance and behavior. Auto Layout allows us to work withUIViewNaturally, as if we said: "This button should be to the left of that mark and have the same height with it." This user interface experience is intuitive and effective. You can try to give examples where well-written code saves more time when creating some UI elements, but globally this does not change much. Storyboard does its job well.Separately, note Auto Layout. This is a very powerful and useful tool, without which it would be difficult to create an application that supports all the many different screen sizes. Interface Builder allows you to see the result of working with Auto Layout without launching the application, and if some constraints do not fit into the general scheme, Xcode will immediately warn you about it. Of course, there are cases when Interface Builder is not able to provide the necessary behavior of some very dynamic and complex interface, then you have to rely on the code. But even in such situations, you can do most of it in Interface Builder and supplement it with just a couple of lines of code.
Let's look at a few examples that demonstrate the useful features of Interface Builder.
Dynamic tables based UIStackView
Создаем новый
UIViewController, добавляем UIScrollView на весь экран: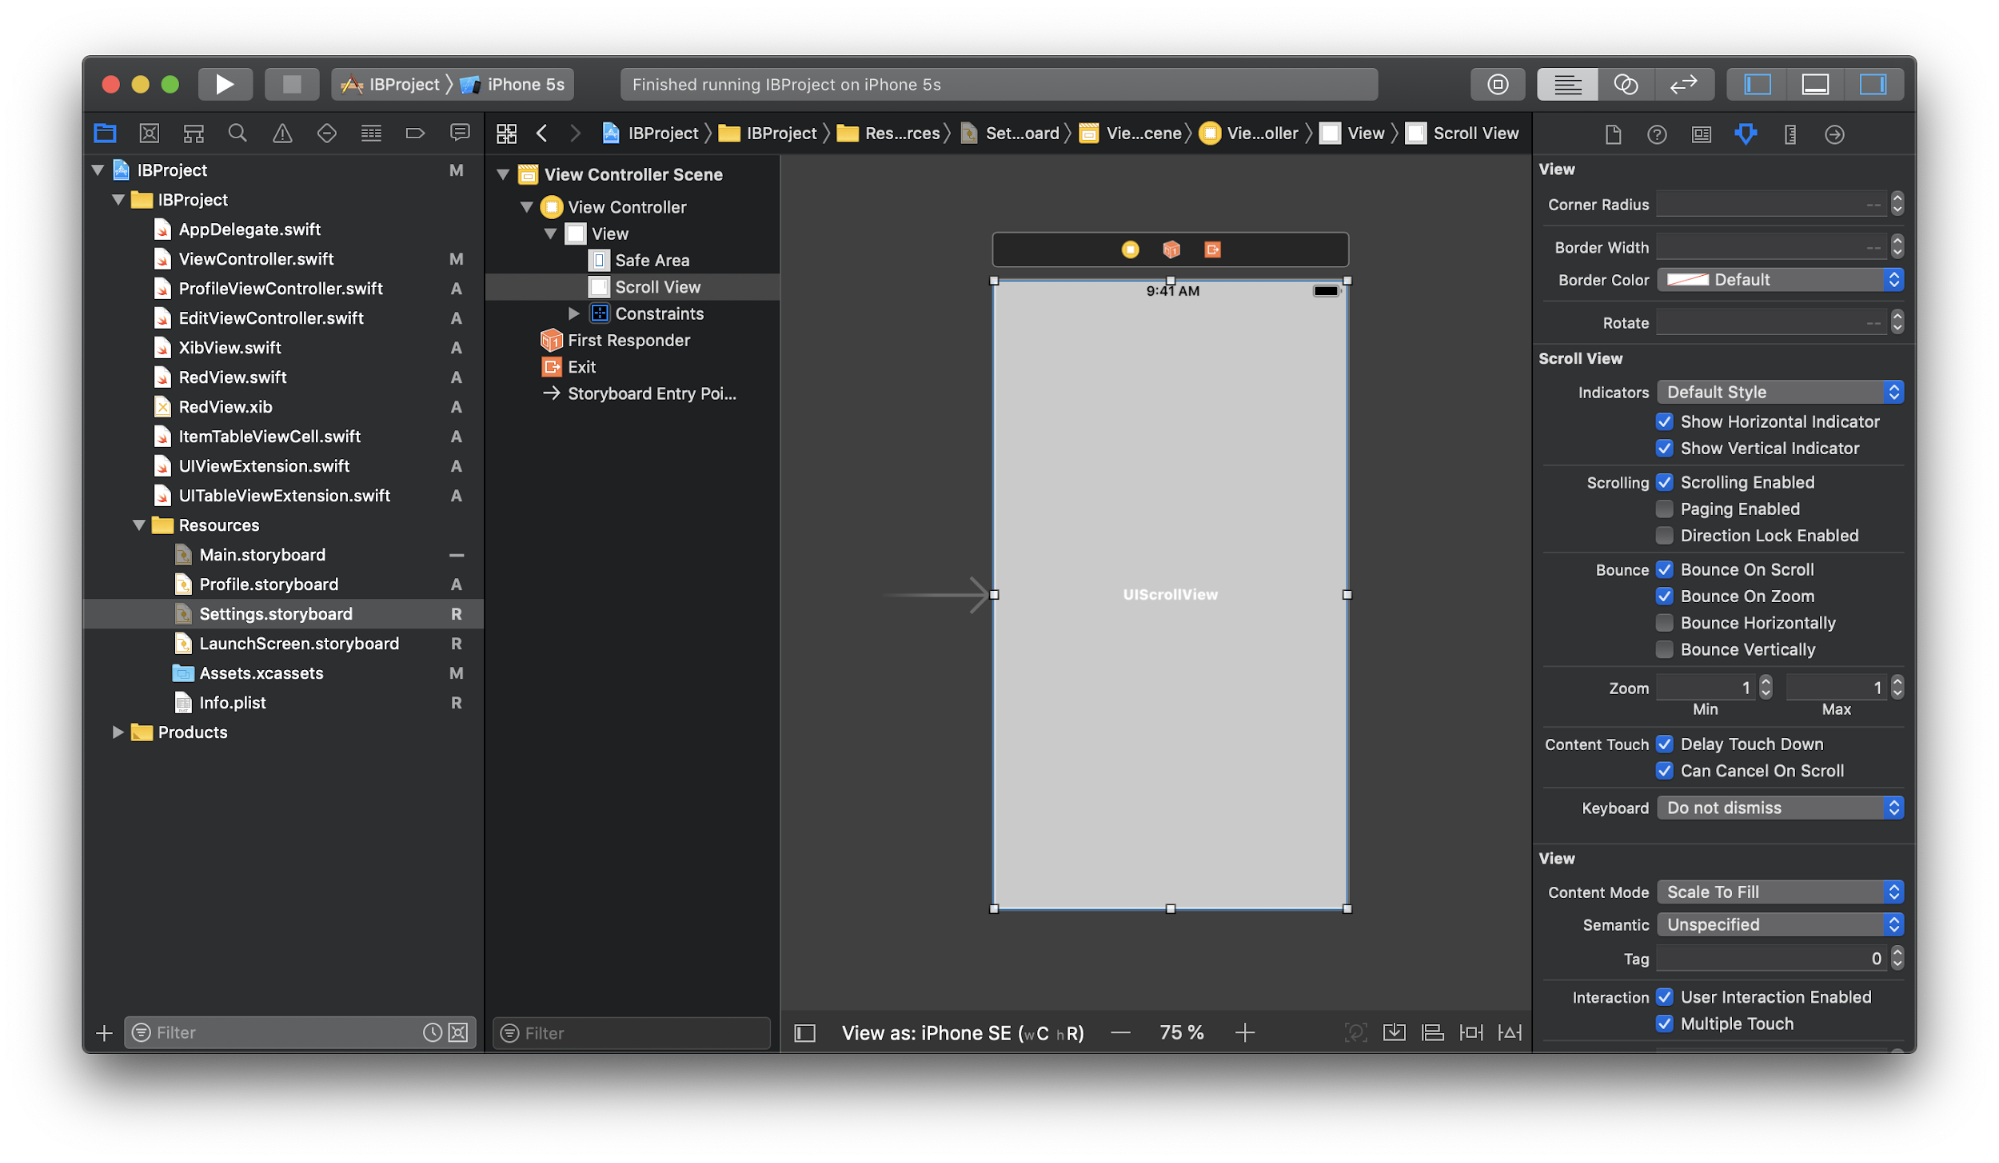
В
UIScrollView добавляем вертикальный UIStackView, привязываем его к краям и устанавливаем высоту и ширину, равную UIScrollView. При этом высоте присвоим priority = Low (250):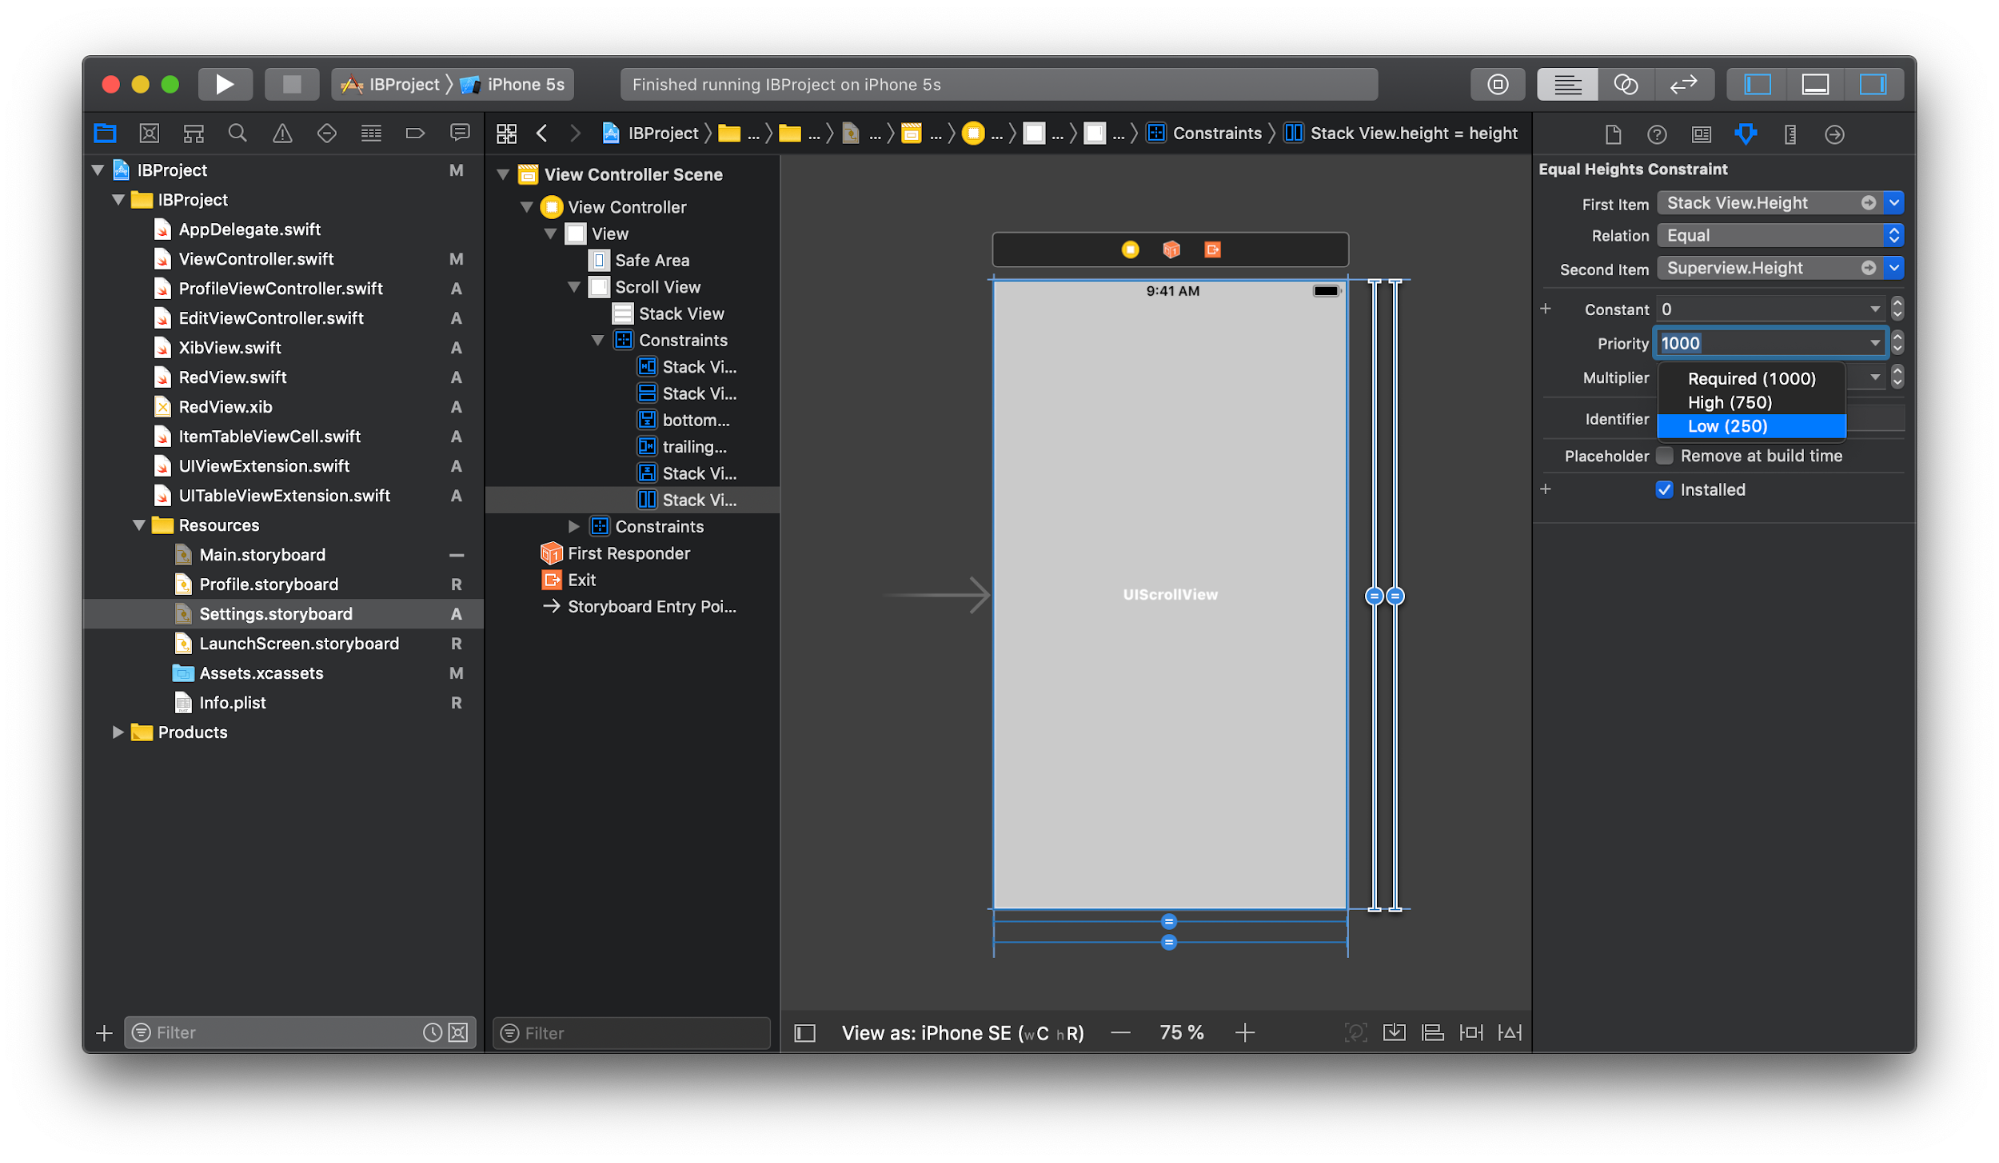
Далее создаем все необходимые ячейки и добавляем их в
UIStackView. Может это будут обычные UIView в единственном экземпляре, а может и переиспользуемые UIView, для которых мы создали свой Xib-файл. В любом случае, весь UI этого экрана – в Storyboard, а благодаря правильно настроенному Auto Layout прокрутка будет работать идеально, подстраиваясь под содержимое:
Мы также можем сделать, чтобы ячейки адаптировались под размеры своего контента. Добавим в каждую ячейку по
UILabel, привяжем их к краям:
It’s already clear how this will all look at run time. You can attach any actions to the cells, for example, switching to another screen. And all this without a single line of code.
Moreover, if you install
hidden = truefor UIViewfrom UIStackView, then it will not only hide, but also will not occupy space. UIStackViewautomatically recounts its sizes: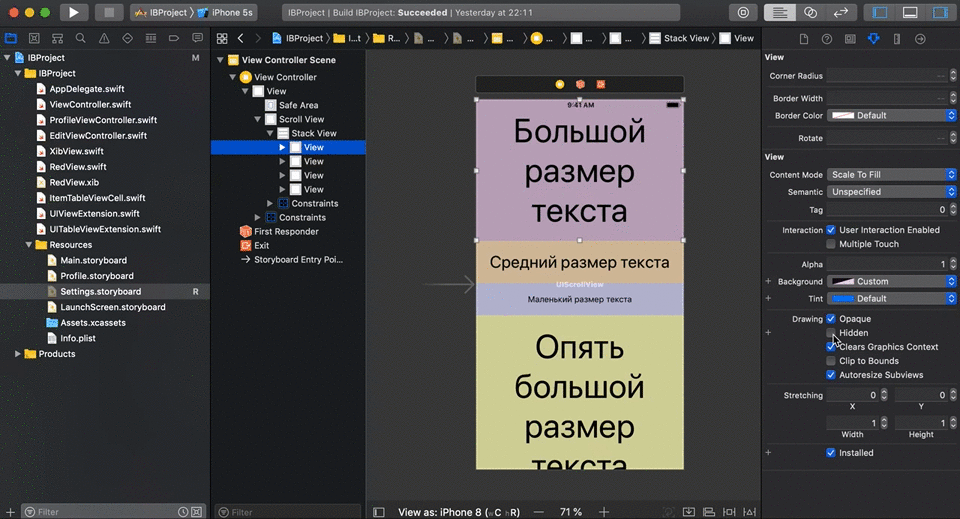
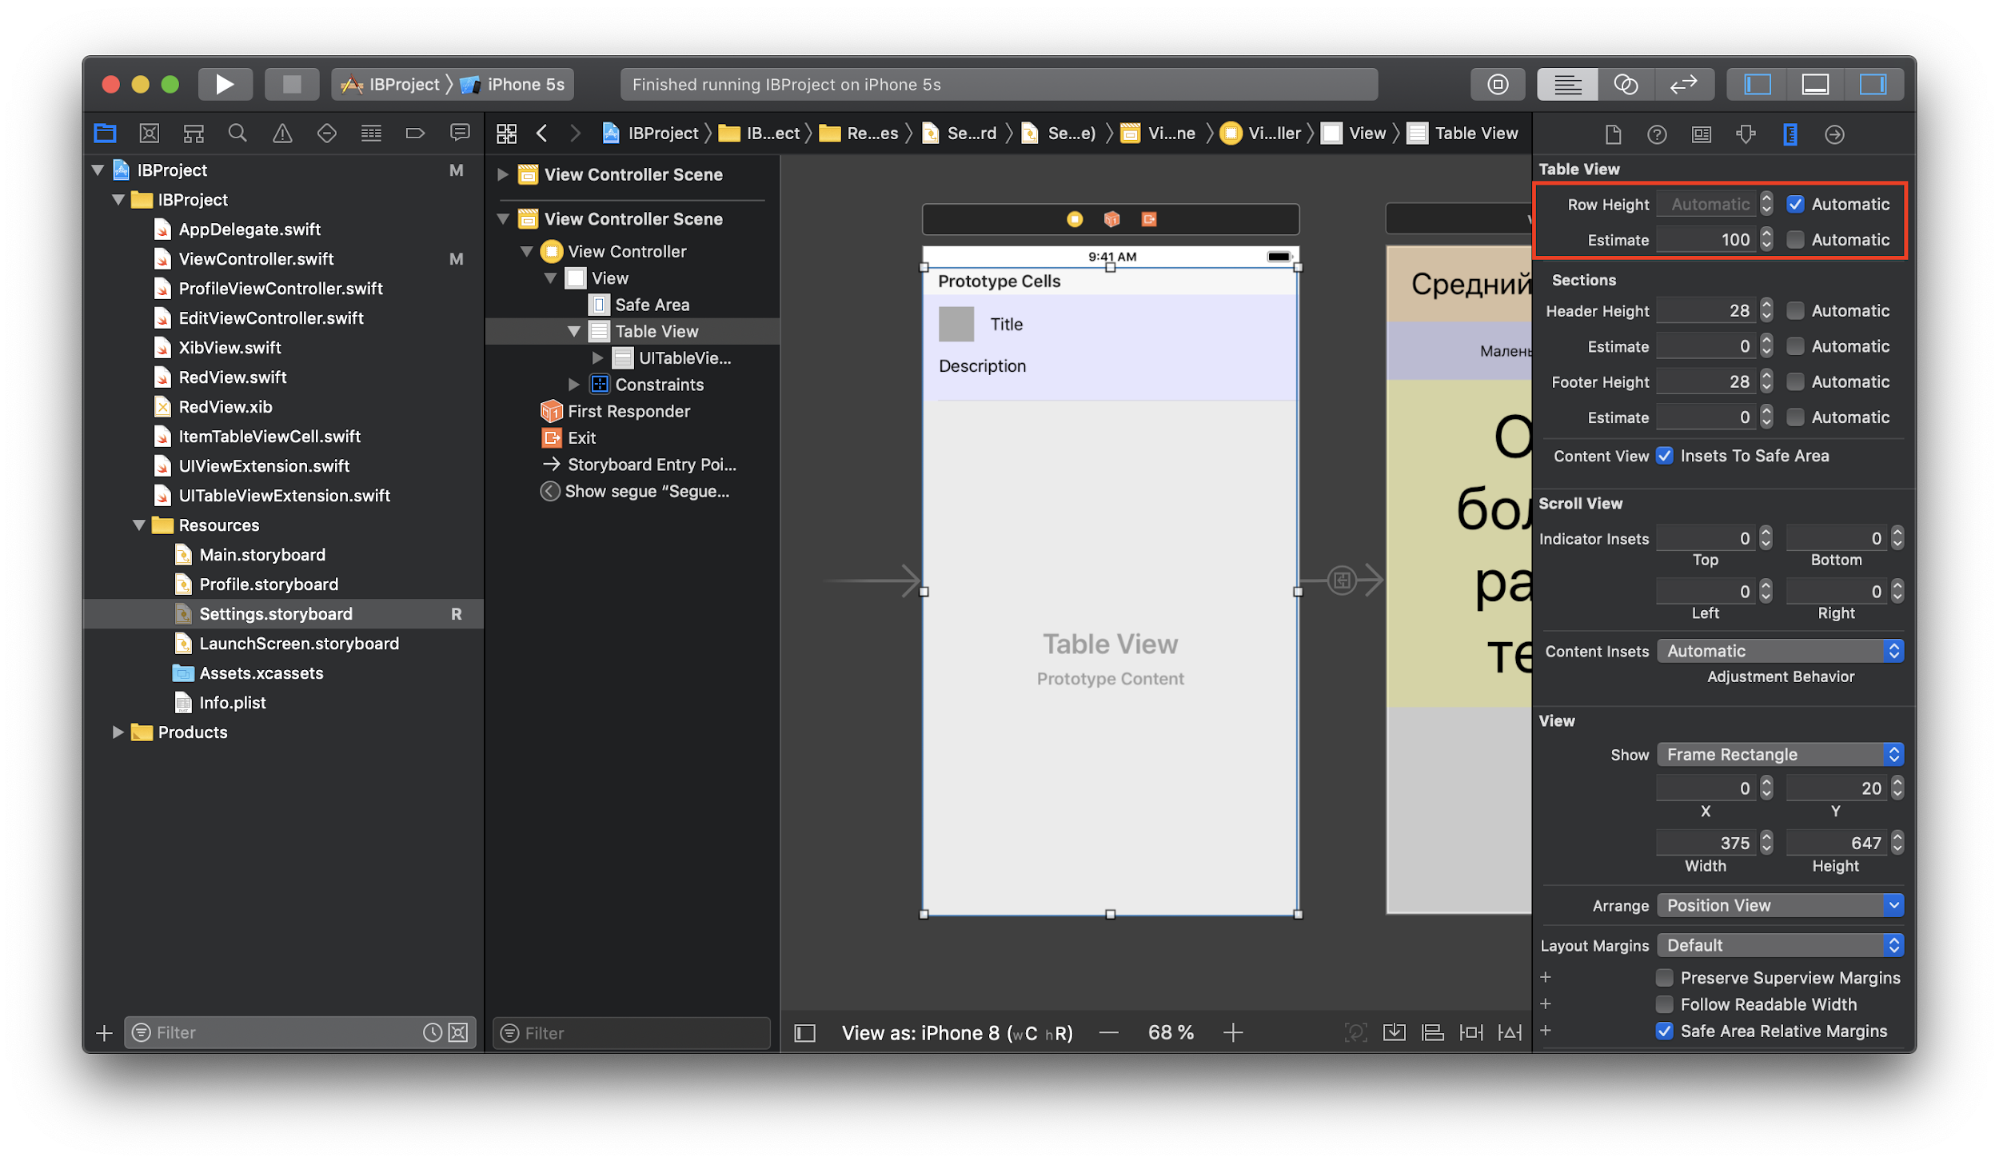
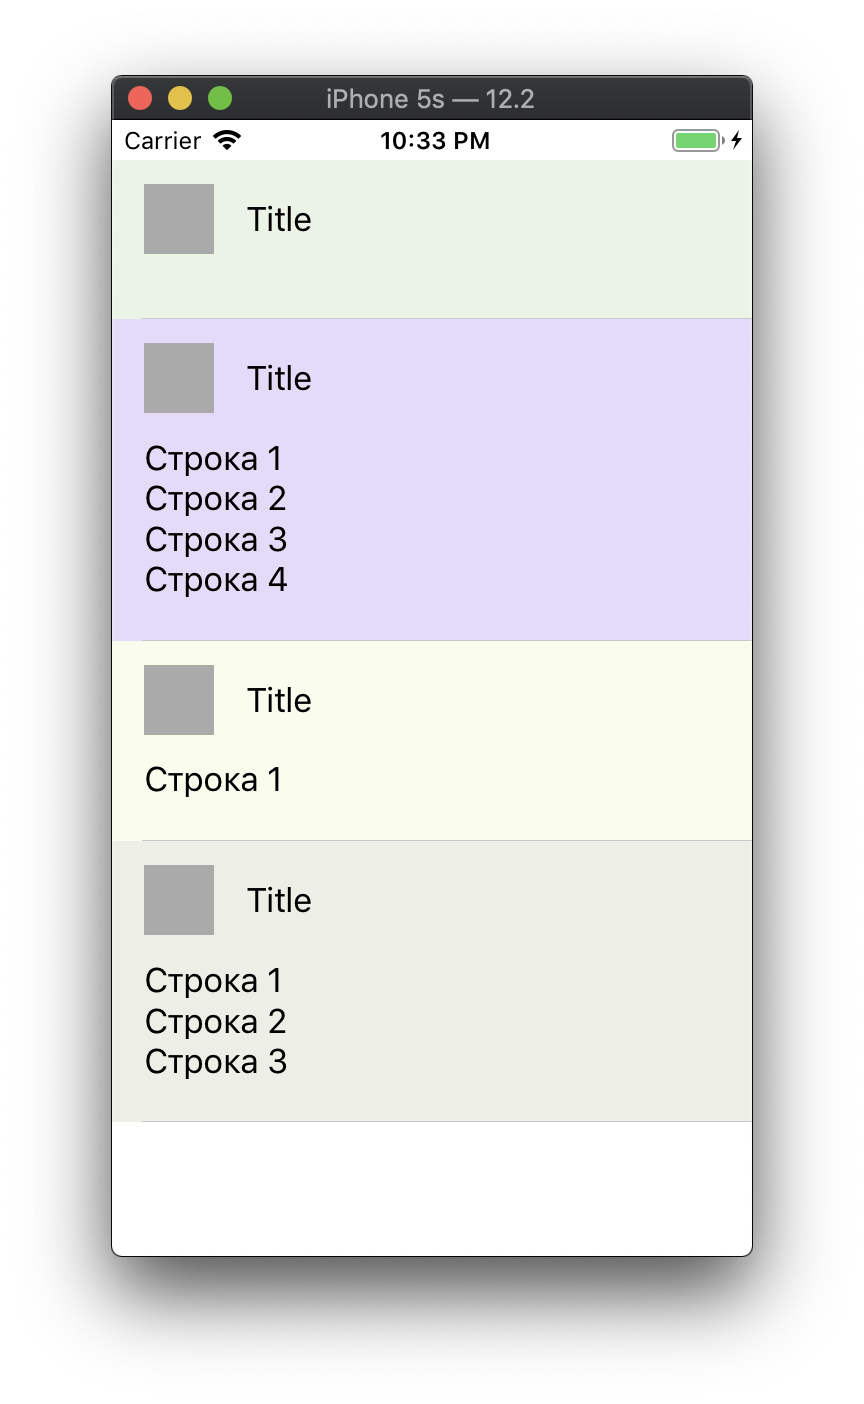
Self-sizing cells
Set Row Height = Automatic in the Size inspector of the table , and Estimate set it to some average value: For this to work, constraints must be correctly configured in the cells themselves and allow exact calculation of the cell height based on the contents at run time. If it’s not clear what is at stake, there is a very good explanation in the official documentation . As a result, starting the application, we will see that everything is correctly displayed:
Self-sizing table
You need to implement this table behavior:
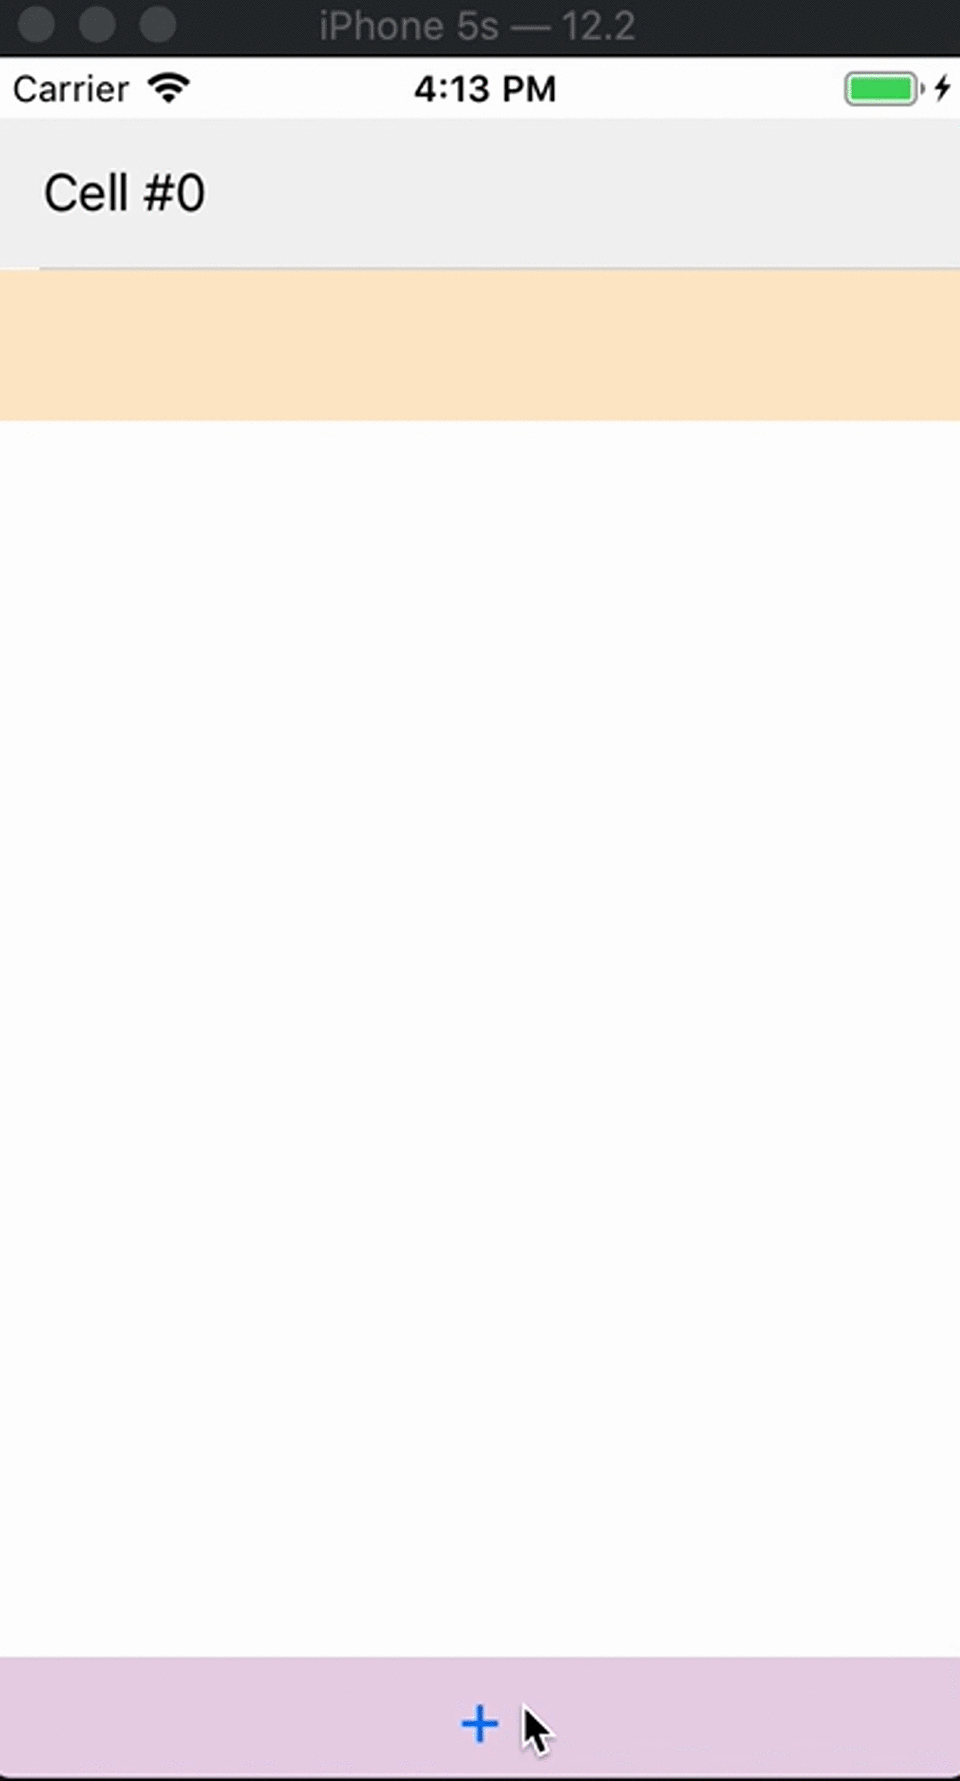
How to achieve such a dynamic change in height? In contrast
UILabel, UIButtonand other subclasses UIView, with the table to do a little more difficult as the Intrinsic Content Size does not depend on the size of the cells within it. She cannot calculate her height based on the content, but there is an opportunity to help her with this. Note that at some point in the video the height of the table stops changing, reaching a certain maximum value. This can be achieved by setting the table height constraint with the value Relation = Less Than Or Equal :

At this stage, Interface Builder does not yet know what height the table will be, he only knows its maximum value equal to 200 (from height constraint). As noted earlier, Intrinsic Content Size is not equal to the contents of the table. However, we have the opportunity to set the placeholder in the Intrinsic Size field :
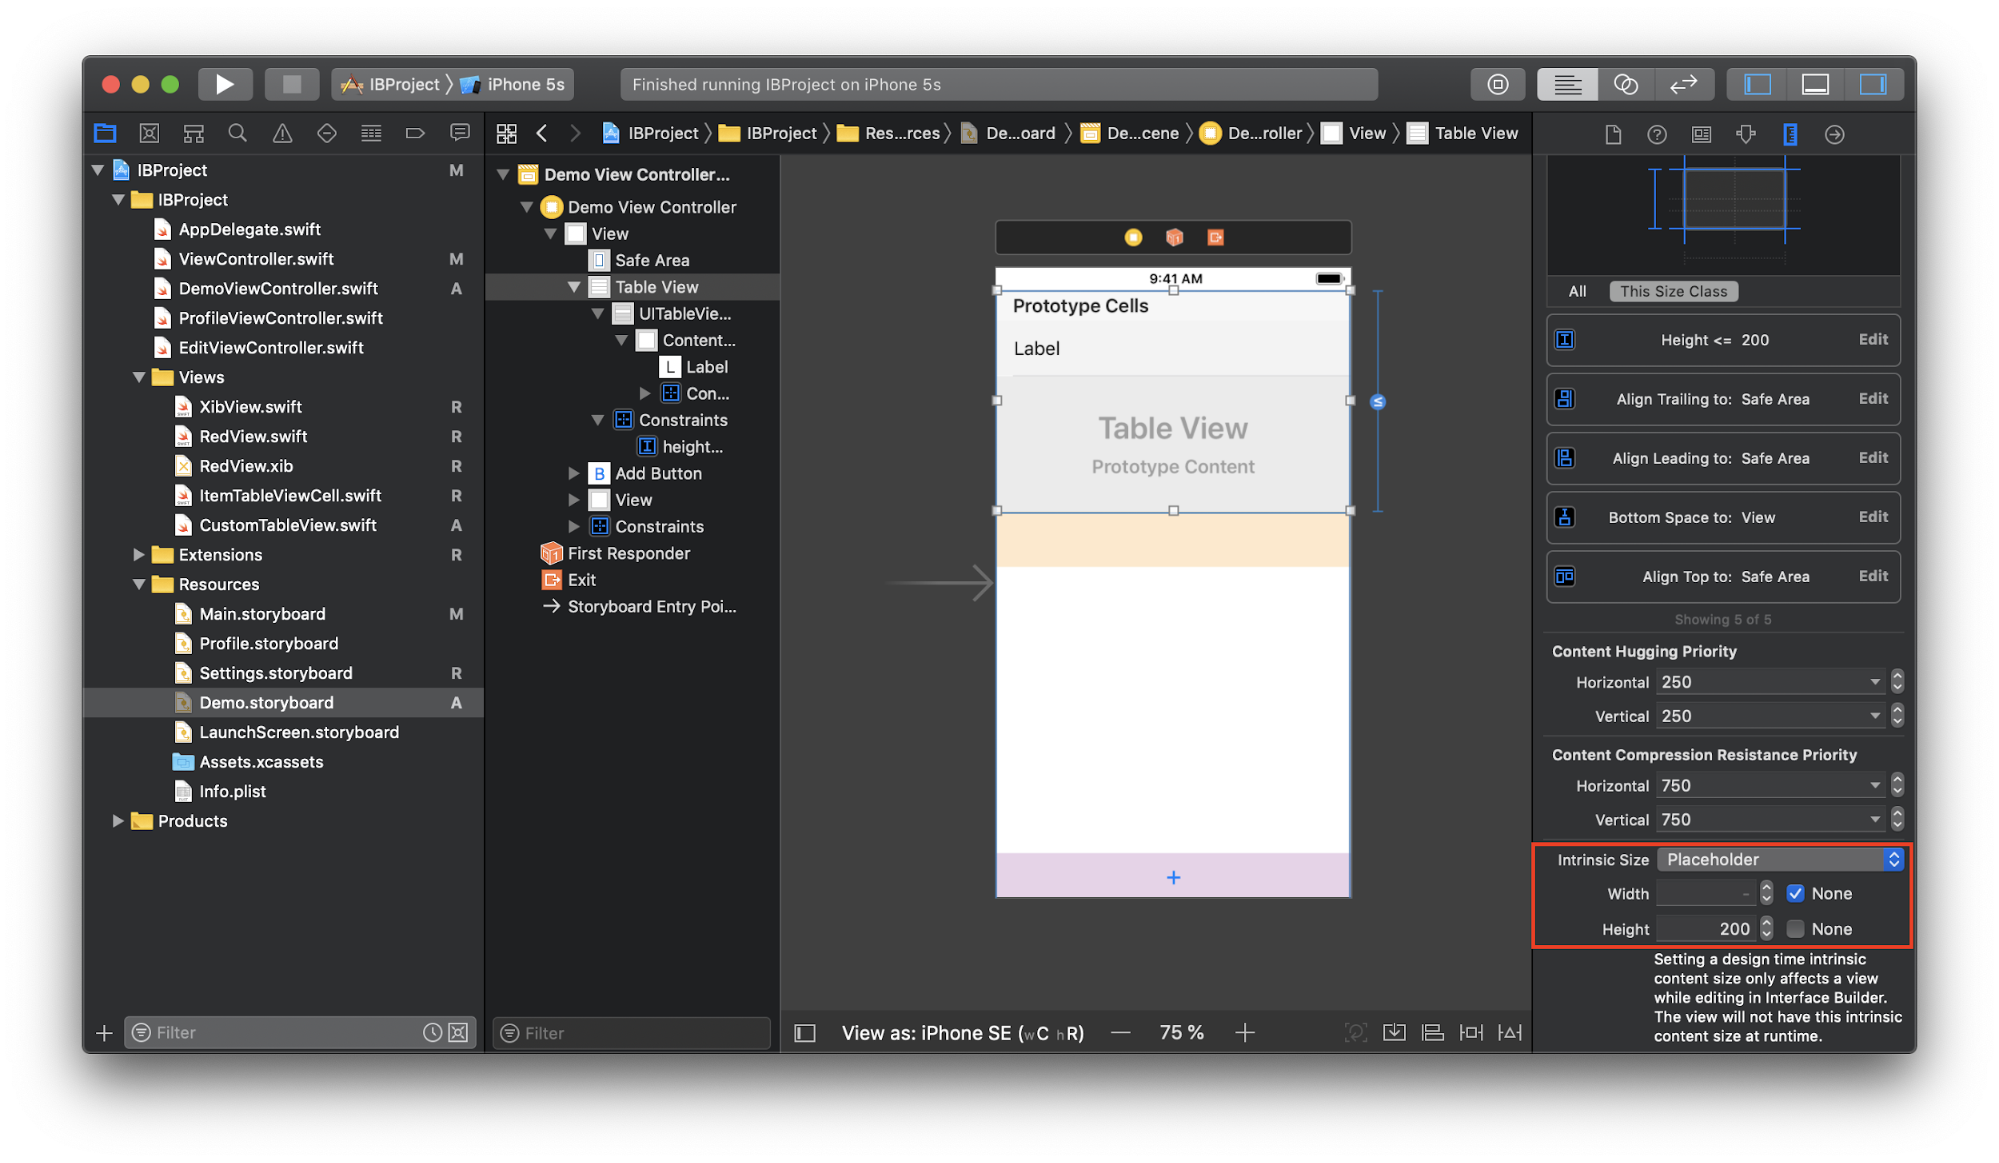
This value is valid only for the duration of the work with Interface Builder. Of course, Intrinsic Content Size does not have to be equal to this value at runtime. We just told Interface Builder that everything is under control.
Next, create a new subclass of the table
CustomTableView:final class CustomTableView: UITableView {
override var contentSize: CGSize {
didSet {
invalidateIntrinsicContentSize()
}
}
override var intrinsicContentSize: CGSize {
return contentSize
}
}One of those cases when the code is necessary. Here we invoke
invalidateIntrinsicContentSizewhenever contentSizetables change . This will allow the system to accept the new Intrinsic Content Size. It, in turn, returns contentSize, forcing the table to dynamically adjust its height and display a certain number of cells without scrolling. Scrolling appears at the moment when we reach the height constraint limit. All three of these Interface Builder features can be combined with each other. They add more flexibility in content organization options without the need for additional constraints or any configuration
UIView.2. The ability to instantly see the result of their actions
If you have resized
UIView, moved it a couple of points to the side, or changed the background color, you will immediately see how it will look at runtime without having to launch the application. No need to wonder why some button did not appear on the screen or why the behavior UIViewdoes not match the desired. Using
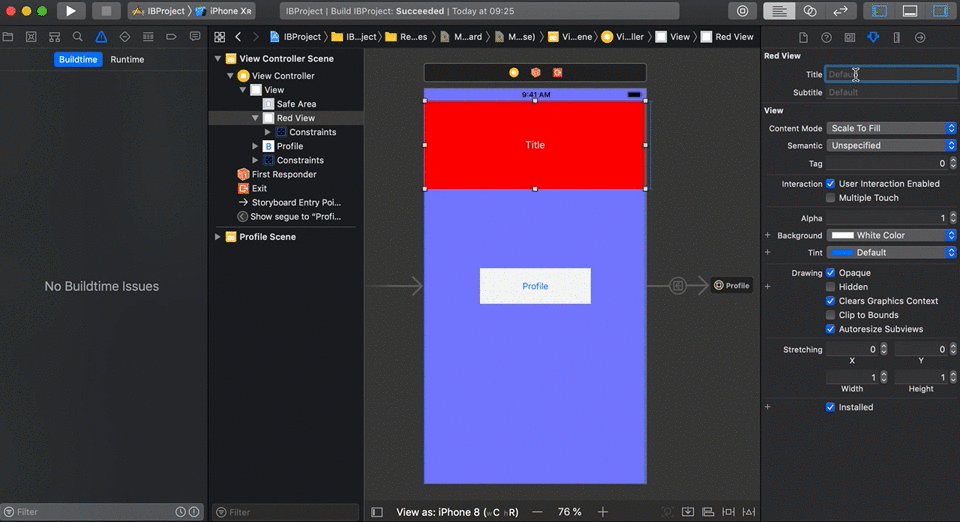
@IBInspectablereveals this advantage even more interesting. Add to RedViewtwo UILabeland two properties:final class RedView: XibView {
@IBOutlet weak var titleLabel: UILabel!
@IBOutlet weak var subtitleLabel: UILabel!
@IBInspectable var title: String = "" { didSet { titleLabel.text = title } }
@IBInspectable var subtitle: String = "" { didSet { subtitleLabel.text = subtitle } }
}В Attributes Inspector для
RedView появится два новых поля – Title и Subtitle, которые мы пометили как @IBInspectable:
Если мы попробуем ввести значения в эти поля, то сразу же увидим, как все будет выглядеть на этапе выполнения:
Можно управлять чем угодно:
cornerRadius, borderWidth, borderColor. Например, расширим базовый класс UIView:extension UIView {
@IBInspectable var cornerRadius: CGFloat {
set { layer.cornerRadius = newValue }
get { return layer.cornerRadius }
}
@IBInspectable var borderWidth: CGFloat {
set { layer.borderWidth = newValue }
get { return layer.borderWidth }
}
@IBInspectable var borderColor: UIColor? {
set { layer.borderColor = newValue?.cgColor }
get { return layer.borderColor != nil ? UIColor(cgColor: layer.borderColor!) : nil }
}
@IBInspectable var rotate: CGFloat {
set { transform = CGAffineTransform(rotationAngle: newValue * .pi/180) }
get { return 0 }
}
}Видим, что Attributes Inspector объекта
RedView обзавелся еще 4-мя новыми полями, с которыми теперь тоже можно поиграться: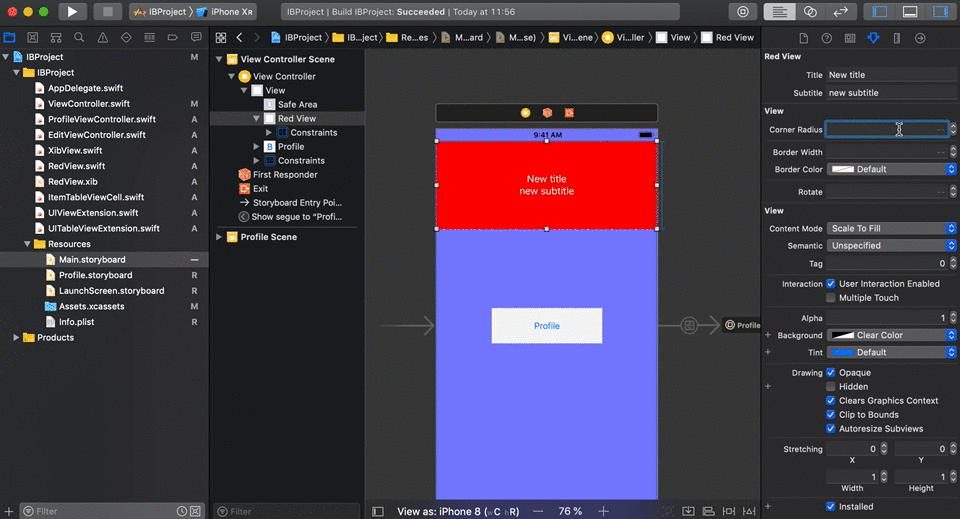
3. Предварительный просмотр всех размеров экрана одновременно
So we threw the necessary elements on the screen, adjusted their appearance and added the necessary constraints. How do we find out if the content will correctly display on different screen sizes? Of course, you can run the application on each simulator, but it will take a lot of time. There is a better option: Xcode has a preview mode, it allows you to see several screen sizes at once without launching the application.
We call the Assistant editor , in it click on the first segment of the transition bar, select Preview -> Settings.storyboard (as an example):

First we see only one screen, but we can add as much as necessary by clicking “+” in the lower left corner and selecting necessary devices from the list:
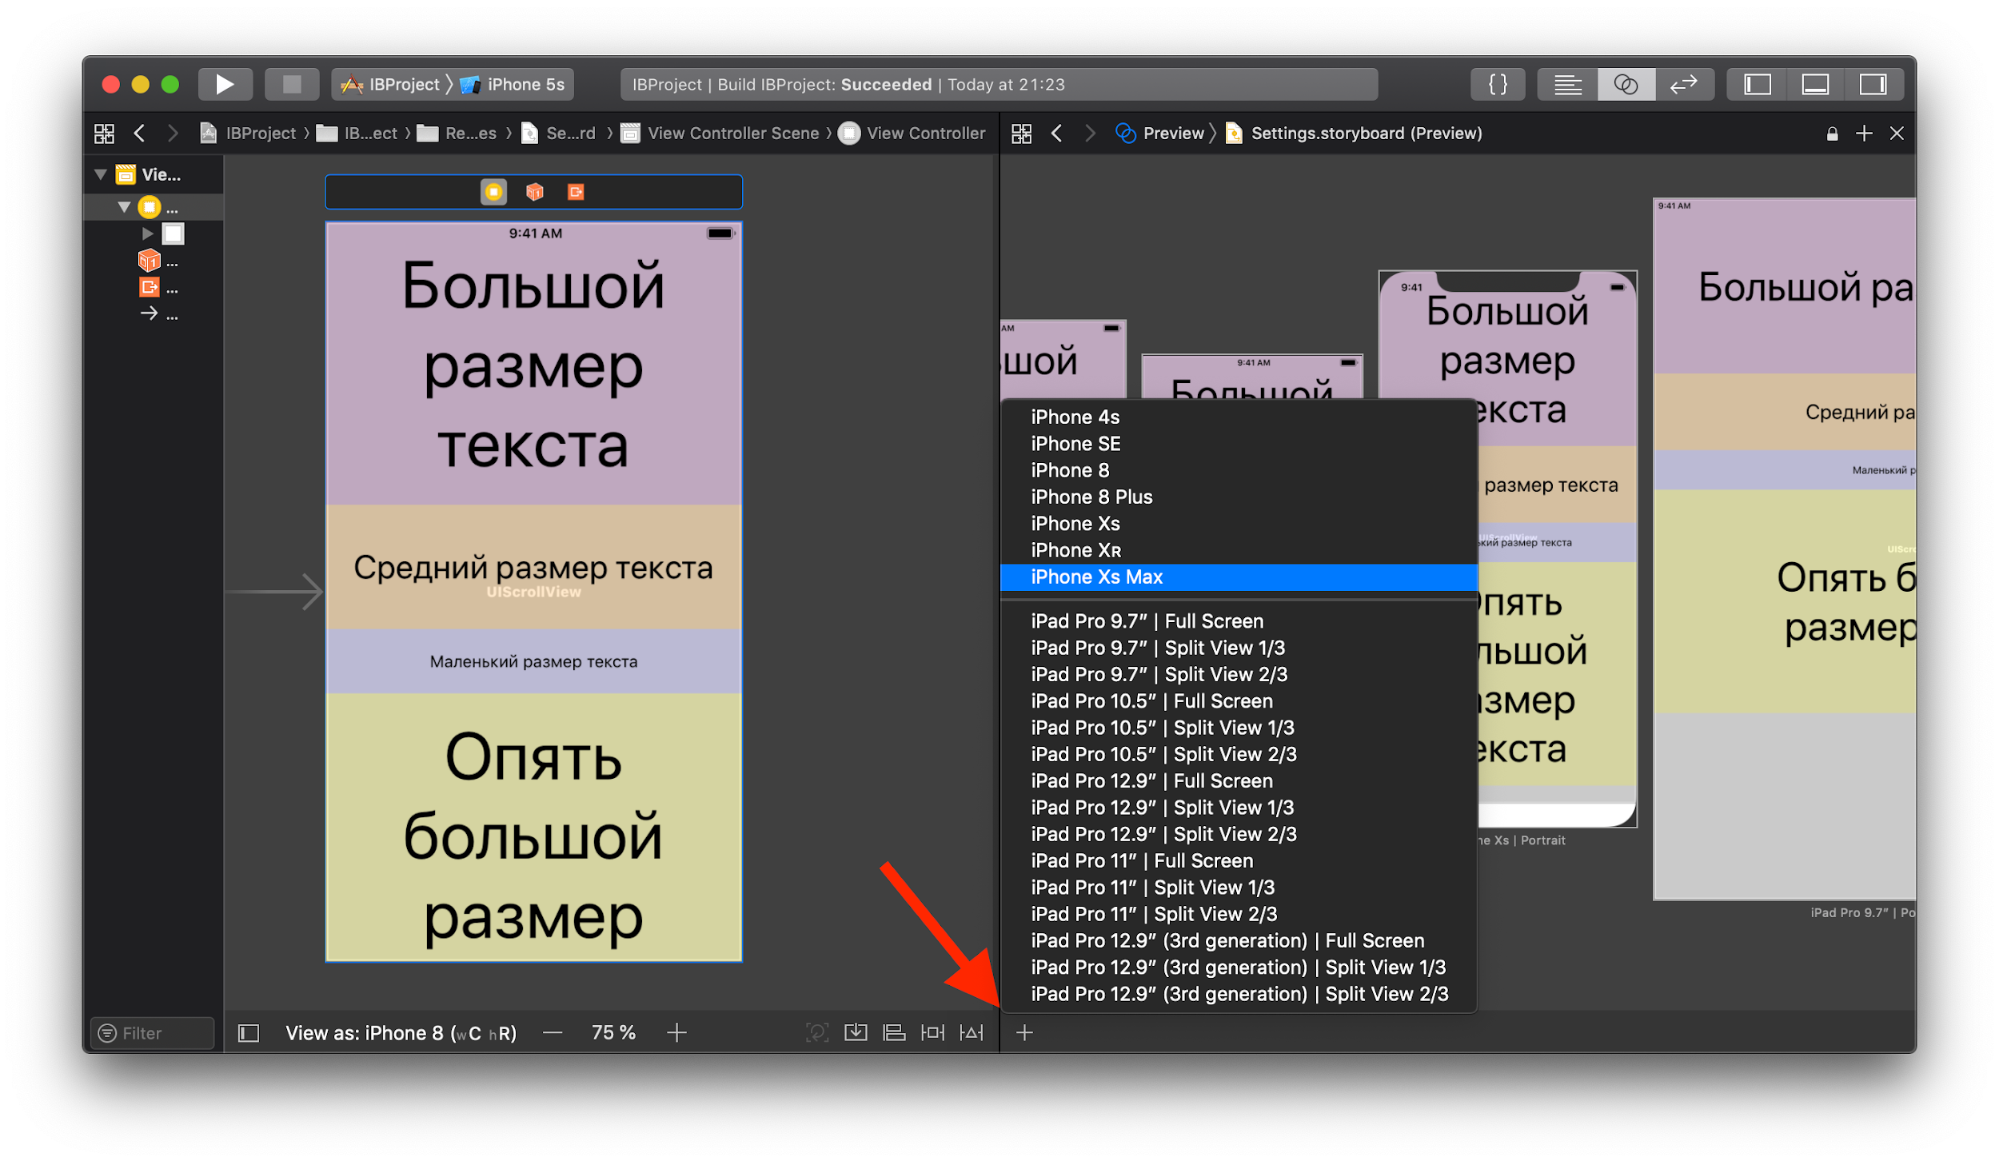
In addition, if the Storyboard supports several languages, you can see how the selected screen will look like with each of them: You
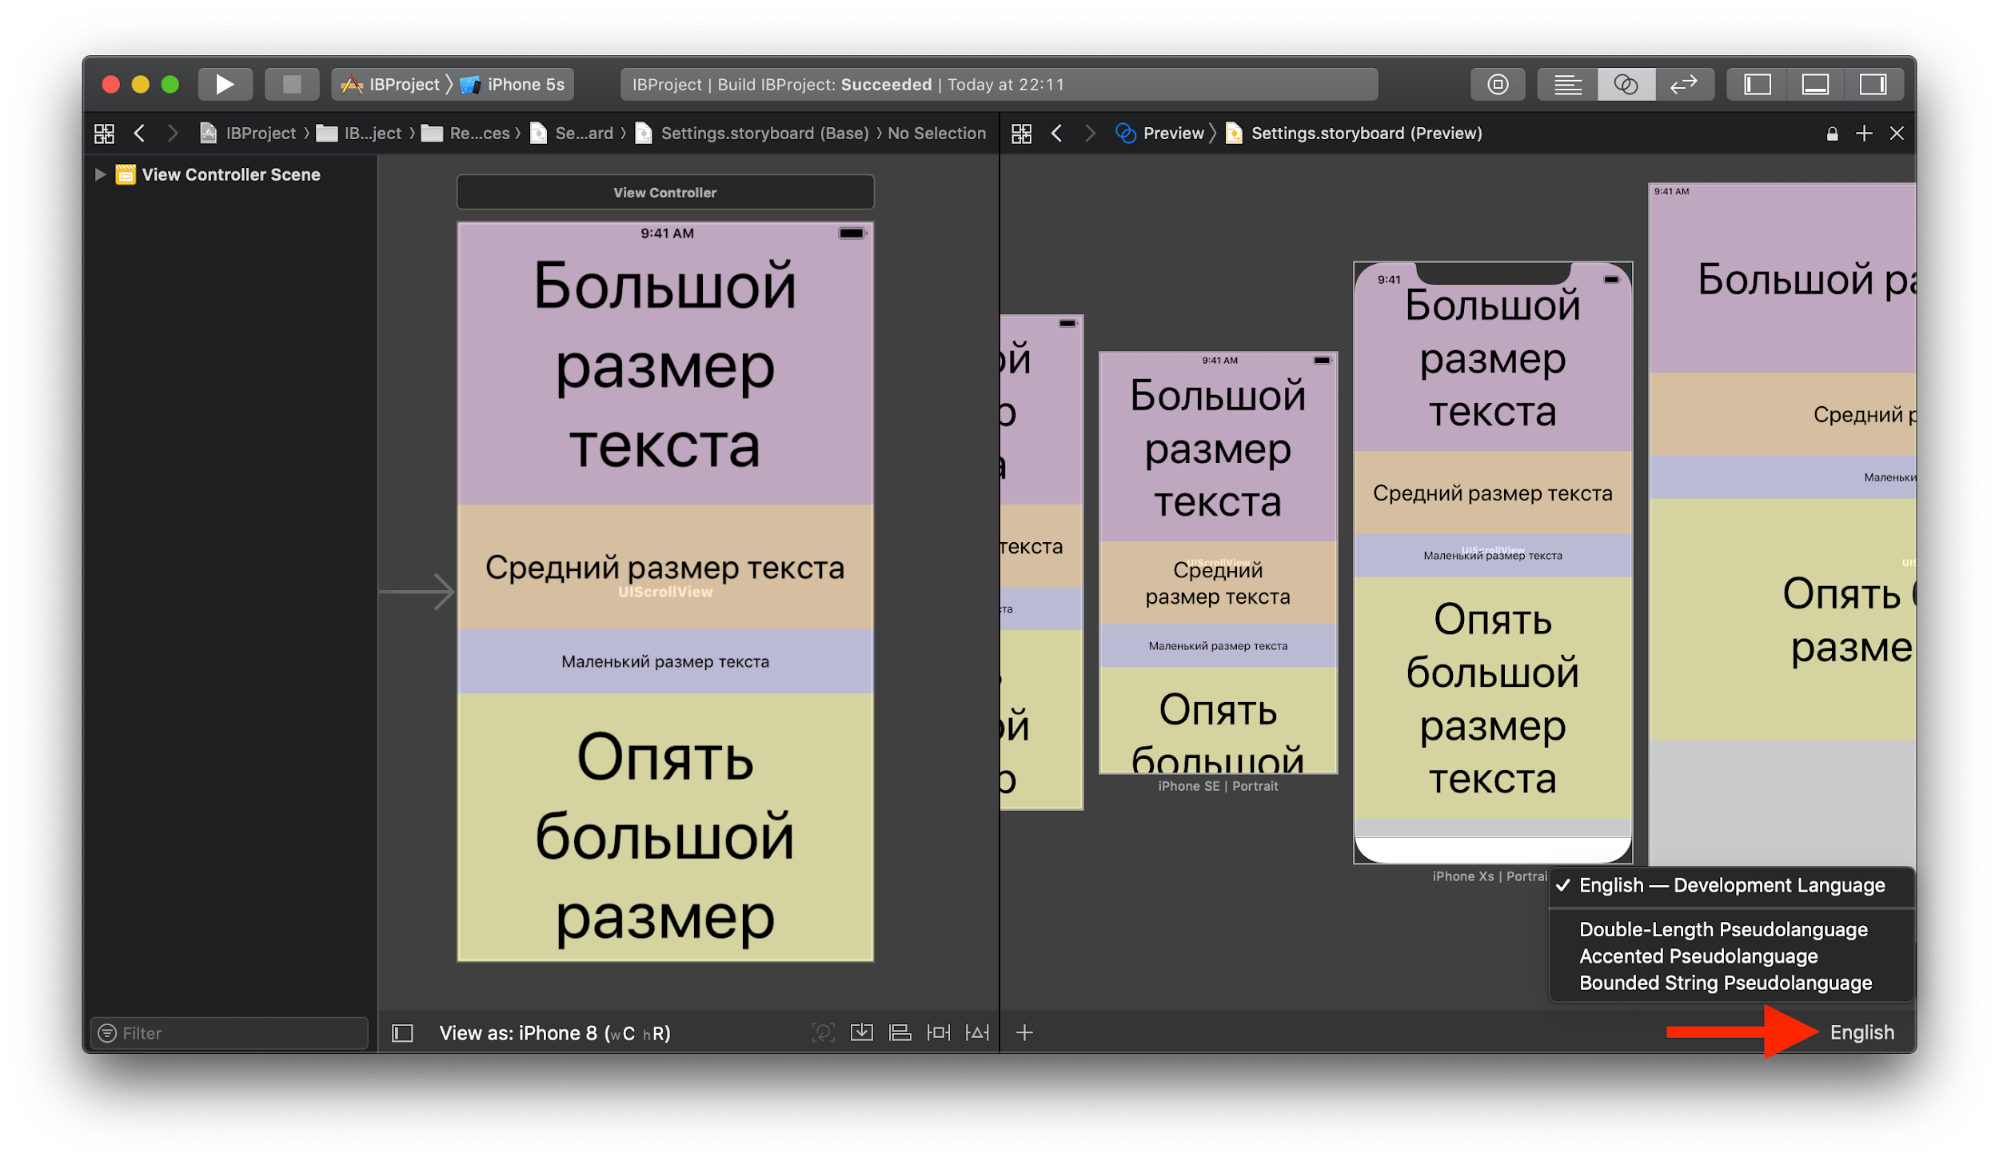
can select a language for all screens at once, or for each individually.
4. Removing the template UI code
Creating a user interface without Interface Builder is accompanied by either a large amount of boilerplate code, or superclasses and extensions that entail additional maintenance work. This code can infiltrate other parts of the application, making it difficult to read and search. Using Storyboards and Xibs can offload code, making it more focused on logic.
5. Size classes
Every year, new devices appear, for which you need to adapt the user interface. The concept of trait variations and, in particular, size classes , which allow you to create UI for any size and orientation of the screen, helps in this .
Size classes classify the height (h) and width (w) of device screens in terms of compact and regular ( C and R ). For example, iPhone 8 has a size class (wC hR) in portrait orientation and (wC hC) in landscape, and iPhone 8 Plus has (wC hR) and (wR hC) respectively. The rest of the devices can be found here .
In one Storyboard or Xib for each of the size classes, you can store your own data set, and the application will use the appropriate one depending on the device and screen orientation at runtime, thus identifying the current size class. If some layout parameters are the same for all size classes, then they can be configured in the " Any " category , which is already selected by default.
For example, configure the font size depending on the size class. We select the iPhone 8 Plus device for portrait viewing in Storyboard and add a new condition for
font: if width is Regular (set the rest to “Any”), then the font size should be 37:
Now, if we change the screen orientation, the font size will increase - a new condition will work, since the iPhone 8 Plus has a size class (wR hC) in landscape orientation . In the Storyboard, depending on the size class, you can also hide Views, enable / disable constraints, change their value
constantand much more. Read more about how to do all this here . In the screenshot above, it is worth noting the bottom panel with the choice of device to display the layout. It allows you to quickly check the adaptability of the UI on any device and with any screen orientation, and also shows the size class of the current configuration (next to the device name). Among other things, on the right there is a button « Vary for Traits". Its purpose is to enable trait variations only for a specific category of width, height or width and height at the same time. For example, selecting an iPad with a size class (wR hR) , click “Vary for Traits” and check the box next to width and height . Now, all subsequent layout changes will only apply to devices with (wR hR) until we click Done Varying .
Conclusion
| # | disadvantages | Benefits |
|---|---|---|
| 1 | Hard to rule conflicts | UI visualization and constraints |
| 2 | Not as flexible as code | The ability to instantly see the result of your actions |
| 3 | An error can lead to a crash at runtime. | Preview all screen sizes at once |
| 4 | You cannot use custom initializers to UIViewControllers | Removing the template UI code |
| 5 | Size classes |
Only registered users can participate in the survey. Please come in.
Using Storyboards?
- 61.1% Yes 52
- 17.6% No, only Xibs 15
- 18.8% No, I don’t even use Xibs 16
- 2.3% Now I will be 2
- 0% Now I won’t 0