3CX technical support responds: capture SIP traffic on the PBX server
- Tutorial
In this article, we will talk about the basics of capturing and analyzing SIP traffic generated by 3CX PBXs. The article is addressed to novice system administrators or ordinary users whose responsibilities include the maintenance of telephony. For in-depth study of the topic, we recommend that you complete the 3CX Advanced Training Course .
3CX V16 allows you to capture SIP traffic directly through the server’s web interface and save it in the standard Wireshark PCAP format. You can attach the capture file when contacting technical support or download for self-analysis.
If 3CX runs on Windows, you must install Wireshark on the 3CX server yourself. Otherwise, when you try to capture, the following message appears.

On Linux systems, tcpdump is installed automatically when you install or upgrade 3CX.
To start capturing, go to the interface section Home> SIP Events and select the interface on which you want to capture. You can also capture traffic on all interfaces simultaneously, except for IPv6 tunneling interfaces.
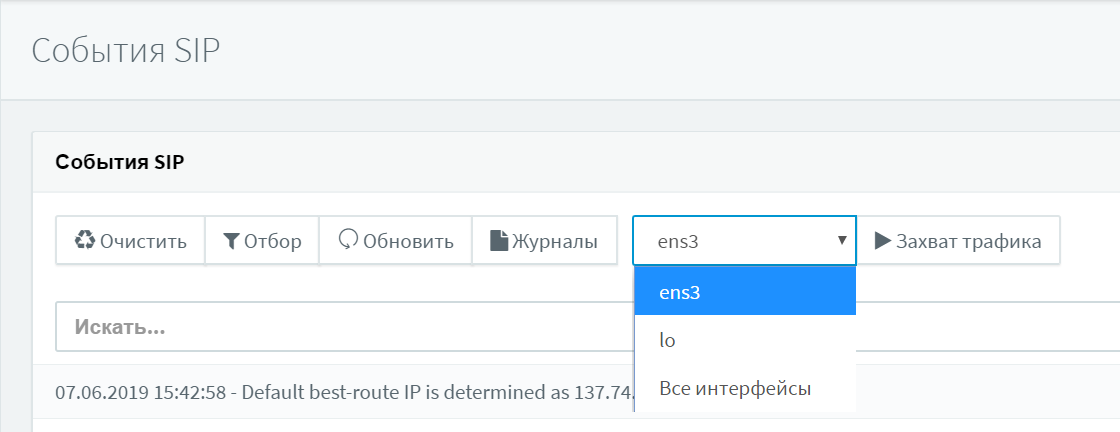
In 3CX for Linux, you can capture traffic for the local host (lo). This capture is used to analyze SIP client connections using 3CX Tunnel technology and Session Border Controller .
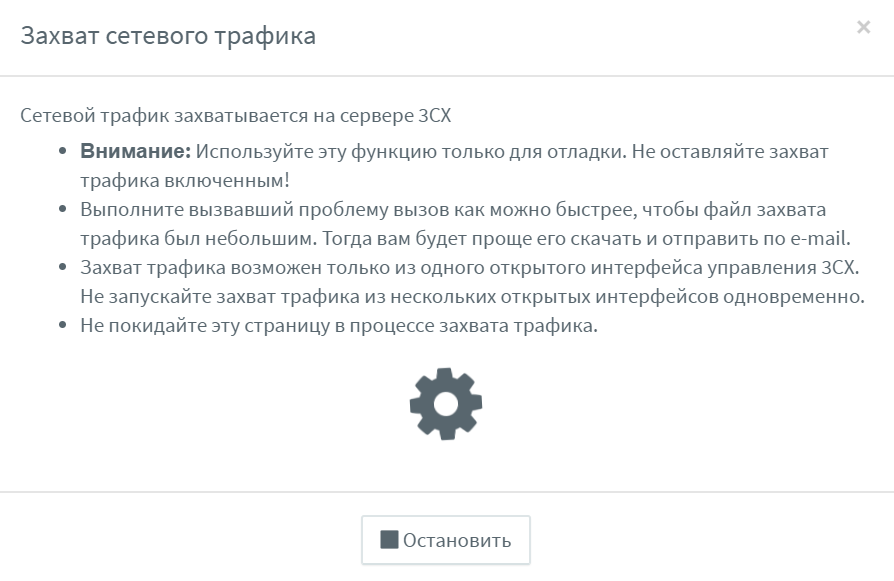
The Traffic Capture button launches Wireshark on Windows or tcpdump on Linux. At this point, you need to quickly reproduce the problem, because Capture loads the processor and takes up enough disk space.
Pay attention to the following call parameters:
Try not to click in other places of the interface, except for the “Stop” button. Also do not click on other links in this browser window. Otherwise, the capture of traffic will continue in the background and will lead to additional load on the server.
The Stop button stops the capture and saves the capture file. You can download the file to your computer for analysis in the Wireshark utility or generate a special technical support file that will include this capture and other debugging information. After downloading or inclusion in the technical support package, the capture file is automatically deleted from the 3CX server for security reasons.
On the 3CX server, the file is located in the following location:
To avoid increased server load or packet loss during capture, the capture period is limited to 2 million packets. After that, the capture automatically stops. If you need a longer capture, use the separate Wireshark utility, as described below.
If you are interested in a deeper analysis of network traffic, capture it manually. Download the Wireshark utility for your OS from here . After installing the utility on the 3CX server, go to Capture> Interfaces. All network interfaces of the OS will be shown here. Interface IP addresses can be displayed in IPv6. To see the IPv4 address, click on the IPv6 address.

Select the interface to capture and click the Options button. Uncheck Capture Traffic in promiscuous mode, and leave the rest of the settings unchanged.

Now you should reproduce the problem. When the problem is reproduced, stop capturing (menu Capture> Stop). You can select SIP messages in the Telephony> SIP Flows menu.
Consider the main fields of the INVITE SIP message that is sent to establish a VoIP call, i.e. is the starting point for analysis. Typically, SIP INVITE includes from 4 to 6 fields with information that is used by SIP terminal devices (telephones, gateways) and telecom operators. Understanding the contents of INVITE and the messages that follow it often helps determine the source of the problem. In addition, knowing the INVITE fields helps when connecting SIP operators to 3CX or combining 3CX with other SIP exchanges.
In an INVITE message, users (or SIP devices) are identified by URI. Typically, a SIP URI is the user's phone number + SIP server address. SIP URI is very similar to an e-mail address and is written as sip: x @ y: Port.
Request-Line-URI - the field contains the recipient of the call. It contains the same information as in the To field, but without a Display Name.
Via - each SIP server (proxy) through which the INVITE request passes, adds at the top of the Via list its IP address and port to which the message was received. Then the message is transmitted further along the route. When the final recipient answers the INVITE request, all transit nodes “look through” the Via header and return a message to the sender along the same route. In this case, the SIP transit proxy deletes its data from the header.
From - the header indicates the initiator of the request from the point of view of the SIP server. The header is formed in the same way as an e-mail address (user @ domain, where user is the extension number of the 3CX user, and domain is the local IP address or SIP domain of the 3CX server). Like the To header, the From header contains a URI and, optionally, a Display Name username. From the From header, you can understand exactly how this SIP request should be processed.
The SIP RFC 3261 standard provides that if the Display Name is not transmitted, the IP phone or VoIP Gateway (UAC) must use the Display Name “Anonymous”, for example, From: “Anonymous”.
To - this header indicates the recipient of the request. This can be either the final recipient of the call, or an intermediate link. Typically, the header contains a SIP URI, but other schemes are possible (see RFC 2806 [9]). However, SIP URIs must be supported in all SIP implementations, regardless of equipment manufacturer. The To header may also contain a Display Name Display Name, for example, To: “First Name Last Name”)
Typically, the To field contains a SIP URI indicating the first (next) SIP proxy that will process the request. This does not have to be the final recipient of the request.
Contact - the header contains the SIP URI, by which you can contact the sender of the INVITE request. This is a required header and should contain only one SIP URI. It is part of a two-way communication corresponding to the initial SIP INVITE request. It is very important that the Contact header contains the correct information (including the IP address) at which the sender of the request is waiting for a response. URI Contact is also used in further communications, after the establishment of a communication session.
Allow - the field contains a list of parameters (SIP methods), separated by a comma. They describe what features of the SIP protocol this sender (device) supports. Full list of methods: ACK, BYE, CANCEL, INFO, INVITE, NOTIFY, OPTIONS, PRACK, REFER, REGISTER, SUBSCRIBE, UPDATE. More SIP methods are described here .
3CX V16 allows you to capture SIP traffic directly through the server’s web interface and save it in the standard Wireshark PCAP format. You can attach the capture file when contacting technical support or download for self-analysis.
If 3CX runs on Windows, you must install Wireshark on the 3CX server yourself. Otherwise, when you try to capture, the following message appears.
On Linux systems, tcpdump is installed automatically when you install or upgrade 3CX.
Traffic capture
To start capturing, go to the interface section Home> SIP Events and select the interface on which you want to capture. You can also capture traffic on all interfaces simultaneously, except for IPv6 tunneling interfaces.
In 3CX for Linux, you can capture traffic for the local host (lo). This capture is used to analyze SIP client connections using 3CX Tunnel technology and Session Border Controller .
The Traffic Capture button launches Wireshark on Windows or tcpdump on Linux. At this point, you need to quickly reproduce the problem, because Capture loads the processor and takes up enough disk space.
Pay attention to the following call parameters:
- The number that was called, which was called by other numbers / participants of the call.
- The exact time the problem occurred on the 3CX server clock.
- The route of the call.
Try not to click in other places of the interface, except for the “Stop” button. Also do not click on other links in this browser window. Otherwise, the capture of traffic will continue in the background and will lead to additional load on the server.
Getting capture file
The Stop button stops the capture and saves the capture file. You can download the file to your computer for analysis in the Wireshark utility or generate a special technical support file that will include this capture and other debugging information. After downloading or inclusion in the technical support package, the capture file is automatically deleted from the 3CX server for security reasons.
On the 3CX server, the file is located in the following location:
- Windows: C: \ ProgramData \ 3CX \ Instance1 \ Data \ Logs \ dump.pcap
- Linux: /var/lib/3cxpbx/Instance/Data/Logs/dump.pcap
To avoid increased server load or packet loss during capture, the capture period is limited to 2 million packets. After that, the capture automatically stops. If you need a longer capture, use the separate Wireshark utility, as described below.
Wireshark Traffic Capture
If you are interested in a deeper analysis of network traffic, capture it manually. Download the Wireshark utility for your OS from here . After installing the utility on the 3CX server, go to Capture> Interfaces. All network interfaces of the OS will be shown here. Interface IP addresses can be displayed in IPv6. To see the IPv4 address, click on the IPv6 address.
Select the interface to capture and click the Options button. Uncheck Capture Traffic in promiscuous mode, and leave the rest of the settings unchanged.
Now you should reproduce the problem. When the problem is reproduced, stop capturing (menu Capture> Stop). You can select SIP messages in the Telephony> SIP Flows menu.
Traffic Analysis Basics - SIP INVITE Message
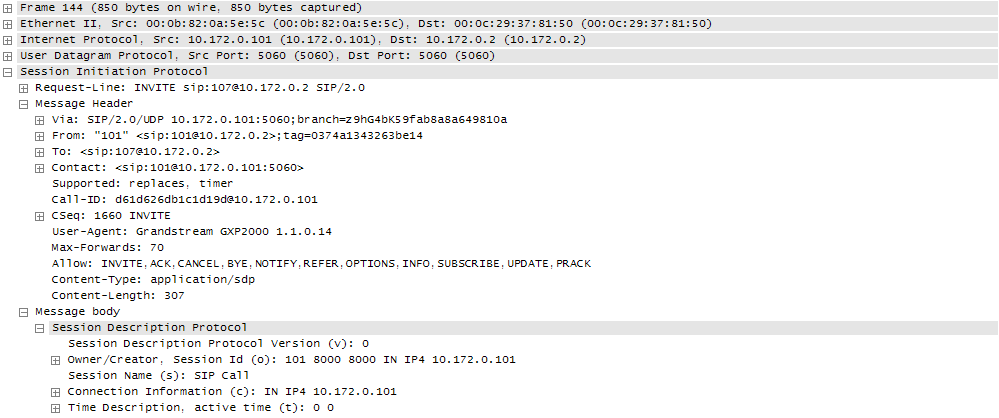
Consider the main fields of the INVITE SIP message that is sent to establish a VoIP call, i.e. is the starting point for analysis. Typically, SIP INVITE includes from 4 to 6 fields with information that is used by SIP terminal devices (telephones, gateways) and telecom operators. Understanding the contents of INVITE and the messages that follow it often helps determine the source of the problem. In addition, knowing the INVITE fields helps when connecting SIP operators to 3CX or combining 3CX with other SIP exchanges.
In an INVITE message, users (or SIP devices) are identified by URI. Typically, a SIP URI is the user's phone number + SIP server address. SIP URI is very similar to an e-mail address and is written as sip: x @ y: Port.
Request-Line-URI:
Request-Line-URI - the field contains the recipient of the call. It contains the same information as in the To field, but without a Display Name.
Via:
Via - each SIP server (proxy) through which the INVITE request passes, adds at the top of the Via list its IP address and port to which the message was received. Then the message is transmitted further along the route. When the final recipient answers the INVITE request, all transit nodes “look through” the Via header and return a message to the sender along the same route. In this case, the SIP transit proxy deletes its data from the header.
From:
From - the header indicates the initiator of the request from the point of view of the SIP server. The header is formed in the same way as an e-mail address (user @ domain, where user is the extension number of the 3CX user, and domain is the local IP address or SIP domain of the 3CX server). Like the To header, the From header contains a URI and, optionally, a Display Name username. From the From header, you can understand exactly how this SIP request should be processed.
The SIP RFC 3261 standard provides that if the Display Name is not transmitted, the IP phone or VoIP Gateway (UAC) must use the Display Name “Anonymous”, for example, From: “Anonymous”
To:
To - this header indicates the recipient of the request. This can be either the final recipient of the call, or an intermediate link. Typically, the header contains a SIP URI, but other schemes are possible (see RFC 2806 [9]). However, SIP URIs must be supported in all SIP implementations, regardless of equipment manufacturer. The To header may also contain a Display Name Display Name, for example, To: “First Name Last Name”
Typically, the To field contains a SIP URI indicating the first (next) SIP proxy that will process the request. This does not have to be the final recipient of the request.
Contact:
Contact - the header contains the SIP URI, by which you can contact the sender of the INVITE request. This is a required header and should contain only one SIP URI. It is part of a two-way communication corresponding to the initial SIP INVITE request. It is very important that the Contact header contains the correct information (including the IP address) at which the sender of the request is waiting for a response. URI Contact is also used in further communications, after the establishment of a communication session.
Allow:
Allow - the field contains a list of parameters (SIP methods), separated by a comma. They describe what features of the SIP protocol this sender (device) supports. Full list of methods: ACK, BYE, CANCEL, INFO, INVITE, NOTIFY, OPTIONS, PRACK, REFER, REGISTER, SUBSCRIBE, UPDATE. More SIP methods are described here .