Porting desktop apps to .NET Core
Since I’ve been working with the community on porting desktop applications from .NET Framework to .NET Core, I’ve noticed that there are two camps of folks: some want a very simple and short list of instructions to get their apps ported to .NET Core while others prefer a more principled approach with more background information. Instead of writing up a “Swiss Army knife”-document, we are going to publish two blog posts, one for each camp:
- This post is the simple case. It’s focused on simple instructions and smaller applications and is the easiest way to move your app to .NET Core.
- We will publish another post for more complicated cases. This post will focus more on non-trivial applications, such WPF application with dependencies on WCF and third-party UI packages.
If you prefer watching videos instead of reading, here is the video where I do everything that is described below.
Step 0 – Prerequisites
To port your desktop apps to Core, you’ll need .NET Core 3 and Visual Studio 2019.
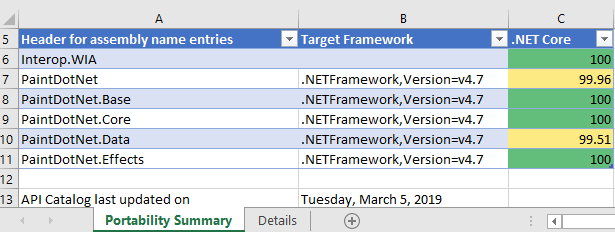
Step 1 – Run portability analyzer
Before porting, you should check how compatible your application is with .NET Core. To do so, download and run .NET Portability Analyzer.
- On the first tab, Portability Summary, if you have only 100% in .NET Core column (everything is highlighted in green), your code is fully compatible, go to Step 2.
- If you have values of less than 100%, first look at all assemblies that aren’t part of you application. For those, check if their authors are providing versions for .NET Core or .NET Standard.
- Now look at the other part of assemblies that are coming from your code. If you don’t have any of your assemblies listed in the portability report, go to Step 2. If you do, open Details tab, filter the table by clicking on the column Assembly and only focus on the ones that are from your application. Walk the list and refactor your code to stop using the API or replace the API usage with alternatives from .NET Core.
Step 2 – Migrate to SDK-style .csproj
In Solution Explorer right-click on your project (not on the solution!). Do you see Edit Project File? If you do, you already use the SDK-style project file, so you should move to Step 3. If not, do the following.
- Check in the Solution Explorer if your project contains a
packages.configfile. If you don’t, no action is needed, if you do, right-click onpackages.configand choose Migrate packages.config to PackageReference. Then click OK. - Open your project file by right-clicking on the project and choose Unload Project. Then right-click on the project and choose Edit
.csproj . - Copy the content of the project file somewhere, for example into Notepad, so you can search in it later.
- Delete everything from your project file opened in Visual Studio (I know it sounds aggressive, but we will add only needed content from the copy we’ve just made in a few steps). Instead of the text you’ve just deleted, paste the following code.For a WinForms application:
WinExe net472 true false
For a WPF application:WinExe net472 true false - In Notepad, search for
PackageReference. If you did not find anything, move on. If you foundPackageReference, copy the entirePackageReferencein your project file, opened in Visual Studio, right below the lines you’ve pasted in the step above. Do it for each occurrence of thePackageReferenceyou have found. The copied block should look like this.3.11.0 - Now do the same as above for
ProjectReference. If you did not find anything, move on. If you found anyProjectReferenceitems, they would look like this.{7bce0d50-17fe-4fda-b6b7-e7960aed8ac2} WindowsFormsApp1 - You can remove lines with
ProjectReferencethat you have found (if any), copy onlyItemGroupandProjectReferencelike this.
Save everything. Close the .csproj file in Visual Studio. Right-click on your project in the Solution Explorer and select Reload Project. Rebuild and make sure there are no errors.Great news, you just updated your project file to the new SDK-style! The project is still targeting .NET Framework, but now you’ll be able to retarget it to .NET Core.
Step 3 – Retarget to .NET Core
Open your project file by double-clicking on your project in Solution Explorer. Find the property
netcoreapp3.0. Now your project file should look like this:WinExe netcoreapp3.0 ...Build and run your project. Congratulations, you ported to .NET Core 3!
Fixing errors
If you get errors like
The type or namespacecould not be found or
The namedoes not exist in the current context and your portability report was green, it should be easy to fix by adding a NuGet package with the corresponding library. If you cannot find the NuGet package with the library that is missing, try referencing Microsoft.Windows.Compatibility. This package adds ~21K .NET APIs from .NET Framework.
Working with designers
Even though it is possible to edit the user interface of your application via code, developers usually prefer using the visual designers. With .NET Core we had to rearchitect the way the designers work with .NET Core projects:
- The WPF designer is already in preview and we are working on adding more functionality to it.
- The WinForms designer for .NET Core will be available later, and meanwhile there you can use the .NET Framework WinForms designer as a workaround.
Here is how you can use the .NET Framework WinForms designer:
- Copy your .csproj file (let’s say you have
MyProject.csproj), give it a different name, for exampleMyProject.NetFramework.csprojand put it next to your existing project file. - Make sure your project is closed in Visual Studio, open the new project
MyProject.NetFramework.csproj.
In Solution Explorer right-click on your project and select Properties. In the Application tab (should be open by default) set Assembly name and Default namespace to the same values as in your initial project (remove “.NetFramework” from the names).
Save this solution next to your existing solution. - Open the new project file and change the
net472. - Now when you need to use the WinForms designer, load your project with the
MyProject.NetFramework.csprojproject file and you’ll get the full experience of .NET Framework designer. When you are done with the designer, close and open your project with the .NET Core project file. - This is just a workaround until the WinForms designer for .NET Core is ready.
Why port to .NET Core
Check out the video where Scott Hunter and I are talking about all the new things coming with .NET Core 3 Porting to .NET Core 3.0.