Yealink Meeting Server-based video conferencing cluster
- Tutorial
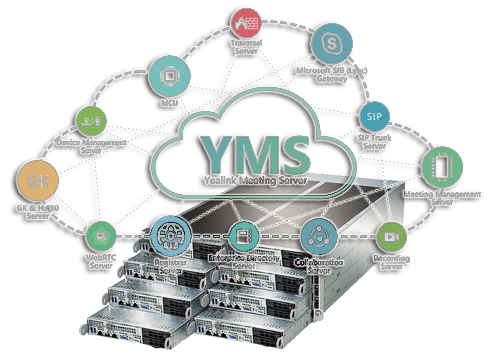 This article is the continuation of a series of publications dedicated to the integrated solution of the videoconferencing Yealink Meeting Server (YMS).
 In the previous article Yealink Meeting Server 2.0 - new videoconferencing features, we described a significant breakthrough in the solution functionality:
- added own conference recording service integrated in YMS
- a new type of license has appeared - Broadcast, which allows you to optimize the cost of asymmetric conferences
- Integrated with Skype for Business and Teams
In this article, we will consider the possibility of cascading YMS - installing and configuring the system in cluster mode.
purpose
The performance of hardware server platforms for YMS allows you to solve the problems of most enterprises that need a modern and high-quality video conferencing service. There is a solution that supports up to 100 FullHD connections on one hardware MCU YMS. But, nevertheless, the cluster solution is in demand, and the point is not only the need to expand the port capacity of the server.
There are several reasons for cascading:
- There are many companies requiring the integration of hundreds of, and even thousands of subscribers around the world into a single VKS infrastructure. Load balancing is the first of the cluster features.
- Even the smallest installation of VKS, if this service is critical for business processes, requires fault tolerance and high availability. Redundancy is the second goal of building a fault-tolerant system based on the YMS cluster
- Client terminals are sometimes located not only in different networks, but also in different parts of the world. Optimization of communication channels with the selection of the optimal node for the connection is the third trump card of the cluster solution.
Installation
To begin with, it is necessary to determine the roles of each cluster node; there are three of these roles in the YMS solution:
- manager-master is the main management server
- manager-slave- n - one of the backup management servers
- business- n - one of the media servers responsible for mixing and transcoding
The configurations are as follows:
(1 x manager-master) + (nx business)
(1 x manager-master) + (2 + nx manager-slave) + (nx business)
Thus, the master is backed up by at least two servers.
On each node you need to install an OS, such as CentOS .
A minimal installation is enough for YMS to work.
The current version of Yealink Meeting Server can be obtained through an official partner of Yealink, including through us.
On the main server (manager-master), in the usr / local / directory, you need to place the YMS distribution, for example, through WinSCP .
Next, through the console, you need to unzip the archive and start the installation:
cd /usr/local
tar xvzf YMS_22.0.0.5.tar.gz
cd apollo_install
tar xvzf install.tar.gz
./install.sh
After running install.sh , a choice of installation mode is provided.
To install a single version of YMS - you need to select [A]
To install in the "cluster" mode - select [B]

Then, the system offers to go to the / usr / local / apollo / data / directory and edit the install.conf file .
The file contains parameters for accessing the nodes and the distribution of roles between them:
[global]
# ansible_ssh_user = root
# ansible_ssh_pass = XXXXXX
# ansible_ssh_private_key_file=
# nginx_http_listen_port = 80
# nginx_https_listen_port = 443
# nginx_http_redirect_https = false
# ---- mongodb init configurations. -----
# !!! Only the first deployment takes effect,
# !!! and subsequent upgrade changes to this will
# !!! not change the database password.
# mongodb_admin_user = xxx
# mongodb_admin_password = xxxxxx
# mongodb_normal_user = xxxx
# mongodb_normal_user_password = xxxxxx
# mongodb_wiredtiger_cachesize_gb = 1
# ---- YMS backend service java opt setting ----
# dbc_java_opt             = -XX:+UseG1GC -Xmx2G -Xms1G
# microsystem_java_opt     = -XX:+UseG1GC -Xmx256m -Xms64m
# microconference_java_opt = -XX:+UseG1GC -Xmx2560m -Xms1024m
# microuser_java_opt       = -XX:+UseG1GC -Xmx2048m -Xms1024m
# microgateway_java_opt    = -XX:+UseG1GC -Xmx512m -Xms256m
# micromigration_java_opt  = -XX:+UseG1GC -Xmx512m -Xms256m
[manager-master]
ip=127.0.0.1
# ansible_ssh_user=root
[manager-slave-1]
# ip=x.x.x.x
[manager-slave-2]
# ip=x.x.x.x
[business-1]
# ip=x.x.x.x
[business-2]
# ip=x.x.x.x
[business-3]
# ip=x.x.x.x
If we have all the servers have the same access settings, then in the global settings we prescribe a single login and password for root access:
[global]
ansible_ssh_user = root
ansible_ssh_pass = 1234567890
If the credentials are different, then for each node they can be specified individually.
For example:
[manager-master]
ip=111.11.11.101
ansible_ssh_user = admin
ansible_ssh_pass = 0987654321
[manager-slave-1]
ip=111.11.11.102
ansible_ssh_user = root
ansible_ssh_pass = 1234567890
To configure the cluster, we assign for each role the IP address of the node and account information (if applicable).
For example, a cluster (3 x manager) + (3 x business) is configured according to the principle:
[manager-master]
ip=111.11.11.101
[manager-slave-1]
ip=111.11.11.102
[manager-slave-2]
ip=111.11.11.103
[business-1]
ip=111.11.11.104
[business-2]
ip=111.11.11.105
[business-3]
ip=111.11.11.106
If the roles are distributed differently, then unnecessary lines can be deleted or commented out, and the missing ones can be added, for example: business-4, business-5, business-6 and so on.
After saving the changes to the install.conf file , you must restart the installation process - install.sh
The system will automatically detect the available nodes on the network and deploy YMS to them.
When configuring a YMS cluster through a web-based interface, special attention should be paid to the parameters of each service, which can now be activated not on one, but already on several servers that are part of the cluster.
Here, at the discretion of the system administrator, the functionality is either reserved or distributed.
In setting up services will helpYealink manual or my previous article, Yealink Meeting Server 2.0 - new videoconferencing features .
At the end of the article, I suggest you get acquainted with the Yealink Meeting Server solution in person!
To obtain a distribution kit and a test license, you just need to write a request to me at: 1@stss.ru Letter
subject: Testing YMS ( name of your company )
You must attach a card to your company to register the project and create a demo key for you.
In the body of the letter, I ask you to briefly describe the task, the existing videoconferencing infrastructure and the planned scenario for using the videoconferencing.
Thanks for attention!
Sincerely,
Kirill Usikov (Usikoff )
Head
of video surveillance and video conferencing systems