Application Deployment in VM, Nomad and Kubernetes
Hello! My name is Pavel Agaletsky. I work as a team leader in a team that develops a Lamoda delivery system. In 2018, I spoke at the HighLoad ++ conference, and today I want to introduce a transcript of my report.
My topic is dedicated to the experience of our company in deploying systems and services to different environments. Starting from our prehistoric times, when we deployed all systems to regular virtual servers, ending with a gradual transition from Nomad to a deployment to Kubernetes. I’ll tell you why we did this and what problems we had in the process.
To begin with, 3 years ago all the systems and services of the company were deployed on ordinary virtual servers. Technically, it was organized so that all the code of our systems lay and assembled using automatic build tools using jenkins. With Ansible, he was rolling out of our version control system to virtual servers. Moreover, each system that was in our company was deployed at least on 2 servers: one of them - on the head, the second - on the tail. These two systems were absolutely identical to each other in all their settings, power, configuration, and more. The only difference between them was that head received user traffic, while tail never received user traffic.
Why was this done?
When we deployed new releases of our application, we wanted to provide the possibility of seamless rolling out, that is, without noticeable consequences for users. This was achieved due to the fact that the next assembled release using Ansible was rolled out on tail. There, people who were engaged in the deployment could check and make sure that everything was fine: all metrics, sections, and applications worked; the necessary scripts are launched. Only after they were convinced that everything is OK, the traffic was switched. He started to go to the server that was tail before. And the one that was the head before, was left without user traffic, while with the previous version of our application on it.
Thus, for users it was seamless. Because the switching is simultaneous, since it is just a balancer switching. It is very easy to roll back to the previous version by simply switching the balancer back. We could also verify the application’s ability to production even before user traffic goes to it, which was convenient enough.
What advantages did we see in all this?
But in this we also saw several shortcomings:
Therefore, we decided that it would be more convenient to switch from the deployment of ordinary virtual machines to the deployment of our applications in the docker container. If you have docker, you need a system that can run the application in the cluster, since you cannot just lift the container. Usually you want to keep track of how many containers are raised so that they rise automatically. For this reason, we had to choose a control system.
We thought for a long time about which one can be taken. The fact is that at that time this stack of deployments to ordinary virtual servers was somewhat outdated, since there were not the latest versions of operating systems there. At some point, even FreeBSD stood there, which was not very convenient to maintain. We understood that you need to migrate to docker as quickly as possible. Our devs looked at their existing experience with different solutions and chose a system like Nomad.
Nomad is a HashiCorp product. They are also known for their other solutions:
Consul is a tool for service discovery.
Terraform is a server management system that allows you to configure them through a configuration called infrastructure-as-a-code.
Vagrant allows you to deploy virtual machines locally or in the cloud through specific configuration files.
Nomad at that time seemed a fairly simple solution that you can quickly switch to without changing the entire infrastructure. In addition, it is quite easily mastered. Therefore, we chose it as our filter system for our container.
What does it take to completely deploy your system to Nomad?
When we talk about Nomad, it uses the HCL language as an information file format, which stands for HashiCorp Configuration Language . This is a superset of Yaml that allows you to describe your service in terms of Nomad.

It allows you to say how many containers you want to deploy, from which images to transfer them various parameters during the deployment. Thus, you feed this Nomad file, and it launches containers in production in accordance with it.
In our case, we realized that just writing exactly the same, identical HLC files for each service would not be very convenient, because there are many services and sometimes you want to update them. It happens that one service is deployed not in one instance, but in the most different ones. For example, one of the systems that we have in production has more than 100 instances in the production. They are launched from the same images, but differ in configuration settings and configuration files.
Therefore, we decided that it would be convenient for us to store all our configuration files for the deployment in one common repository. Thus, they became observable: they were easy to maintain and it was possible to see which systems we had. If necessary, it is also easy to update or change something. Adding a new system is also not difficult - just enter the configuration file inside the new directory. Inside it are the files: service.hcl, which contains a description of our service, and some env-files that allow this service, being deployed in production, to configure.
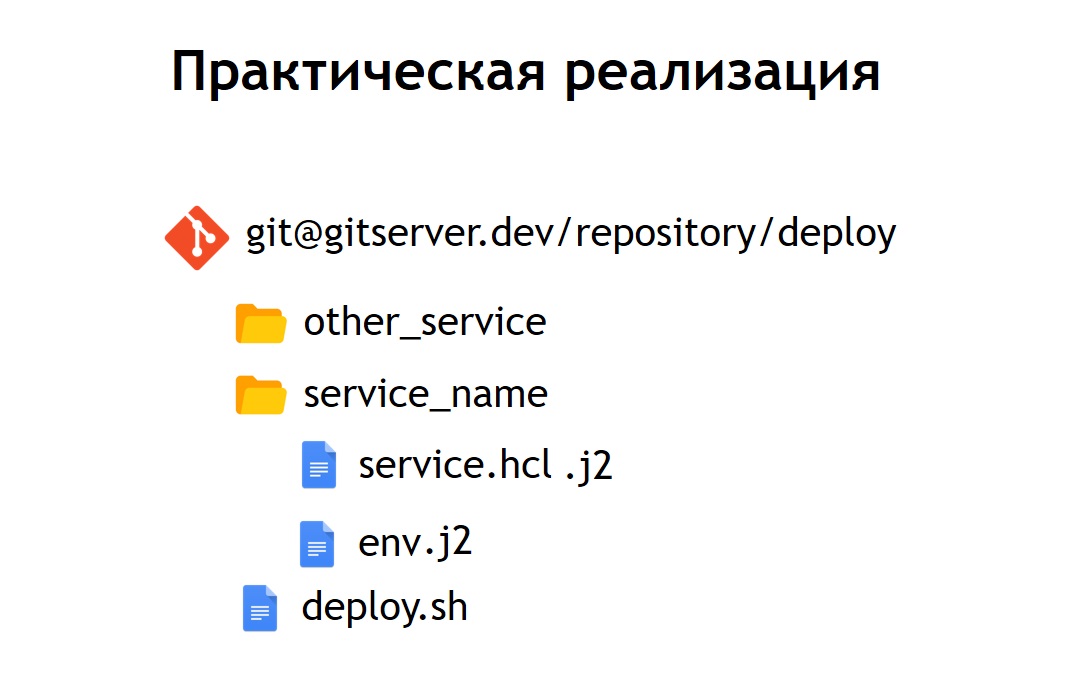
However, some of our systems are deployed in the prod not in one copy, but in several at once. Therefore, we decided that it would be convenient for us not to store configs in their pure form, but their template form. And as the template language we chose jinja 2 . In this format, we store both the configs of the service itself and the env files needed for it.
In addition, we placed in the repository a common script deploy for all projects, which allows you to launch and deploy your service in production, in the right environment, in the right target. In the case when we turned our HCL-config into a template, then the HCL file, which was previously a regular Nomad config, in this case began to look a little different.
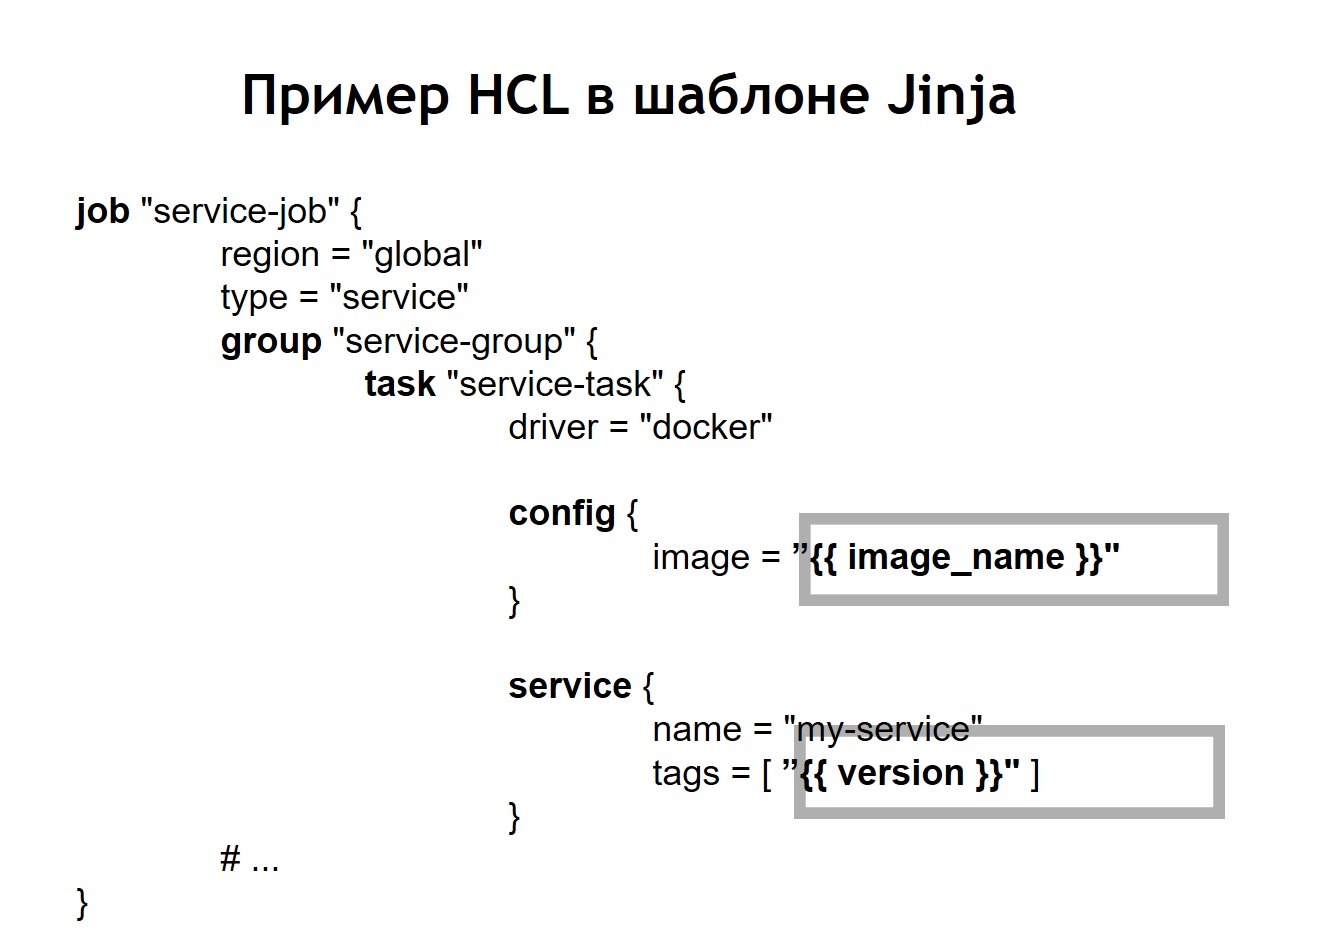
That is, we replaced some variables in the config file with variable inserts, which are taken from env files or from other sources. In addition, we were able to collect HL files dynamically, that is, we can use not only the usual variable insertions. Since jinja supports loops and conditions, you can also make configuration files there, which vary depending on where exactly you deploy your applications.
For example, you want to deploy your service in pre-production and in production. Suppose that in pre-production you don’t want to run crown scripts, you just want to see the service on a separate domain to make sure that it is functioning. For anyone deploying a service, the process looks very simple and transparent. It is enough to run the deploy.sh file, specify which service you want to deploy and in which target. For example, you want to deploy a certain system to Russia, Belarus or Kazakhstan. To do this, simply change one of the parameters, and you will have the correct configuration file.
When the Nomad service is already deployed in your cluster, it looks like this.
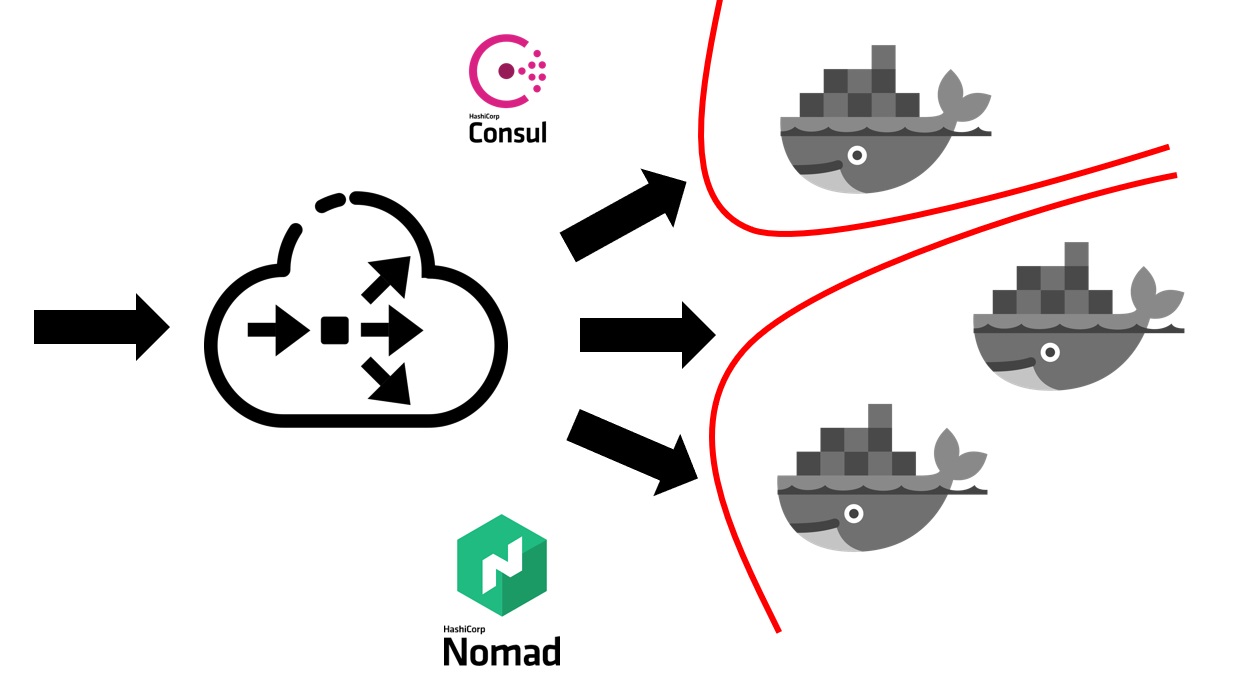
First you need some balancer outside that will take all user traffic into itself. He will work together with Consul and find out from him where, on which node, at what IP address there is a specific service that corresponds to a particular domain name. Services in Consul come from Nomad itself. Since these are products of the same company, they are well connected. We can say that Nomad out of the box can register all the services launched in it inside Consul.
After your external balancer finds out which service it is necessary to send traffic to, it redirects it to the appropriate container or to several containers that correspond to your application. Naturally, it is also necessary to think about security. Even though all services run on the same virtual machines in containers, this usually requires the prohibition of free access from any service to any other. We achieved this through segmentation. Each service was launched in its own virtual network, on which routing rules and rules for allowing / denying access to other systems and services were prescribed. They could be located both inside this cluster and outside it. For example, if you want to prevent a service from connecting to a specific database, this can be done by segmentation at the network level. That is, even by mistake, you cannot accidentally connect from a test environment to your production base.
What did the transition cost in terms of human resources cost us?
The transition of the entire company to Nomad took about 5-6 months. We switched service-less, but at a fairly fast pace. Each team had to create their own containers for services.
We have adopted such an approach that each team is responsible for the docker images of their systems on their own. Devops also provide the general infrastructure necessary for deployment, that is, support for the cluster itself, support for the CI system, and so on. And at that time we had more than 60 systems moved to Nomad, it turned out about 2 thousand containers.
Devops is responsible for the overall infrastructure of everything connected with the deployment, with the servers. And each development team, in turn, is responsible for the implementation of containers for its specific system, since it is the team that knows what it generally needs in a particular container.
What advantages did we get by switching to deploy using Nomad and docker as well?
But we also faced several shortcomings:
It turned out that we could not achieve seamless deployments in the case of Nomad. When rolling containers out of different conditions, it could turn out that it turned out to be running, and Nomad perceived it as a container ready to accept traffic. This happened even before the application inside it managed to start. For this reason, the system for a short time began to produce 500 errors, because traffic began to go to the container, which is not yet ready to receive it.
We encountered some bugs. The most significant bug is that Nomad does not accept a large cluster very well if you have many systems and containers. When you want to take one of the servers that is included in the Nomad cluster into service, there is a high probability that the cluster will not feel very well and will fall apart. Part of the containers may, for example, fall and not rise - this will subsequently be very expensive for you if all your production systems are located in a cluster managed by Nomad.
Therefore, we decided to think about where to go next. At that time, we became much better aware of what we want to achieve. Namely: we want reliability, a little more functions than Nomad gives, and a more mature, more stable system.
In this regard, our choice fell on Kubernetes as the most popular platform for launching clusters. Especially provided that the size and quantity of our containers was quite large. For such purposes, Kubernetes seemed the most suitable system of those that we could see.
I’ll talk a bit about the basic concepts of Kubernetes and how they differ from Nomad.
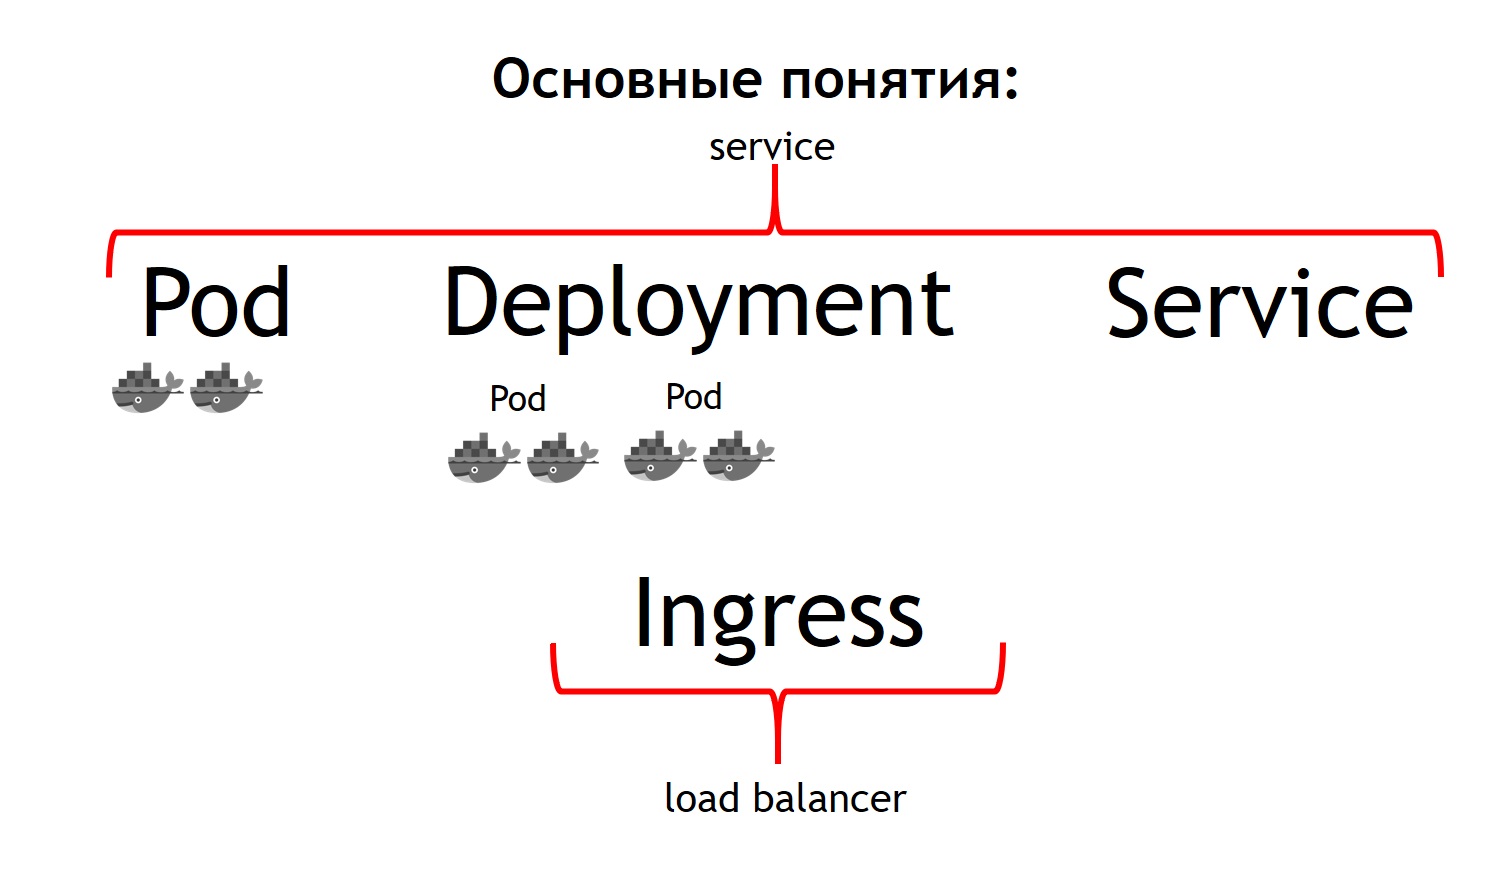
First of all, the most basic concept in Kubernetes is the concept of pod. A pod is a group of one or more containers that always run together. And they seem to always work strictly on the same virtual machine. They are available to each other via IP 127.0.0.1 on different ports.
Suppose you have a PHP application that consists of nginx and php-fpm - a classic circuit. Most likely, you want both nginx and php-fpm containers to be always together. Kubernetes does this by describing them as one common pod. This is exactly what we could not get with the help of Nomad.
The second concept is deployment. The fact is that the pod itself is an ephemeral thing, it starts and disappears. Whether you want to kill all your previous containers first, and then launch new versions at once, or do you want to roll them out gradually - this is the very concept that deployment is responsible for. It describes how you deploy your pods, in how many and how to update them.
The third concept is service. Your service is actually your system, which receives some traffic, and then directs it to one or more pods that correspond to your service. That is, it allows you to say that all incoming traffic to such a service with such a name must be sent to these particular pods. And at the same time, it provides you with traffic balancing. That is, you can run two pods of your application, and all incoming traffic will be evenly balanced between the pods related to this service.
And the fourth basic concept is Ingress. This is a service that runs in a Kubernetes cluster. It acts as an external load balancer, which takes on all requests. Due to the API, Kubernetes Ingress can determine where these requests should be sent. And he does it very flexibly. You can say that all requests to this host and such URL are sent to this service. And we send these requests coming to this host and to another URL to another service.
The coolest thing from the point of view of the one who develops the application is that you are able to manage it all yourself. Having set the Ingress config, you can send all traffic coming to such an API to separate containers registered, for example, to Go. But this traffic coming to the same domain, but to a different URL, should be sent to containers written in PHP, where there is a lot of logic, but they are not very fast.
If we compare all these concepts with Nomad, then we can say that the first three concepts are all together Service. And the last concept in Nomad itself is missing. We used an external balancer as it: it can be haproxy, nginx, nginx + and so on. In the case of a cube, you do not need to introduce this additional concept separately. However, if you look at Ingress inside, it is either nginx, or haproxy, or traefik, but as if built into Kubernetes.
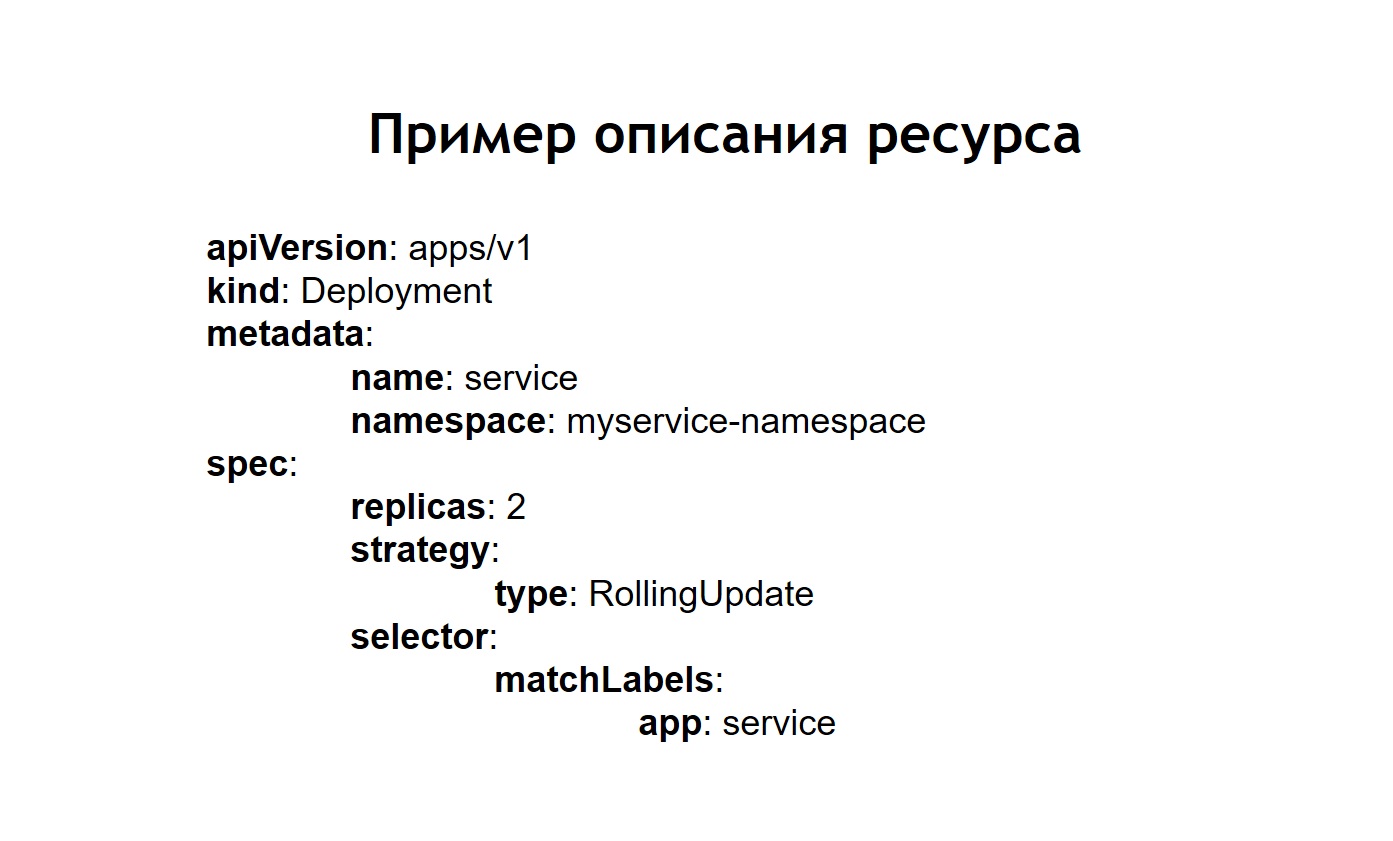
All the concepts I have described are essentially the resources that exist within the Kubernetes cluster. To describe them in the cube, the yaml format is used, which is more readable and familiar than the HCl files in the case of Nomad. But structurally they describe in the case of, for example, pod the same thing. They say - I want to deploy such and such pods there and there, with such and such images, in such and such a quantity.
In addition, we realized that we did not want to create each individual resource with our own hands: deployment, services, Ingress, and more. Instead, we wanted to describe every deployed system in terms of Kubernetes during the deployment so that we would not have to manually recreate all the necessary resource dependencies in the right order. Helm was chosen as the system that allowed us to do this.
Helm is a package manager for Kubernetes. It is very similar to how package managers work in programming languages. They allow you to store a service consisting of, for example, deployment nginx, deployment php-fpm, a config for Ingress, configmaps (this is an entity that allows you to set env and other parameters for your system) in the form of so-called charts. Helm runs on top of Kubernetes. That is, this is not some kind of system that stands aside, but just another service that runs inside the cube. You interact with it through its API through a console command. Its convenience and charm is that even if helm breaks or you remove it from the cluster, your services will not disappear, since helm essentially serves only to start the system. Kubernetes itself is responsible for the uptime and state of services.
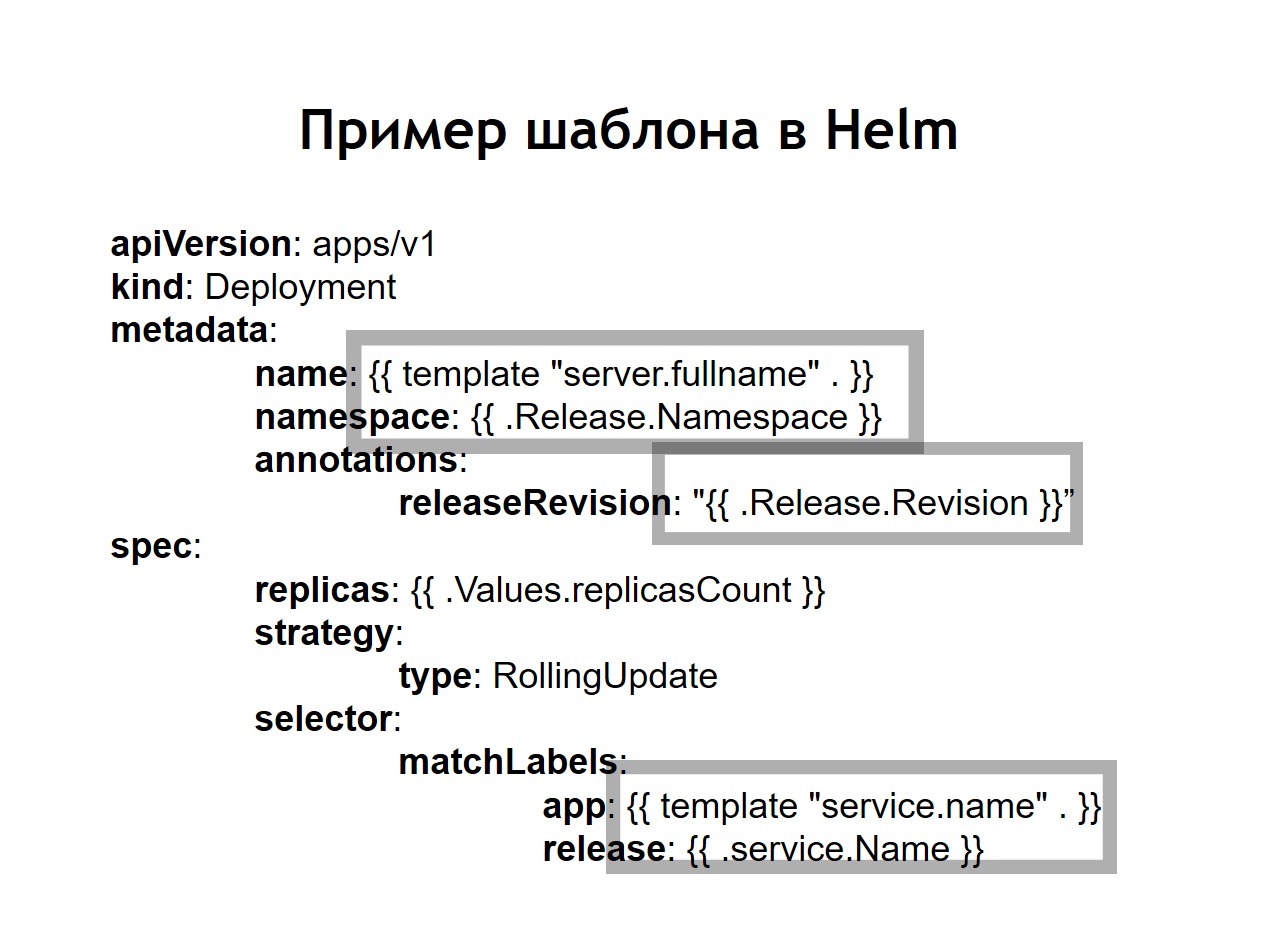
We also realized that the standardization , which before that had to be done independently through the introduction of jinja in our configs, is one of the main features of helm. All the configs that you create for your systems are stored in helm in the form of templates similar a bit like jinja, but, in fact, using the Go language template that helm is written in, like Kubernetes.
Helm adds some more additional concepts to us.
Chart is a description of your service. Other package managers would call it package, bundle, or something like that. This is called chart here.
Values are the variables you want to use to build your configs from templates.
Release. Each time a service that is deployed using helm receives an incremental version of the release. Helm remembers what the service config was in the previous, the year before last release, and so on. Therefore, if you need to roll back, just run the helm callback command, indicating to it the previous version of the release. Even if at the time of the rollback the corresponding configuration in your repository is not available, helm still remembers what it was and rolls back your system to the state it was in the previous release.
In the case when we use helm, the usual configs for Kubernetes also turn into templates, in which it is possible to use variables, functions, apply conditional operators. Thus, you can collect the config of your service depending on the environment.
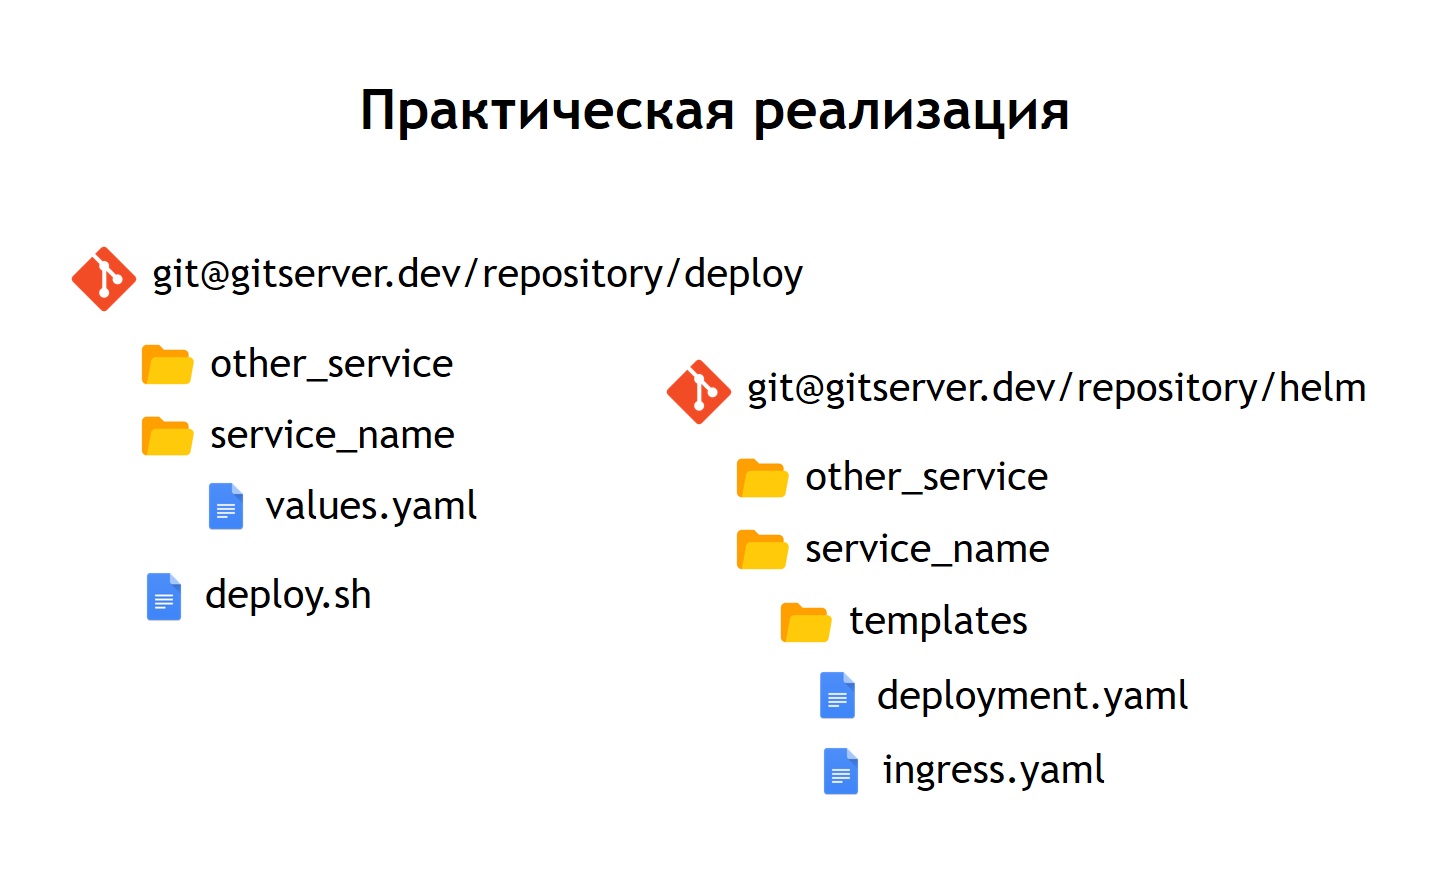
In practice, we decided to do a little differently than we did in the case of Nomad. If in Nomad in the same repository both configs for the deployment and n-variables that were needed to deploy our service were stored, here we decided to divide them into two separate repositories. Only the n-variables needed for the deployment are stored in the deploy repository, and configs or charts are stored in the helm repository.
What did it give us?
Despite the fact that we do not store any really sensitive data in the configuration files themselves. For example, database passwords. They are stored as secrets in Kubernetes, but nevertheless, there are still some things there that we don’t want to give access to everyone in a row. Therefore, access to the deploy repository is more limited, and the helm repository simply contains a description of the service. For this reason, it is possible to give access to a larger circle of people safely.
Since we have not only production, but also other environments, thanks to this separation, we can reuse our helm charts to deploy services not only in production, but also, for example, in QA-environment. Even to deploy them locally using Minikube is such a thing to run Kubernetes locally.
Inside each repository, we left a separation into separate directories for each service. That is, inside each directory there are templates related to the corresponding chart and describing those resources that need to be deployed to launch our system. In the deploy repository, we left only enves. In this case, we did not use templating with jinja, because helm itself gives templating out of the box - this is one of its main functions.
We left the deployment script, deploy.sh, which simplifies and standardizes launch for deployment using helm. Thus, for anyone who wants to deploy, the deployment interface looks exactly the same as it was in the case of the deployment via Nomad. The same deploy.sh, the name of your service, and where you want to deploy it. This causes helm to start inside. He, in turn, collects configs from templates, substitutes the necessary values-files in them, then deploys, putting them into Kubernetes.
Kubernetes service looks more complex than Nomad.
This is where outbound traffic comes to Ingress. This is just the front controller, which receives all the requests and subsequently sends them to the services corresponding to the request data. It defines them on the basis of configs, which are part of the description of your application in helm and which developers set independently. The service sends requests to its pods, that is, specific containers, balancing incoming traffic between all containers that belong to this service. Well, of course, do not forget that we should not go anywhere from security at the network level. Therefore, Kubernetes cluster operates segmentation, which is based on tagging. All services have certain tags, to which the access rights of services to certain external / internal resources are attached inside or outside the cluster.
When completing the transition, we saw that Kubernetes has all the features of Nomad, which we used before, and also adds a lot of new things. It can be expanded through plugins, and in fact through custom resource types. That is, you have the opportunity not only to use something that goes into Kubernetes out of the box, but to create your own resource and service that will read your resource. This provides additional options for expanding your system without the need to reinstall Kubernetes and without the need for changes.
An example of this is Prometheus, which runs inside our Kubernetes cluster. In order for him to start collecting metrics from a particular service, we need to add an additional resource type, the so-called service monitor, to the service description. Prometheus, due to the fact that it can read, being launched in Kubernetes, a custom type of resources, automatically starts collecting metrics from the new system. It is quite convenient.
The first deployment we made at Kubernetes was in March 2018. And during this time we never experienced any problems with him. It works stably enough without significant bugs. In addition, we can expand it further. Today, we have enough of the opportunities that it has, and we really like the pace of development of Kubernetes. Currently, more than 3,000 containers are located in Kubernetes. The cluster takes several Node. At the same time, it is serviced, stable and very controlled.
My topic is dedicated to the experience of our company in deploying systems and services to different environments. Starting from our prehistoric times, when we deployed all systems to regular virtual servers, ending with a gradual transition from Nomad to a deployment to Kubernetes. I’ll tell you why we did this and what problems we had in the process.
Deploy applications on VM
To begin with, 3 years ago all the systems and services of the company were deployed on ordinary virtual servers. Technically, it was organized so that all the code of our systems lay and assembled using automatic build tools using jenkins. With Ansible, he was rolling out of our version control system to virtual servers. Moreover, each system that was in our company was deployed at least on 2 servers: one of them - on the head, the second - on the tail. These two systems were absolutely identical to each other in all their settings, power, configuration, and more. The only difference between them was that head received user traffic, while tail never received user traffic.
Why was this done?
When we deployed new releases of our application, we wanted to provide the possibility of seamless rolling out, that is, without noticeable consequences for users. This was achieved due to the fact that the next assembled release using Ansible was rolled out on tail. There, people who were engaged in the deployment could check and make sure that everything was fine: all metrics, sections, and applications worked; the necessary scripts are launched. Only after they were convinced that everything is OK, the traffic was switched. He started to go to the server that was tail before. And the one that was the head before, was left without user traffic, while with the previous version of our application on it.
Thus, for users it was seamless. Because the switching is simultaneous, since it is just a balancer switching. It is very easy to roll back to the previous version by simply switching the balancer back. We could also verify the application’s ability to production even before user traffic goes to it, which was convenient enough.
What advantages did we see in all this?
- First of all, it works quite simply. Everyone understands how this deployment scheme works, because most people have ever deployed to ordinary virtual servers.
- This is quite reliable , since the deployment technology is simple, tested by thousands of companies. Millions of servers are deployed that way. It’s hard to break something.
- And finally, we could get atomic deployments . Deployments that occur to users simultaneously, without a noticeable stage of switching between the old version and the new one.
But in this we also saw several shortcomings:
- In addition to the production environment, development environment, there are other environments. For example, qa and preproduction. At that time, we had many servers and about 60 services. For this reason, it was necessary for each service to maintain the version of the virtual machine that was relevant to it . Moreover, if you want to update libraries or install new dependencies, you need to do this in all environments. It was also necessary to synchronize the time when you were going to deploy the next new version of your application with the time when devops made the necessary environment settings. In this case, it is easy to get into a situation where our environment will be slightly different at once in all environments in a row. For example, in the QA environment there will be some versions of libraries, and in production - others, which will lead to problems.
- Difficulty updating the dependencies of your application. It does not depend on you, but on the other team. Namely, from the devops command, which supports the server. You must set an appropriate task for them and give a description of what you want to do.
- At that time, we also wanted to divide the large large monoliths that we had into separate small services, since we understood that there would be more and more of them. At that time, we already had more than 100 of them. It was necessary for each new service to create a separate new virtual machine, which also needs to be serviced and deployed. In addition, you need not one car, but at least two. To this, the QA environment is still being added. This causes problems and makes creating and launching new systems more difficult, costly and time consuming for you.
Therefore, we decided that it would be more convenient to switch from the deployment of ordinary virtual machines to the deployment of our applications in the docker container. If you have docker, you need a system that can run the application in the cluster, since you cannot just lift the container. Usually you want to keep track of how many containers are raised so that they rise automatically. For this reason, we had to choose a control system.
We thought for a long time about which one can be taken. The fact is that at that time this stack of deployments to ordinary virtual servers was somewhat outdated, since there were not the latest versions of operating systems there. At some point, even FreeBSD stood there, which was not very convenient to maintain. We understood that you need to migrate to docker as quickly as possible. Our devs looked at their existing experience with different solutions and chose a system like Nomad.
Switch to Nomad
Nomad is a HashiCorp product. They are also known for their other solutions:
Consul is a tool for service discovery.
Terraform is a server management system that allows you to configure them through a configuration called infrastructure-as-a-code.
Vagrant allows you to deploy virtual machines locally or in the cloud through specific configuration files.
Nomad at that time seemed a fairly simple solution that you can quickly switch to without changing the entire infrastructure. In addition, it is quite easily mastered. Therefore, we chose it as our filter system for our container.
What does it take to completely deploy your system to Nomad?
- First of all, you need the docker image of your application. You need to build it and put it in the docker image storage. In our case, this is artifactory - such a system that allows you to push various artifacts of various types into it. It can store archives, docker images, PHP composer packages, NPM packages, and so on.
- You also need a configuration file that tells Nomad what, where and how much you want to deploy.
When we talk about Nomad, it uses the HCL language as an information file format, which stands for HashiCorp Configuration Language . This is a superset of Yaml that allows you to describe your service in terms of Nomad.
It allows you to say how many containers you want to deploy, from which images to transfer them various parameters during the deployment. Thus, you feed this Nomad file, and it launches containers in production in accordance with it.
In our case, we realized that just writing exactly the same, identical HLC files for each service would not be very convenient, because there are many services and sometimes you want to update them. It happens that one service is deployed not in one instance, but in the most different ones. For example, one of the systems that we have in production has more than 100 instances in the production. They are launched from the same images, but differ in configuration settings and configuration files.
Therefore, we decided that it would be convenient for us to store all our configuration files for the deployment in one common repository. Thus, they became observable: they were easy to maintain and it was possible to see which systems we had. If necessary, it is also easy to update or change something. Adding a new system is also not difficult - just enter the configuration file inside the new directory. Inside it are the files: service.hcl, which contains a description of our service, and some env-files that allow this service, being deployed in production, to configure.
However, some of our systems are deployed in the prod not in one copy, but in several at once. Therefore, we decided that it would be convenient for us not to store configs in their pure form, but their template form. And as the template language we chose jinja 2 . In this format, we store both the configs of the service itself and the env files needed for it.
In addition, we placed in the repository a common script deploy for all projects, which allows you to launch and deploy your service in production, in the right environment, in the right target. In the case when we turned our HCL-config into a template, then the HCL file, which was previously a regular Nomad config, in this case began to look a little different.
That is, we replaced some variables in the config file with variable inserts, which are taken from env files or from other sources. In addition, we were able to collect HL files dynamically, that is, we can use not only the usual variable insertions. Since jinja supports loops and conditions, you can also make configuration files there, which vary depending on where exactly you deploy your applications.
For example, you want to deploy your service in pre-production and in production. Suppose that in pre-production you don’t want to run crown scripts, you just want to see the service on a separate domain to make sure that it is functioning. For anyone deploying a service, the process looks very simple and transparent. It is enough to run the deploy.sh file, specify which service you want to deploy and in which target. For example, you want to deploy a certain system to Russia, Belarus or Kazakhstan. To do this, simply change one of the parameters, and you will have the correct configuration file.
When the Nomad service is already deployed in your cluster, it looks like this.
First you need some balancer outside that will take all user traffic into itself. He will work together with Consul and find out from him where, on which node, at what IP address there is a specific service that corresponds to a particular domain name. Services in Consul come from Nomad itself. Since these are products of the same company, they are well connected. We can say that Nomad out of the box can register all the services launched in it inside Consul.
After your external balancer finds out which service it is necessary to send traffic to, it redirects it to the appropriate container or to several containers that correspond to your application. Naturally, it is also necessary to think about security. Even though all services run on the same virtual machines in containers, this usually requires the prohibition of free access from any service to any other. We achieved this through segmentation. Each service was launched in its own virtual network, on which routing rules and rules for allowing / denying access to other systems and services were prescribed. They could be located both inside this cluster and outside it. For example, if you want to prevent a service from connecting to a specific database, this can be done by segmentation at the network level. That is, even by mistake, you cannot accidentally connect from a test environment to your production base.
What did the transition cost in terms of human resources cost us?
The transition of the entire company to Nomad took about 5-6 months. We switched service-less, but at a fairly fast pace. Each team had to create their own containers for services.
We have adopted such an approach that each team is responsible for the docker images of their systems on their own. Devops also provide the general infrastructure necessary for deployment, that is, support for the cluster itself, support for the CI system, and so on. And at that time we had more than 60 systems moved to Nomad, it turned out about 2 thousand containers.
Devops is responsible for the overall infrastructure of everything connected with the deployment, with the servers. And each development team, in turn, is responsible for the implementation of containers for its specific system, since it is the team that knows what it generally needs in a particular container.
Reasons for abandoning Nomad
What advantages did we get by switching to deploy using Nomad and docker as well?
- We provided the same conditions for all environments. In a development company, QA-environment, pre-production, production, the same container images are used, with the same dependencies. Accordingly, you have practically no chance that the production will turn out to be different from what you previously tested locally or on a test environment.
- We also found that it is easy enough to add a new service . From the point of view of deployment, any new systems are launched very simply. It is enough to go to the repository that stores the configs, add the next config for your system there, and you are ready. You can deploy your system in production without additional effort from devops.
- All configuration files in one common repository turned out to be monitored . At that moment, when we deployed our systems using virtual servers, we used Ansible, in which the configs lay in the same repository. However, for most developers it was a bit more difficult to work with. Here the volume of configs and code that you need to add in order to deploy the service has become much smaller. Plus for devops it is very easy to fix it or change it. In the case of transitions, for example, on the new version of Nomad, they can take and massively update all operating files lying in the same place.
But we also faced several shortcomings:
It turned out that we could not achieve seamless deployments in the case of Nomad. When rolling containers out of different conditions, it could turn out that it turned out to be running, and Nomad perceived it as a container ready to accept traffic. This happened even before the application inside it managed to start. For this reason, the system for a short time began to produce 500 errors, because traffic began to go to the container, which is not yet ready to receive it.
We encountered some bugs. The most significant bug is that Nomad does not accept a large cluster very well if you have many systems and containers. When you want to take one of the servers that is included in the Nomad cluster into service, there is a high probability that the cluster will not feel very well and will fall apart. Part of the containers may, for example, fall and not rise - this will subsequently be very expensive for you if all your production systems are located in a cluster managed by Nomad.
Therefore, we decided to think about where to go next. At that time, we became much better aware of what we want to achieve. Namely: we want reliability, a little more functions than Nomad gives, and a more mature, more stable system.
In this regard, our choice fell on Kubernetes as the most popular platform for launching clusters. Especially provided that the size and quantity of our containers was quite large. For such purposes, Kubernetes seemed the most suitable system of those that we could see.
Going to Kubernetes
I’ll talk a bit about the basic concepts of Kubernetes and how they differ from Nomad.
First of all, the most basic concept in Kubernetes is the concept of pod. A pod is a group of one or more containers that always run together. And they seem to always work strictly on the same virtual machine. They are available to each other via IP 127.0.0.1 on different ports.
Suppose you have a PHP application that consists of nginx and php-fpm - a classic circuit. Most likely, you want both nginx and php-fpm containers to be always together. Kubernetes does this by describing them as one common pod. This is exactly what we could not get with the help of Nomad.
The second concept is deployment. The fact is that the pod itself is an ephemeral thing, it starts and disappears. Whether you want to kill all your previous containers first, and then launch new versions at once, or do you want to roll them out gradually - this is the very concept that deployment is responsible for. It describes how you deploy your pods, in how many and how to update them.
The third concept is service. Your service is actually your system, which receives some traffic, and then directs it to one or more pods that correspond to your service. That is, it allows you to say that all incoming traffic to such a service with such a name must be sent to these particular pods. And at the same time, it provides you with traffic balancing. That is, you can run two pods of your application, and all incoming traffic will be evenly balanced between the pods related to this service.
And the fourth basic concept is Ingress. This is a service that runs in a Kubernetes cluster. It acts as an external load balancer, which takes on all requests. Due to the API, Kubernetes Ingress can determine where these requests should be sent. And he does it very flexibly. You can say that all requests to this host and such URL are sent to this service. And we send these requests coming to this host and to another URL to another service.
The coolest thing from the point of view of the one who develops the application is that you are able to manage it all yourself. Having set the Ingress config, you can send all traffic coming to such an API to separate containers registered, for example, to Go. But this traffic coming to the same domain, but to a different URL, should be sent to containers written in PHP, where there is a lot of logic, but they are not very fast.
If we compare all these concepts with Nomad, then we can say that the first three concepts are all together Service. And the last concept in Nomad itself is missing. We used an external balancer as it: it can be haproxy, nginx, nginx + and so on. In the case of a cube, you do not need to introduce this additional concept separately. However, if you look at Ingress inside, it is either nginx, or haproxy, or traefik, but as if built into Kubernetes.
All the concepts I have described are essentially the resources that exist within the Kubernetes cluster. To describe them in the cube, the yaml format is used, which is more readable and familiar than the HCl files in the case of Nomad. But structurally they describe in the case of, for example, pod the same thing. They say - I want to deploy such and such pods there and there, with such and such images, in such and such a quantity.
In addition, we realized that we did not want to create each individual resource with our own hands: deployment, services, Ingress, and more. Instead, we wanted to describe every deployed system in terms of Kubernetes during the deployment so that we would not have to manually recreate all the necessary resource dependencies in the right order. Helm was chosen as the system that allowed us to do this.
Key Concepts at Helm
Helm is a package manager for Kubernetes. It is very similar to how package managers work in programming languages. They allow you to store a service consisting of, for example, deployment nginx, deployment php-fpm, a config for Ingress, configmaps (this is an entity that allows you to set env and other parameters for your system) in the form of so-called charts. Helm runs on top of Kubernetes. That is, this is not some kind of system that stands aside, but just another service that runs inside the cube. You interact with it through its API through a console command. Its convenience and charm is that even if helm breaks or you remove it from the cluster, your services will not disappear, since helm essentially serves only to start the system. Kubernetes itself is responsible for the uptime and state of services.
We also realized that the standardization , which before that had to be done independently through the introduction of jinja in our configs, is one of the main features of helm. All the configs that you create for your systems are stored in helm in the form of templates similar a bit like jinja, but, in fact, using the Go language template that helm is written in, like Kubernetes.
Helm adds some more additional concepts to us.
Chart is a description of your service. Other package managers would call it package, bundle, or something like that. This is called chart here.
Values are the variables you want to use to build your configs from templates.
Release. Each time a service that is deployed using helm receives an incremental version of the release. Helm remembers what the service config was in the previous, the year before last release, and so on. Therefore, if you need to roll back, just run the helm callback command, indicating to it the previous version of the release. Even if at the time of the rollback the corresponding configuration in your repository is not available, helm still remembers what it was and rolls back your system to the state it was in the previous release.
In the case when we use helm, the usual configs for Kubernetes also turn into templates, in which it is possible to use variables, functions, apply conditional operators. Thus, you can collect the config of your service depending on the environment.
In practice, we decided to do a little differently than we did in the case of Nomad. If in Nomad in the same repository both configs for the deployment and n-variables that were needed to deploy our service were stored, here we decided to divide them into two separate repositories. Only the n-variables needed for the deployment are stored in the deploy repository, and configs or charts are stored in the helm repository.
What did it give us?
Despite the fact that we do not store any really sensitive data in the configuration files themselves. For example, database passwords. They are stored as secrets in Kubernetes, but nevertheless, there are still some things there that we don’t want to give access to everyone in a row. Therefore, access to the deploy repository is more limited, and the helm repository simply contains a description of the service. For this reason, it is possible to give access to a larger circle of people safely.
Since we have not only production, but also other environments, thanks to this separation, we can reuse our helm charts to deploy services not only in production, but also, for example, in QA-environment. Even to deploy them locally using Minikube is such a thing to run Kubernetes locally.
Inside each repository, we left a separation into separate directories for each service. That is, inside each directory there are templates related to the corresponding chart and describing those resources that need to be deployed to launch our system. In the deploy repository, we left only enves. In this case, we did not use templating with jinja, because helm itself gives templating out of the box - this is one of its main functions.
We left the deployment script, deploy.sh, which simplifies and standardizes launch for deployment using helm. Thus, for anyone who wants to deploy, the deployment interface looks exactly the same as it was in the case of the deployment via Nomad. The same deploy.sh, the name of your service, and where you want to deploy it. This causes helm to start inside. He, in turn, collects configs from templates, substitutes the necessary values-files in them, then deploys, putting them into Kubernetes.
conclusions
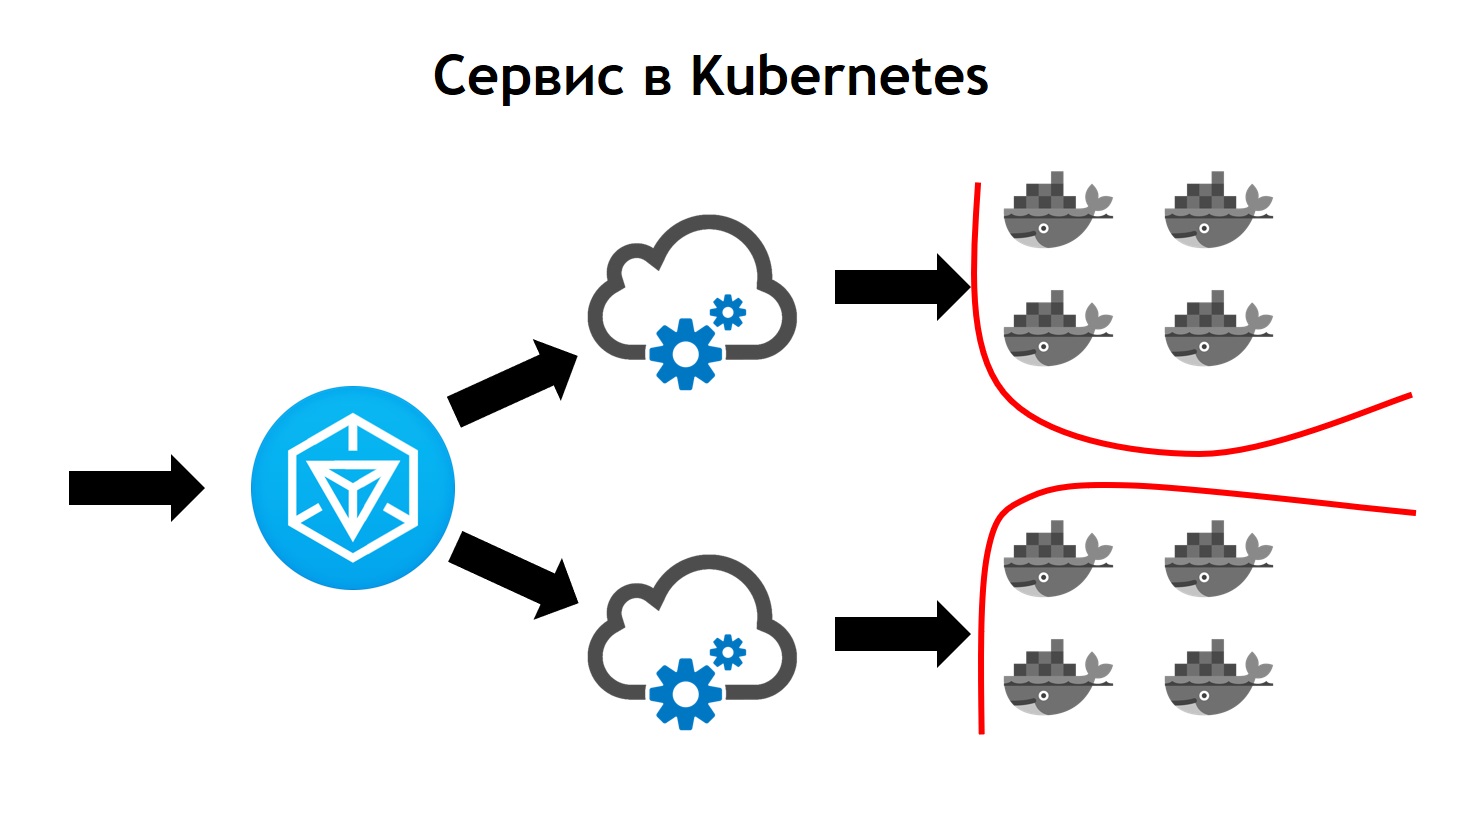
Kubernetes service looks more complex than Nomad.
This is where outbound traffic comes to Ingress. This is just the front controller, which receives all the requests and subsequently sends them to the services corresponding to the request data. It defines them on the basis of configs, which are part of the description of your application in helm and which developers set independently. The service sends requests to its pods, that is, specific containers, balancing incoming traffic between all containers that belong to this service. Well, of course, do not forget that we should not go anywhere from security at the network level. Therefore, Kubernetes cluster operates segmentation, which is based on tagging. All services have certain tags, to which the access rights of services to certain external / internal resources are attached inside or outside the cluster.
When completing the transition, we saw that Kubernetes has all the features of Nomad, which we used before, and also adds a lot of new things. It can be expanded through plugins, and in fact through custom resource types. That is, you have the opportunity not only to use something that goes into Kubernetes out of the box, but to create your own resource and service that will read your resource. This provides additional options for expanding your system without the need to reinstall Kubernetes and without the need for changes.
An example of this is Prometheus, which runs inside our Kubernetes cluster. In order for him to start collecting metrics from a particular service, we need to add an additional resource type, the so-called service monitor, to the service description. Prometheus, due to the fact that it can read, being launched in Kubernetes, a custom type of resources, automatically starts collecting metrics from the new system. It is quite convenient.
The first deployment we made at Kubernetes was in March 2018. And during this time we never experienced any problems with him. It works stably enough without significant bugs. In addition, we can expand it further. Today, we have enough of the opportunities that it has, and we really like the pace of development of Kubernetes. Currently, more than 3,000 containers are located in Kubernetes. The cluster takes several Node. At the same time, it is serviced, stable and very controlled.