The Art of Creating Organic 3D Models: Subdermal Shaders
- Transfer
Daniel Bauer talked about creating a realistic model of teeth and subdermal shaders in ZBrush , Toolbag and Substance Painter .
I started my project by collecting references on Google, Pinterest and Youtube.
Today you can find a huge abundance of resources and the problem is to filter this amount of information. I use PureRef to organize my resources. On such boards, technical details can be stored, for example, anatomical dimensions, or reflectance values and images of teeth. At first, there was no CGI on my board, because I tried to draw inspiration from real-life examples.
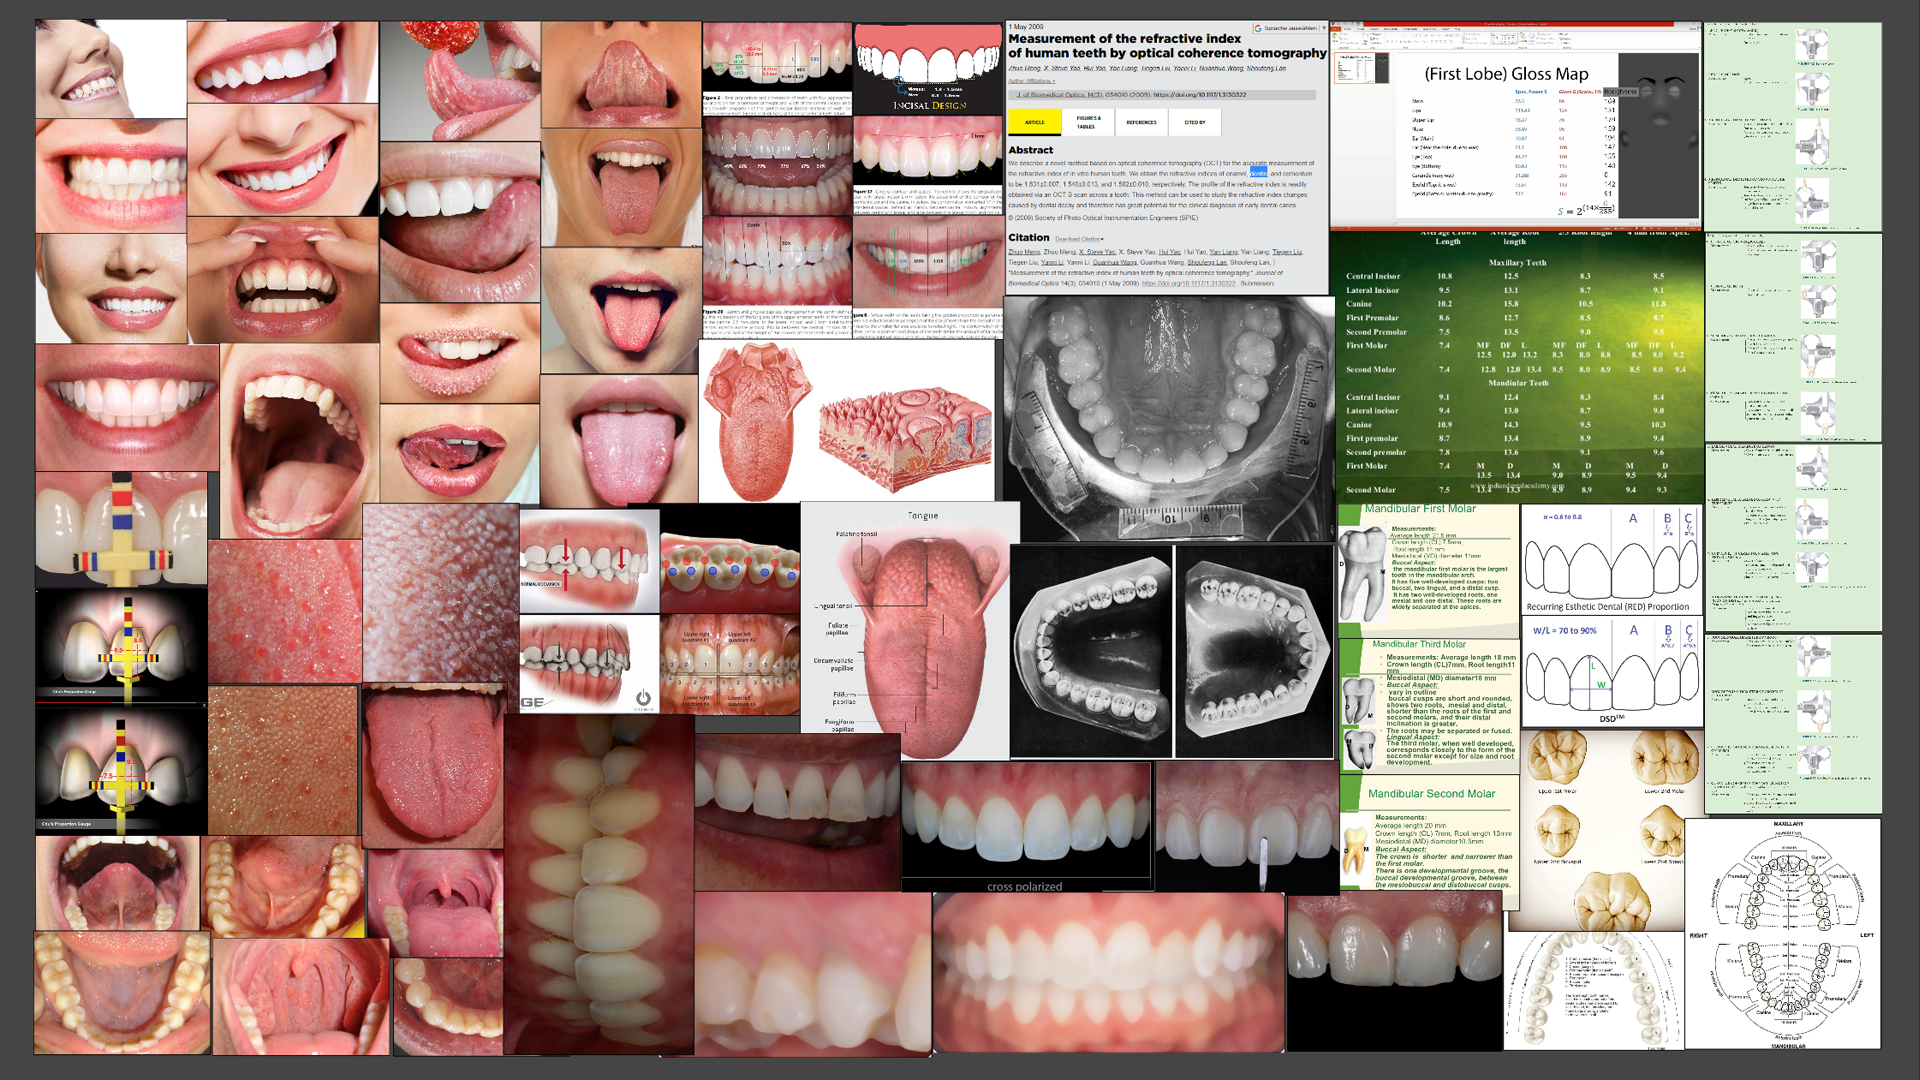
Tip : save some cross-polarized photos. You can learn a lot by observing pure color.
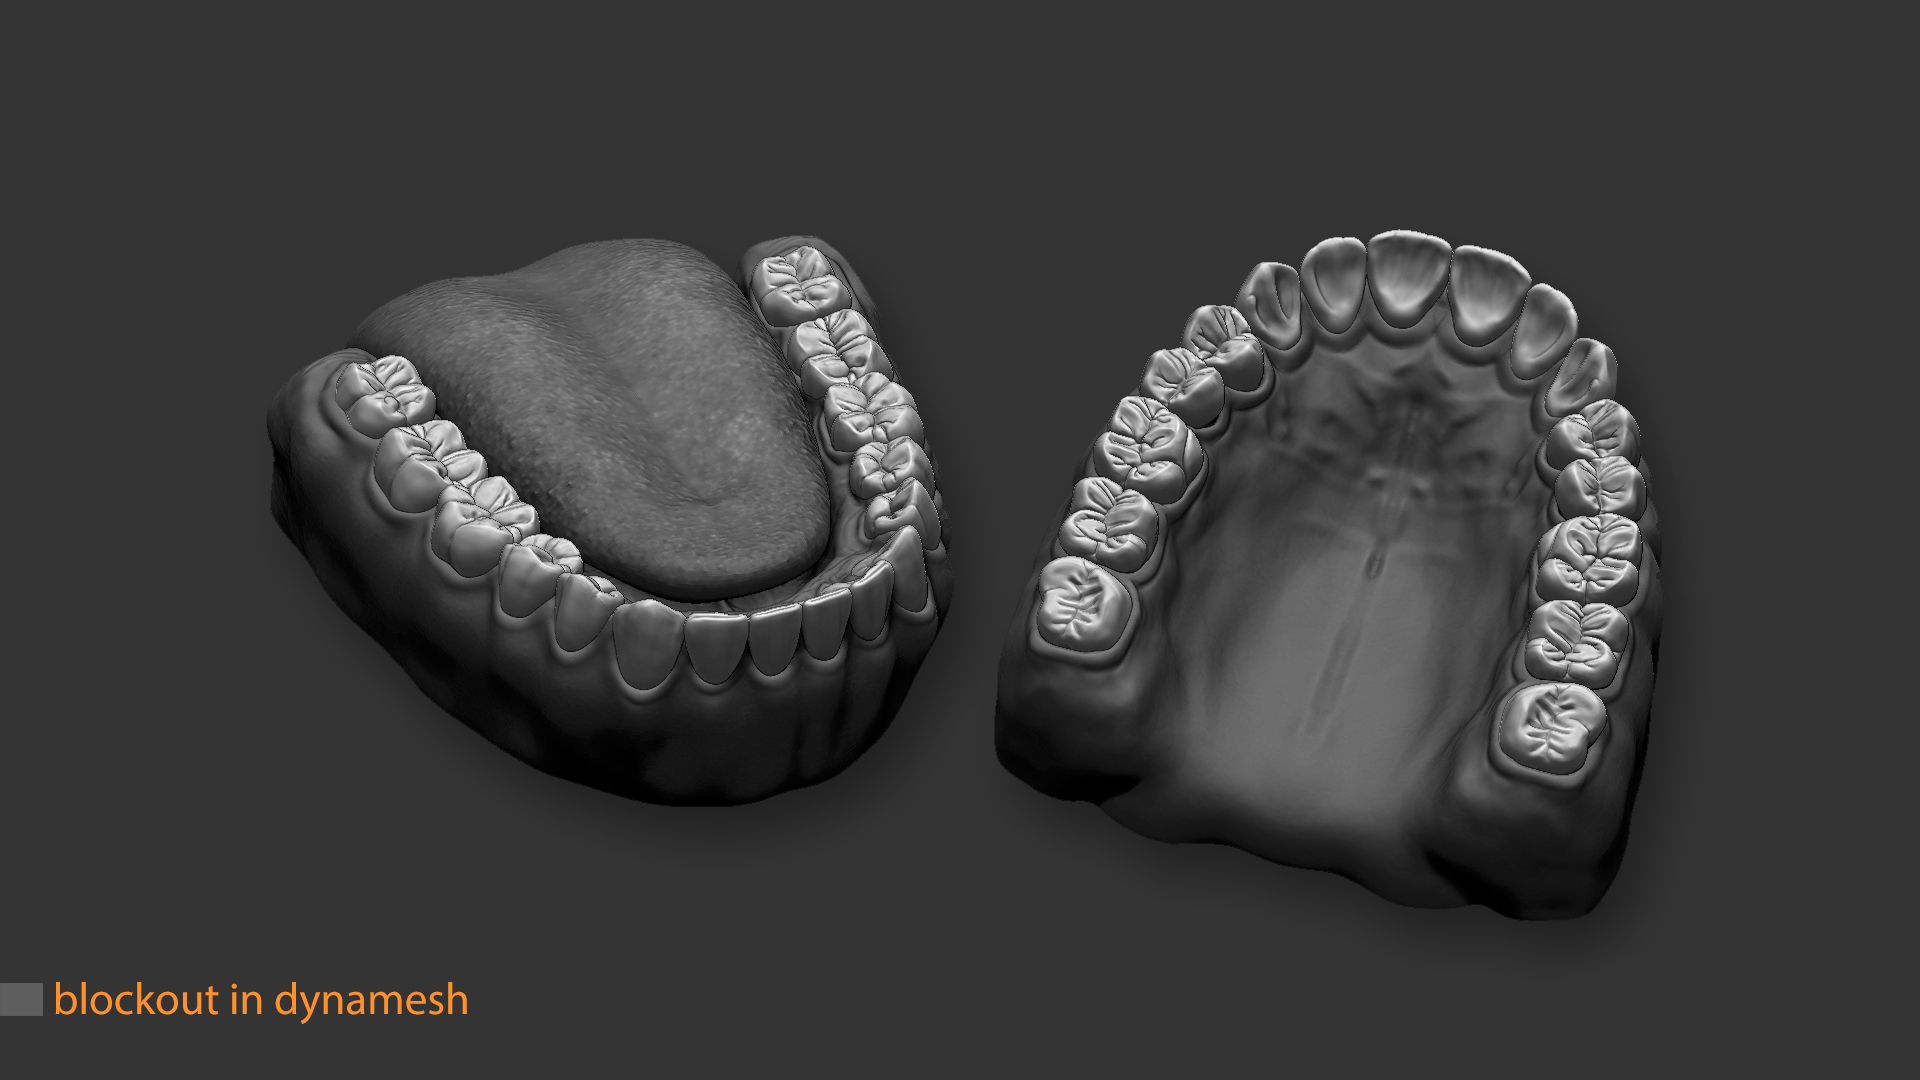
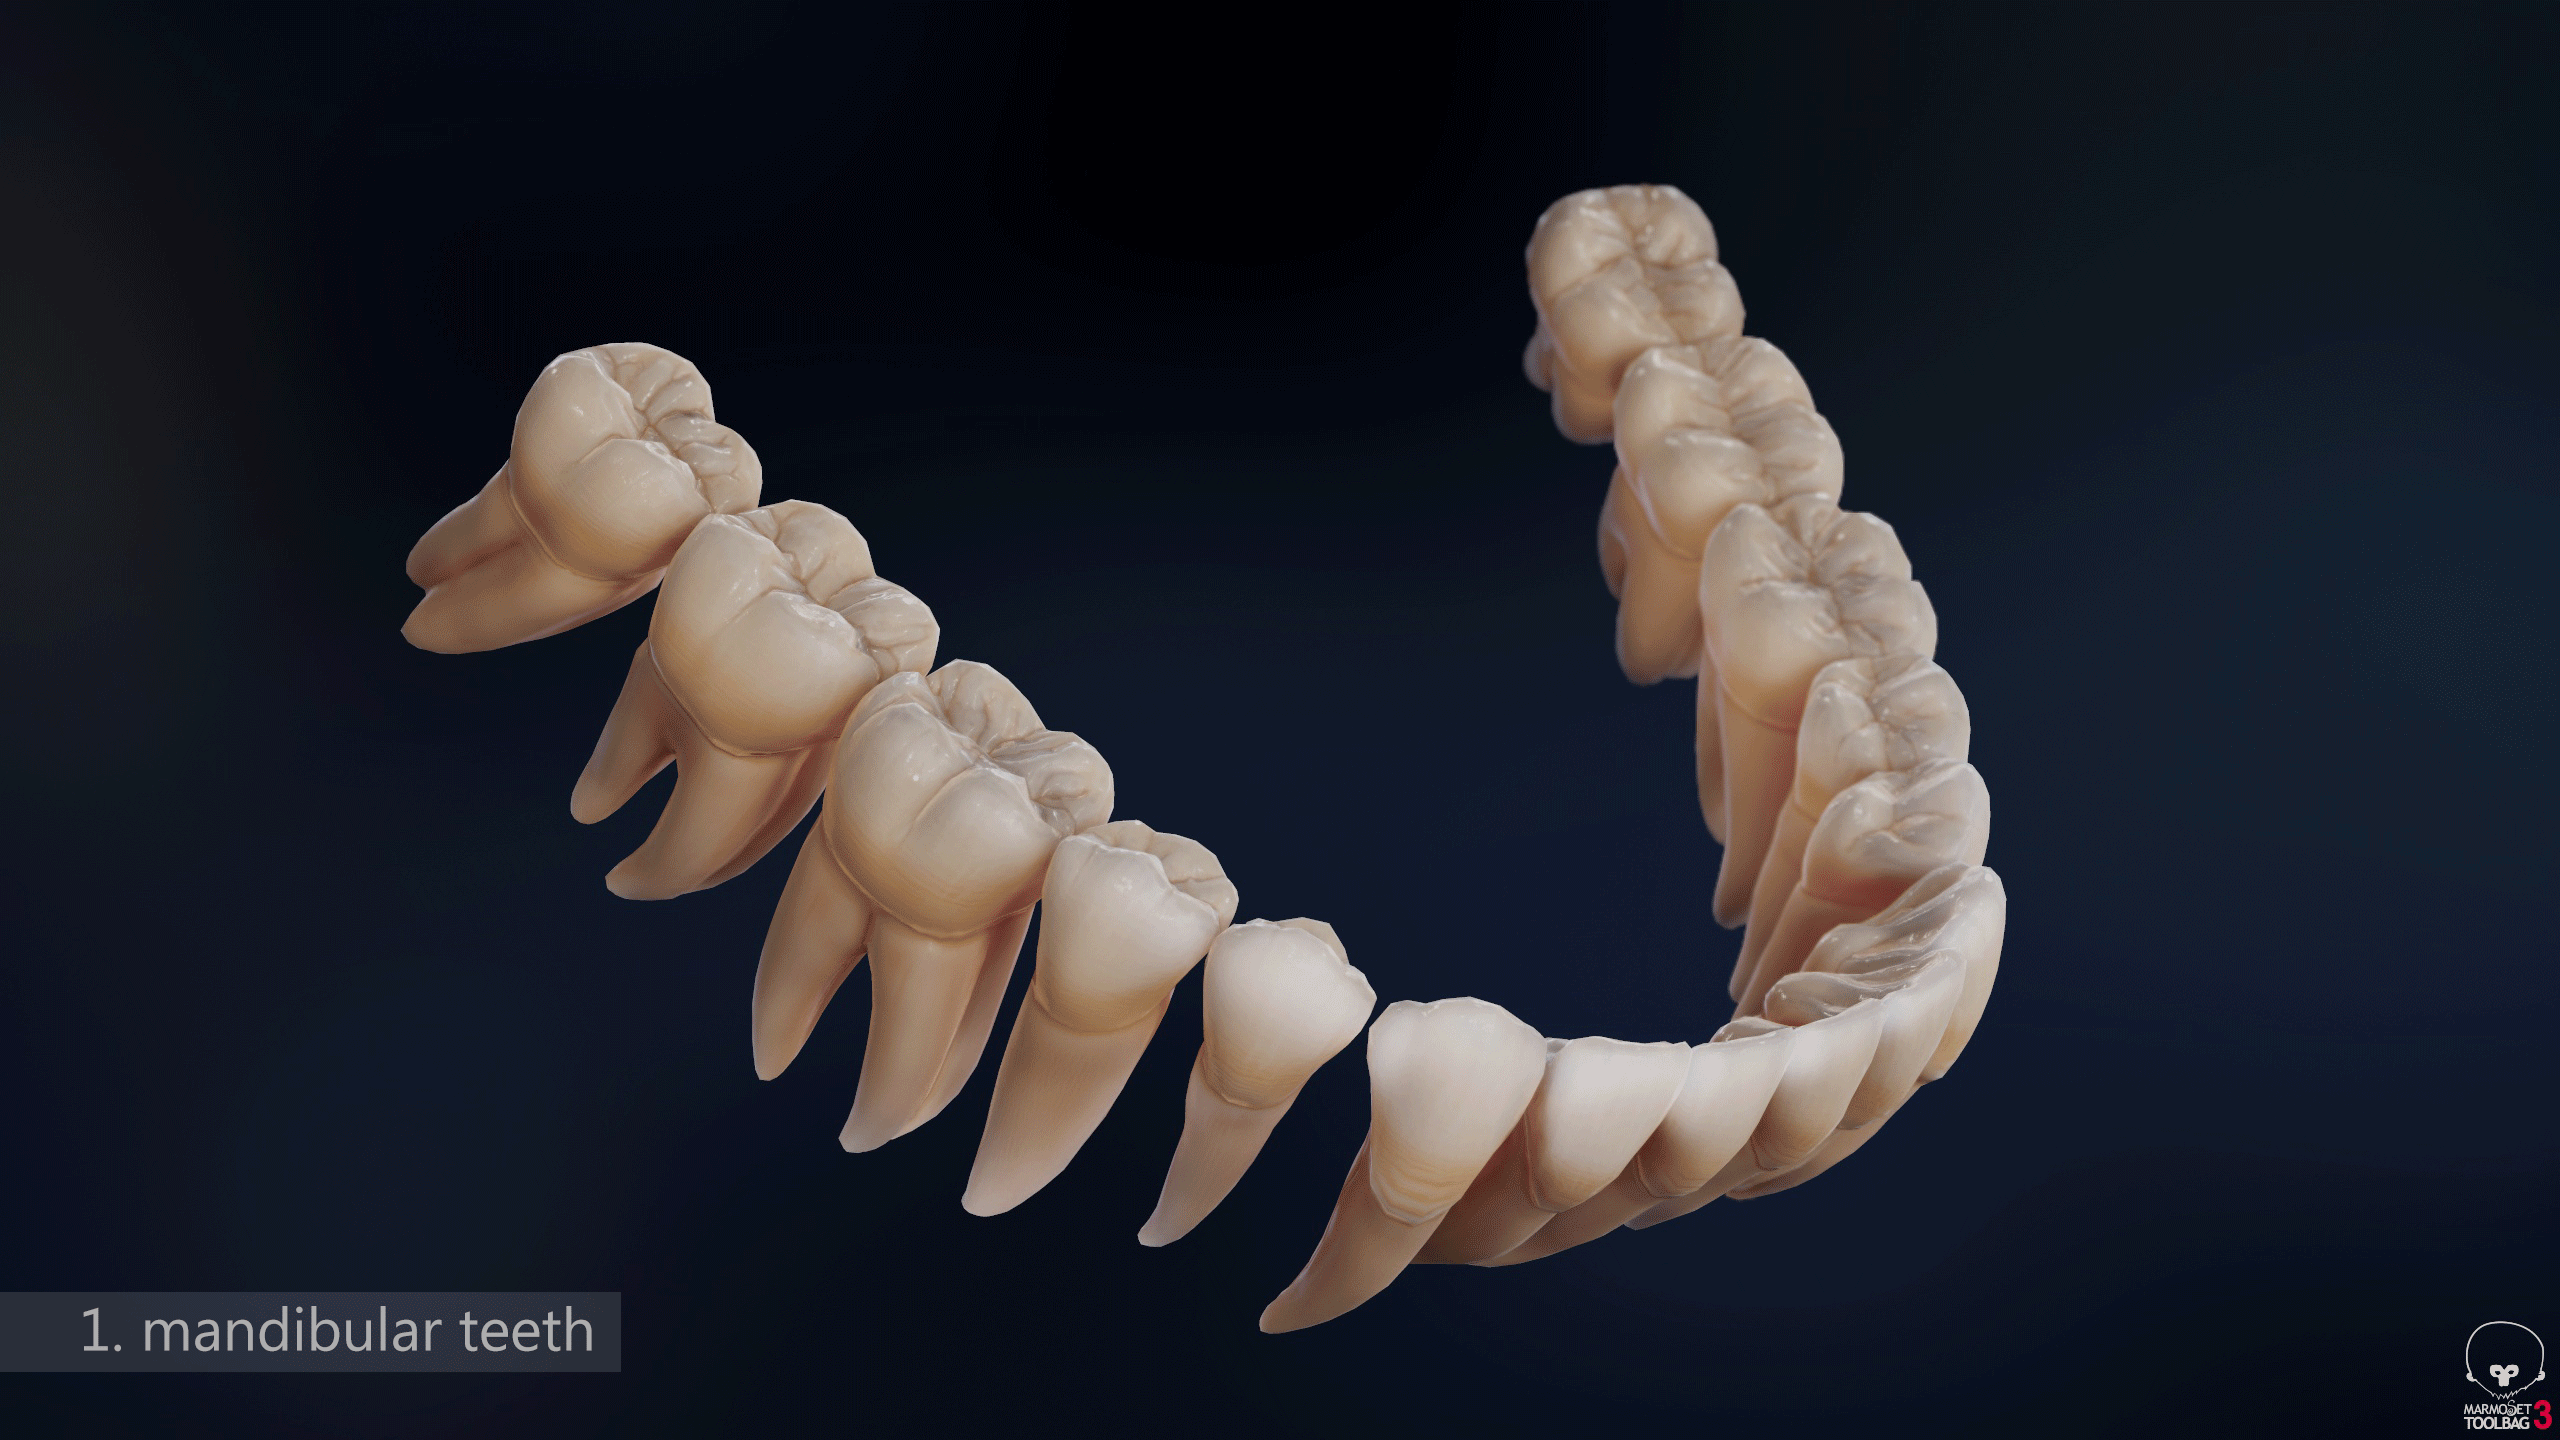
For sculpting the main volumes, I used ZBrush . I did not strictly adhere to the form, because I wanted the image to be well read from a distance. Very often, I greatly alienated the model to test it. To get a satisfactory result, the mesh had to undergo many iterations. By the way, you can use the ZBrush “see-through” mode and compare your sculpting with 3D scans on Sketchfab .
Ensure the correct size of the teeth and roots, because the observer will immediately notice that the proportions are not respected. I have been working with a low level of subdivision for a very long time. The longer I work on personal projects, the more I understand how important this habit has become.
Tip : Use a contour shader or black material to constantly check the silhouettes of the model.
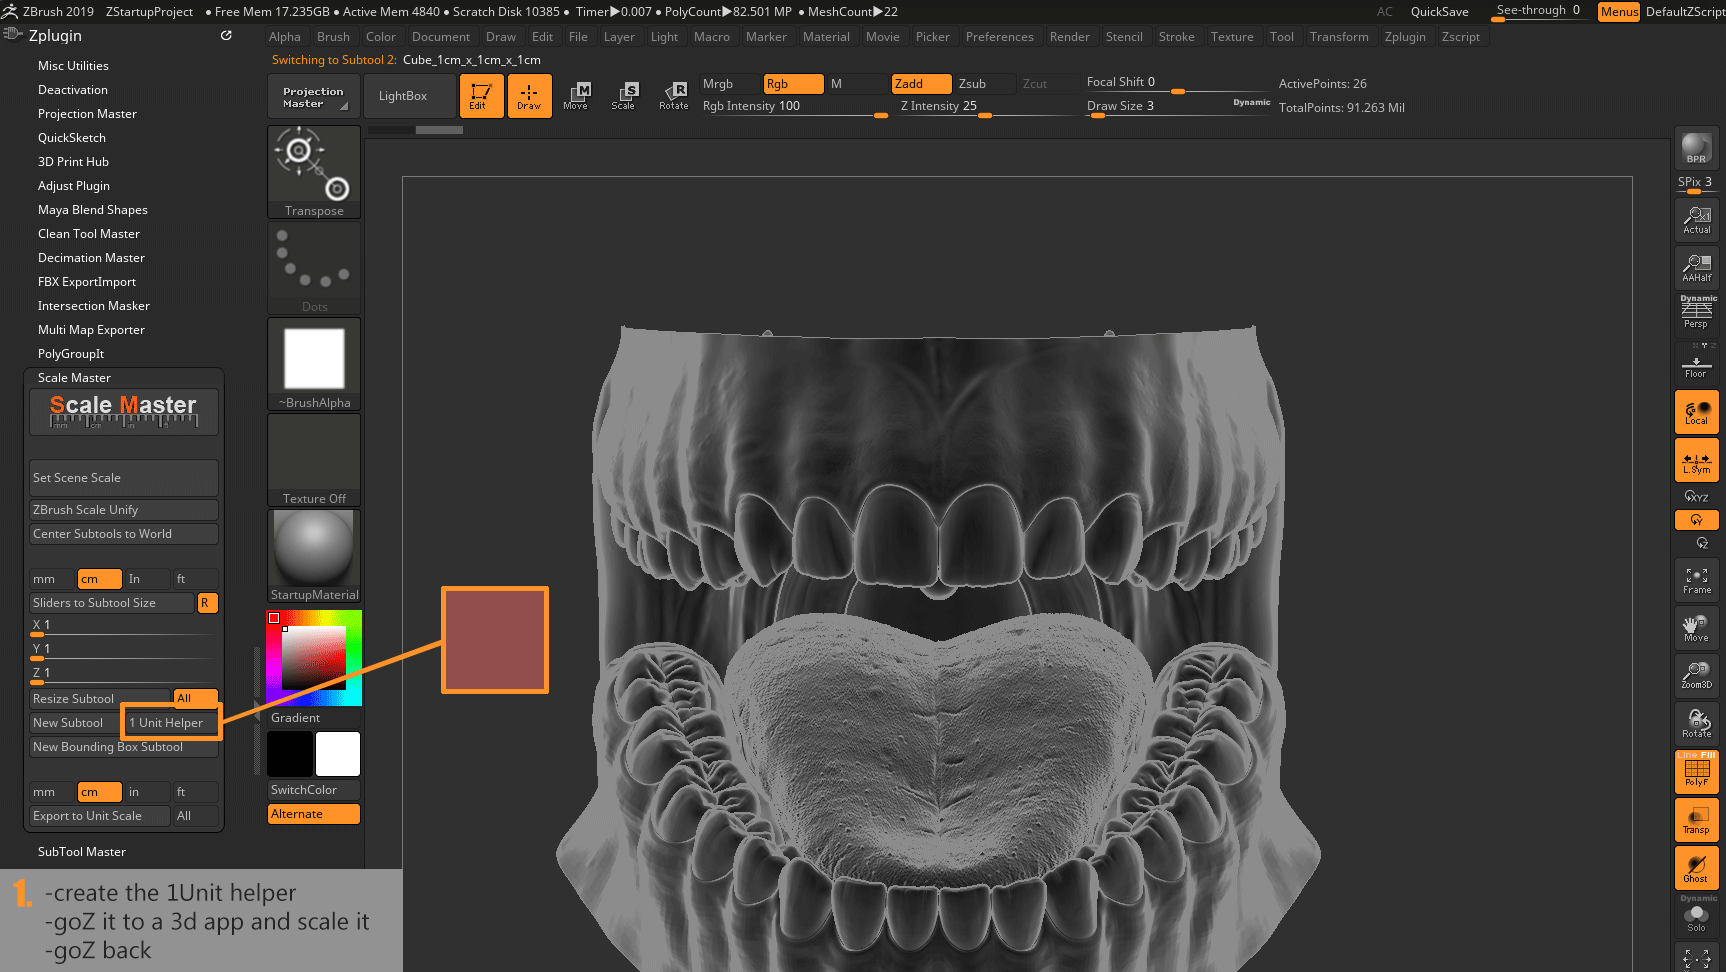
I used the transpose line ZBrush to measure each tooth and bring them all to the right size. Many people have difficulty with ZBrush units, so I’ll give you advice:
I sculpted each tooth individually and this gives me complete control over baking in the Toolbag or in the Substance Painter . If each tool (subtool) will be stored separately, then this provides flexibility if you need to modify the tooth. When I realized how complicated human teeth really are, this method allowed me to listen to the feedback of other artists and eliminate the shortcomings of the forms without any problems. In the first pass, some details are exaggerated, while others are missing:
Tip : due to the specifics of implementing units (subdivisions, SD), when you return to level 1, the SD mesh can be compressed. This led to an undesirable effect, because my teeth, gums and blend mesh should blend perfectly. I wrote a macro that saved the morphtarget of the mesh before each subdivide command and restored its original volume.
I used this macro as my main subdivide command, bound to CTRL + D. The script can be downloaded from here .
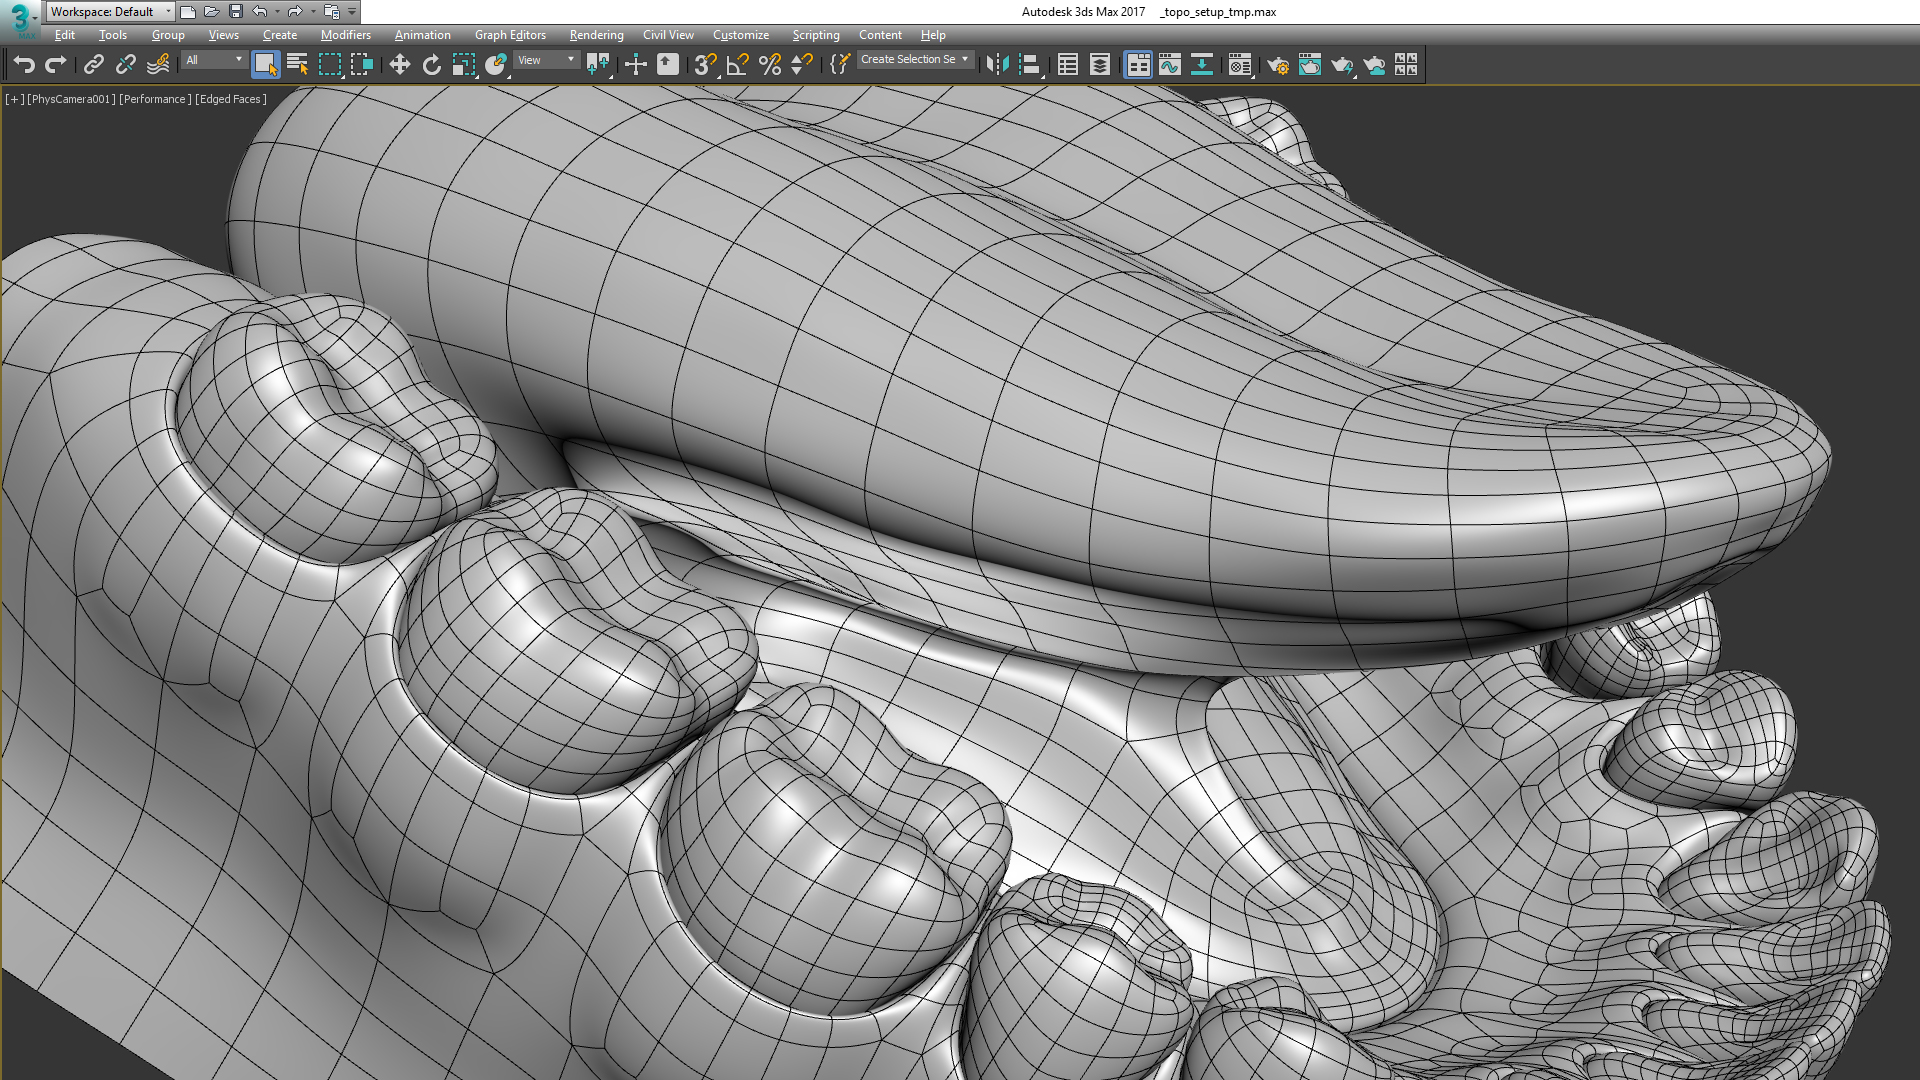
Having finished with the basics sculpting, we need to think about the topology. A good topology can support sculpting, glitter, and animation.
The smoothness of the polygons of the teeth and gums helps blendmesh maintain all complex shapes.
You always need to maintain a balance between low poly and the number of reference edges. From the very first level of SD, I strove to create a clear silhouette of the teeth:
Here are a couple of good topology resources:
Having finished with topology and sculpting, I import decimated meshes into the Marmoset Toolbag. This helps to get a general idea of the appearance of the model in different lighting models.
Start using Toolbag or Keyshot as early as possible to find areas that were missing in the drill-down phase. In addition, observing the results helps in moving in the right direction.
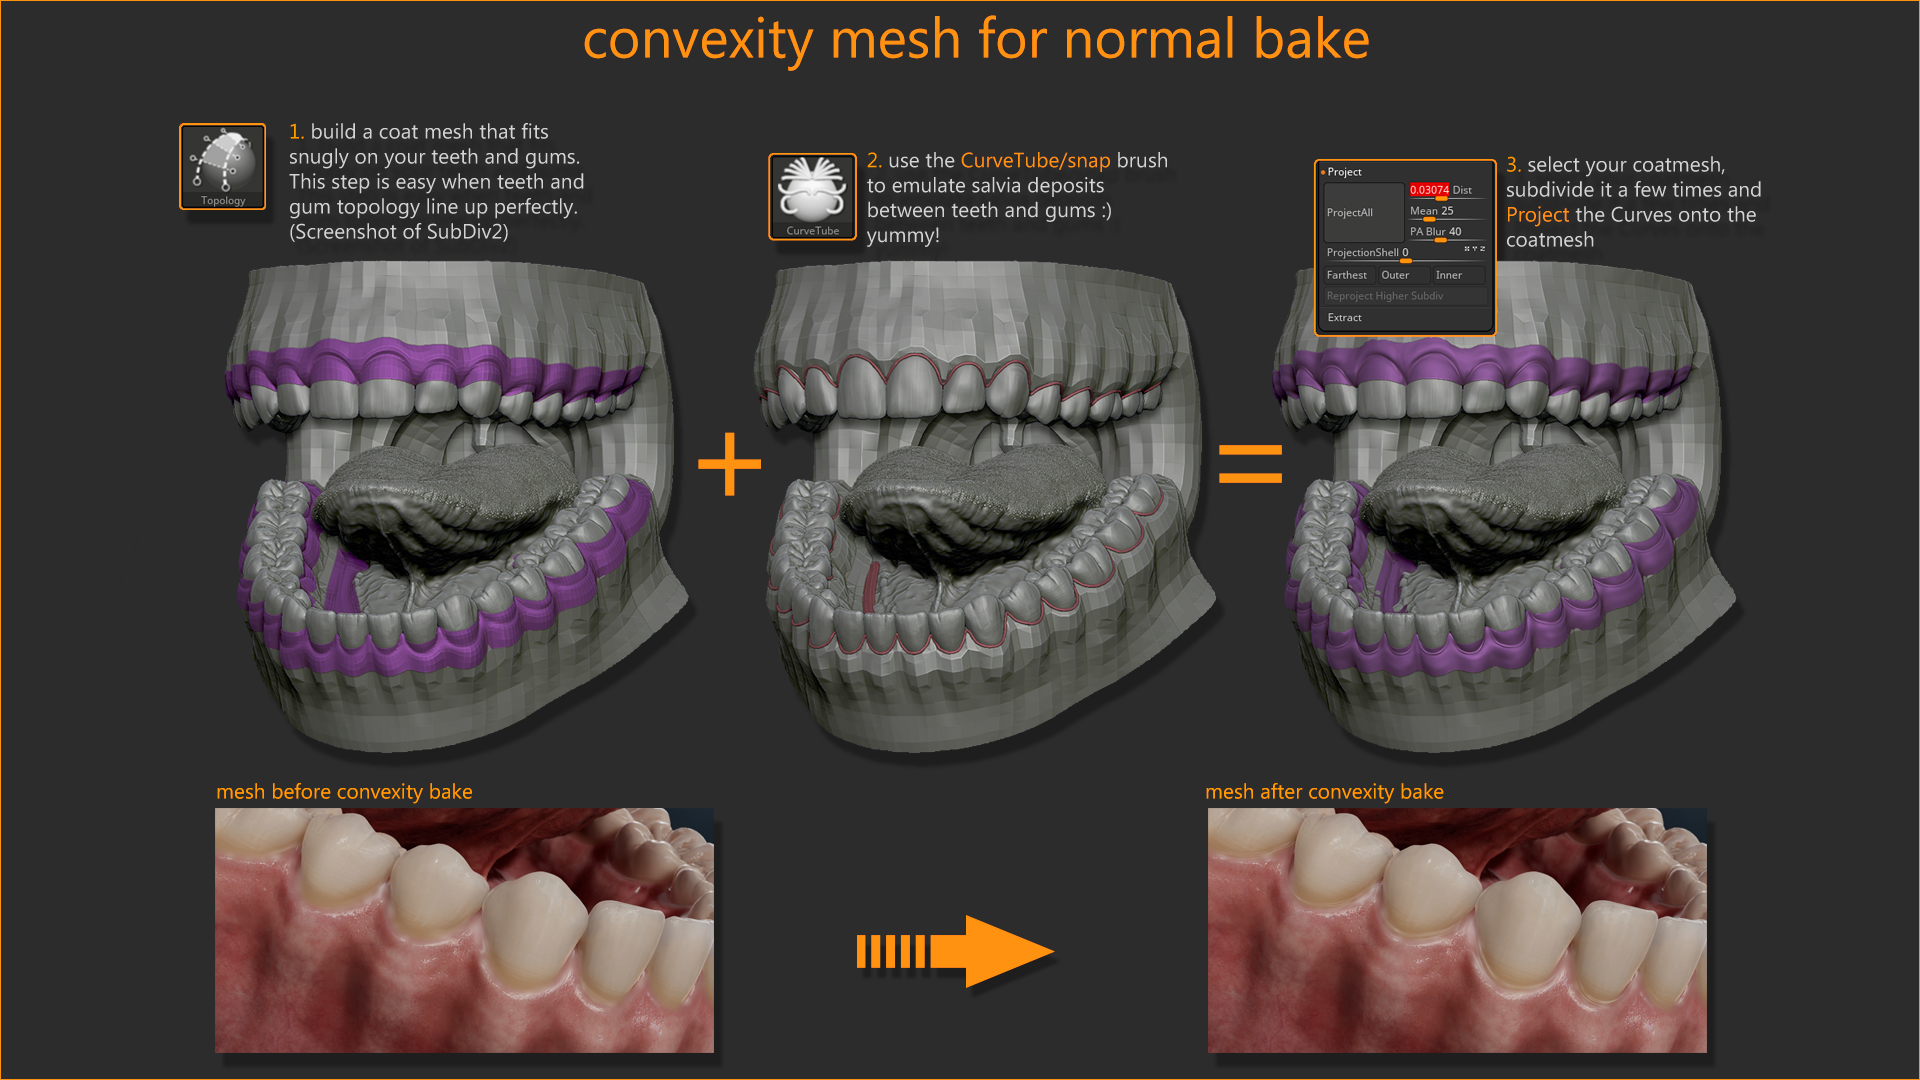
I wanted to present the model in a real-time environment, so I created a transitional mesh
for the implementation of blending teeth with gums. Otherwise, subsurface scattering in the screen space leads to abrupt transitions. I will talk about how I increased the level of detail in this blendmesh.
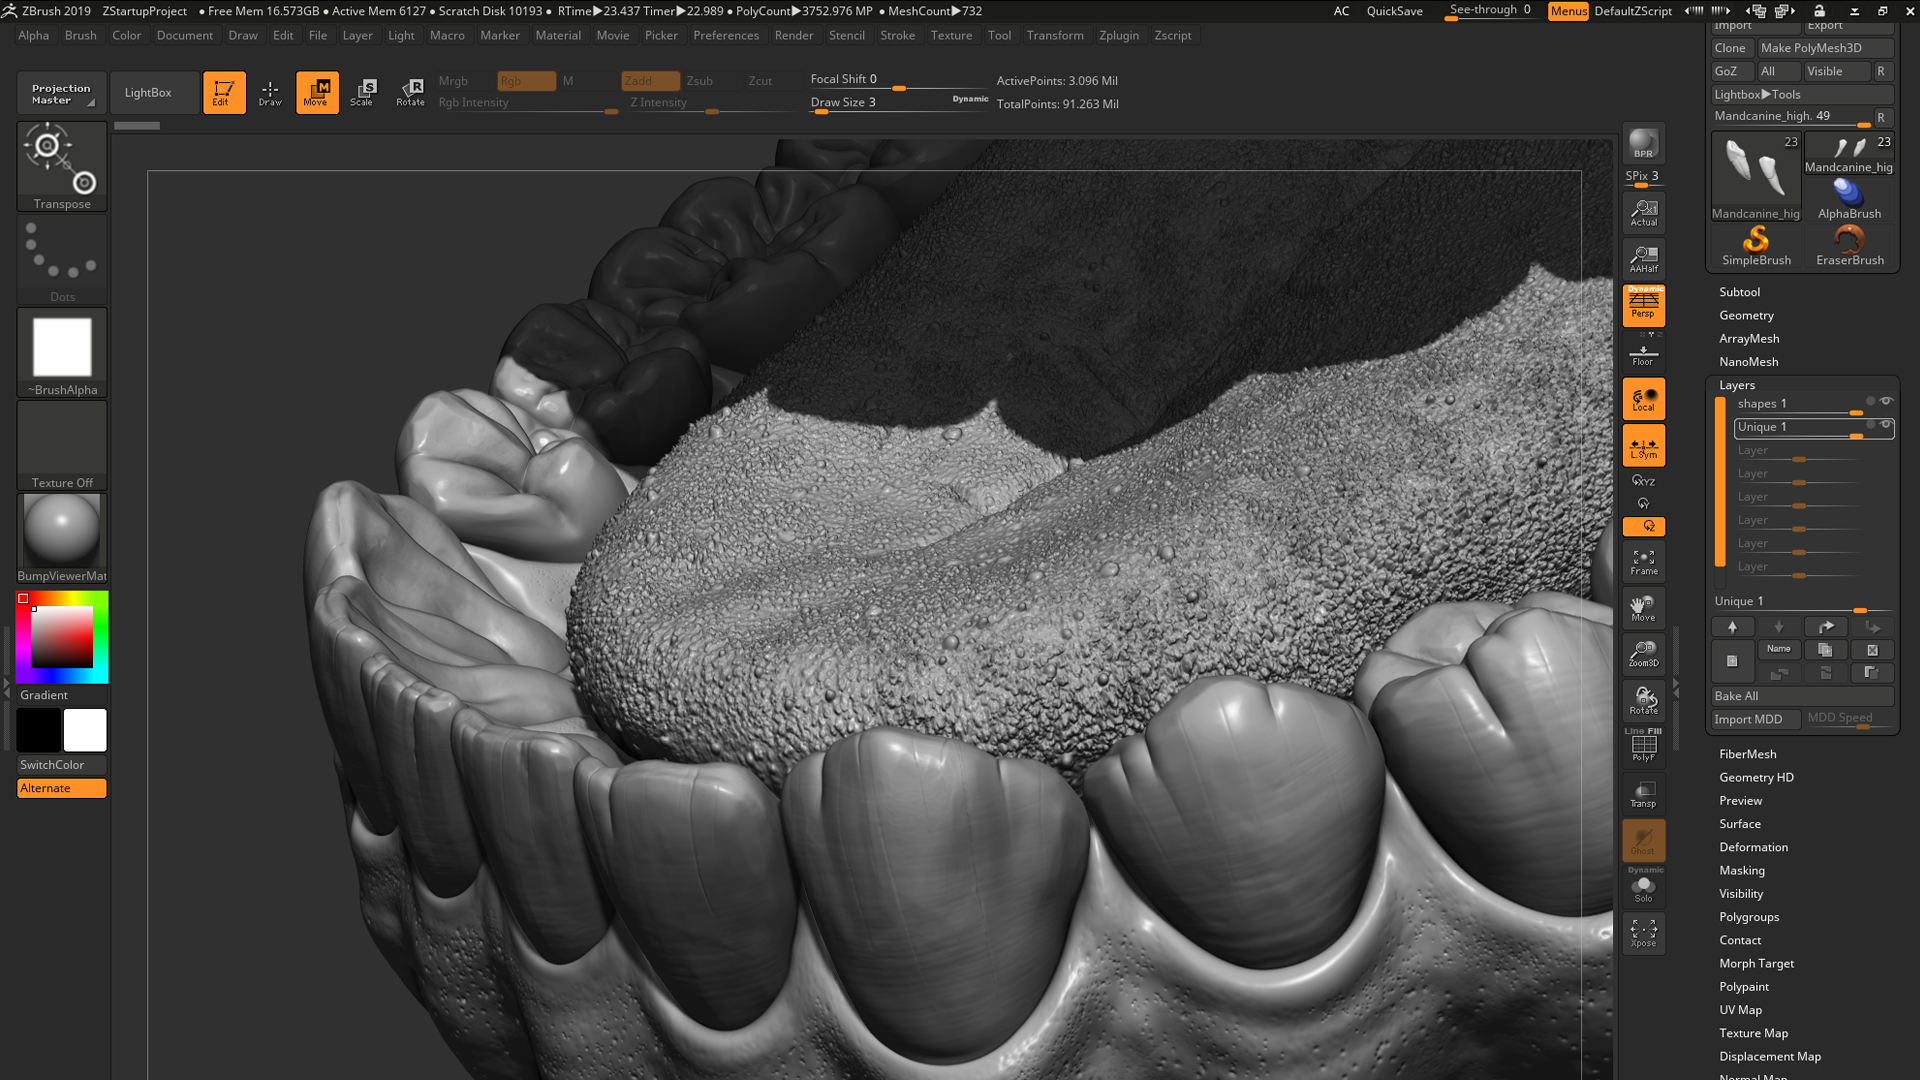
In ZBrush, you can draw thin tubes in the cavities that will indicate the accumulation of saliva. We use them only for baking. Thus we get a tight-fitting concave blendmesh plus a normal map resembling a convex shape. This will come in handy in a real-time renderer, because in the troughs we get beautiful reflections, as shown in this image:
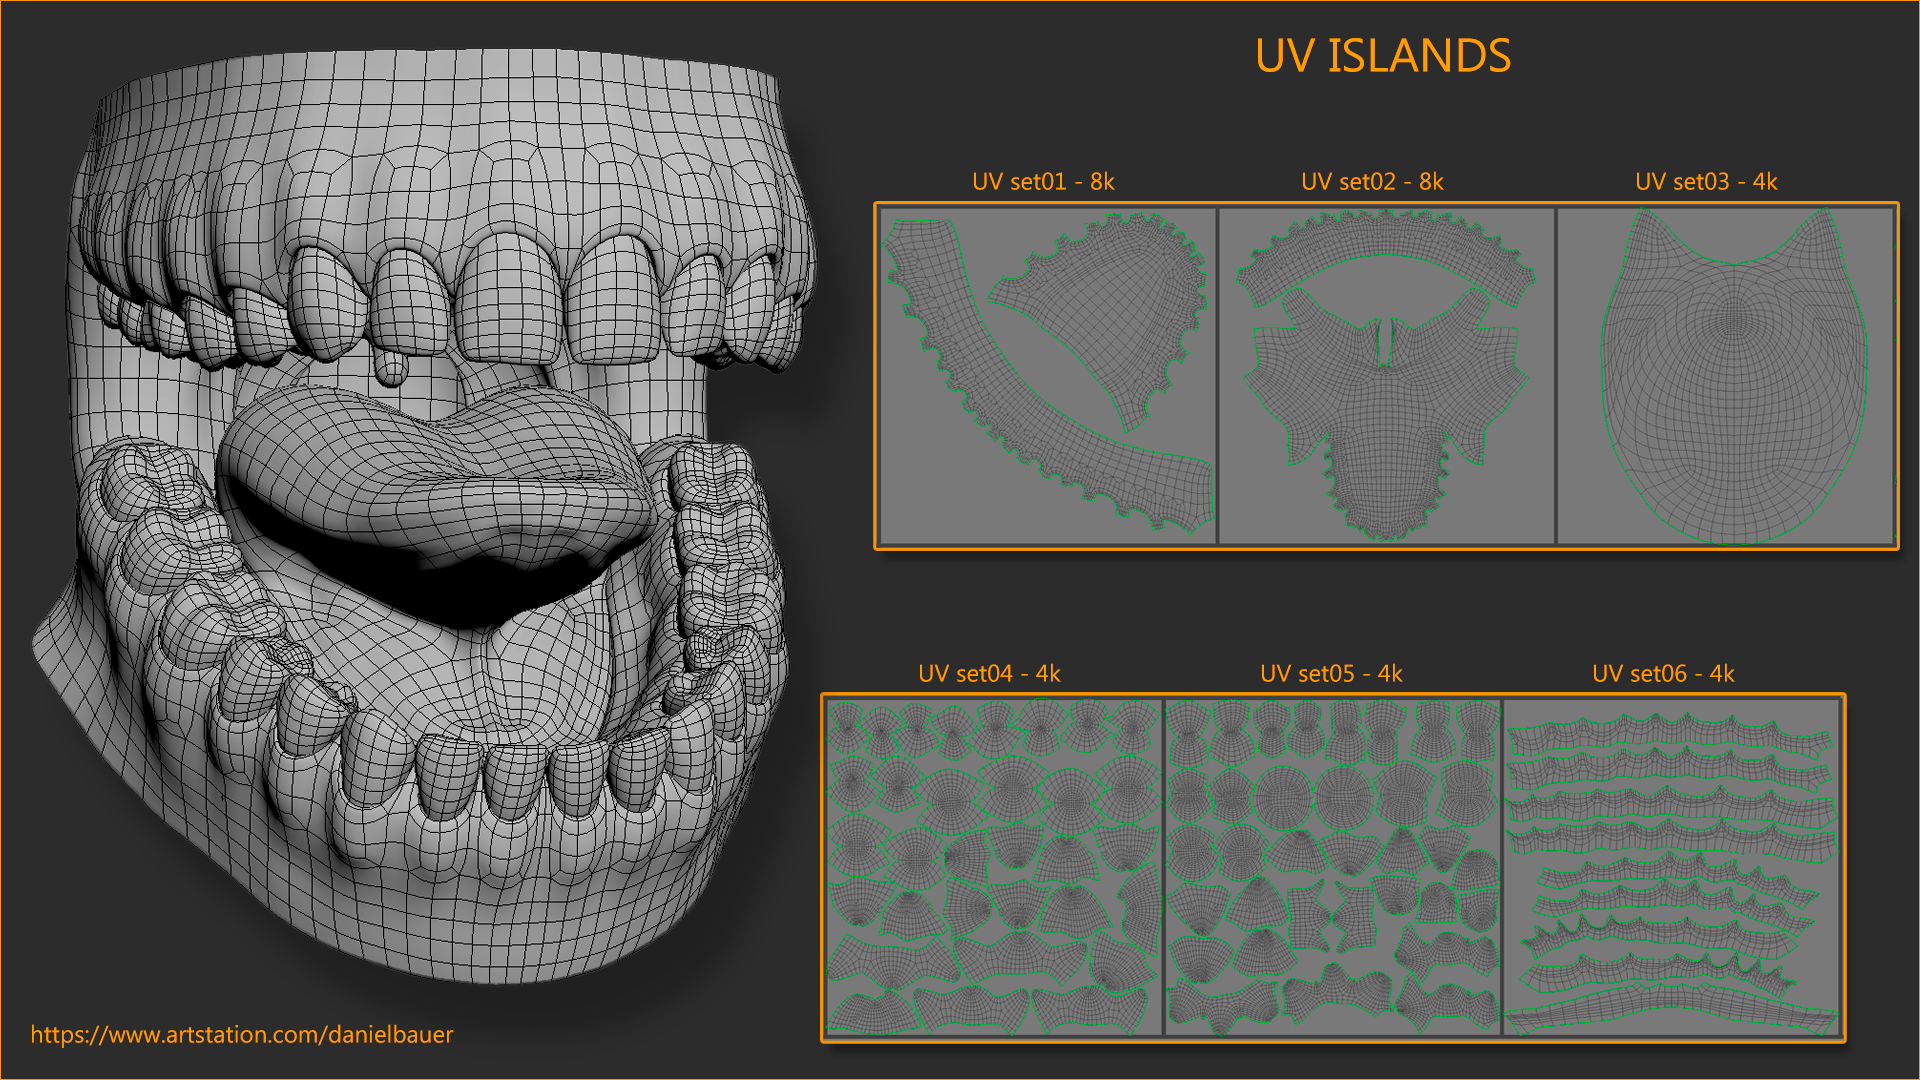
You can import meshes into 3ds Max or another similar package to create a flat pattern and layout texture. I wanted to keep the UDIM scan in order to have a model ready for production on different platforms. I transferred my 3ds Max tools through GoZ to indicate the seams of the cuts, and then performed a quick-peel and packing operation. Then he returned everything via GoZ back to ZBrush to take advantage of his powerful “use existing seems” tool. This is very important if you want to export displacement maps from ZBrush.
Tip : You can learn a lot about scans from Tim Bergholz .
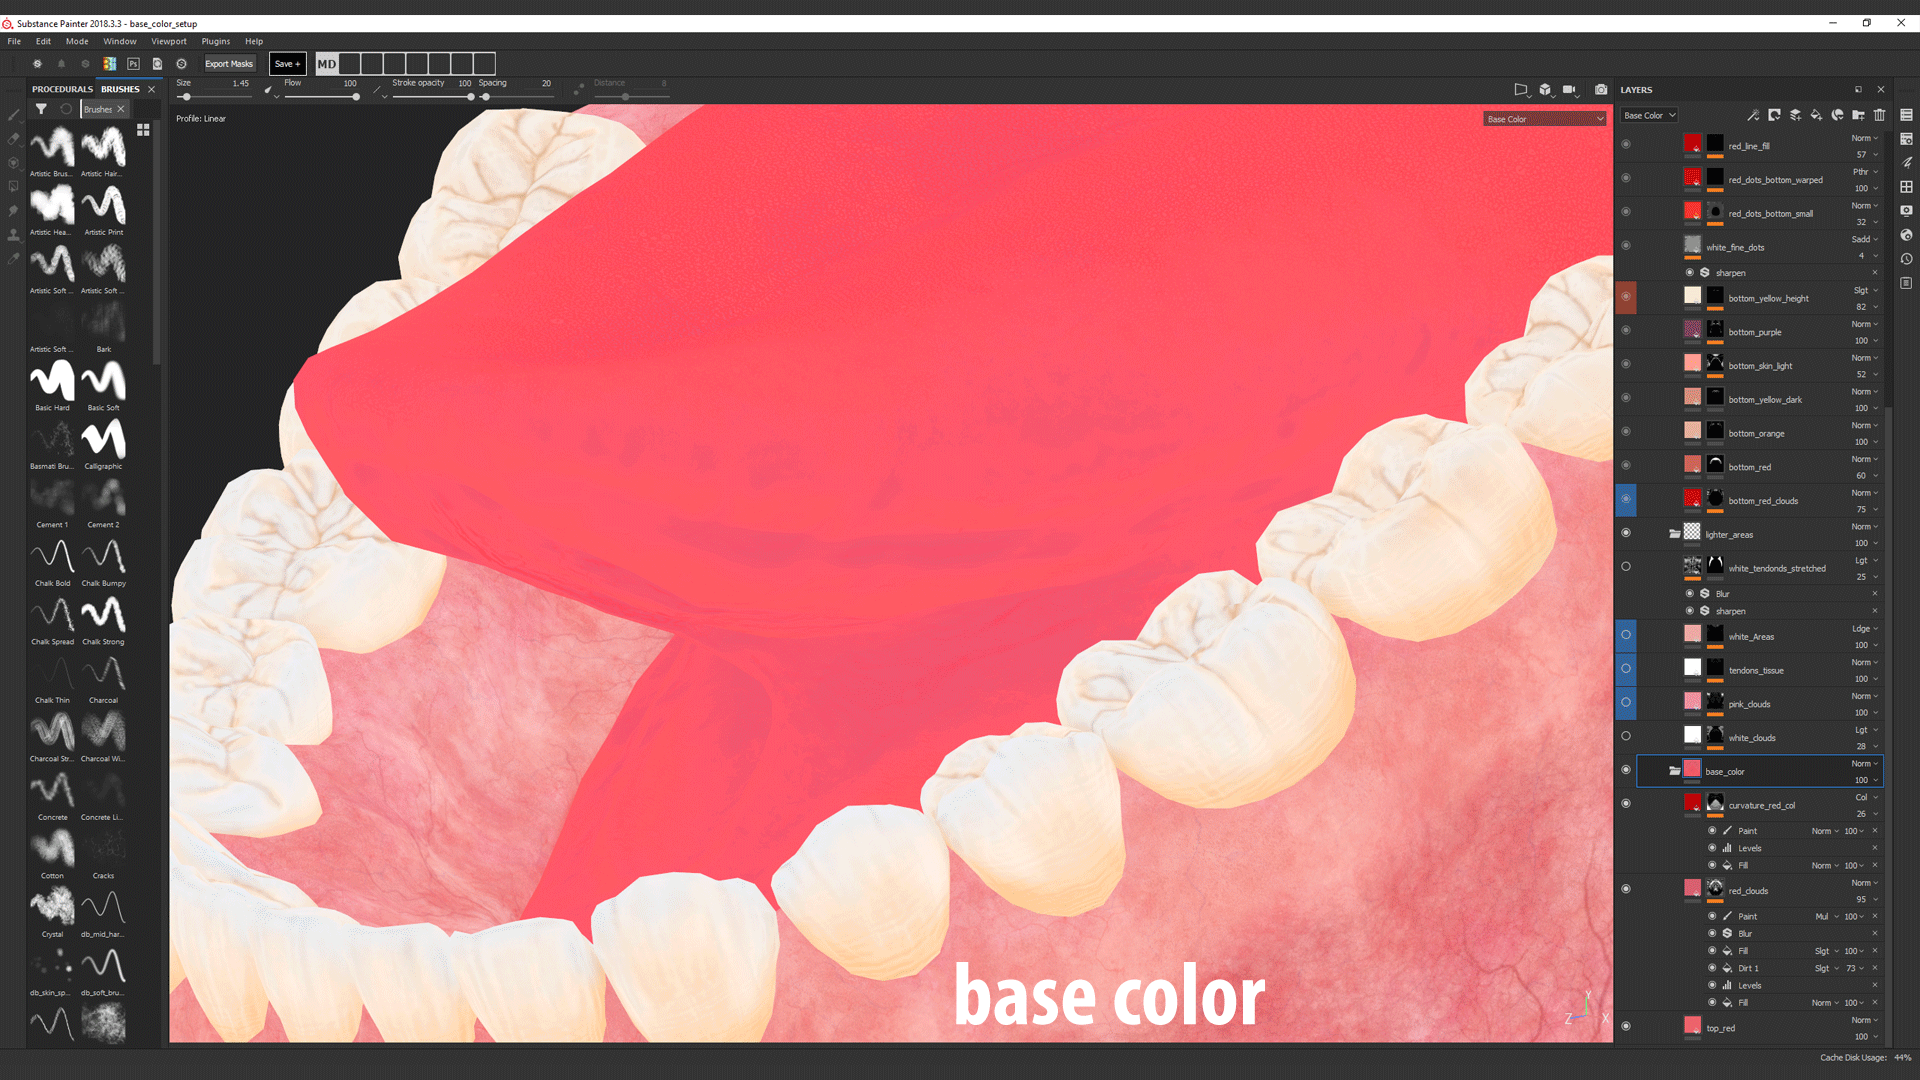
After creating a sweep, you can load the model into Substance Painter to colorize it.
To create albedo maps, I like to use procedural and hand-drawn masks. The idea of projecting cross-polarized photographs seems attractive, but they limit you if you want to change veins or blood vessels for another project. You can learn a lot about color values and fabric layers by creating everything manually. This may not be an ideal albedo, but in the long run this work will be rewarded to you.
At an early stage, I constantly had Toolbag running with all my shaders. Since the gums reflect a lot of light, thus hiding the albedo information, I exaggerated the colors:
To get a wet surface feel in the Toolbag, I created a roughness map. It includes very small changes on different layers. To achieve the desired result, I redid everything many times. The appearance of the gums varies greatly, so it is important to consult the references.
For most cavities, I used a slightly stronger roughness value, but excluded tooth cavities in which the roughness values are lower. I continued to configure this card even in the process of writing the article, so I received new reviews. I like to complete projects, but to improve my skills I need to be critical of myself and be open to new ideas.
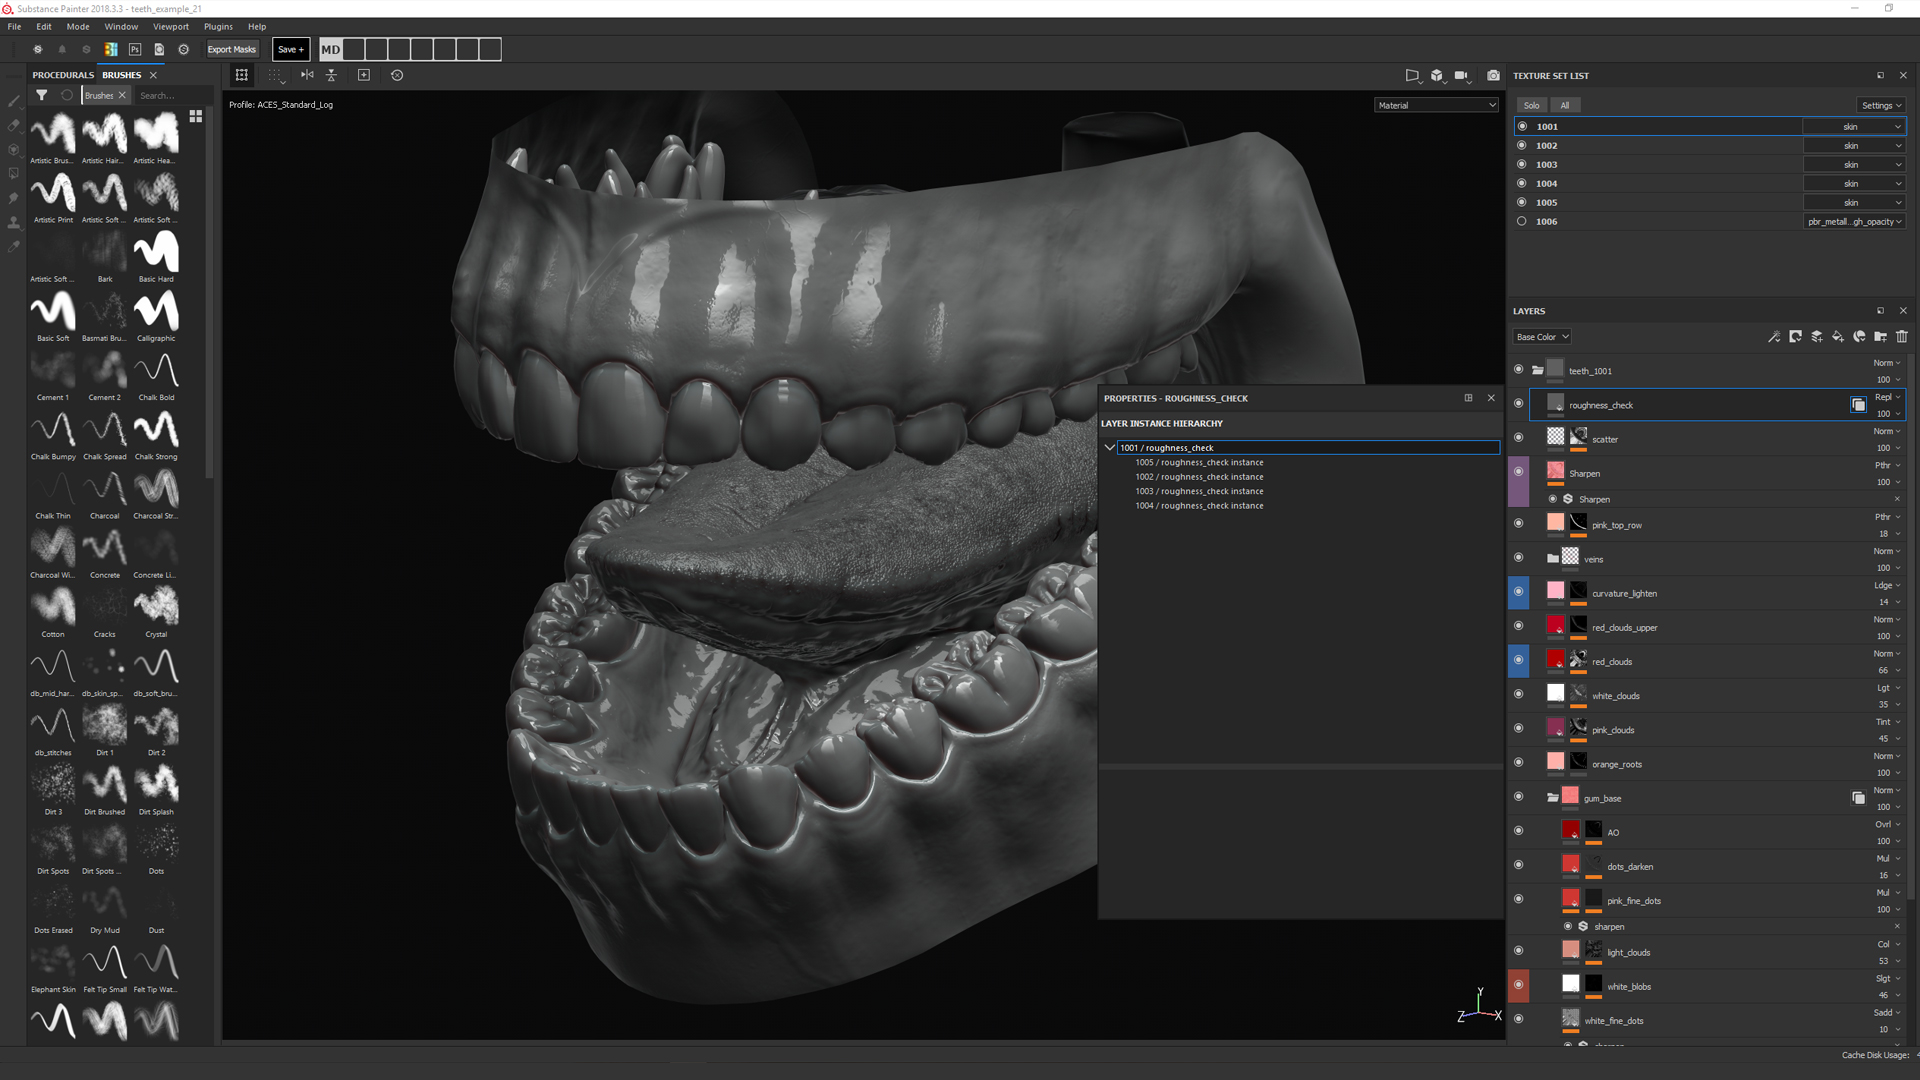
Tip : Create a dark gray color in all texture sets and switch the blending mode to “replace” to immediately check the roughness map's behavior under various lighting conditions.
First, select a separate shader for this texture set. Ideal results are obtained with the “metal / rough-with-alpha-test” shader. For other texture sets, apply a skin-shader.
Add an opacity channel to the “Texture Set Settings” and create a fill layer at the bottom of the stack of layers with neutral normals and zeroed information about opacity.
Now you can start drawing on top of the opacity mask (for clarity, I used red).
I had to work hard to get the perfect result, but the rush at this stage will greatly reduce the overall quality of the rendering.
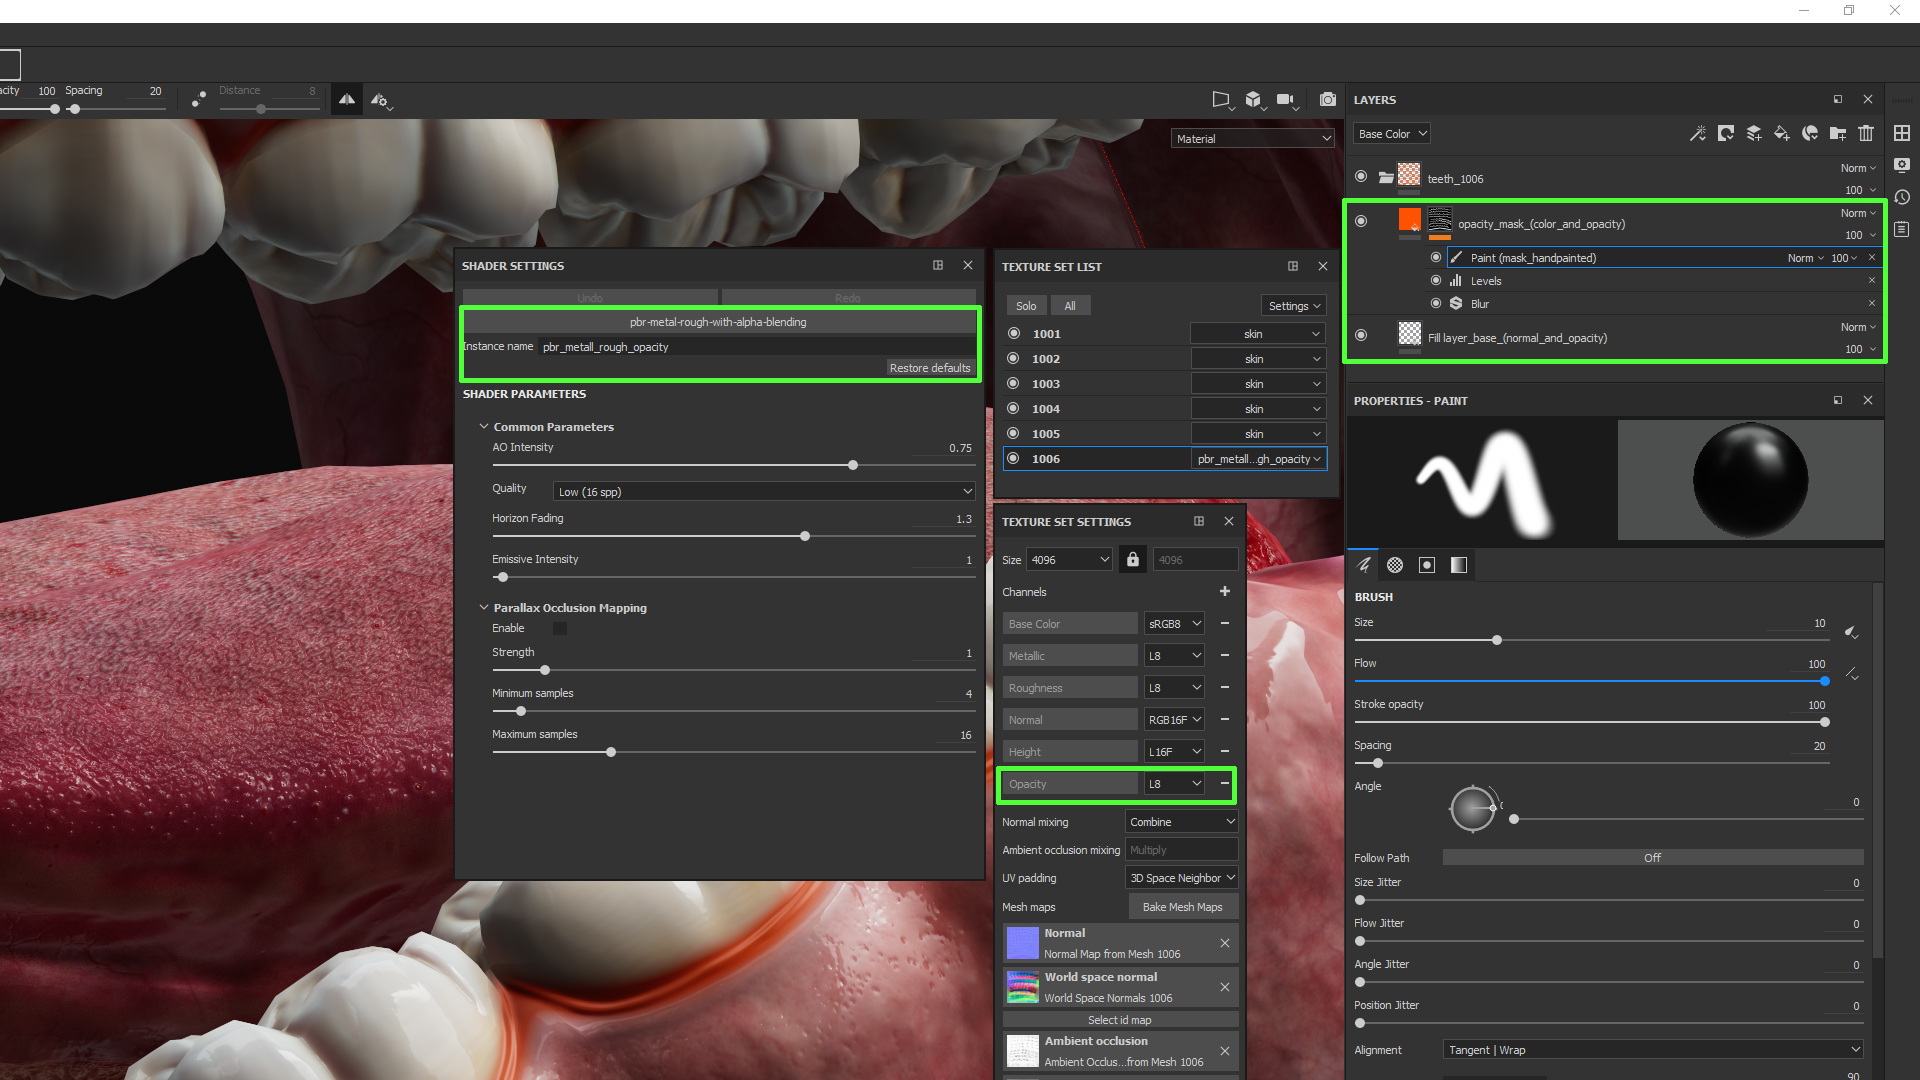
Tip : you can export your mask through the texture set menu or simply by right-clicking on the mask stack and selecting “Export mask to file”.
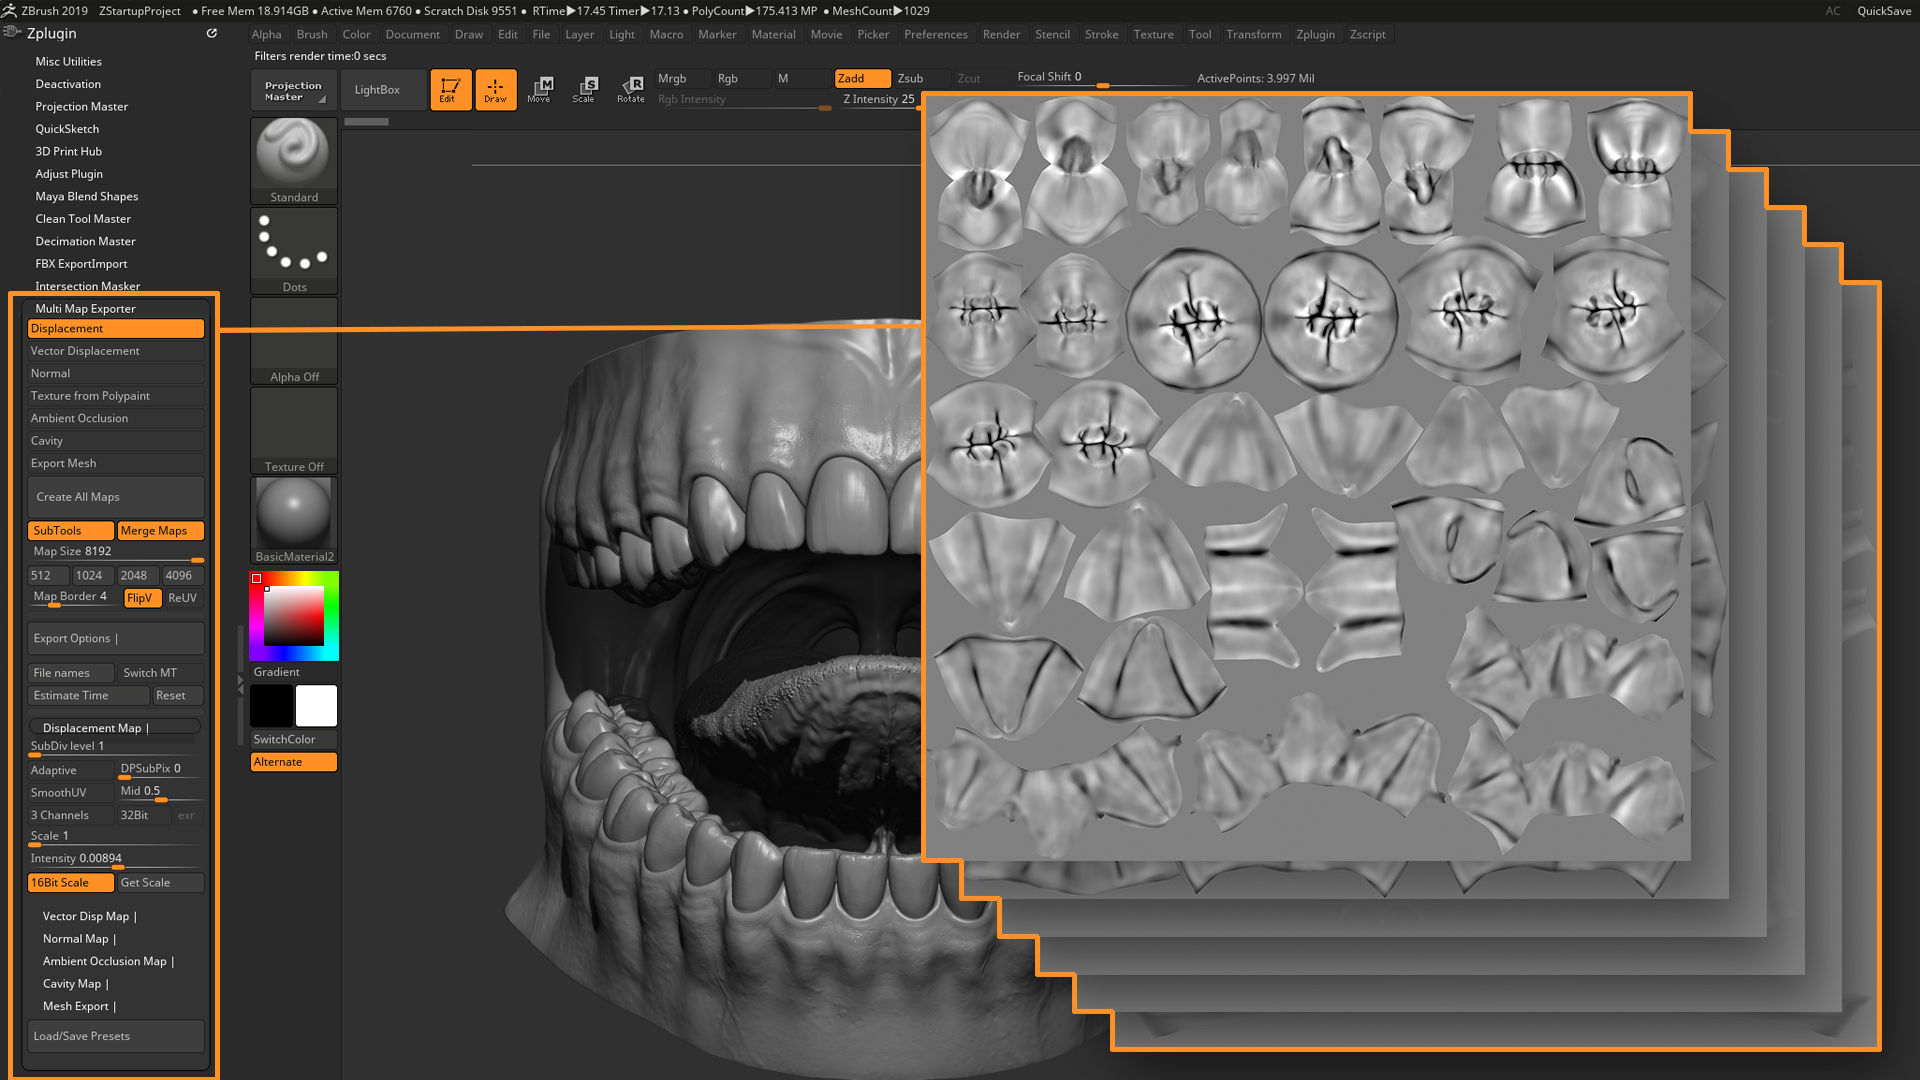
Displacement maps I exported from ZBrush.
It has a convenient function that analyzes instruments and aligns the displacement map to cover all high and low values. I used Multi Map Exporter to combine individual tools with their UV tiles, using the following options:
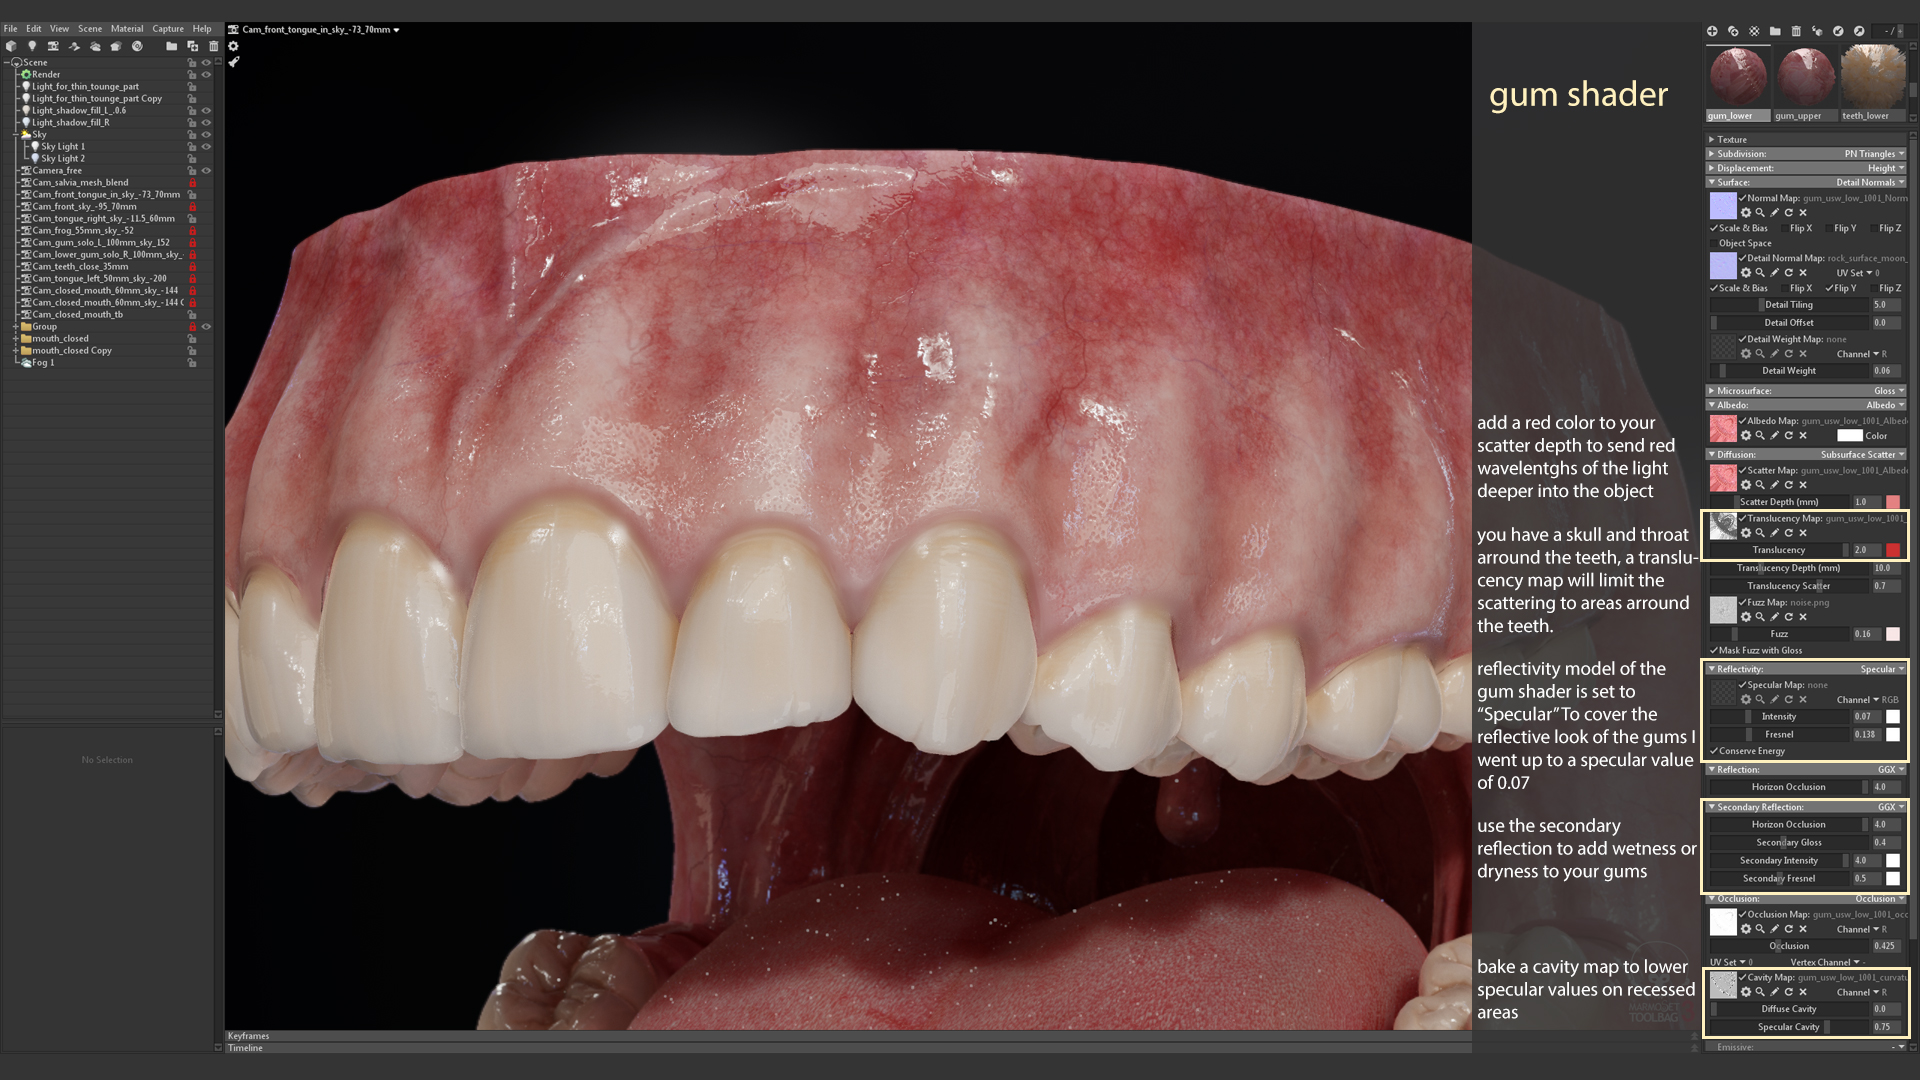
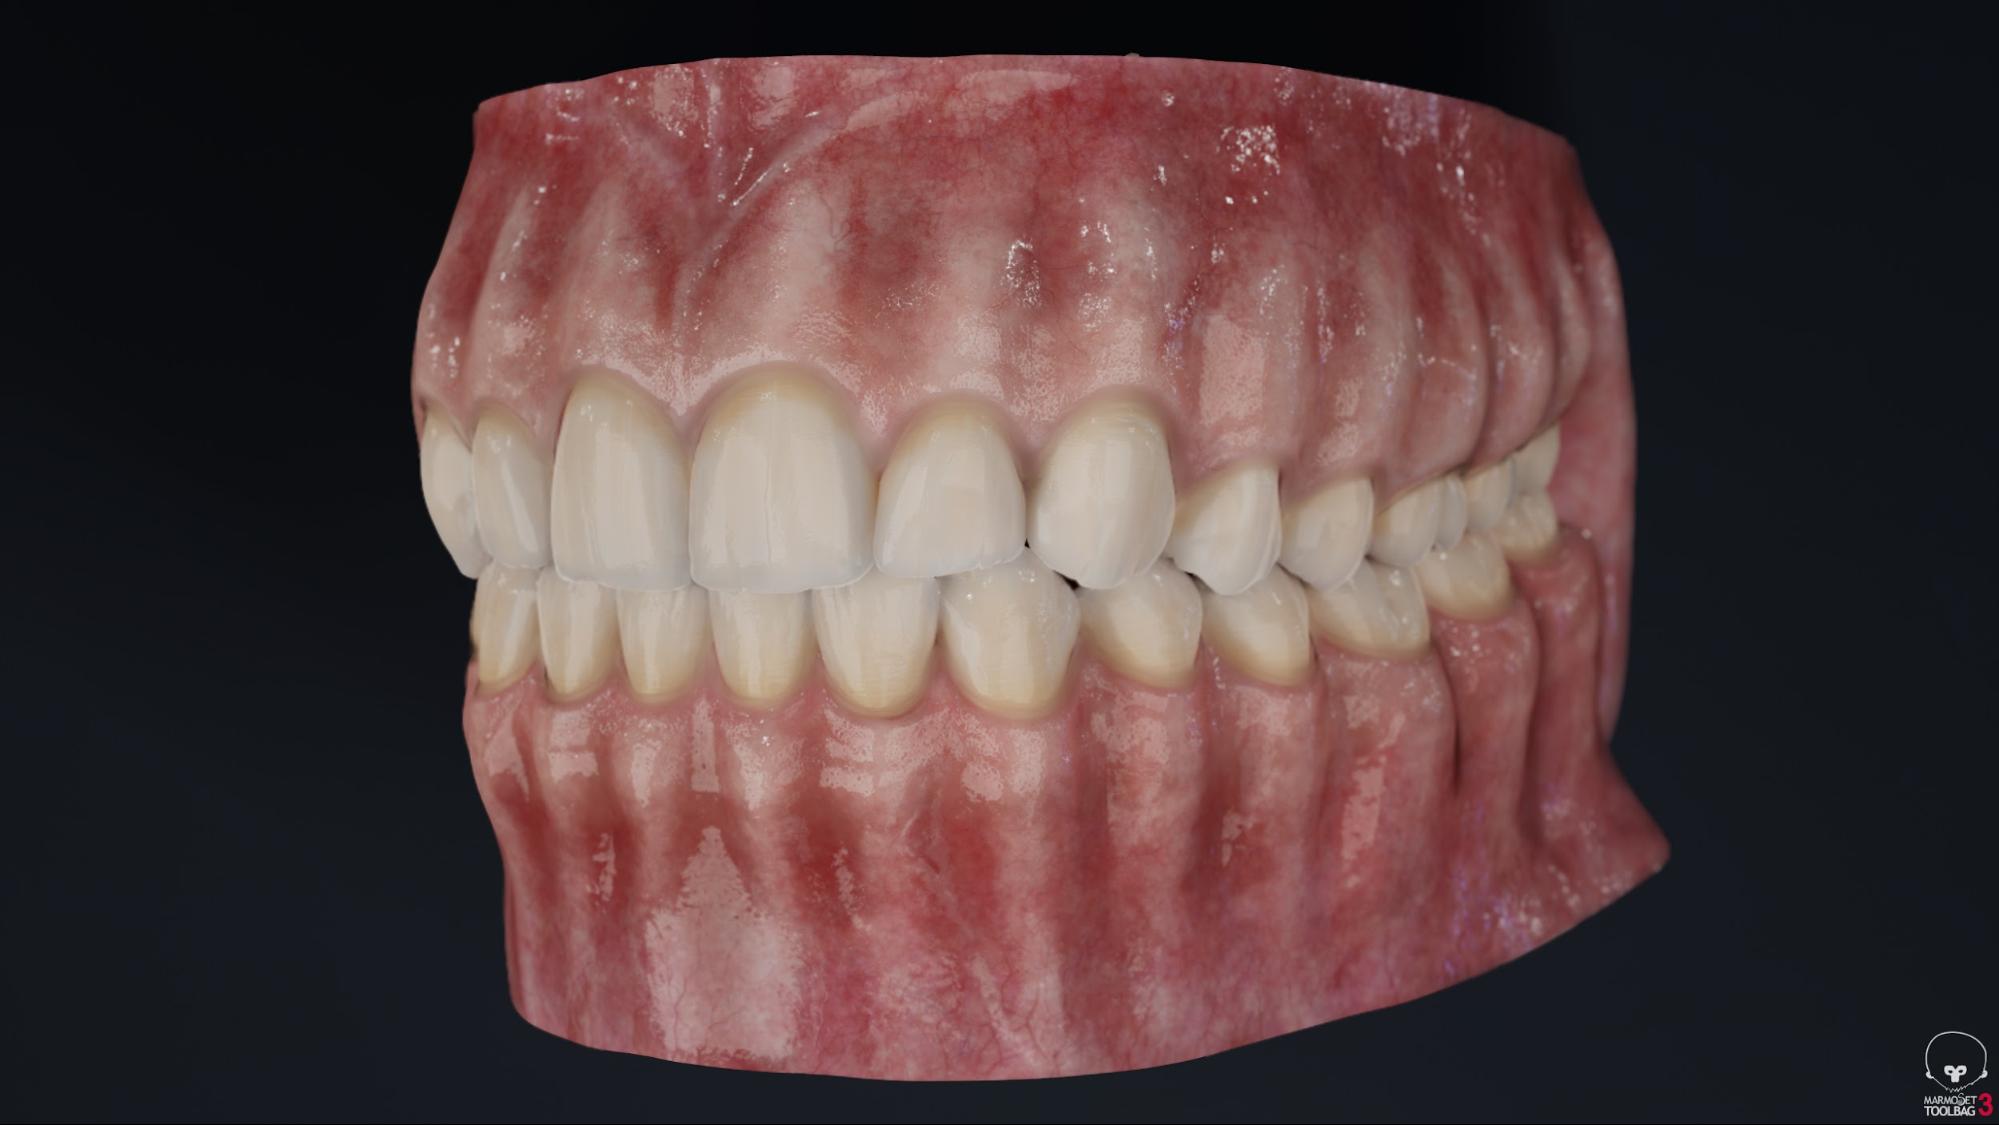
For each texture set, I created my shader in the Marmoset Toolbag. This allowed me to use different shader options for the tongue, teeth and gums.
Before setting up the SSS shaders and offsets, it's important to set the scene scale correctly. The Toolbag has the “Scale” and “Scale-Center” sliders, and I used them to emphasize the offset effect:
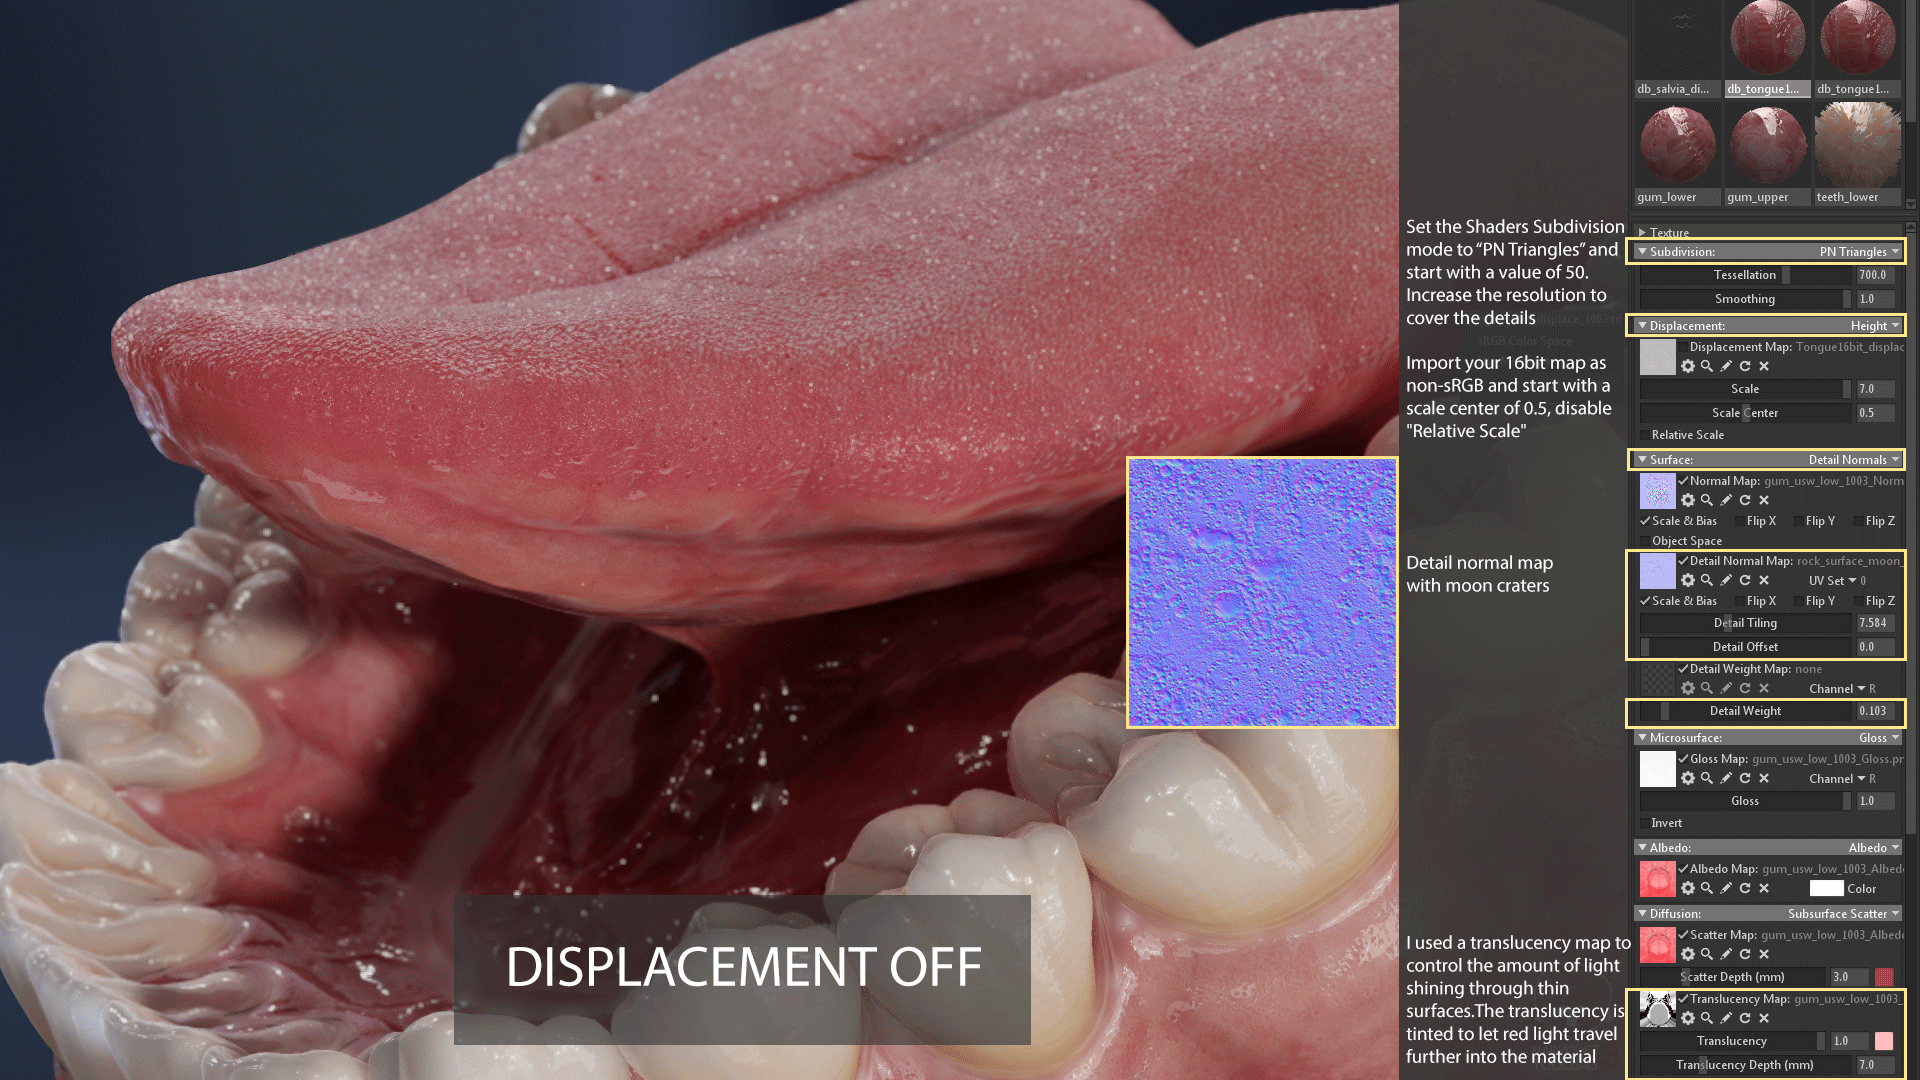
Toolbag has a good subsurface shader that, if you have high-quality maps, can produce excellent results. To add variation to the baked normal map, I used the detail normal map. By their nature, teeth appear to be translucent, and a good translucency map helps a lot in achieving this effect. I baked a thickness map in Substance Painter and changed it to fit my needs.
Here are the options for my tooth shader:
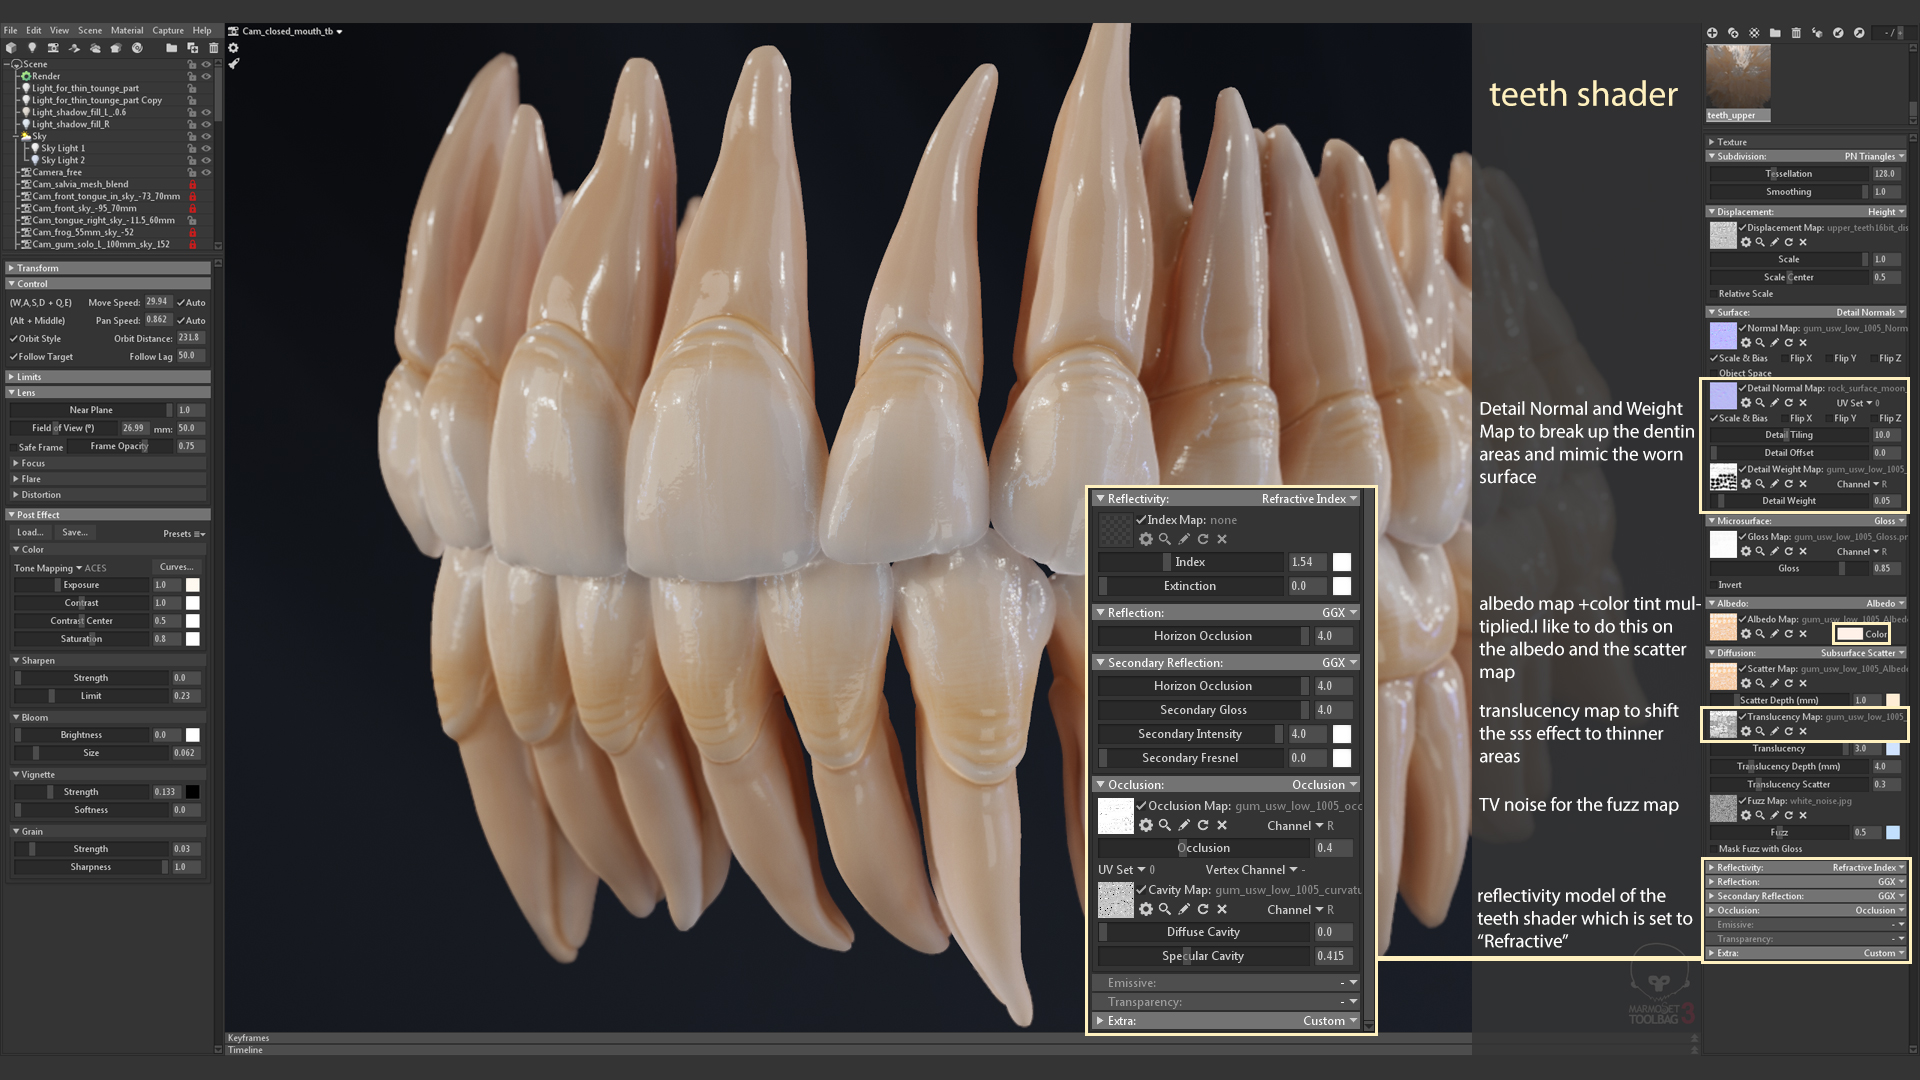
I believe that the most important thing in the tooth shader is the reflection model, for which I selected the “Refractive” parameter. The refractive index determines how much the beam path is distorted or refracted when it enters the material. It is very important to give the materials the right appearance. Having studied the question, I found out that the dentin IOR is equal to 1.540.
To emphasize the reduced reflectivity in the troughs, I added a cavity map to the shader and moved the “specular cavity” slider to 0.4. I left the Diffuse Cavity slider at zero, because my Albedo map already contained a red cavity fill.
Here is a comparison between refracted and specular models:
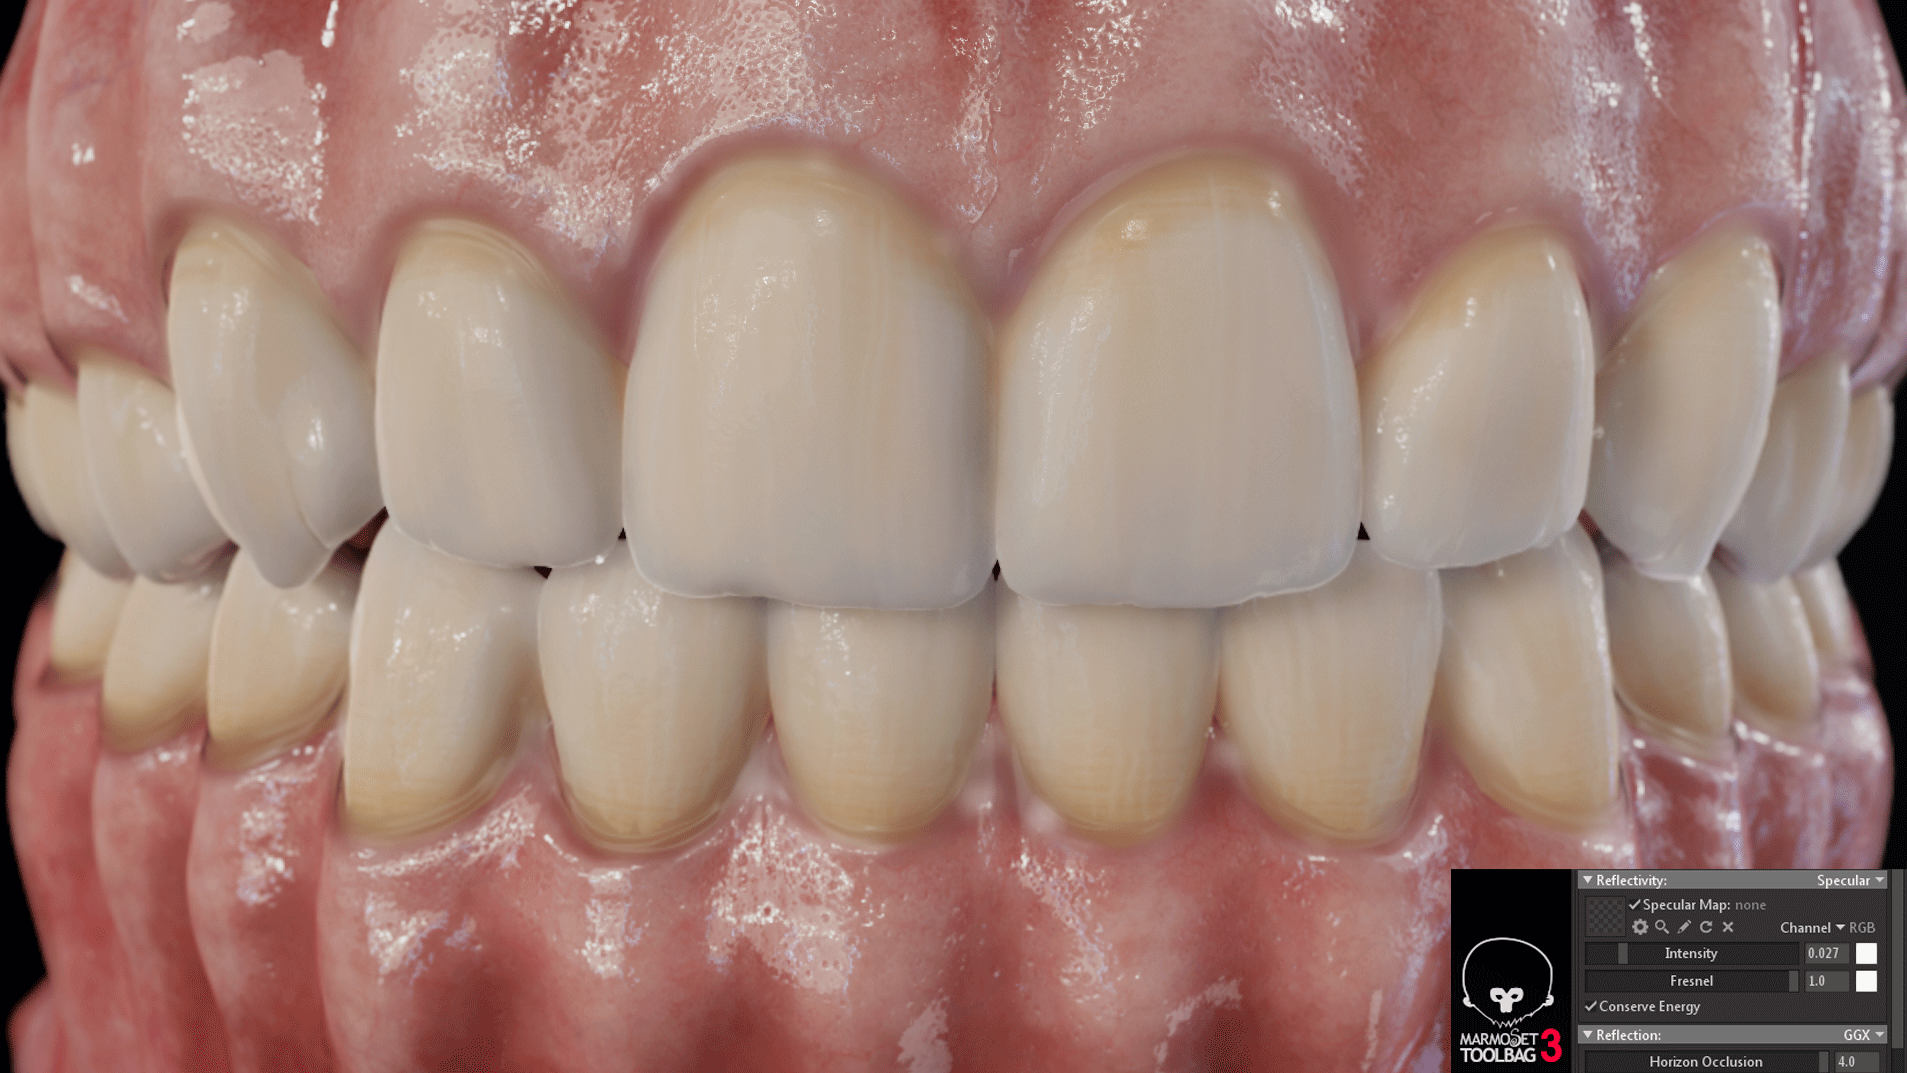
Tip : Check out Joe Wilson and Lee Denowald's explanations of the mirror image model:
The physically correct value of specular reflection for the skin is approximately equal to 0.028. This has become a good reference point for me.
For gums, I increased this figure to 0.07. Here you need to adhere to low values, otherwise the shader can create a metal effect. A little Fresnel can give convincing results.
Do not get carried away with too large Fresnel values on wet materials, because this can lead to problems with surfaces turned to the other side of the camera.
Tip : here you can learn about realistic skin rendering techniques in real time.
You can use different transparency modes to create convincing saliva in the Toolbag.
For a perfect blend between teeth and gums, I used the Refraction with Dithering method. Here are the shader options:
The result obtained after using the described techniques:
It was a very exciting project. He still has some rough edges, but he has become an excellent learning process in anatomy and materials.
A simplified model for your projects can be downloaded here .
Thank you for reading! I hope this article was helpful to you.
My name is Daniel Bauer , I am a 3D artist and specialize in modeling organics. I started my career in a small 2D animation studio, where I got acquainted with the magic of 3D modeling. The career path has led me to solve problems such as shading and modeling for CGI in the automotive industry. In my free time I liked to engage in modeling organics and continue to do so to this day.
While studying anatomy, I found that our teeth influence how other people perceive us. What began as a study gradually led me to the project presented in the article.
I wrote this article to show how I solved the tasks of the project, as well as to share useful tips.
Resources
I started my project by collecting references on Google, Pinterest and Youtube.
Today you can find a huge abundance of resources and the problem is to filter this amount of information. I use PureRef to organize my resources. On such boards, technical details can be stored, for example, anatomical dimensions, or reflectance values and images of teeth. At first, there was no CGI on my board, because I tried to draw inspiration from real-life examples.
Tip : save some cross-polarized photos. You can learn a lot by observing pure color.
Sculpting
For sculpting the main volumes, I used ZBrush . I did not strictly adhere to the form, because I wanted the image to be well read from a distance. Very often, I greatly alienated the model to test it. To get a satisfactory result, the mesh had to undergo many iterations. By the way, you can use the ZBrush “see-through” mode and compare your sculpting with 3D scans on Sketchfab .
Ensure the correct size of the teeth and roots, because the observer will immediately notice that the proportions are not respected. I have been working with a low level of subdivision for a very long time. The longer I work on personal projects, the more I understand how important this habit has become.
Tip : Use a contour shader or black material to constantly check the silhouettes of the model.
I used the transpose line ZBrush to measure each tooth and bring them all to the right size. Many people have difficulty with ZBrush units, so I’ll give you advice:
- Add a single size auxiliary object to the scene, transfer it using GoZ to the 3D package, scale it to 10mm and return it to ZBrush through GoZ.
- Now drag the Transpose Line from one side of the cube to the other and set the scale to 1 Unit. So you can use the Transpose Line, which reads the exact values.
I sculpted each tooth individually and this gives me complete control over baking in the Toolbag or in the Substance Painter . If each tool (subtool) will be stored separately, then this provides flexibility if you need to modify the tooth. When I realized how complicated human teeth really are, this method allowed me to listen to the feedback of other artists and eliminate the shortcomings of the forms without any problems. In the first pass, some details are exaggerated, while others are missing:
Tip : due to the specifics of implementing units (subdivisions, SD), when you return to level 1, the SD mesh can be compressed. This led to an undesirable effect, because my teeth, gums and blend mesh should blend perfectly. I wrote a macro that saved the morphtarget of the mesh before each subdivide command and restored its original volume.
I used this macro as my main subdivide command, bound to CTRL + D. The script can be downloaded from here .
Having finished with the basics sculpting, we need to think about the topology. A good topology can support sculpting, glitter, and animation.
The smoothness of the polygons of the teeth and gums helps blendmesh maintain all complex shapes.
You always need to maintain a balance between low poly and the number of reference edges. From the very first level of SD, I strove to create a clear silhouette of the teeth:
Here are a couple of good topology resources:
Having finished with topology and sculpting, I import decimated meshes into the Marmoset Toolbag. This helps to get a general idea of the appearance of the model in different lighting models.
Start using Toolbag or Keyshot as early as possible to find areas that were missing in the drill-down phase. In addition, observing the results helps in moving in the right direction.
I wanted to present the model in a real-time environment, so I created a transitional mesh
for the implementation of blending teeth with gums. Otherwise, subsurface scattering in the screen space leads to abrupt transitions. I will talk about how I increased the level of detail in this blendmesh.
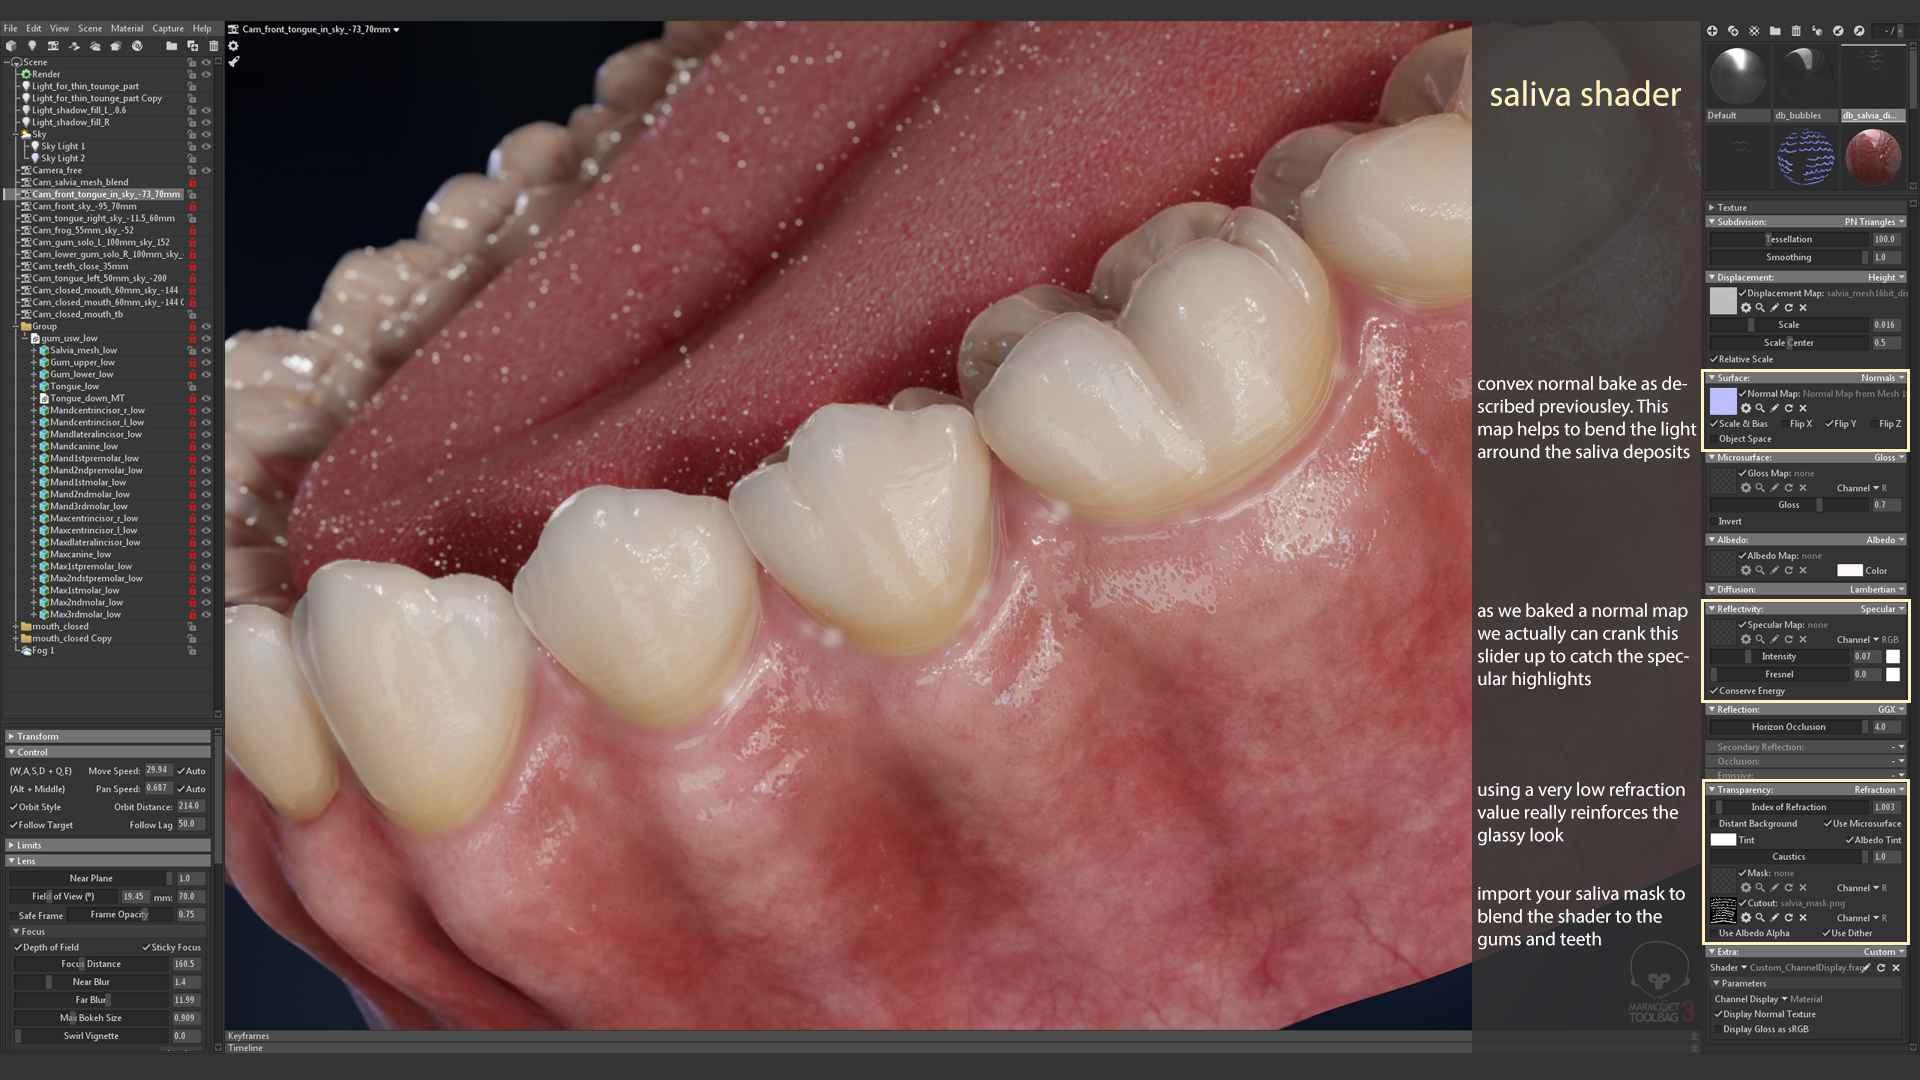
In ZBrush, you can draw thin tubes in the cavities that will indicate the accumulation of saliva. We use them only for baking. Thus we get a tight-fitting concave blendmesh plus a normal map resembling a convex shape. This will come in handy in a real-time renderer, because in the troughs we get beautiful reflections, as shown in this image:
UV scan
You can import meshes into 3ds Max or another similar package to create a flat pattern and layout texture. I wanted to keep the UDIM scan in order to have a model ready for production on different platforms. I transferred my 3ds Max tools through GoZ to indicate the seams of the cuts, and then performed a quick-peel and packing operation. Then he returned everything via GoZ back to ZBrush to take advantage of his powerful “use existing seems” tool. This is very important if you want to export displacement maps from ZBrush.
Tip : You can learn a lot about scans from Tim Bergholz .
Texture Coloring and Offset
After creating a sweep, you can load the model into Substance Painter to colorize it.
- Albedo
To create albedo maps, I like to use procedural and hand-drawn masks. The idea of projecting cross-polarized photographs seems attractive, but they limit you if you want to change veins or blood vessels for another project. You can learn a lot about color values and fabric layers by creating everything manually. This may not be an ideal albedo, but in the long run this work will be rewarded to you.
At an early stage, I constantly had Toolbag running with all my shaders. Since the gums reflect a lot of light, thus hiding the albedo information, I exaggerated the colors:
- Roughness
To get a wet surface feel in the Toolbag, I created a roughness map. It includes very small changes on different layers. To achieve the desired result, I redid everything many times. The appearance of the gums varies greatly, so it is important to consult the references.
For most cavities, I used a slightly stronger roughness value, but excluded tooth cavities in which the roughness values are lower. I continued to configure this card even in the process of writing the article, so I received new reviews. I like to complete projects, but to improve my skills I need to be critical of myself and be open to new ideas.
Tip : Create a dark gray color in all texture sets and switch the blending mode to “replace” to immediately check the roughness map's behavior under various lighting conditions.
- Opacity for blendmesh
First, select a separate shader for this texture set. Ideal results are obtained with the “metal / rough-with-alpha-test” shader. For other texture sets, apply a skin-shader.
Add an opacity channel to the “Texture Set Settings” and create a fill layer at the bottom of the stack of layers with neutral normals and zeroed information about opacity.
Now you can start drawing on top of the opacity mask (for clarity, I used red).
I had to work hard to get the perfect result, but the rush at this stage will greatly reduce the overall quality of the rendering.
Tip : you can export your mask through the texture set menu or simply by right-clicking on the mask stack and selecting “Export mask to file”.
- Displacement
Displacement maps I exported from ZBrush.
It has a convenient function that analyzes instruments and aligns the displacement map to cover all high and low values. I used Multi Map Exporter to combine individual tools with their UV tiles, using the following options:
Shader
For each texture set, I created my shader in the Marmoset Toolbag. This allowed me to use different shader options for the tongue, teeth and gums.
Before setting up the SSS shaders and offsets, it's important to set the scene scale correctly. The Toolbag has the “Scale” and “Scale-Center” sliders, and I used them to emphasize the offset effect:
- Tooth shader
Toolbag has a good subsurface shader that, if you have high-quality maps, can produce excellent results. To add variation to the baked normal map, I used the detail normal map. By their nature, teeth appear to be translucent, and a good translucency map helps a lot in achieving this effect. I baked a thickness map in Substance Painter and changed it to fit my needs.
Here are the options for my tooth shader:
Shader model
I believe that the most important thing in the tooth shader is the reflection model, for which I selected the “Refractive” parameter. The refractive index determines how much the beam path is distorted or refracted when it enters the material. It is very important to give the materials the right appearance. Having studied the question, I found out that the dentin IOR is equal to 1.540.
To emphasize the reduced reflectivity in the troughs, I added a cavity map to the shader and moved the “specular cavity” slider to 0.4. I left the Diffuse Cavity slider at zero, because my Albedo map already contained a red cavity fill.
Here is a comparison between refracted and specular models:
Tip : Check out Joe Wilson and Lee Denowald's explanations of the mirror image model:
- Gum shader
The physically correct value of specular reflection for the skin is approximately equal to 0.028. This has become a good reference point for me.
For gums, I increased this figure to 0.07. Here you need to adhere to low values, otherwise the shader can create a metal effect. A little Fresnel can give convincing results.
Do not get carried away with too large Fresnel values on wet materials, because this can lead to problems with surfaces turned to the other side of the camera.
Tip : here you can learn about realistic skin rendering techniques in real time.
- Saliva shader
You can use different transparency modes to create convincing saliva in the Toolbag.
For a perfect blend between teeth and gums, I used the Refraction with Dithering method. Here are the shader options:
The result obtained after using the described techniques:
Conclusion
- It is very important to use resources that at first seem unobvious. Scanning data is useful for studying anatomy.
- Allow enough time for the modeling step and make sure that the mesh is well read and has a solid structure at its core.
- Subscribe to blogs about your area of expertise. Find like-minded people and communicate with them!
It was a very exciting project. He still has some rough edges, but he has become an excellent learning process in anatomy and materials.
A simplified model for your projects can be downloaded here .
Thank you for reading! I hope this article was helpful to you.
about the author
My name is Daniel Bauer , I am a 3D artist and specialize in modeling organics. I started my career in a small 2D animation studio, where I got acquainted with the magic of 3D modeling. The career path has led me to solve problems such as shading and modeling for CGI in the automotive industry. In my free time I liked to engage in modeling organics and continue to do so to this day.
While studying anatomy, I found that our teeth influence how other people perceive us. What began as a study gradually led me to the project presented in the article.
I wrote this article to show how I solved the tasks of the project, as well as to share useful tips.