Docker: how to deploy a full-stack application and not turn gray
- Tutorial
“We need DevOps!”
(The most popular phrase at the end of any hackathon)
First, some lyrics.
When a developer is an excellent devo who can deploy his brainchild on any machine under any OC, this is a plus. However, if he does not understand anything further than his IDE, this is not a minus - in the end, he is paid for the code, and not for the ability to deploy it. A narrow deep specialist in the market is valued higher than the average skill of "jack of all trades." For people like us, “IDE users,” good people came up with Docker.
The principle of Docker is the following: "it works for me - it works everywhere." The only program needed to deploy a copy of your application anywhere is Docker. If you run your application in the docker on your machine, it is guaranteed to run with the same success in any other docker. And nothing but a docker needs to be installed. For example, I don’t even have Java on the virtual server.
Docker creates an image of a virtual machine with applications installed in it. Further, this image unfolds as a completely autonomous virtual machine. A running copy of the image is called a “container”. You can run any number of images on the server, and each of them will be a separate virtual machine with its own environment.
What is a virtual machine? This is the encapsulated location on the server with the OS in which the applications are installed. In any operating system, a large number of applications are usually spinning, in ours there is one.
The container deployment scheme can be represented as follows:

For each application, we create our own image, and then deploy each container separately. You can also put all applications in one image and deploy as one container. Moreover, in order not to deploy each container separately, we can use a separate docker-compose utility, which configures the containers and the relationship between them through a separate file. Then the structure of the entire application may look like this:
I intentionally did not contribute the database to the general Docker assembly, for several reasons. Firstly, the database is completely independent of the applications that work with it. It can be far from one application, it can be manual requests from the console. Personally, I see no reason to make the database dependent on the Docker assembly in which it is located. Therefore, I endured it. However, an approach is often practiced in which the database is placed in a separate image and launched in a separate container. Secondly, I want to show how the Docker container interacts with systems outside the container.
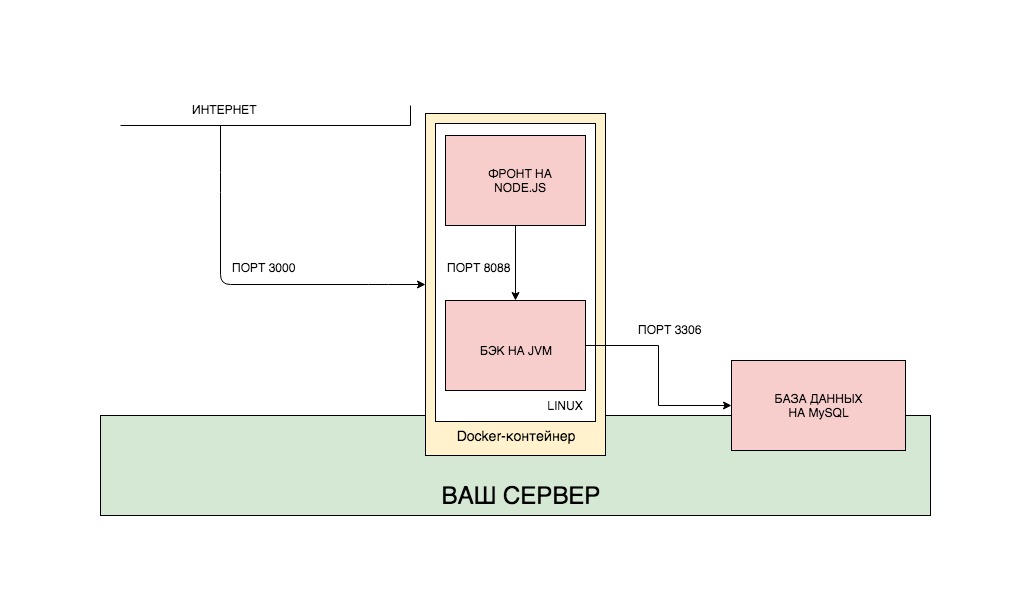
However, quite the lyrics, let's write the code. We will write the simplest application on spring and react, which will record our calls to the front into the database, and we will lift all this through Docker. The structure of our application will look like this: You can

implement such a structure in different ways. We are implementing one of them. We will create two images, launch two containers from them, and the backend will connect to the database that is installed on a specific server somewhere on the Internet (yes, such database requests will not go quickly, but we are not driven by the thirst for optimization, but scientific interest).
The post will be divided into parts:
0. Install Docker.
1. We write applications.
2. We collect images and launch containers.
3. Collect images and run containers on a remote server.
4. Solve network problems.
In order to install Docker, you need to go to the site and follow what is written there. When installing Docker on a remote server, be prepared for the fact that Docker may not work with servers on OpenVZ. As well as there may be problems if you do not have iptables enabled. It is advisable to start the server on KVM with iptables. But these are my recommendations. If everything works for you, and so, I will be glad that you did not spend a lot of time figuring out why it does not work, how I had to do it.
Let's write a simple application with the most primitive backend on Spring Boot, a very simple frontend on ReactJS and a MySQL database. The application will have a Single-Page with a single button, which will record the time it was clicked on it in the database.
I hope that you already know how to write applications on the boot, but if not, you can clone the finished project. All links at the end of the article.
build.gradle:
Log Entity:
LogController, which will work on simplified logic and immediately write to the database. We omit the service.
Everything, as we see, is very simple. By a GET request, we write to the database and return the result.
We will discuss the application settings file separately. There are two of them.
application.yml:
application-remote.yml:
How this works, you probably know first that Spring scans the application.properties or application.yml file - which one it finds. In it we indicate one single setting - which profile we will use. Usually, during development, I accumulate several profiles, and it’s very convenient to switch them using the default profile. Next, Spring finds application.yml with the desired suffix and uses it.
We specified datasource, JPA settings and, importantly, the external port of our backend.
You can also see the frontend in a project on git, or you can not even watch, but clone and run it.
You can check the individual work of the frontend by downloading the project, going to the root folder of the project (where the package.json file is located) in the terminal and executing two commands in sequence:
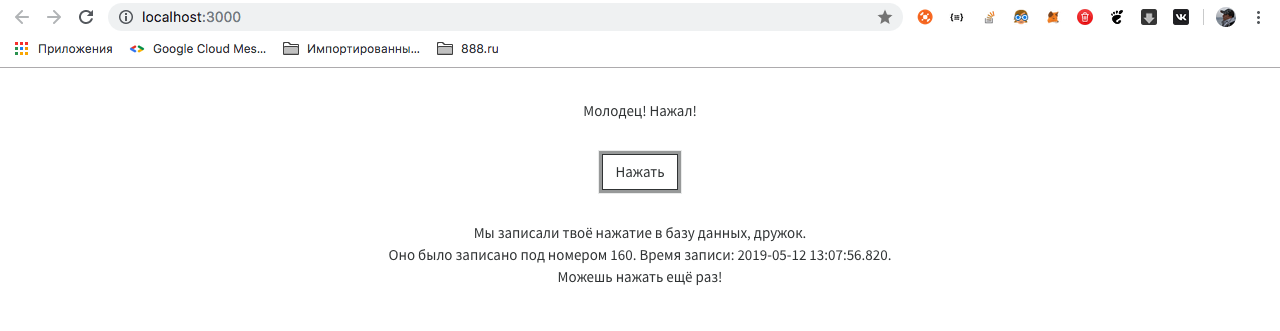
Of course, for this you need the installed Node Package Manager (npm), and this is the most difficult way that we avoid using Docker. If you still started the project, you will see the following window:

Well, okay, it's time to look at the code. I will indicate only the part that refers to the backend.
The frontend works predictably. We follow the link, wait for the answer and display it on the screen.
It is worth focusing on the following points:
The application is ready.
The structure of our assembly will be as follows. We will create two images - the front-end and the back-end, which will communicate with each other through external ports. For the base, we will not create an image, we will install it separately. Why is that? Why don't we create an image for the base? We have two applications that are constantly changing and do not store data in ourselves. The database stores data in itself, and this may be the result of several months of application operation. Moreover, this database can be accessed not only by our backend application, but also by many others - for that it is also a database, and we will not constantly reassemble it. Again, this is an opportunity to work with an external API, which, of course, is to connect to our database.
To run each application (be it front or back), you need a certain sequence of actions. To run the application on React, we need to do the following (provided that we already have Linux):
It is this sequence of actions that we have to perform in the docker. To do this, in the root of the project (in the same place as package.json is located), we must place the Dockerfile with the following contents:
Let's see what each line means.
With this line, we make it clear to the docker that when you start the container, the first thing you need to do is to download Docker from the repository and install NodeJS, and the lightest one (all the lightest versions of popular frameworks and libraries in docker are usually called alpine).
In the Linux container, the same standard folders will be created as in other Linux ones - / opt, / home, / etc, / usr and so on. We set the working directory with which we will work - / usr / app / front.
We open port 3000. Further communication with the application running in the container will occur through this port.
Copy the contents of the source project to the working folder of the container.
Install all the packages necessary to run the application.
We start the application with the npm start command.
This scenario will be executed in our application when the container starts.
Let's get the front straight. To do this, in the terminal, being in the root folder of the project (where the Dockerfile is located), execute the command:
Command Values:
docker - call the docker application, well, you know that.
build - assembly of the image from the target materials.
-t <name> - in the future, the application will be available by the tag specified here. No need to specify, then Docker will generate its own tag, but it will be impossible to distinguish it from others.
. - indicates that you need to collect the project from the current folder.
As a result, the assembly should end with the text:
If we see that the last step has been completed and everything is Successfull, then we have an image. We can verify this by running it:
The meaning of this command, I think, is generally understood, with the exception of the -p 8080: 3000 entry.
docker run rebounder-chain-frontend - means that we are launching such a docker image, which we called rebounder-chain-frontend. But such a container will not have an exit to the outside, it needs to set a port. It is the team below that sets it. We remember that our React application runs on port 3000. The -p 8080: 3000 command tells the docker to take port 3000 and forward it to port 8080 (which will be open). Thus, an application that runs on port 3000 will be opened on port 8080, and it will be available on the local machine on that port.
Do not let the record bother you
React thinks so. It is really available within the container on port 3000, but we forwarded this port to port 8080, and from the container the application runs on port 8080. You can run the application locally and check this.
So, we have a ready-made container with a front-end application, now let's collect the backend.
The script for launching an application in Java is significantly different from the previous assembly. It consists of the following items:
In Dockerfile, this process looks like this:
The process of assembling an image with the inclusion of a dzharnik on some points resembles that for our front.
The process of assembling and launching the second image is essentially the same as assembling and launching the first.
Now, if you have both containers running and the backend is connected to the database, everything will work. I remind you that you must register the connection to the database from the backend yourself, and it must work through an external network.
In order for everything to work on a remote server, we need Docker already installed on it, after which, just run the images. We will go the right way and commit our images to our account in the Docker cloud, after which they will be available from anywhere in the world. Of course, there are plenty of alternatives to this approach, like everything that is described in the post, but let's push it a little more and do our job well. Bad, as Andrei Mironov said, we always have time to do it.
The first thing you have to do is get an account on the Docker hub. To do this, go to the hub and register. It's not hard.
Next, we need to go to the terminal and log in to Docker.
You will be asked to enter a username and password. If everything is ok, a notification will appear in the terminal that Login Succeeded.
Next, we need to tag our images with tags and commit them to the hub. This is done by the team according to the following scheme:
Thus, we need to specify the name of our image, login / repository and the tag under which our image will be commited to the hub.
In my case, it looked like this:

We can check for the presence of this image in the local repository using the command:
Our image is ready to commit. Commit:
A successful commit entry should appear.
Do the same with the frontend:
Now, if we go to hub.docker.com, we will see two locked images. Which are available from anywhere.

Congratulations. It remains for us to move on to the final part of our work - to launch images on a remote server.
Now we can run our image on any machine with Docker by completing just one line in the terminal (in our case, we need to sequentially execute two lines in different terminals - one for each image).
This launch has, however, one minus. When the terminal is closed, the process will end and the application will stop working. To avoid this, we can run the application in “detached” mode:
Now the application will not issue a log to the terminal (this can, again, be configured separately), but even when the terminal is closed, it will not stop working.
If you did everything right, you may expect the biggest disappointment along the way to following this post - it may well turn out that nothing works. For example, everything worked perfectly for you and worked on the local machine (as, for example, on my Mac), but when deployed on a remote server, the containers stopped seeing each other (as, for example, on my remote server on Linux). What is the problem? But the problem is this, and I hinted at it at the beginning. As mentioned earlier, when the container starts, Docker creates a separate virtual machine, rolls Linux there, and then installs the application on that Linux. This means that the conditional localhost for the running container is limited to the container itself, and the application is not aware of the existence of other networks. But we need to:
a) the containers saw each other.
b) the backend saw the database.
There are two solutions to the problem.
1. Creating an internal network.
2. Bringing containers to the host level.
1. At the Docker level, you can create networks, moreover, three of them in it by default - bridge , none and host .
Bridge is a Docker internal network isolated from the host network. You can only access containers through the ports that you open when the container starts with the -p command . You can create any number of networks such as bridge .

None is a separate network for a specific container.
HostIs the host network. When choosing this network, your container is fully accessible through the host - the -p command simply does not work here , and if you deployed the container to this network, then you do not need to specify an external port - the container is accessible by its internal port. For example, if Dockerfile EXPOSE is set to 8090, it is through this port that the application will be available.
Since we need to have access to the server database, we will use the latter method and lay out the containers on the remote server network.
This is done very simply, we remove the mention of ports from the container launch command and specify the host network:
Connection to the base I indicated
Connection of the front to the back had to be specified entirely, external:
If you forward the internal port to an external port, which is often the case for remote servers, then you need to specify the internal port for the database, and the external port for the container.
If you want to experiment with connections, you can download and build a project that I specially wrote to test the connection between containers. Just enter the necessary address, press Send and in debug mode, see what flew back.
The project lies here .
There are tons of ways to build and run a Docker image. For those interested, I advise you to study docker-compose. Here we have examined only one of the ways to work with docker. Of course, such an approach at first seems not so simple. But here is an example - during the writing of a post, I had outgoing connections on a remote server. And in the process of debug I had to change the settings for connecting to the database several times. The entire assembly and deployment fit into my set of 4 lines, after entering which I saw the result on a remote server. In extreme programming mode, Docker is indispensable.
As promised, I post application sources:
backend
frontend
(The most popular phrase at the end of any hackathon)
First, some lyrics.
When a developer is an excellent devo who can deploy his brainchild on any machine under any OC, this is a plus. However, if he does not understand anything further than his IDE, this is not a minus - in the end, he is paid for the code, and not for the ability to deploy it. A narrow deep specialist in the market is valued higher than the average skill of "jack of all trades." For people like us, “IDE users,” good people came up with Docker.
The principle of Docker is the following: "it works for me - it works everywhere." The only program needed to deploy a copy of your application anywhere is Docker. If you run your application in the docker on your machine, it is guaranteed to run with the same success in any other docker. And nothing but a docker needs to be installed. For example, I don’t even have Java on the virtual server.
How does docker work?
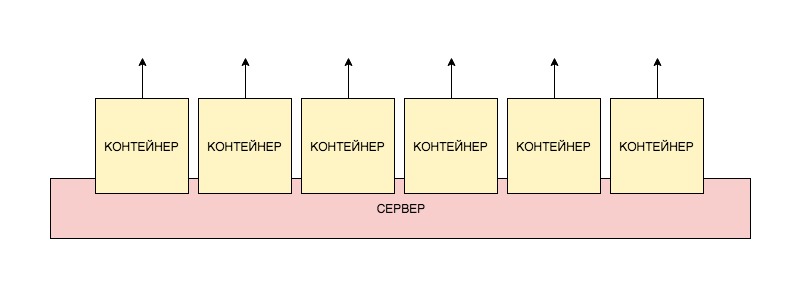
Docker creates an image of a virtual machine with applications installed in it. Further, this image unfolds as a completely autonomous virtual machine. A running copy of the image is called a “container”. You can run any number of images on the server, and each of them will be a separate virtual machine with its own environment.
What is a virtual machine? This is the encapsulated location on the server with the OS in which the applications are installed. In any operating system, a large number of applications are usually spinning, in ours there is one.
The container deployment scheme can be represented as follows:
For each application, we create our own image, and then deploy each container separately. You can also put all applications in one image and deploy as one container. Moreover, in order not to deploy each container separately, we can use a separate docker-compose utility, which configures the containers and the relationship between them through a separate file. Then the structure of the entire application may look like this:
I intentionally did not contribute the database to the general Docker assembly, for several reasons. Firstly, the database is completely independent of the applications that work with it. It can be far from one application, it can be manual requests from the console. Personally, I see no reason to make the database dependent on the Docker assembly in which it is located. Therefore, I endured it. However, an approach is often practiced in which the database is placed in a separate image and launched in a separate container. Secondly, I want to show how the Docker container interacts with systems outside the container.
However, quite the lyrics, let's write the code. We will write the simplest application on spring and react, which will record our calls to the front into the database, and we will lift all this through Docker. The structure of our application will look like this: You can
implement such a structure in different ways. We are implementing one of them. We will create two images, launch two containers from them, and the backend will connect to the database that is installed on a specific server somewhere on the Internet (yes, such database requests will not go quickly, but we are not driven by the thirst for optimization, but scientific interest).
The post will be divided into parts:
0. Install Docker.
1. We write applications.
2. We collect images and launch containers.
3. Collect images and run containers on a remote server.
4. Solve network problems.
0. Install Docker
In order to install Docker, you need to go to the site and follow what is written there. When installing Docker on a remote server, be prepared for the fact that Docker may not work with servers on OpenVZ. As well as there may be problems if you do not have iptables enabled. It is advisable to start the server on KVM with iptables. But these are my recommendations. If everything works for you, and so, I will be glad that you did not spend a lot of time figuring out why it does not work, how I had to do it.
1. We write applications
Let's write a simple application with the most primitive backend on Spring Boot, a very simple frontend on ReactJS and a MySQL database. The application will have a Single-Page with a single button, which will record the time it was clicked on it in the database.
I hope that you already know how to write applications on the boot, but if not, you can clone the finished project. All links at the end of the article.
Backend on Spring Boot
build.gradle:
plugins {
    id 'org.springframework.boot' version '2.1.4.RELEASE'
    id 'java'
}
apply plugin: 'io.spring.dependency-management'
group = 'ru.xpendence'
version = '0.0.2'
sourceCompatibility = '1.8'
repositories {
    mavenCentral()
}
dependencies {
    implementation 'org.springframework.boot:spring-boot-starter-data-jpa'
    implementation 'org.springframework.boot:spring-boot-starter-web'
    runtimeOnly 'mysql:mysql-connector-java'
    testImplementation 'org.springframework.boot:spring-boot-starter-test'
}
Log Entity:
package ru.xpendence.rebounder.entity;
import com.fasterxml.jackson.annotation.JsonFormat;
import javax.persistence.*;
import java.io.Serializable;
import java.time.LocalDateTime;
import java.util.Objects;
/**
 * Author: Vyacheslav Chernyshov
 * Date: 14.04.19
 * Time: 21:20
 * e-mail: 2262288@gmail.com
 */
@Entity
@Table(name = "request_logs")
public class Log implements Serializable {
    private Long id;
    private LocalDateTime created;
    @Id
    @GeneratedValue(strategy = GenerationType.IDENTITY)
    public Long getId() {
        return id;
    }
    @Column
    @JsonFormat(shape = JsonFormat.Shape.STRING, pattern = "yyyy-MM-dd HH:mm:ss.SSS")
    public LocalDateTime getCreated() {
        return created;
    }
    @PrePersist
    public void prePersist() {
        this.created = LocalDateTime.now();
    }
    //setters, toString, equals, hashcode, constructors
LogController, which will work on simplified logic and immediately write to the database. We omit the service.
package ru.xpendence.rebounder.controller;
import com.fasterxml.jackson.core.JsonProcessingException;
import com.fasterxml.jackson.databind.ObjectMapper;
import org.springframework.beans.factory.annotation.Autowired;
import org.springframework.http.ResponseEntity;
import org.springframework.web.bind.annotation.GetMapping;
import org.springframework.web.bind.annotation.RequestMapping;
import org.springframework.web.bind.annotation.RestController;
import ru.xpendence.rebounder.entity.Log;
import ru.xpendence.rebounder.repository.LogRepository;
import java.util.logging.Logger;
/**
 * Author: Vyacheslav Chernyshov
 * Date: 14.04.19
 * Time: 22:24
 * e-mail: 2262288@gmail.com
 */
@RestController
@RequestMapping("/log")
public class LogController {
    private final static Logger LOG = Logger.getLogger(LogController.class.getName());
    private final LogRepository repository;
    @Autowired
    public LogController(LogRepository repository) {
        this.repository = repository;
    }
    @GetMapping
    public ResponseEntity log() {
        Log log = repository.save(new Log());
        LOG.info("saved new log: " + log.toString());
        return ResponseEntity.ok(log);
    }
}
Everything, as we see, is very simple. By a GET request, we write to the database and return the result.
We will discuss the application settings file separately. There are two of them.
application.yml:
spring:
  profiles:
    active: remote
application-remote.yml:
spring:
  datasource:
    driver-class-name: com.mysql.cj.jdbc.Driver
    url: jdbc:mysql://my-remote-server-database:3306/rebounder_database?useUnicode=true&useJDBCCompliantTimezoneShift=true&useLegacyDatetimeCode=false&serverTimezone=UTC
    username: admin
    password: 12345
  jpa:
    hibernate:
      ddl-auto: update
    show-sql: true
    properties:
      hibernate.dialect: org.hibernate.dialect.MySQL5Dialect
server:
  port: 8099
How this works, you probably know first that Spring scans the application.properties or application.yml file - which one it finds. In it we indicate one single setting - which profile we will use. Usually, during development, I accumulate several profiles, and it’s very convenient to switch them using the default profile. Next, Spring finds application.yml with the desired suffix and uses it.
We specified datasource, JPA settings and, importantly, the external port of our backend.
ReactJS Frontend
You can also see the frontend in a project on git, or you can not even watch, but clone and run it.
You can check the individual work of the frontend by downloading the project, going to the root folder of the project (where the package.json file is located) in the terminal and executing two commands in sequence:
npm install    // устанавливает в проект все необходимые зависимости, аналог maven
npm start      // запускает проект
Of course, for this you need the installed Node Package Manager (npm), and this is the most difficult way that we avoid using Docker. If you still started the project, you will see the following window:
Well, okay, it's time to look at the code. I will indicate only the part that refers to the backend.
export default class Api {
    _apiPath = 'http://localhost:8099';
    _logUrl = '/log';
    getResource = async () => {
        const res = await fetch(`${this._apiPath}${this._logUrl}`);
        if (!res.ok) {
            throw new Error(`Could not fetch ${this._logUrl}` +
                `, received ${res.status}`)
        }
        return await res.json();
    };
};
The frontend works predictably. We follow the link, wait for the answer and display it on the screen.
It is worth focusing on the following points:
- The front is open to the outside world through port 3000. This is the default port for React.
- The back is open on port 8099. We set it in the application settings.
- The back is knocking on the database via the external Internet.
The application is ready.
2. Collect images and launch containers
The structure of our assembly will be as follows. We will create two images - the front-end and the back-end, which will communicate with each other through external ports. For the base, we will not create an image, we will install it separately. Why is that? Why don't we create an image for the base? We have two applications that are constantly changing and do not store data in ourselves. The database stores data in itself, and this may be the result of several months of application operation. Moreover, this database can be accessed not only by our backend application, but also by many others - for that it is also a database, and we will not constantly reassemble it. Again, this is an opportunity to work with an external API, which, of course, is to connect to our database.
Front-end assembly
To run each application (be it front or back), you need a certain sequence of actions. To run the application on React, we need to do the following (provided that we already have Linux):
- Install NodeJS.
- Copy the application to a specific folder.
- Install the required packages (npm install command).
- Launch the application with the npm start command.
It is this sequence of actions that we have to perform in the docker. To do this, in the root of the project (in the same place as package.json is located), we must place the Dockerfile with the following contents:
FROM node:alpine
WORKDIR /usr/app/front
EXPOSE 3000
COPY ./ ./
RUN npm install
CMD ["npm", "start"]
Let's see what each line means.
FROM node:alpineWith this line, we make it clear to the docker that when you start the container, the first thing you need to do is to download Docker from the repository and install NodeJS, and the lightest one (all the lightest versions of popular frameworks and libraries in docker are usually called alpine).
WORKDIR /usr/app/frontIn the Linux container, the same standard folders will be created as in other Linux ones - / opt, / home, / etc, / usr and so on. We set the working directory with which we will work - / usr / app / front.
EXPOSE 3000We open port 3000. Further communication with the application running in the container will occur through this port.
COPY ./ ./Copy the contents of the source project to the working folder of the container.
RUN npm installInstall all the packages necessary to run the application.
CMD ["npm", "start"]We start the application with the npm start command.
This scenario will be executed in our application when the container starts.
Let's get the front straight. To do this, in the terminal, being in the root folder of the project (where the Dockerfile is located), execute the command:
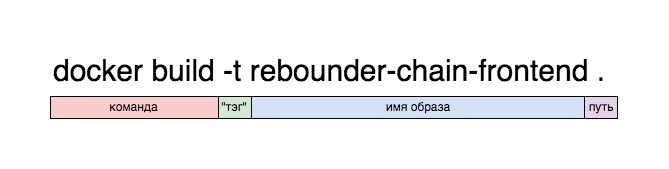
docker build -t rebounder-chain-frontend .Command Values:
docker - call the docker application, well, you know that.
build - assembly of the image from the target materials.
-t <name> - in the future, the application will be available by the tag specified here. No need to specify, then Docker will generate its own tag, but it will be impossible to distinguish it from others.
. - indicates that you need to collect the project from the current folder.
As a result, the assembly should end with the text:
Step 7/7 : CMD ["npm", "start"]
 ---> Running in ee0e8a9066dc
Removing intermediate container ee0e8a9066dc
 ---> b208c4184766
Successfully built b208c4184766
Successfully tagged rebounder-chain-frontend:latest
If we see that the last step has been completed and everything is Successfull, then we have an image. We can verify this by running it:
docker run -p 8080:3000 rebounder-chain-frontendThe meaning of this command, I think, is generally understood, with the exception of the -p 8080: 3000 entry.
docker run rebounder-chain-frontend - means that we are launching such a docker image, which we called rebounder-chain-frontend. But such a container will not have an exit to the outside, it needs to set a port. It is the team below that sets it. We remember that our React application runs on port 3000. The -p 8080: 3000 command tells the docker to take port 3000 and forward it to port 8080 (which will be open). Thus, an application that runs on port 3000 will be opened on port 8080, and it will be available on the local machine on that port.
Итак, что мы видим при запуске команды выше:
Mac-mini-Vaceslav:rebounder-chain-frontend xpendence$ docker run -p 8080:3000 rebounder-chain-frontend
> rebounder-chain-frontend@0.1.0 start /usr/app/front
> react-scripts start
Starting the development server...
Compiled successfully!
You can now view rebounder-chain-frontend in the browser.
  Local:            http://localhost:3000/
  On Your Network:  http://172.17.0.2:3000/
Note that the development build is not optimized.
To create a production build, use npm run build.
Do not let the record bother you
  Local:            http://localhost:3000/
  On Your Network:  http://172.17.0.2:3000/
React thinks so. It is really available within the container on port 3000, but we forwarded this port to port 8080, and from the container the application runs on port 8080. You can run the application locally and check this.
So, we have a ready-made container with a front-end application, now let's collect the backend.
Build back-end.
The script for launching an application in Java is significantly different from the previous assembly. It consists of the following items:
- Install the JVM.
- We collect jar archive.
- We launch it.
In Dockerfile, this process looks like this:
# back
# устанавливаем самую лёгкую версию JVM
FROM openjdk:8-jdk-alpine
# указываем ярлык. Например, разработчика образа и проч. Необязательный пункт.
LABEL maintainer="2262288@gmail.com"
# указываем точку монтирования для внешних данных внутри контейнера (как мы помним, это Линукс)
VOLUME /tmp
# внешний порт, по которому наше приложение будет доступно извне
EXPOSE 8099
# указываем, где в нашем приложении лежит джарник
ARG JAR_FILE=build/libs/rebounder-chain-backend-0.0.2.jar
# добавляем джарник в образ под именем rebounder-chain-backend.jar
ADD ${JAR_FILE} rebounder-chain-backend.jar
# команда запуска джарника
ENTRYPOINT ["java","-jar","/rebounder-chain-backend.jar"]
The process of assembling an image with the inclusion of a dzharnik on some points resembles that for our front.
The process of assembling and launching the second image is essentially the same as assembling and launching the first.
docker build -t rebounder-chain-backend .
docker run -p 8099:8099 rebounder-chain-backend
Now, if you have both containers running and the backend is connected to the database, everything will work. I remind you that you must register the connection to the database from the backend yourself, and it must work through an external network.
3. Collect images and run containers on a remote server
In order for everything to work on a remote server, we need Docker already installed on it, after which, just run the images. We will go the right way and commit our images to our account in the Docker cloud, after which they will be available from anywhere in the world. Of course, there are plenty of alternatives to this approach, like everything that is described in the post, but let's push it a little more and do our job well. Bad, as Andrei Mironov said, we always have time to do it.
Creating an account on the Docker hub
The first thing you have to do is get an account on the Docker hub. To do this, go to the hub and register. It's not hard.
Next, we need to go to the terminal and log in to Docker.
docker loginYou will be asked to enter a username and password. If everything is ok, a notification will appear in the terminal that Login Succeeded.
Committing Images to the Docker Hub
Next, we need to tag our images with tags and commit them to the hub. This is done by the team according to the following scheme:
docker tag имя образа логин/имя_образа:версияThus, we need to specify the name of our image, login / repository and the tag under which our image will be commited to the hub.
In my case, it looked like this:
We can check for the presence of this image in the local repository using the command:
Mac-mini-Vaceslav:rebounder-chain-backend xpendence$ docker image ls
REPOSITORY TAG IMAGE ID CREATED SIZE
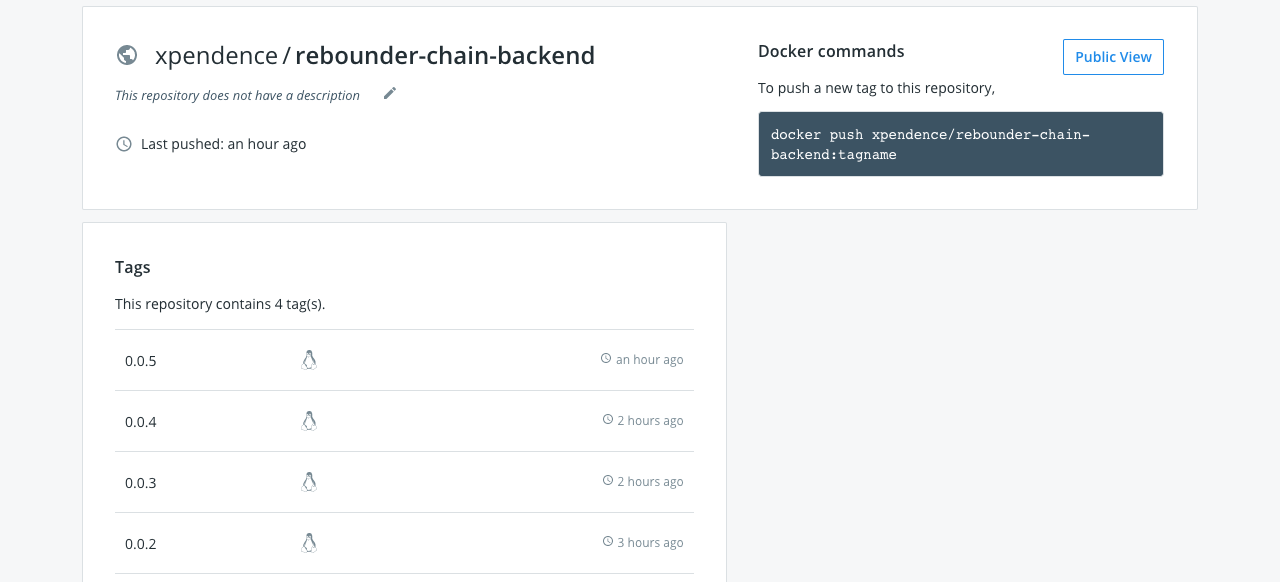
xpendence/rebounder-chain-backend 0.0.2 c8f5b99e15a1 About an hour ago 141MBOur image is ready to commit. Commit:
docker push xpendence/rebounder-chain-backend:0.0.2A successful commit entry should appear.
Do the same with the frontend:
docker tag rebounder-chain-frontend xpendence/rebounder-chain-frontend:0.0.1
docker push xpendence/rebounder-chain-frontend:0.0.1
Now, if we go to hub.docker.com, we will see two locked images. Which are available from anywhere.
Congratulations. It remains for us to move on to the final part of our work - to launch images on a remote server.
Run images on a remote server
Now we can run our image on any machine with Docker by completing just one line in the terminal (in our case, we need to sequentially execute two lines in different terminals - one for each image).
docker run -p 8099:8099 xpendence/rebounder-chain-backend:0.0.2
docker run -p 8080:3000 xpendence/rebounder-chain-frontend:0.0.1
This launch has, however, one minus. When the terminal is closed, the process will end and the application will stop working. To avoid this, we can run the application in “detached” mode:
docker run -d -p 8099:8099 xpendence/rebounder-chain-backend:0.0.2
docker run -d -p 8080:3000 xpendence/rebounder-chain-frontend:0.0.1
Now the application will not issue a log to the terminal (this can, again, be configured separately), but even when the terminal is closed, it will not stop working.
4. Solving network problems
If you did everything right, you may expect the biggest disappointment along the way to following this post - it may well turn out that nothing works. For example, everything worked perfectly for you and worked on the local machine (as, for example, on my Mac), but when deployed on a remote server, the containers stopped seeing each other (as, for example, on my remote server on Linux). What is the problem? But the problem is this, and I hinted at it at the beginning. As mentioned earlier, when the container starts, Docker creates a separate virtual machine, rolls Linux there, and then installs the application on that Linux. This means that the conditional localhost for the running container is limited to the container itself, and the application is not aware of the existence of other networks. But we need to:
a) the containers saw each other.
b) the backend saw the database.
There are two solutions to the problem.
1. Creating an internal network.
2. Bringing containers to the host level.
1. At the Docker level, you can create networks, moreover, three of them in it by default - bridge , none and host .
Bridge is a Docker internal network isolated from the host network. You can only access containers through the ports that you open when the container starts with the -p command . You can create any number of networks such as bridge .
None is a separate network for a specific container.
HostIs the host network. When choosing this network, your container is fully accessible through the host - the -p command simply does not work here , and if you deployed the container to this network, then you do not need to specify an external port - the container is accessible by its internal port. For example, if Dockerfile EXPOSE is set to 8090, it is through this port that the application will be available.
Since we need to have access to the server database, we will use the latter method and lay out the containers on the remote server network.
This is done very simply, we remove the mention of ports from the container launch command and specify the host network:
docker run --net=host xpendence/rebounder-chain-frontend:0.0.8Connection to the base I indicated
localhost:3306Connection of the front to the back had to be specified entirely, external:
http://<хост_удалённого_сервера:порт_удалённого_сервера>If you forward the internal port to an external port, which is often the case for remote servers, then you need to specify the internal port for the database, and the external port for the container.
If you want to experiment with connections, you can download and build a project that I specially wrote to test the connection between containers. Just enter the necessary address, press Send and in debug mode, see what flew back.
The project lies here .
Conclusion
There are tons of ways to build and run a Docker image. For those interested, I advise you to study docker-compose. Here we have examined only one of the ways to work with docker. Of course, such an approach at first seems not so simple. But here is an example - during the writing of a post, I had outgoing connections on a remote server. And in the process of debug I had to change the settings for connecting to the database several times. The entire assembly and deployment fit into my set of 4 lines, after entering which I saw the result on a remote server. In extreme programming mode, Docker is indispensable.
As promised, I post application sources:
backend
frontend