Seamless (almost) migration between PostgreSQL major releases using logical replication
- Tutorial
In True Engineering, on one project, there is a need to change the version of PostgreSQL from 9.6 to 11.1.
What for? The database on the project is already 1.5 Tb in volume and is growing. Performance is one of the basic requirements for the system. And the data structure itself evolves: new columns are added, existing ones change. The new version of Postgres has learned to work efficiently with the addition of new columns with default values, so there is no need to fence down custom crutches at the application level. Even in the new version they added several new ways to partition tables, which is also extremely useful in the conditions of a large amount of data.
So, we decided to migrate. Of course, you can raise in parallel with the old PostgreSQL server version, stop the application, via dump / restore (or pg_upgrade) move the base and restart the application. This decision didn’t work for us due to the large size of the base; moreover, the application works in combat mode, and there are a few minutes to downtime.
Therefore, we decided to try migration using logical replication in PostgreSQL using a third-party plugin called pglogical .
In the process of "sampling" we are faced with very fragmentary documentation on this process (and in Russian there is none at all), as well as some pitfalls and unobvious nuances. In this article we want to present our experience in the form of a tutorial.

TL; DR
As we have already said, the easiest way out is to pick up the new PostgreSQL server in parallel with the old one, stop the application, move the base via dump / restore (or pg_upgrade) and start the application again. For small databases, in principle, this is quite a suitable option (or, in general, the volume is unimportant when you have the possibility of downtime of the application while the database is “transfused” from the old server to a new one, no matter how long this time is). But in our case, the base takes about 1.5 Tb on the disk, and moving it is not a matter of minutes, but several hours. The application, in turn, works in combat mode, and I really wanted to avoid downtime longer than a couple of minutes.
Also against this option was the fact that we use Master-Slave replication and can not shut down the Slave server from the workflow without serious consequences. So, to switch the application from the old version of PostgreSQL to the new one after the migration of the Master server, it would be necessary to prepare a new Slave server before launching the application. And this is just a few hours of idle time, until a slave is created (although much less than the Master migration).
Therefore, we decided to try migration using logical replication in PostgreSQL using a third-party plugin called pglogical.
pglogical is a logical replication system that uses native Logical Decoding in PostgreSQL and is implemented as a PostgreSQL extension. Allows you to customize selective replication using a subscription / publication model. Does not require the creation of triggers in the database or the use of any external tools for replication.
The extension works on any version of PostgreSQL starting from 9.4 (since Logical Decoding first appeared in 9.4), and allows migration between any supported PostgreSQL versions in any direction.
Configuring replication with pglogical manually is not very trivial, although in principle it is quite possible. Fortunately, there is a third-party utility pgrepup to automate the configuration process, which we will use.
Since we plan to raise a new version of PostgreSQL on the same servers in parallel with the old one, the disk requirements for the database on the Master and Slave servers double. It would seem obvious, but ... Just take care of a sufficient amount of free space before starting replication, so as not to regret the years spent aimlessly.
In our case, database modifications were required, plus the storage format during migration between 9.6 and 11 doesn’t “swell” in favor of the newer version, so the disk space had to be increased by about 2.2 times not by 2. Praise LVM, this can be done during the migration process on the fly.
In general, take care of it.
The old datadir is located in /var/lib/pgsql/9.6/data , the new one, respectively, is located in / var / lib / pgsql / 11 / data
Copy the access settings ( pg_hba.conf ) and server settings ( postgresql.conf ) from 9.6 in 11.
To start two PostgreSQL servers on the same machine, in the postgresql.conf 11 version config, change the port to 15432 (port = 15432).
Here you need to think hard about what else you need to do in the new version of PostgreSQL specifically in your case, so that it starts with your postgresql.conf(and your application could eventually work with it). In our case, it was necessary to install the PostgreSQL extensions used by us into the new version. This is beyond the scope of the article, just make the new PostgreSQL run, work and fully suit you :)
We look in / var / lib / pgsql / 11 / data / pg_log / . All is well? We continue!

Nuances:
We get a list of the output from the set of parameters that must be configured as required.
Example of test results:

All verification errors will need to be fixed. The settings of both servers should be set to wal_level = LOGICAL (for Logical Decoding to work), the necessary settings for the replication engine (the number of slots and wal_senders ). The pgrepup utility hints are informative enough, there should be no questions on most of the items.
We make all the necessary settings that pgrepup asks for.
In both pg_hba.conf files, we add permissions for the user who will replicate, all at the pgrepup prompt:
In order for replication to work, a Primary Key must be defined in all tables.
In our case, PK was not everywhere, so at the time of replication it is necessary to add it, and after the replication is over, if you wish, delete it.
A list of tables without PK, among other things, gives out
The pgrepup utility has a built-in command for performing this operation (
Installation instructions for the extension can be read here . The extension must be installed in both servers.
Add the library load to the postgresql.conf of both servers:
This is a helper extension that pgrepup uses for logical replication of the DDL.
Add the library load to the postgresql.conf of both servers:
Now with the help
If all is well, you can restart the old server. Here you need to think about how your application will react to restarting the database server, you should probably stop it first.
Now in the command output, every single item should be marked OK.
It would seem that you can run the migration, but ...
In the current version of pgrepup there are several bugs that make migration impossible. Pull request'y sent, but alas, are ignored, so you have to make corrections manually.
Go to the pgrepup installation folder (our case is /usr/lib/python2.7/site-packages/pgrepup/commands/ ).
Do it once. In each * .py file we add missing
Commit here .
Do two. In setup.py, we do a search for “sh -c”, two entries, all multi-line shell commands need to be made one-line.
Commit here .
With this command, pgrepup prepares both servers for replication start, creates a user, sets up pglogical, transfers the database schema.
He said “Let's go!” And waved his hand:

Replication is running. The current situation can be seen with the help of the command
Here we see that two databases have already moved and replication is underway, and one is still in the process of moving. Now it remains only to drink coffee and wait until the entire volume of the source database is pumped through.
Along the way, you can look deeper than the pgrepup facade and see what happens under the hood. For inquisitive minds, here is a list of requests as a starting point:
Having drunk enough coffee (on the test server when writing this article, the migration of ~ 700Gb data lasted around a day), we finally see the following picture:
And this means that the time has come to prepare a new Slave.
Here everything is simple and according to the textbook, no nuances.
We copy access settings ( pg_hba.conf ) and server settings ( postgresql.conf ) from 9.6 to 11. In the postgresql.conf 11 configuration file, change the port to 15432 (port = 15432)
After all these procedures, we have such a tricky replication scheme:

Here, as a final check (well, in the end, it's just beautiful), you can do some UPDATE to the 9.6 Master database and see how it replicates to the other three server.

Until now, our application did not suspect anything about the new version of PostgreSQL, it’s time to fix it. The options for action here are fundamentally dependent on two things:
will you outweigh the new services on the same ports that the old ones were running on,
and whether your application requires a restart when the database server is restarted.
For the sake of interest, we will answer both questions “yes” and proceed.
Stop the application.
We return the standard port in the postgresql.conf config of the new version on the Master and Slave.
On the new Slave, we also change the port to the standard one in recovery.conf .
Along the way, there is an offer out of harm to change the port to the old inactive version becoming inactive: We are
setting up a non-standard port in the postgresql.conf of the old version to Master and Slave.
On the old Slave, we also change the port to non-standard in recovery.conf .
Check the logs.
Check replication status on Master.
Run the application. We rejoice half an hour.
And finally, useful literature on the topic:
Successes!
What for? The database on the project is already 1.5 Tb in volume and is growing. Performance is one of the basic requirements for the system. And the data structure itself evolves: new columns are added, existing ones change. The new version of Postgres has learned to work efficiently with the addition of new columns with default values, so there is no need to fence down custom crutches at the application level. Even in the new version they added several new ways to partition tables, which is also extremely useful in the conditions of a large amount of data.
So, we decided to migrate. Of course, you can raise in parallel with the old PostgreSQL server version, stop the application, via dump / restore (or pg_upgrade) move the base and restart the application. This decision didn’t work for us due to the large size of the base; moreover, the application works in combat mode, and there are a few minutes to downtime.
Therefore, we decided to try migration using logical replication in PostgreSQL using a third-party plugin called pglogical .
In the process of "sampling" we are faced with very fragmentary documentation on this process (and in Russian there is none at all), as well as some pitfalls and unobvious nuances. In this article we want to present our experience in the form of a tutorial.
TL; DR
- Everything turned out (not without crutches, about them and the article).
- You can migrate within the PostgreSQL version from 9.4 to 11.x, from any version to any, down or up.
- Downtime is equal to the time it takes for your application to reconnect to the new database server (in our case it was a restart of the entire application, but in the wild, obviously, “options are possible”).
Why we didn’t have a “head on” solution
As we have already said, the easiest way out is to pick up the new PostgreSQL server in parallel with the old one, stop the application, move the base via dump / restore (or pg_upgrade) and start the application again. For small databases, in principle, this is quite a suitable option (or, in general, the volume is unimportant when you have the possibility of downtime of the application while the database is “transfused” from the old server to a new one, no matter how long this time is). But in our case, the base takes about 1.5 Tb on the disk, and moving it is not a matter of minutes, but several hours. The application, in turn, works in combat mode, and I really wanted to avoid downtime longer than a couple of minutes.
Also against this option was the fact that we use Master-Slave replication and can not shut down the Slave server from the workflow without serious consequences. So, to switch the application from the old version of PostgreSQL to the new one after the migration of the Master server, it would be necessary to prepare a new Slave server before launching the application. And this is just a few hours of idle time, until a slave is created (although much less than the Master migration).
Therefore, we decided to try migration using logical replication in PostgreSQL using a third-party plugin called pglogical.
general information
pglogical is a logical replication system that uses native Logical Decoding in PostgreSQL and is implemented as a PostgreSQL extension. Allows you to customize selective replication using a subscription / publication model. Does not require the creation of triggers in the database or the use of any external tools for replication.
The extension works on any version of PostgreSQL starting from 9.4 (since Logical Decoding first appeared in 9.4), and allows migration between any supported PostgreSQL versions in any direction.
Configuring replication with pglogical manually is not very trivial, although in principle it is quite possible. Fortunately, there is a third-party utility pgrepup to automate the configuration process, which we will use.
Memo on free disk space
Since we plan to raise a new version of PostgreSQL on the same servers in parallel with the old one, the disk requirements for the database on the Master and Slave servers double. It would seem obvious, but ... Just take care of a sufficient amount of free space before starting replication, so as not to regret the years spent aimlessly.
In our case, database modifications were required, plus the storage format during migration between 9.6 and 11 doesn’t “swell” in favor of the newer version, so the disk space had to be increased by about 2.2 times not by 2. Praise LVM, this can be done during the migration process on the fly.
In general, take care of it.
Install PostgreSQL 11 on Master
Note: We use Oracle Linux, and all of the following will be sharpened for this distribution. It is possible that other Linux distributions will require a small modification by the file, but it is unlikely to be significant.
# добавляем репозиторий
yum install https://download.postgresql.org/pub/repos/yum/11/redhat/rhel-7-x86_64/pgdg-oraclelinux11-11-2.noarch.rpm
# устанавливаем пакеты postgresql11
yum install postgresql11 postgresql11-devel postgresql11-server postgresql11-contrib
# инициализируем базу
/usr/pgsql-11/bin/postgresql-11-setup initdb
The old datadir is located in /var/lib/pgsql/9.6/data , the new one, respectively, is located in / var / lib / pgsql / 11 / data
Copy the access settings ( pg_hba.conf ) and server settings ( postgresql.conf ) from 9.6 in 11.
To start two PostgreSQL servers on the same machine, in the postgresql.conf 11 version config, change the port to 15432 (port = 15432).
Here you need to think hard about what else you need to do in the new version of PostgreSQL specifically in your case, so that it starts with your postgresql.conf(and your application could eventually work with it). In our case, it was necessary to install the PostgreSQL extensions used by us into the new version. This is beyond the scope of the article, just make the new PostgreSQL run, work and fully suit you :)
# ставим расширения, тюним конфиги, добавляем shared libraries, whatever...# ....# запускаемся
systemctl enable postgresql-11
systemctl start postgresql-11
We look in / var / lib / pgsql / 11 / data / pg_log / . All is well? We continue!
Install and configure pgrepup
# ставим python
yum install python
yum install python2-pip
# ставим pgrepup
pip install pgrepup
# создаём конфигурацию
pgrepup config
Nuances:
- As app_owner we specify the user under which the PostgreSQL servers are running.
- As Database we specify template1 .
- Username and Password - access data for the superuser. In our case, the pg_hba.conf for the local connections of the postgres user was assigned a trust method , so you can specify an arbitrary password.
Configuring Replication
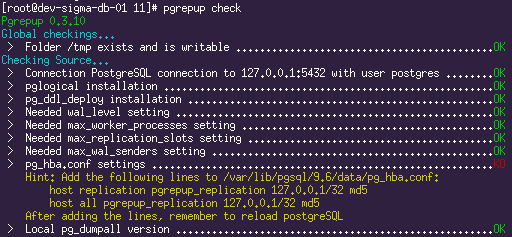
# запускаем проверку
pgrepup check
We get a list of the output from the set of parameters that must be configured as required.
Example of test results:
All verification errors will need to be fixed. The settings of both servers should be set to wal_level = LOGICAL (for Logical Decoding to work), the necessary settings for the replication engine (the number of slots and wal_senders ). The pgrepup utility hints are informative enough, there should be no questions on most of the items.
We make all the necessary settings that pgrepup asks for.
In both pg_hba.conf files, we add permissions for the user who will replicate, all at the pgrepup prompt:
host replication pgrepup_replication 127.0.0.1/32 md5
host all pgrepup_replication 127.0.0.1/32 md5
Add Primary Keys
In order for replication to work, a Primary Key must be defined in all tables.
In our case, PK was not everywhere, so at the time of replication it is necessary to add it, and after the replication is over, if you wish, delete it.
A list of tables without PK, among other things, gives out
pgrepup check. For all tables from this list, you need to add the primary key in any way acceptable to you. In our case, it was something like:ALTERTABLE %s ADDCOLUMN temporary_pk BIGSERIALNOTNULLPRIMARY KEYThe pgrepup utility has a built-in command for performing this operation (
pgrepup fix), and using it even means that if replication is successful, these temporary columns will be automatically deleted. But, unfortunately, this functionality is so non-illusory and magically buggy on large bases, that we decided not to use it, but to do this operation manually as we are comfortable.Install pglogical extension
Installation instructions for the extension can be read here . The extension must be installed in both servers.
# добавляем репозитории с нужными нам версиями
curl https://access.2ndquadrant.com/api/repository/dl/default/release/9.6/rpm | bash
curl https://access.2ndquadrant.com/api/repository/dl/default/release/11/rpm | bash
# устанавливаем пакеты
yum install postgresql96-pglogical postgresql11-pglogical
Add the library load to the postgresql.conf of both servers:
shared_preload_libraries = 'pglogical'Install pgl_ddl_deploy extension
This is a helper extension that pgrepup uses for logical replication of the DDL.
# и его придётся собирать вручную
git clone https://github.com/enova/pgl_ddl_deploy.git
# сборка и установка для старого сервера
PATH=/usr/pgsql-9.6/bin/:$PATH
USE_PGXS=1 make
USE_PGXS=1 make install
make clean
# сборка и установка для нового сервера
PATH=/usr/pgsql-11/bin/:$PATH
make CLANG=true
make install
Add the library load to the postgresql.conf of both servers:
shared_preload_libraries = 'pglogical,pgl_ddl_deploy'Check for changes
# перезапускаем новый postgresql
systemctl restart postgresql-11
Now with the help
pgrepup checkyou need to make sure that everything is ok with the target server and all comments regarding the target server are completely eliminated. If all is well, you can restart the old server. Here you need to think about how your application will react to restarting the database server, you should probably stop it first.
# перезапускаем
systemctl restart postgresql-9.6
# проверяем
pgrepup check
Now in the command output, every single item should be marked OK.
It would seem that you can run the migration, but ...
Rule bugs pgrepup
In the current version of pgrepup there are several bugs that make migration impossible. Pull request'y sent, but alas, are ignored, so you have to make corrections manually.
Go to the pgrepup installation folder (our case is /usr/lib/python2.7/site-packages/pgrepup/commands/ ).
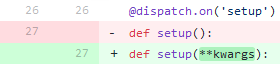
Do it once. In each * .py file we add missing
**kwargsfunctions in the description. A picture is better than a thousand words: Commit here .
Do two. In setup.py, we do a search for “sh -c”, two entries, all multi-line shell commands need to be made one-line.
Commit here .
Starting the migration
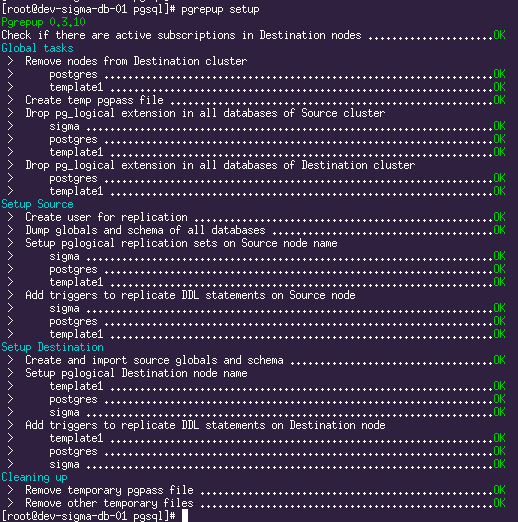
# подготовка
pgrepup setup
With this command, pgrepup prepares both servers for replication start, creates a user, sets up pglogical, transfers the database schema.
# запускаем репликацию
pgrepup start
He said “Let's go!” And waved his hand:
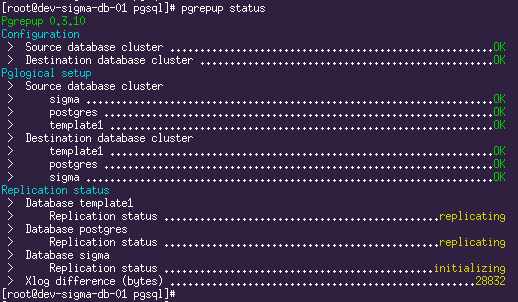
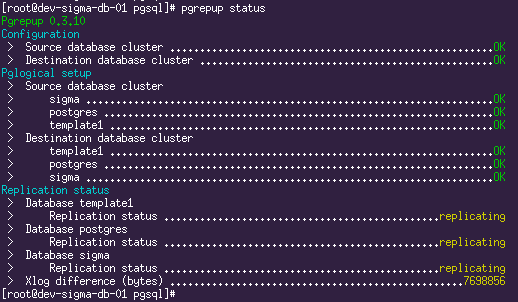
Replication is running. The current situation can be seen with the help of the command
pgrepup status: Here we see that two databases have already moved and replication is underway, and one is still in the process of moving. Now it remains only to drink coffee and wait until the entire volume of the source database is pumped through.
Along the way, you can look deeper than the pgrepup facade and see what happens under the hood. For inquisitive minds, here is a list of requests as a starting point:
SELECT * FROM pg_replication_origin_status ORDERBY remote_lsn DESC;
SELECT *,pg_xlog_location_diff(s.sent_location,s.replay_location) byte_lag FROM pg_stat_replication s;
SELECT query FROM pg_stat_activity WHERE application_name='subscription_copy'
Having drunk enough coffee (on the test server when writing this article, the migration of ~ 700Gb data lasted around a day), we finally see the following picture:
And this means that the time has come to prepare a new Slave.
Install PostgreSQL 11 on Slave
Here everything is simple and according to the textbook, no nuances.
# добавляем репозиторий
yum install https://download.postgresql.org/pub/repos/yum/11/redhat/rhel-7-x86_64/pgdg-oraclelinux11-11-2.noarch.rpm
# устанавливаем postgresql 11
yum install postgresql11 postgresql11-devel postgresql11-server postgresql11-contrib
# переливаем данные с нового мастера
su - postgres
pg_basebackup -h db-master.hostname -p 15432 -D /var/lib/pgsql/11/data/ -R -P -U replication -X stream -c fast
We copy access settings ( pg_hba.conf ) and server settings ( postgresql.conf ) from 9.6 to 11. In the postgresql.conf 11 configuration file, change the port to 15432 (port = 15432)
# запускаем
systemctl enable postgresql-11
systemctl start postgresql-11
# проверяем статус репликации на Master
SELECT *,pg_wal_lsn_diff(s.sent_lsn,s.replay_lsn) AS byte_lag FROM pg_stat_replication s;
# проверяем статус репликации на Slave
SELECT now()-pg_last_xact_replay_timestamp();
Subtotals
After all these procedures, we have such a tricky replication scheme:
Here, as a final check (well, in the end, it's just beautiful), you can do some UPDATE to the 9.6 Master database and see how it replicates to the other three server.
Switch applications to the new PostgreSQL version
Until now, our application did not suspect anything about the new version of PostgreSQL, it’s time to fix it. The options for action here are fundamentally dependent on two things:
will you outweigh the new services on the same ports that the old ones were running on,
and whether your application requires a restart when the database server is restarted.
For the sake of interest, we will answer both questions “yes” and proceed.
Stop the application.
# проверяем, что нет коннектов, например:
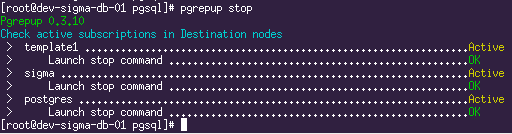
SELECT * FROM pg_stat_activity;# останавливаем логическую репликацию# при этом также произойдёт финальная синхронизация sequences.
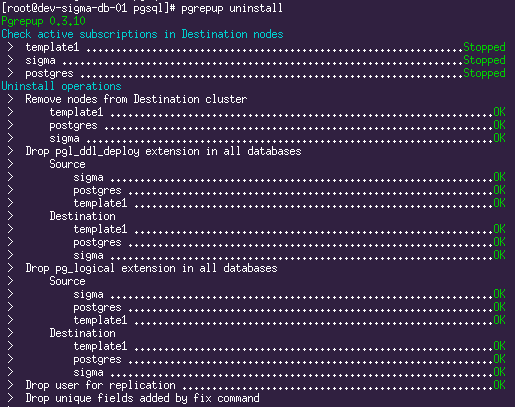
pgrepup stop# чистим за собой все хвосты
pgrepup uninstall
# на master:# выключаем старый сервис
systemctl disable postgresql-9.6
# останавливаем оба сервиса, сначала старый, затем новый.
systemctl stop postgresql-9.6
systemctl stop postgresql-11
# на slave:# выключаем старый сервис
systemctl disable postgresql-9.6
# останавливаем оба сервиса, сначала старый, затем новый.
systemctl stop postgresql-9.6
systemctl stop postgresql-11
We return the standard port in the postgresql.conf config of the new version on the Master and Slave.
On the new Slave, we also change the port to the standard one in recovery.conf .
Along the way, there is an offer out of harm to change the port to the old inactive version becoming inactive: We are
setting up a non-standard port in the postgresql.conf of the old version to Master and Slave.
On the old Slave, we also change the port to non-standard in recovery.conf .
# запускаем на master
systemctl enable postgresql-11
systemctl start postgresql-11
# запускаем на slave:
systemctl enable postgresql-11
systemctl start postgresql-11
Check the logs.
Check replication status on Master.
SELECT *,pg_wal_lsn_diff(s.sent_lsn,s.replay_lsn) AS byte_lag FROM pg_stat_replication s;Run the application. We rejoice half an hour.
And finally, useful literature on the topic:
- pglogical
- Installation Instructions for pglogical
- pglogical docs
- Upgrading PostgreSQL from 9.4 to 10.3 with pglogical
- pgrepup - upgrade PostgreSQL using logical replication
- pgrepup - PostgreSQL REPlicate and UPgrade
- Upgrading PostgreSQL from 9.6 to 10 with minimal downtime using pglogical
Successes!