SDL 2.0 Lesson Cycle: Lesson 3 - SDL Extensions Libraries
- From the sandbox
- Tutorial

From the translator:
I continue the abandoned series of translations of tutorials from Twinklebear, originally available here , with the permission of the translator of the previous lessons of the InvalidPointer series . The first two lessons of the translation series in the list are for its authorship. The translation is partly voluntary and may contain minor corrections or additions from the translator.
List of lessons:
- Lesson 1. Hello World!
- Lesson 2. Don't put everything in main
- Lesson 3. SDL extension libraries
- Lesson 4. Event handling
- Lessons 5-6 - To be continued
SDL Extensions Libraries
Up to this point, we have used only images in the BMP format, since this is the only type of images supported by the main library SDL 2, and this is not very convenient. Fortunately, there are many extension libraries for SDL that add useful features, for example, SDL_image allows you to load many types of images, SDL_ttf adds support for text rendering using TTF fonts, SDL_net for low-level network support, and SDL_mixer for multi-channel audio output.
Extension installation
In this tutorial, we will only use SDL_image, however, the installation process for the remaining extensions is no different, and, in general, almost coincides with that for installing SDL2 itself.
- Windows (MinGW or Visual Studio): Place the extension files downloaded from the extension's project page in the SDL2 folder. Also, you will need to copy SDL2_image, zlib and other .dll files (for example, libpng) to the folder with your executable file (or in C: \ Windows \ system32 - approx. Lane ) so that they load when the application starts.
- Linux : Install the extension using your full-time package manager, or build from source. If you have Linux - most likely you already know how to do this ©.
- Mac : Download .dmg from the official site and follow the instructions in the Readme.
Also, in order to use the extension, you will need to update the list of used header files and link libraries, just as it did for SDL2 itself.
Before you start working with the extension, the <SDL2 / SDL_image.h> file, or the file corresponding to the name of the desired extension, must be connected after the header file of the SDL itself to the .c and .cpp files that use it.
Initialize SDL_image (optional)
When an image of each type is first loaded, SDL_image automatically initializes the subsystem necessary for this type; however, this will cause a slight delay. To avoid this, you can pre-initialize the necessary subsystems using the IMG_Init function. IMG_Init returns a bit mask with a list of all subsystems that have been successfully initialized at the moment, so to check the success of the call, you need to check that the bits for all subsystems specified for initialization were set, for example, by applying the mask to the result of bitwise I. For this lesson, only one subsystem suffices Png. It is important to carry out this operation after SDL_Init.
if ((IMG_Init(IMG_INIT_PNG) & IMG_INIT_PNG) != IMG_INIT_PNG)
{
	logSDLError(std::cout, "IMG_Init");
	SDL_Quit();
	return1;
}
Set the size
In this tutorial we will look at how to load images using SDL_image, how to scale textures when drawing and tile the background with tiles in a more rational way than in the previous lesson - a cycle based on the window and tile sizes.
But first, let's set a constant for the size of the tiles, right below the constants for the size of the window.
constint SCREEN_WIDTH  = 640;
constint SCREEN_HEIGHT = 480;
// Будем использовать квадратные плиткиconstint TILE_SIZE = 40;
Image upload using SDL_image
SDL_image allows you to load several types of images, as well as immediately convert them to SDL_Texture with the IMG_LoadTexture function. This function replaces almost the entire function code loadTexture from the previous lesson, now it is enough just to call IMG_LoadTexture, check for any errors during the load, and exit the function. Since the function IMG_GetError defined in SDL_image is nothing more than a synonym for SDL_GetError, we can use any of them to display error messages.
/**
* Загружает изображение в текстуру для рендерера
* @param file Путь к изображению
* @param ren Рендерер, на который эту текстуру можно будет отрисовать
* @return Возвращает текстуру, либо nullptr в случае ошибки.
*/SDL_Texture* loadTexture(conststd::string &file, SDL_Renderer *ren){
	SDL_Texture *texture = IMG_LoadTexture(ren, file.c_str());
	if (!texture)
	{
		std::cout << IMG_GetError(); // Можно заменить на SDL_GetError()
	}
	return texture;
}
Specify the height and width for drawing
If, when rendering a texture to the renderer, specify the size of the rectangle that is different from the size of the texture itself, SDL2 will scale it accordingly. However, if scaling is not required, then each time determining the original texture size can be inconvenient, so we implement two versions of the renderTexture function, one of which will render the texture with scaling, and the second without.
/**
* Отобразить SDL_Texture на SDL_Renderer на координатах x, y, с масштабированием
* @param tex Текстура для отображения
* @param ren Рендерер
* @param x Координаты
* @param y
* @param w Фактический размер при отрисовке
* @param h
*/voidrenderTexture(SDL_Texture *tex, SDL_Renderer *ren, int x, int y, int w, int h){
	SDL_Rect dst;
	dst.x = x;
	dst.y = y;
	dst.w = w;
	dst.h = h;
	SDL_RenderCopy(ren, tex, NULL, &dst);
}
/**
* Отрисовать SDL_Texture на SDL_Renderer на координатах x, y, без масштабирования
* @param tex Текстура
* @param ren Рендерер
* @param x Координаты
* @param y
*/voidrenderTexture(SDL_Texture *tex, SDL_Renderer *ren, int x, int y){
	int w, h;
	SDL_QueryTexture(tex, NULL, NULL, &w, &h);
	renderTexture(tex, ren, x, y, w, h);
}
Texture loading
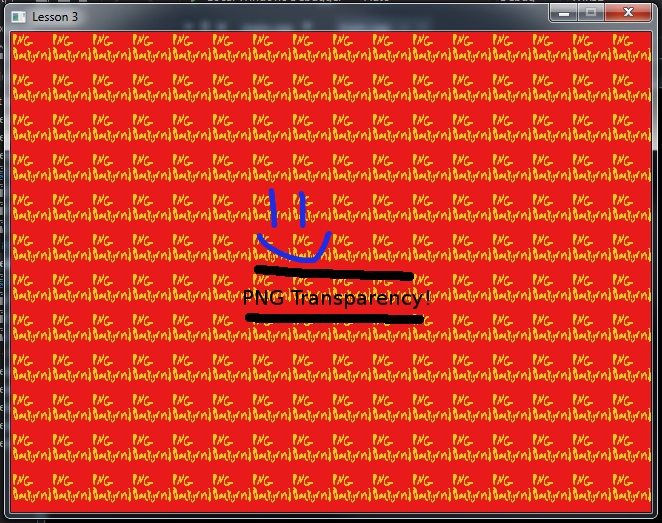
Since the main purpose of this lesson is to download PNG images, we will use the new set of images. Also, we will demonstrate the preservation of PNG transparency when drawing a foreground image (with a transparent background) over a tiled background.
We will use these pictures here:
Tile to fill the background:
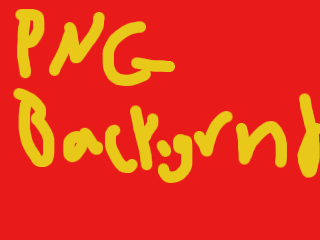
The foreground image (as written on it, with a transparent background, as well as again with emoticons that violate Habr's rules):

Load the images:
SDL_Texture *background = loadTexture("background.png", renderer);
SDL_Texture *image = loadTexture("image.png", renderer);
// Проверкаif (!background || !image)
{
	// В оригинале, эта часть использовала шаблонную функцию cleanup(), рассмотренную в P.S. к первому уроку, добавленному уже после написания перевода, и посему, не попавшему в перевод.
	SDL_DestroyTexture(background);
	SDL_DestroyTexture(image);
	SDL_DestroyRenderer(renderer);
	SDL_DestroyWindow(window);
	IMG_Quit();
	SDL_Quit();
	return1;
}
Tiling background
Since the tiles have become noticeably smaller, we will need to put more than four pieces to fill the entire window, and it will be rather difficult to specify the position for each one manually. Fortunately, you can get the computer to determine these positions independently.
We can find out how many tiles are needed in width by dividing the width of the window by the size of the tile, and likewise for height.
// Определение количества плиток, необходимого для покрытия всего окна// От переводчика: я бы заменил на ceil(float(SCREEN_WIDTH) / TILE_SIZE), чтобы в том случае, кода размер окна не кратен размеру плитки, оставшаяся часть окна не оставалась пустой; однако, в данном примере размеры заданы константой и кратны, так что это не страшно.int xTiles = SCREEN_WIDTH / TILE_SIZE;
int yTiles = SCREEN_HEIGHT / TILE_SIZE;
// Отрисовка фонаfor (int i = 0; i < xTiles * yTiles; ++i)
{
	int x = i % xTiles;
	int y = i / xTiles;
	renderTexture(background, renderer, x * TILE_SIZE, y * TILE_SIZE, TILE_SIZE, TILE_SIZE);
}
Foreground image rendering
As before, the foreground image is placed in the middle of the window.
int iW, iH;
SDL_QueryTexture(image, NULL, NULL, &iW, &iH);
int x = SCREEN_WIDTH / 2 - iW / 2;
int y = SCREEN_HEIGHT / 2 - iH / 2;
renderTexture(image, renderer, x, y);
It remains only to display the result on the window and wait a couple of seconds, just as in the second lesson.
SDL_RenderPresent(renderer);
SDL_Delay(2000);
Cleaning
The release of resources is similar to that in lesson 2 (and has already been met above, when processing an image loading error), with the exception of the added IMG_Quit call.
SDL_DestroyTexture(background);
SDL_DestroyTexture(image);
SDL_DestroyRenderer(renderer);
SDL_DestroyWindow(window);
IMG_Quit();
SDL_Quit();
After successful compilation and launch, if you did everything correctly, the window will look like this:
The end of the third lesson
That came to an end the next lesson. See you all in lesson 4: Event handling.