Integration of AppCenter and GitLab
Hello, hello!
I want to talk about my experience in setting up the integration of GitLab and AppCenter via BitBucket.
The need for such an integration arose during the setup of automatic launch of UI tests for a cross-platform project on Xamarin. A detailed tutorial under the cut!
* On the automation of UI testing under cross-platform conditions, I will make a separate article if the public is interested.
Such material dug up only one article . Therefore, my article can help someone.
Task : Set up automatic launch of UI tests on AppCenter, while our team uses GitLab as a version control system.
The problem turned out to be that AppCenter does not directly integrate with GitLab. As one of the solutions, a bypass through BitBucket was chosen.
Steps
1. Create an empty BitBucket repository
I don’t see the need to describe it in more detail :)
2. Configure GitLab
We need that when push / merge to the repository changes are poured also on BitBucket. To do this, add the runner (or edit the existing .gitlab-ci.yml file).
First, add commands to the before_scripts section
 - git config --global user.email "user@email"
 - git config --global user.name "username"
Then add the following command to the desired stage:
- git push --mirror https://username:password@bitbucket.org/username/projectname.gitIn my case, I got such a file
before_script:
 - git config --global user.email "user@email"
 - git config --global user.name "username"
stages:
  - mirror
mirror:
  stage: mirror
  script:
    - git push --mirror https://****:*****@bitbucket.org/****/testapp.git
We launch the build, check that our changes / files are based on BitBucket.
* As practice has shown, configuring SSH keys is optional. But, just in case, I will give the connection setup algorithm through SSH below
First you need to generate an SSH key. A lot of articles have been written about this. For an example you can look here .
The generated keys look something like this:
Next, the secret key needs to be added as a variable on GitLab. To do this, go to Settings> CI / CD> Enviroment Variables. Add ALL the contents of the file into which you saved the private key. Let's name the variable SSH_PRIVATE_KEY.
* this file, unlike a public key file, will not have an extension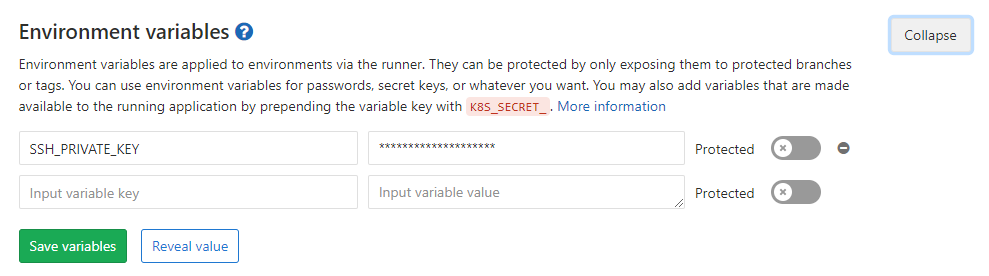
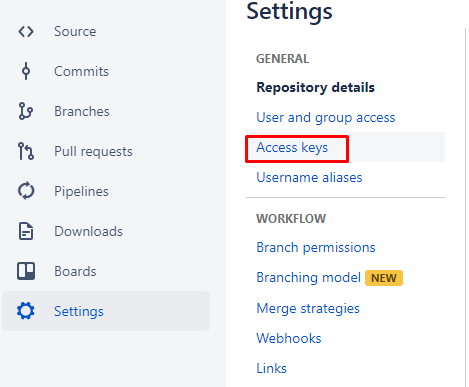
Great, then you need to add the public key to BitBucket. To do this, open the repository, go to Settings> Access Keys.
Then click Add Key and paste the contents of the file with the public key (file with the extension .pub).
The next step is to use the keys in gitlab-runner. Use these commands, but specify your data instead of asterisks
image: timbru31/node-alpine-git:latest
stages:
  - mirror
before_script:
  - eval $(ssh-agent -s)
  - echo "$SSH_PRIVATE_KEY" | tr -d '\r' | ssh-add - > /dev/null
  - mkdir -p ~/.ssh
  - chmod 700 ~/.ssh
  - ssh-keyscan bitbucket.org >> ~/.ssh/known_hosts
  - chmod 644 ~/.ssh/known_hosts
  - git config --global user.email "*****@***"
  - git config --global user.name "****"
  - ssh -T git@bitbucket.org
mirror:
  stage: mirror
  script:
    - git push --mirror https://****:****@bitbucket.org/*****/*****.git
3. Configure AppCenter
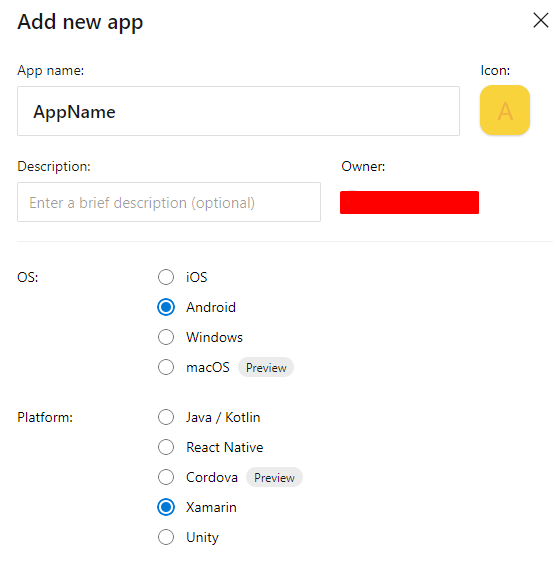
We create a new application on AppCenter.

Specify the language / platform
Next, go to the Build section of the newly created application. We select BitBucket and the repository created in step 1 there.
Ok, now you need to configure the build. To do this, find the gear icon

In principle, everything is intuitive there. We select the project and configuration. If necessary, enable the launch of tests after the build. They will start automatically.
In principle, that’s all. It sounds easy, but naturally, everything will not go smoothly. Therefore, I will describe some errors that I encountered while working:
It arises because the path to ssh-keygen.exe is not added to the environment variables.
There are two options: add C: \ Program Files \ Git \ usr \ bin to Enviroment Variables (will apply after rebooting the machine), or start the console from this directory.
To solve the problem, you need to untie the BitBucket account from AppCenter. We go into the wrong BitBucket account, go to the user profile.

Next, go to Settings> Access Management> OAuth

Click Revoke to untie the account.

После этого нужно залогиниться под нужным BitBucket аккаунтом
* В крайнем случае еще и почистить кэш браузера
Теперь переходим в AppCenter. переходим в секцию Build, нажимаем Disconnect BitBucket account

Когда старый аккаунт будет отвязан, привязываем AppCenter заново. Теперь уже к нужному аккаунту.
Используем вместо команды
- eval $(ssh-agent -s)Команду:
- ssh-agentВ некоторых случаях придётся или указать полный путь к C:\Program Files\Git\usr\bin\ssh-agent.exe, или добавить этот путь в системные переменные на машине, где запущен runner
В моём случае проблема возникла из-за того, что я работала с несколькими аккаунтами. Решилась очисткой кэша.