My home automation system
- Tutorial
Hello, Habr!
The purpose of this article (cycle) is theHabra effect, an introductory story about my home automation system, of course I did not invent and created everything from scratch, but only collected technologies and projects that I considered the most suitable for this purpose and added a little from myself. Amateur level, but as a result, everything works, people use it and do not run after me with a club. I did everything myself. Constructive criticism is welcome, it will be interesting to know any opinion.
The system includes equipment, and a set of programs: directly an automation system for equipment communication and visualization, communication and telemetry for remote monitoring and updating, a voice assistant from Yandex. Everything (almost everything) is open and posted on Github .
The main and necessary part is a server based on the Raspberry Pi, but it can work on a PC with Debian or Ubuntu without problems. Raspbian operating system. The system should work 24/7/365 so you need a high-quality power supply, for example, an ideal PSU for iPad.

For Remote Management, I also have the skill for voice assistant Yandex need a server with a "white" IP and a domain. An MQTT server is running on the server; SSL / TLS is used for security.
KNX support through the BAOS 771-774 gateway. BAOS is the interface between the KNX bus and LAN. Allows access to addresses on the bus through a web service in JSON format.
My equipment:
Projects for Arduino IDE
Wifi Controller based on Wemos D1 mini
Powered by a 230 volt network, it is also possible without a power supply unit from a common 5 volt bus to power Wemos or from equipment that it controls, for example, a curtain drive. It is possible to install in mounting and junction boxes of sufficient depth, for example behind a switch.
It can be used instead of radio control of various curtain drives.
Pinout of controlled outputs:
L1, L2 - Power outputs from BT-137S triacs, controlled by wemos'a outputs D0, D5 through an MOC 3063S optocoupler with phase transition control through zero. Turning the load on and off will take place without causing interference to the network.
p1, p2 - pwm output for dimmers or motorized curtain drives or additional buttons, depending on the settings. correspond to the conclusions of wemos'a D6, D7.
A0 analog input for connecting various sensors, such as light or an additional button.
ds - Connection of the DS18B20 temperature sensor corresponds to pin D1.
DHT - Connecting the temperature sensor DHT22 corresponds to pin D2.
b1, b2 - Buttons, short and long press, with the function of the counter of clicks, can be connected to the pulse outputs of the meters of electricity, water, etc.
Controller program created in Arduino IDE. Suitable for all motherboards based on ESP-8266. Network setup, control and operation of the controller is carried out by MQTT. For convenient viewing of settings, there is a Web interface, previously there was the ability to control via http, but then I considered it superfluous and removed it.
The web interface can be disabled. For the convenience of initial configuration, a winit.sh script and instructions are provided. To reset the controller to the default settings, you must either enter the command “default 1” or simultaneously press the buttons b1, b2 for 20 seconds. There is also a simplified version of the program for managed Sonoff outlets.
Arduino Mega-based controller
It consists of the mega and the shield of the W5100 network card, the board has separate outputs for dimmers and an input for sensors and buttons, the relay outputs must be connected separately using a cable to the 2-row connector located on the opposite side of the mega board from the mega power ports and USB. The controller is designed for the D6MG enclosure.
Pinout:
D2-9, D11-13 - PWM outputs for dimmers, PWM frequency increased from standard.
D14-21 - DS18B20 and DHT22 temperature sensors.
D22-49 - relay outputs, D22-29 outputs can be configured for blinds, gates, curtains drives.
D 10.50-53 - uses the W5100 network card.
A0-16 - inputs for buttons, short and long press. A0-A6 can be configured for analog sensors.
Network settings for mega are set in the program before flashing. The IP address is fixed.
Dimmer on the BT137-600E triac.

Input 220 volts, PWM control 0-5 / 3.3 volts, set by setting a jumper. 0-5 volts for working with Arduino Mega or 0-3.3 volts in case of wemos. The PWM signal is fed to the analog input A0 Arduino Pro where it is converted into a delay for opening the triac, a connector is provided for flashing the arduino in place. Designated space for radiator. On the side of the arduino, there is a control and power connector for the arduino (PWM, -, +), on the side of the smimstor, there is a 4-pin power connector - power and load output, if necessary, it can also be equipped with a varistor or snubber. The dimmer board is designed for the D2MG chassis.
Dimmer Project:

There is also a 28 channel triac unit in the D9MG package.
The equipment is connected through the Local Area Network, a protocol for MQTT communication. I am using the MQTT Mosquitto server.
For convenience, first you need to prepare an image of the operating system with all the necessary programs, I use Raspbian Stretch Lite. You will need to install nodejs, python-pip, python3-pip, supervisor, mosquitto, mosquitto-clients, sqlite3. And pip packages: paho-mqtt and psutil. You can also install Node-red, perfect for all kinds of experiments.
After the release of Apple Homekit in 2016, it turned out that all manufacturers and developers for the entire existence of Smart Home systems could not do anything close in terms of convenience and functionality compared to the homkit, this is similar to the situation with the release of the first iPhone, when it turned out that the whole zoo phones, smartphones, communicators turned into a bunch of junk. In any case, it is always pleasant to use a quality and finished product.
I chose the homekit2mqtt project as the main visualization system. Of course, you can use OpenHUB or Homeassistant, these systems also work with MQTT.
hjmqtt
Homekit2mqtt creates Homekit Bridge, it can be found in the Home program on Apple devices. Accessories (lighting, sensors, temperature controllers, etc.) must be registered in a special file in JSON format. The scripts filegen.sh and install.sh are responsible for creating this file. You need to register accessories in filegen.sh, install.sh adds homekit2mqtt to autoload and starts. The main thing happens in the hjmqtt.py file - the connection of accessories with equipment, also manually in the file, you need to register accessories and equipment parameters, addresses for KNX.
The functionality for accessories is registered in the files accessory.py and accessoryknx.py. The device statuses are stored in the sqlite database; the statdb.py library is used for database operations.
hjconnect
The following project is needed for remote telemetry. This is the use of memory, disks, load and temperature, and the psutil package is used for this. Now the hjconnect version is available for open access only for monitoring and without encryption, and with a separate project, the program for linking files is also on MQTT file-transfer-via-mqtt . Settings are directly in the main hjconnect.py file. If you run it with the -l option, you can test it on the local MQTT server, the settings for the remote server are on line 160
server test.mosquitto.org can be replaced with your domain or IP. To identify the Raspberry Pi, the processor’s serial number is included in the topic, if the program is run on another computer, instead of the serial number, there will be the string “SN”. The message interval is set on line 96.
where 9 is seconds.
sima
Now only Yandex has the only Russian-speaking column. Creating a skill for Alice is easy enough. Unlike Siri, there is complete freedom of action. And access on any device. Only, unfortunately, while there is no sane way to launch a skill, constantly running a skill is inconvenient.
This is a working skill example. To start the skill, you need an SSL certificate; it can be generated using openssl. In line sima.py on line 14 there is an example of certificate generation
site.com and user need to be replaced with their data.
When a skill is launched on a new device, its identifier is recorded. In order to link the identifier and the automation system, you first need to create a new csv file in the clients directory based on the sample my.csv file. The serial number is written in the file according to the template, this is the same serial number from the hjconnect program, and the control objects are written: name, type, topic. Topic is a significant part of the MQTT accessory topic from the JSON file for homekit2mqtt. Then, using sn.py, you need to convert the serial number to a password and name this password on the device from which you will manage. Communication is provided by the hjconnect program, and the MQTT monitoring server is the same computer on which the skill is running.
Thanks, bye.
The purpose of this article (cycle) is the
The system includes equipment, and a set of programs: directly an automation system for equipment communication and visualization, communication and telemetry for remote monitoring and updating, a voice assistant from Yandex. Everything (almost everything) is open and posted on Github .
Equipment level
The main and necessary part is a server based on the Raspberry Pi, but it can work on a PC with Debian or Ubuntu without problems. Raspbian operating system. The system should work 24/7/365 so you need a high-quality power supply, for example, an ideal PSU for iPad.
For Remote Management, I also have the skill for voice assistant Yandex need a server with a "white" IP and a domain. An MQTT server is running on the server; SSL / TLS is used for security.
KNX support through the BAOS 771-774 gateway. BAOS is the interface between the KNX bus and LAN. Allows access to addresses on the bus through a web service in JSON format.
My equipment:
Projects for Arduino IDE
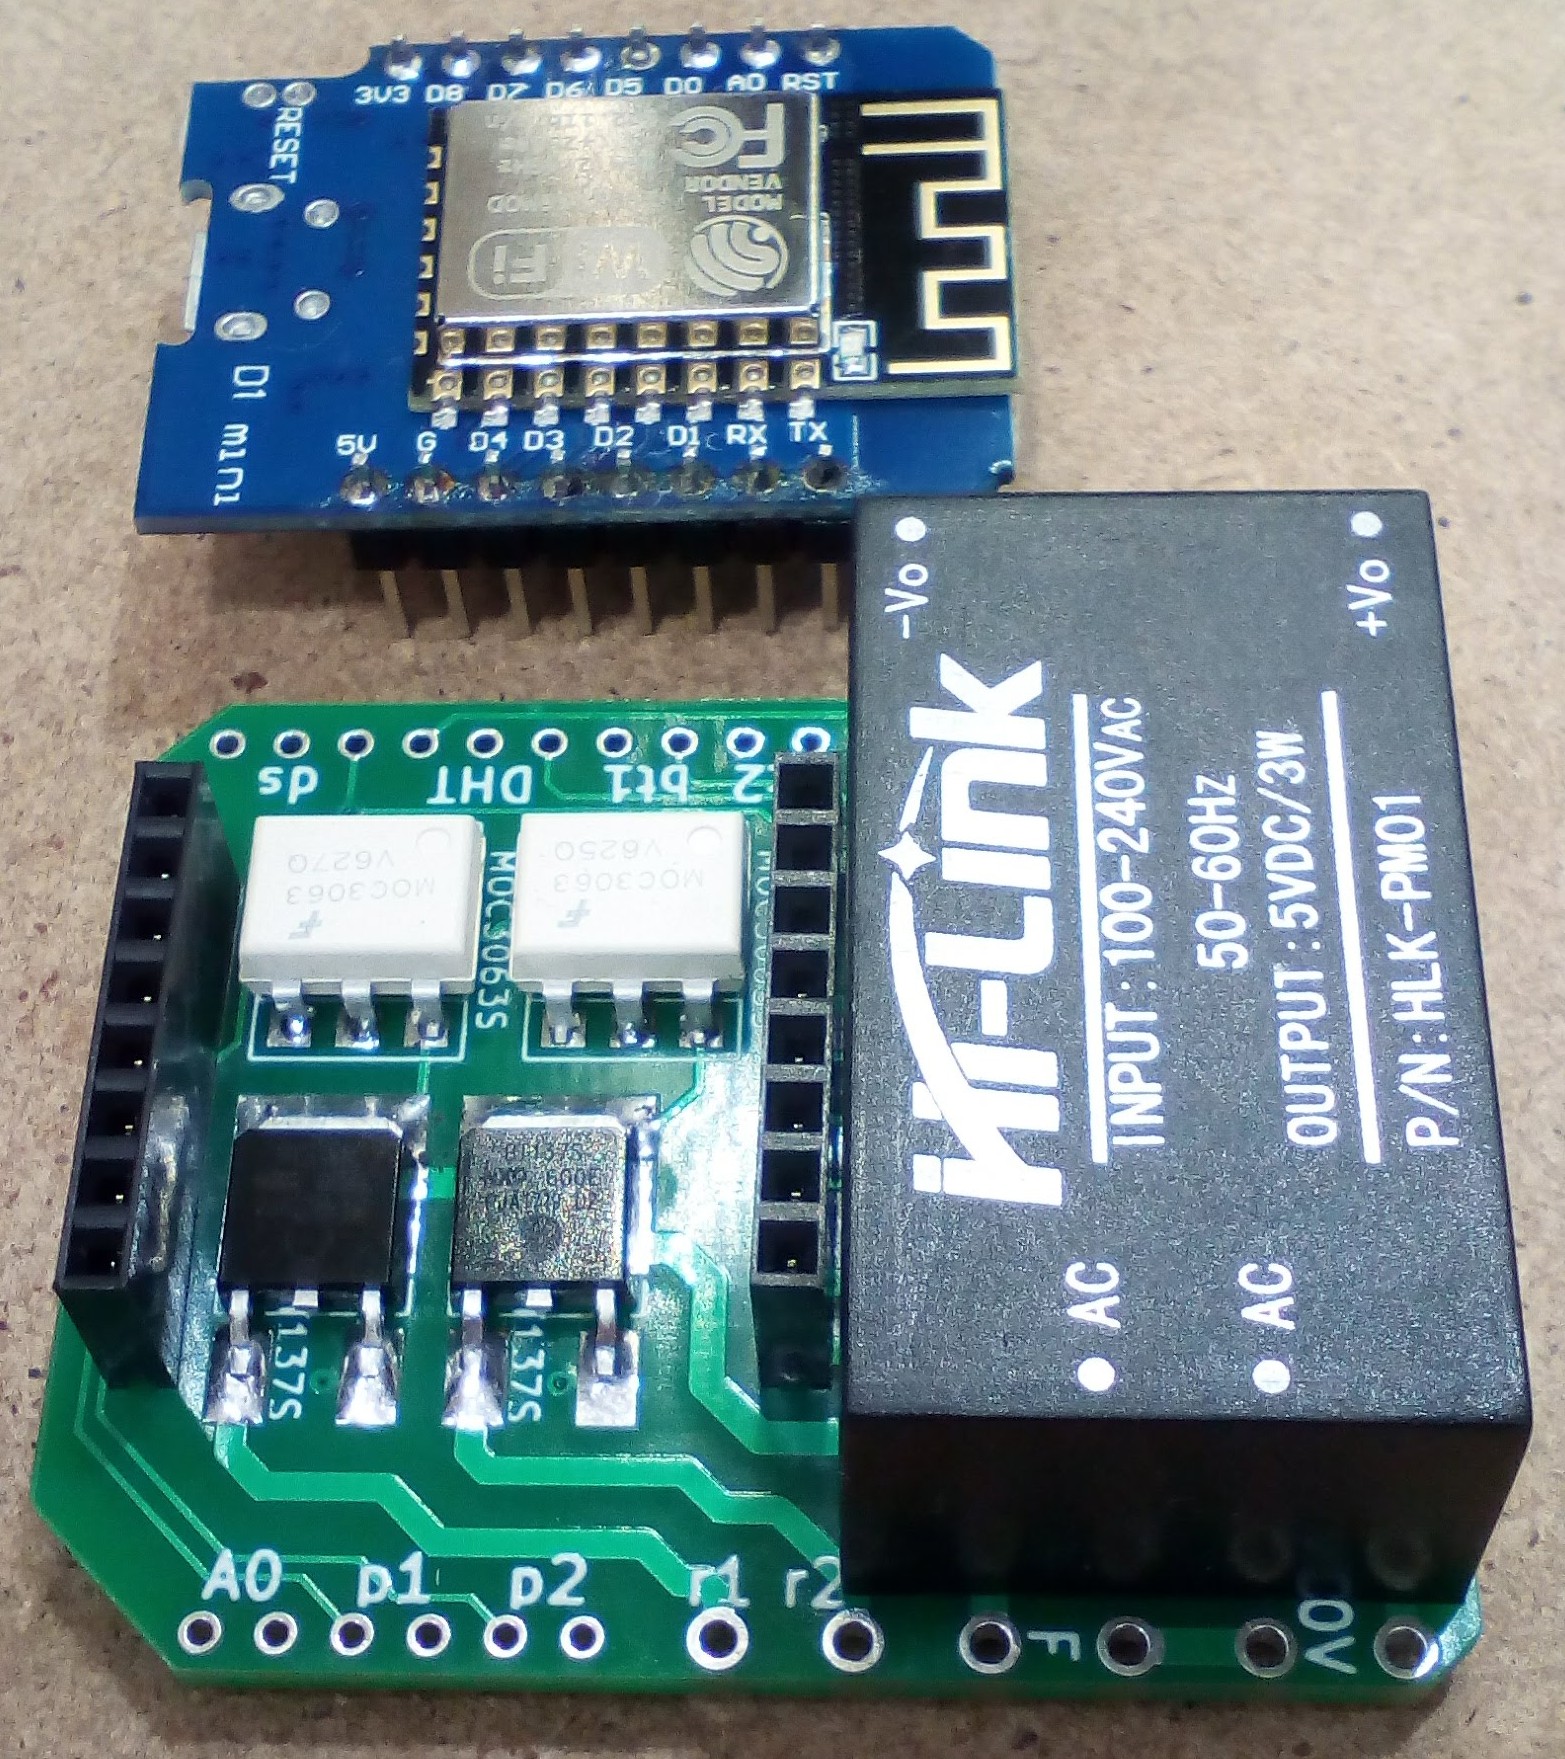
Wifi Controller based on Wemos D1 mini
Powered by a 230 volt network, it is also possible without a power supply unit from a common 5 volt bus to power Wemos or from equipment that it controls, for example, a curtain drive. It is possible to install in mounting and junction boxes of sufficient depth, for example behind a switch.
It can be used instead of radio control of various curtain drives.
Scheme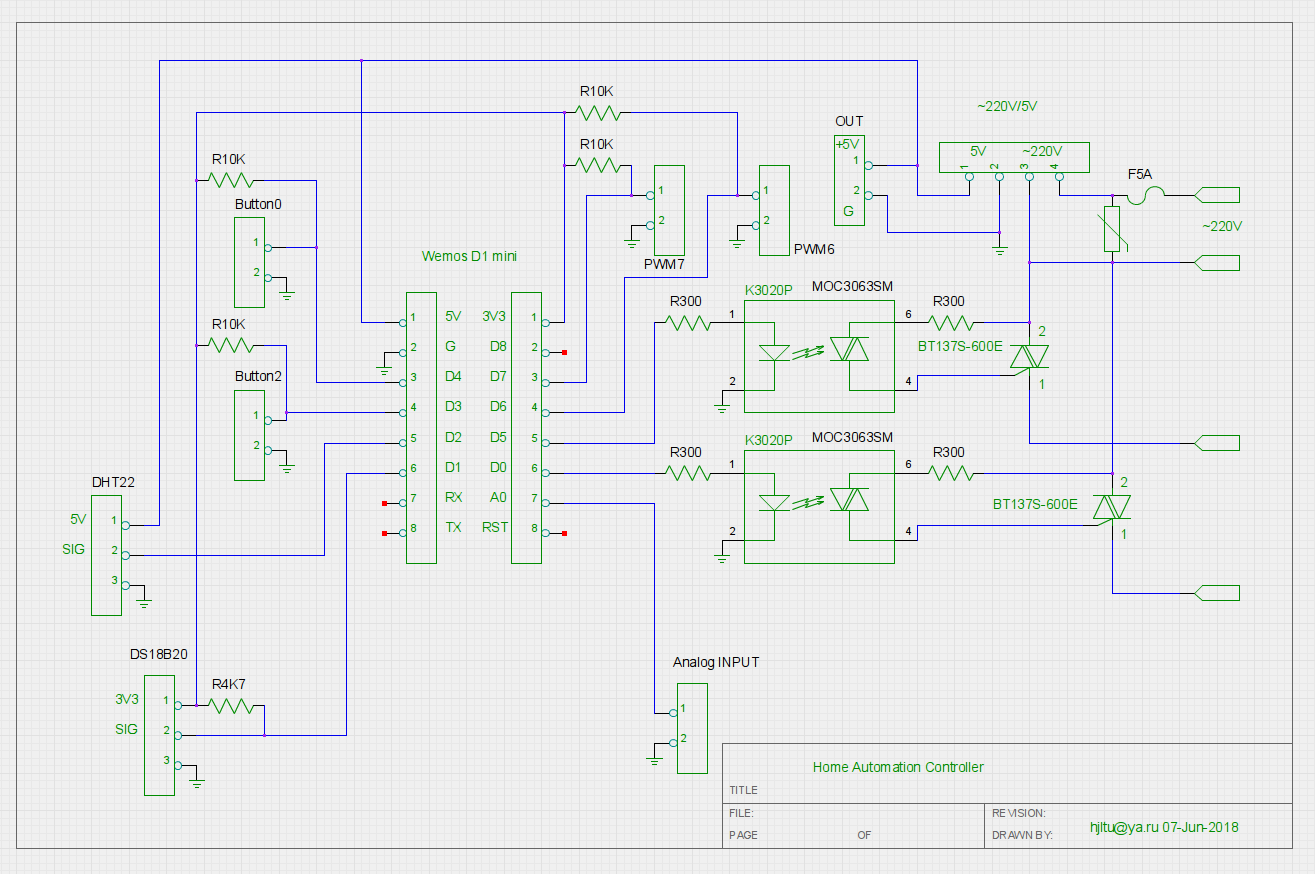
Pinout of controlled outputs:
L1, L2 - Power outputs from BT-137S triacs, controlled by wemos'a outputs D0, D5 through an MOC 3063S optocoupler with phase transition control through zero. Turning the load on and off will take place without causing interference to the network.
p1, p2 - pwm output for dimmers or motorized curtain drives or additional buttons, depending on the settings. correspond to the conclusions of wemos'a D6, D7.
A0 analog input for connecting various sensors, such as light or an additional button.
ds - Connection of the DS18B20 temperature sensor corresponds to pin D1.
DHT - Connecting the temperature sensor DHT22 corresponds to pin D2.
b1, b2 - Buttons, short and long press, with the function of the counter of clicks, can be connected to the pulse outputs of the meters of electricity, water, etc.
Work demonstration
Controller program created in Arduino IDE. Suitable for all motherboards based on ESP-8266. Network setup, control and operation of the controller is carried out by MQTT. For convenient viewing of settings, there is a Web interface, previously there was the ability to control via http, but then I considered it superfluous and removed it.
Web interface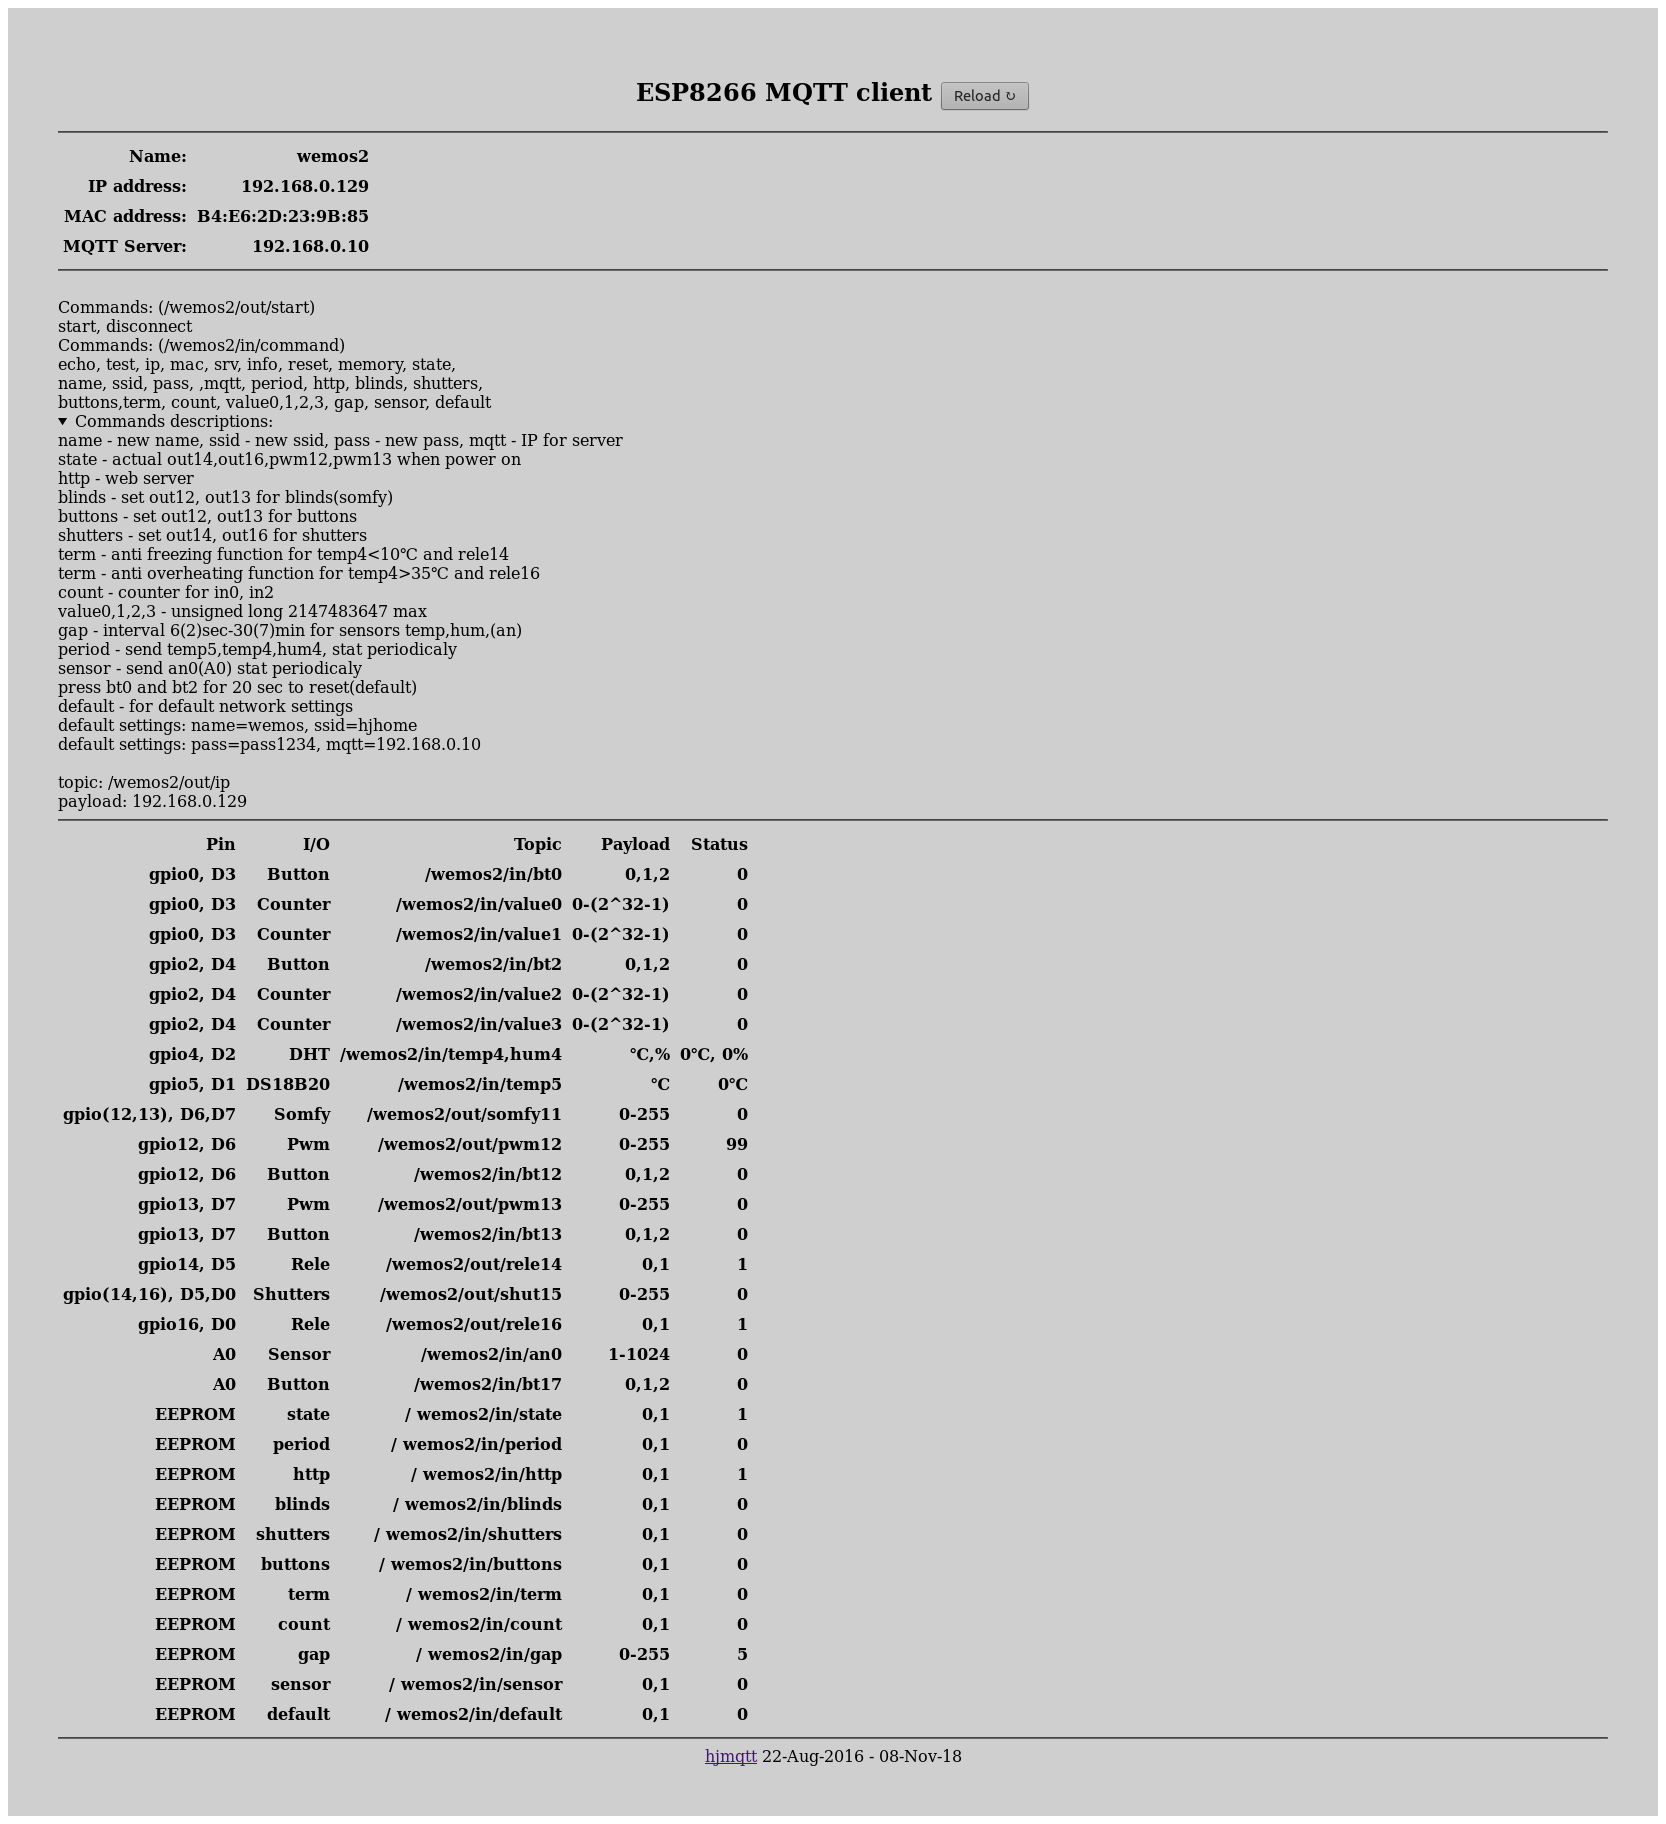
The web interface can be disabled. For the convenience of initial configuration, a winit.sh script and instructions are provided. To reset the controller to the default settings, you must either enter the command “default 1” or simultaneously press the buttons b1, b2 for 20 seconds. There is also a simplified version of the program for managed Sonoff outlets.
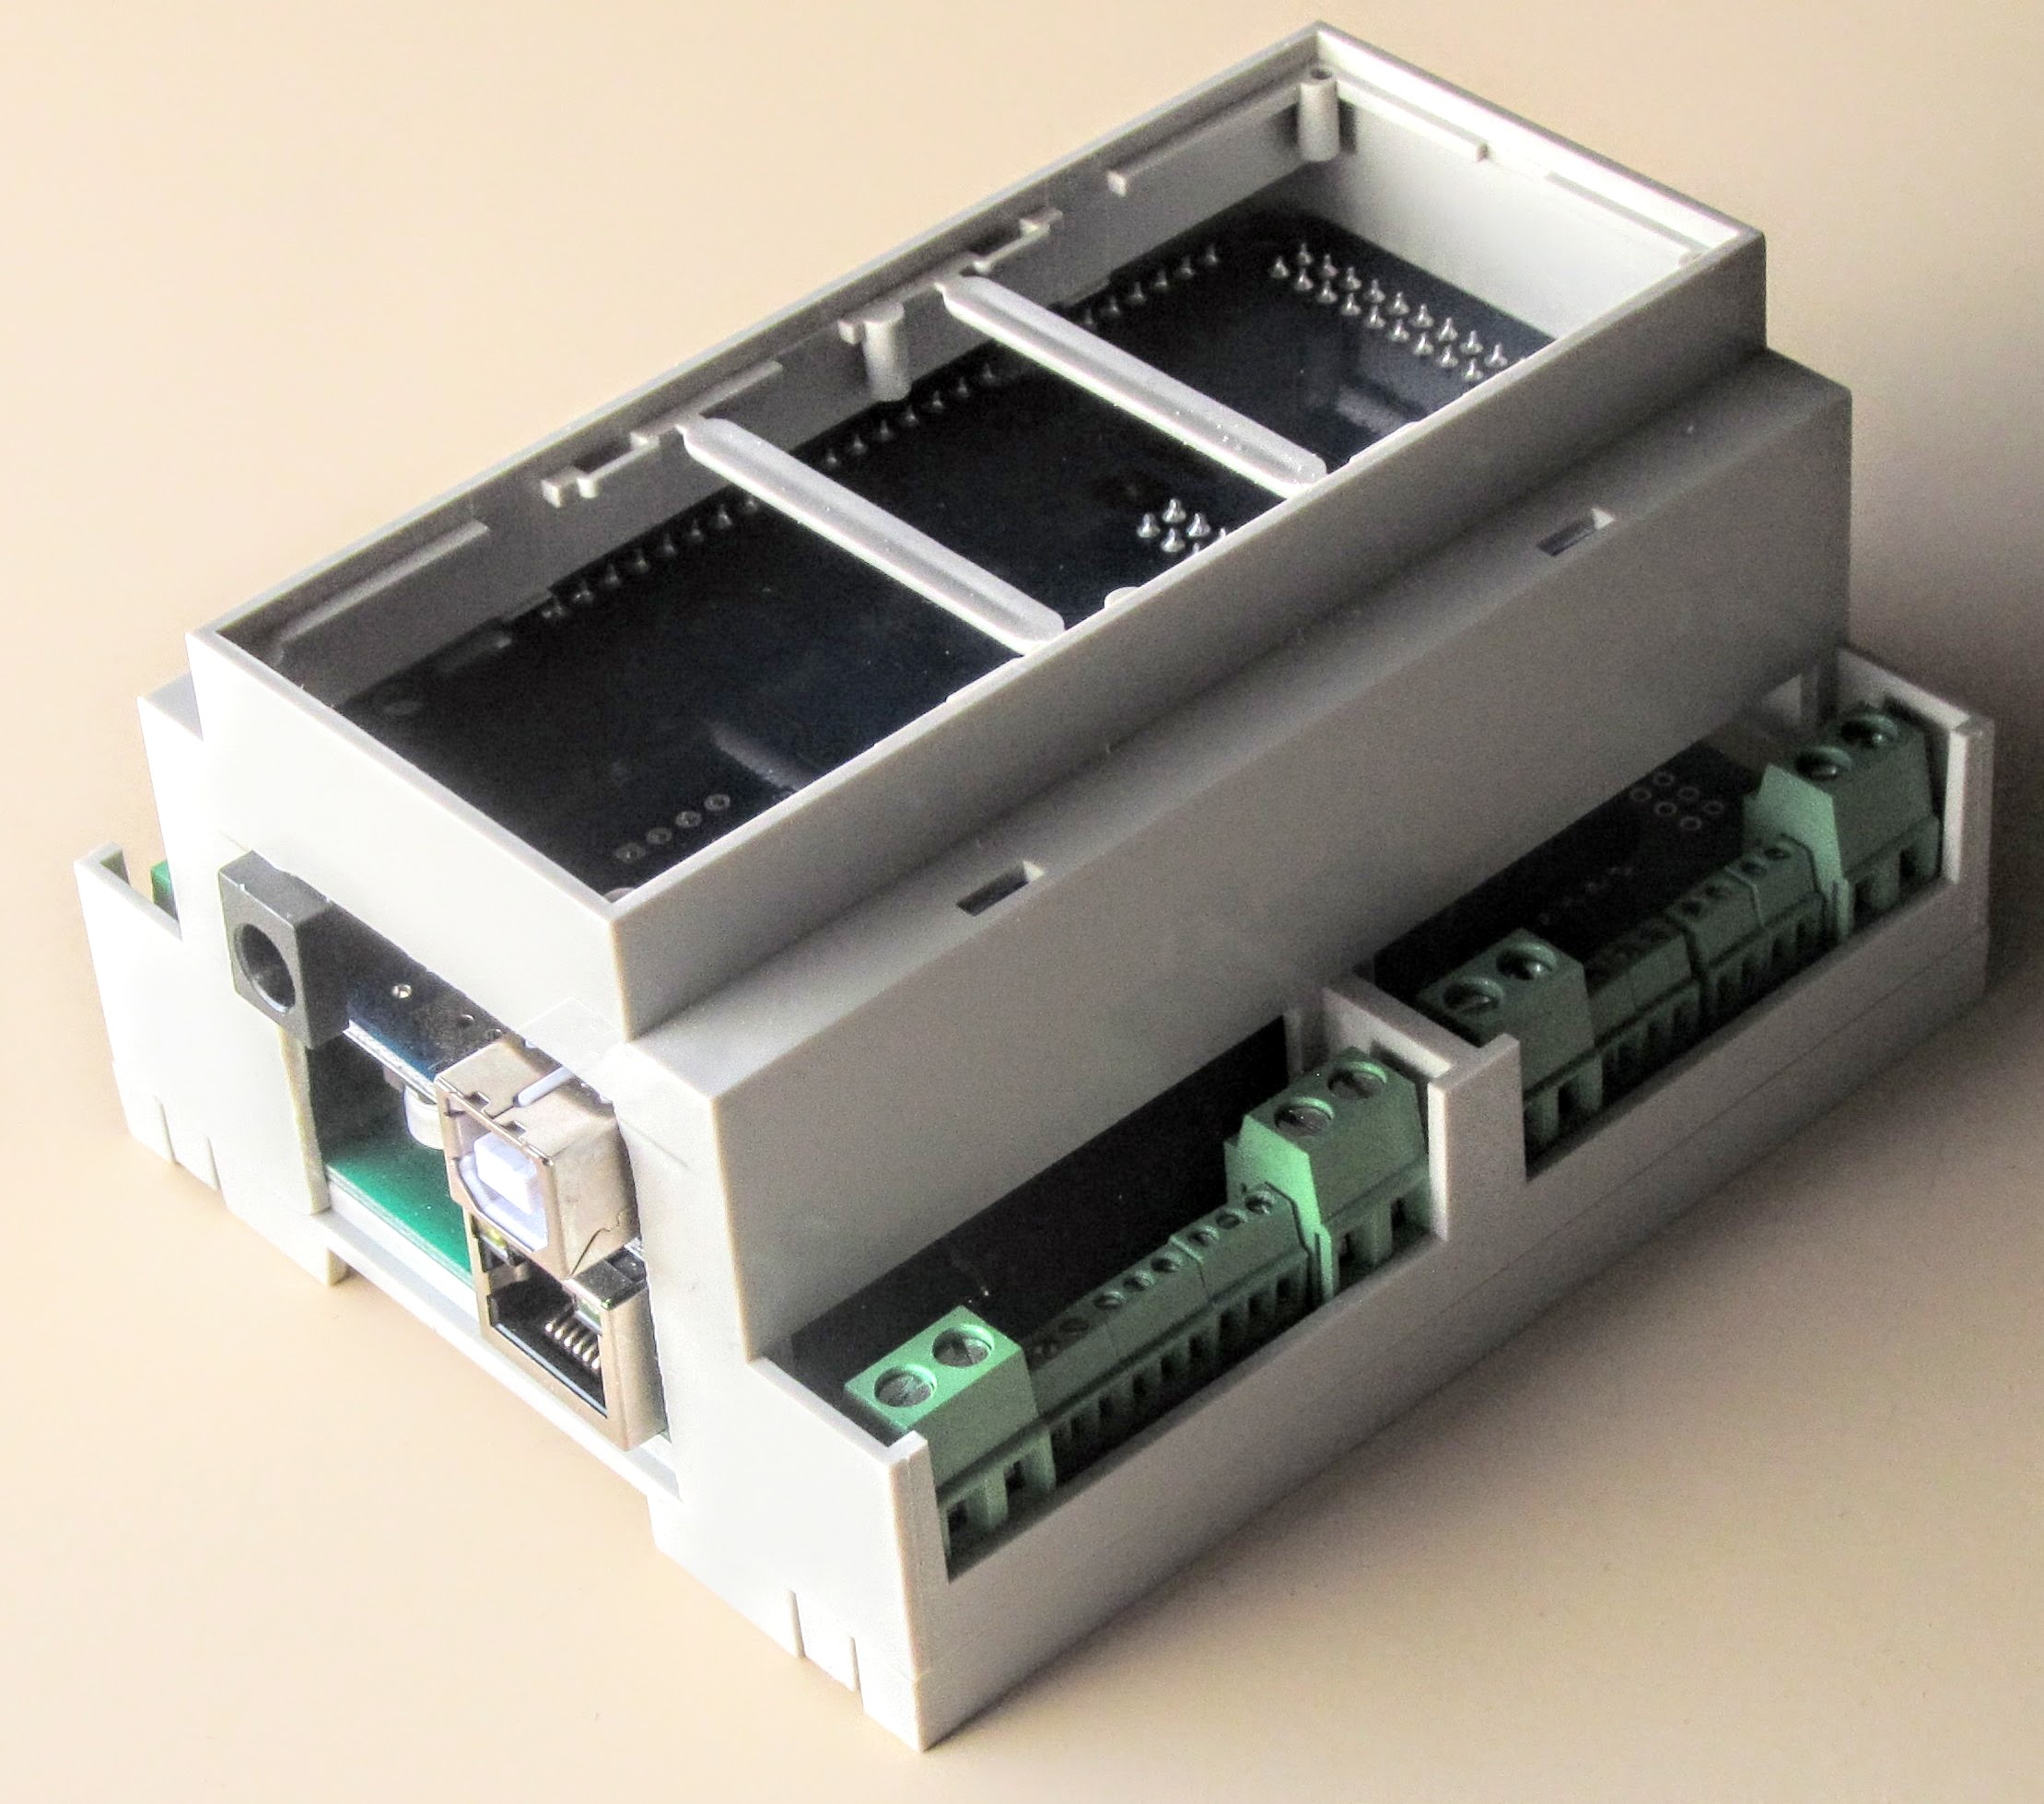
Arduino Mega-based controller
It consists of the mega and the shield of the W5100 network card, the board has separate outputs for dimmers and an input for sensors and buttons, the relay outputs must be connected separately using a cable to the 2-row connector located on the opposite side of the mega board from the mega power ports and USB. The controller is designed for the D6MG enclosure.
Pinout:
D2-9, D11-13 - PWM outputs for dimmers, PWM frequency increased from standard.
D14-21 - DS18B20 and DHT22 temperature sensors.
D22-49 - relay outputs, D22-29 outputs can be configured for blinds, gates, curtains drives.
D 10.50-53 - uses the W5100 network card.
A0-16 - inputs for buttons, short and long press. A0-A6 can be configured for analog sensors.
Network settings for mega are set in the program before flashing. The IP address is fixed.
Web interface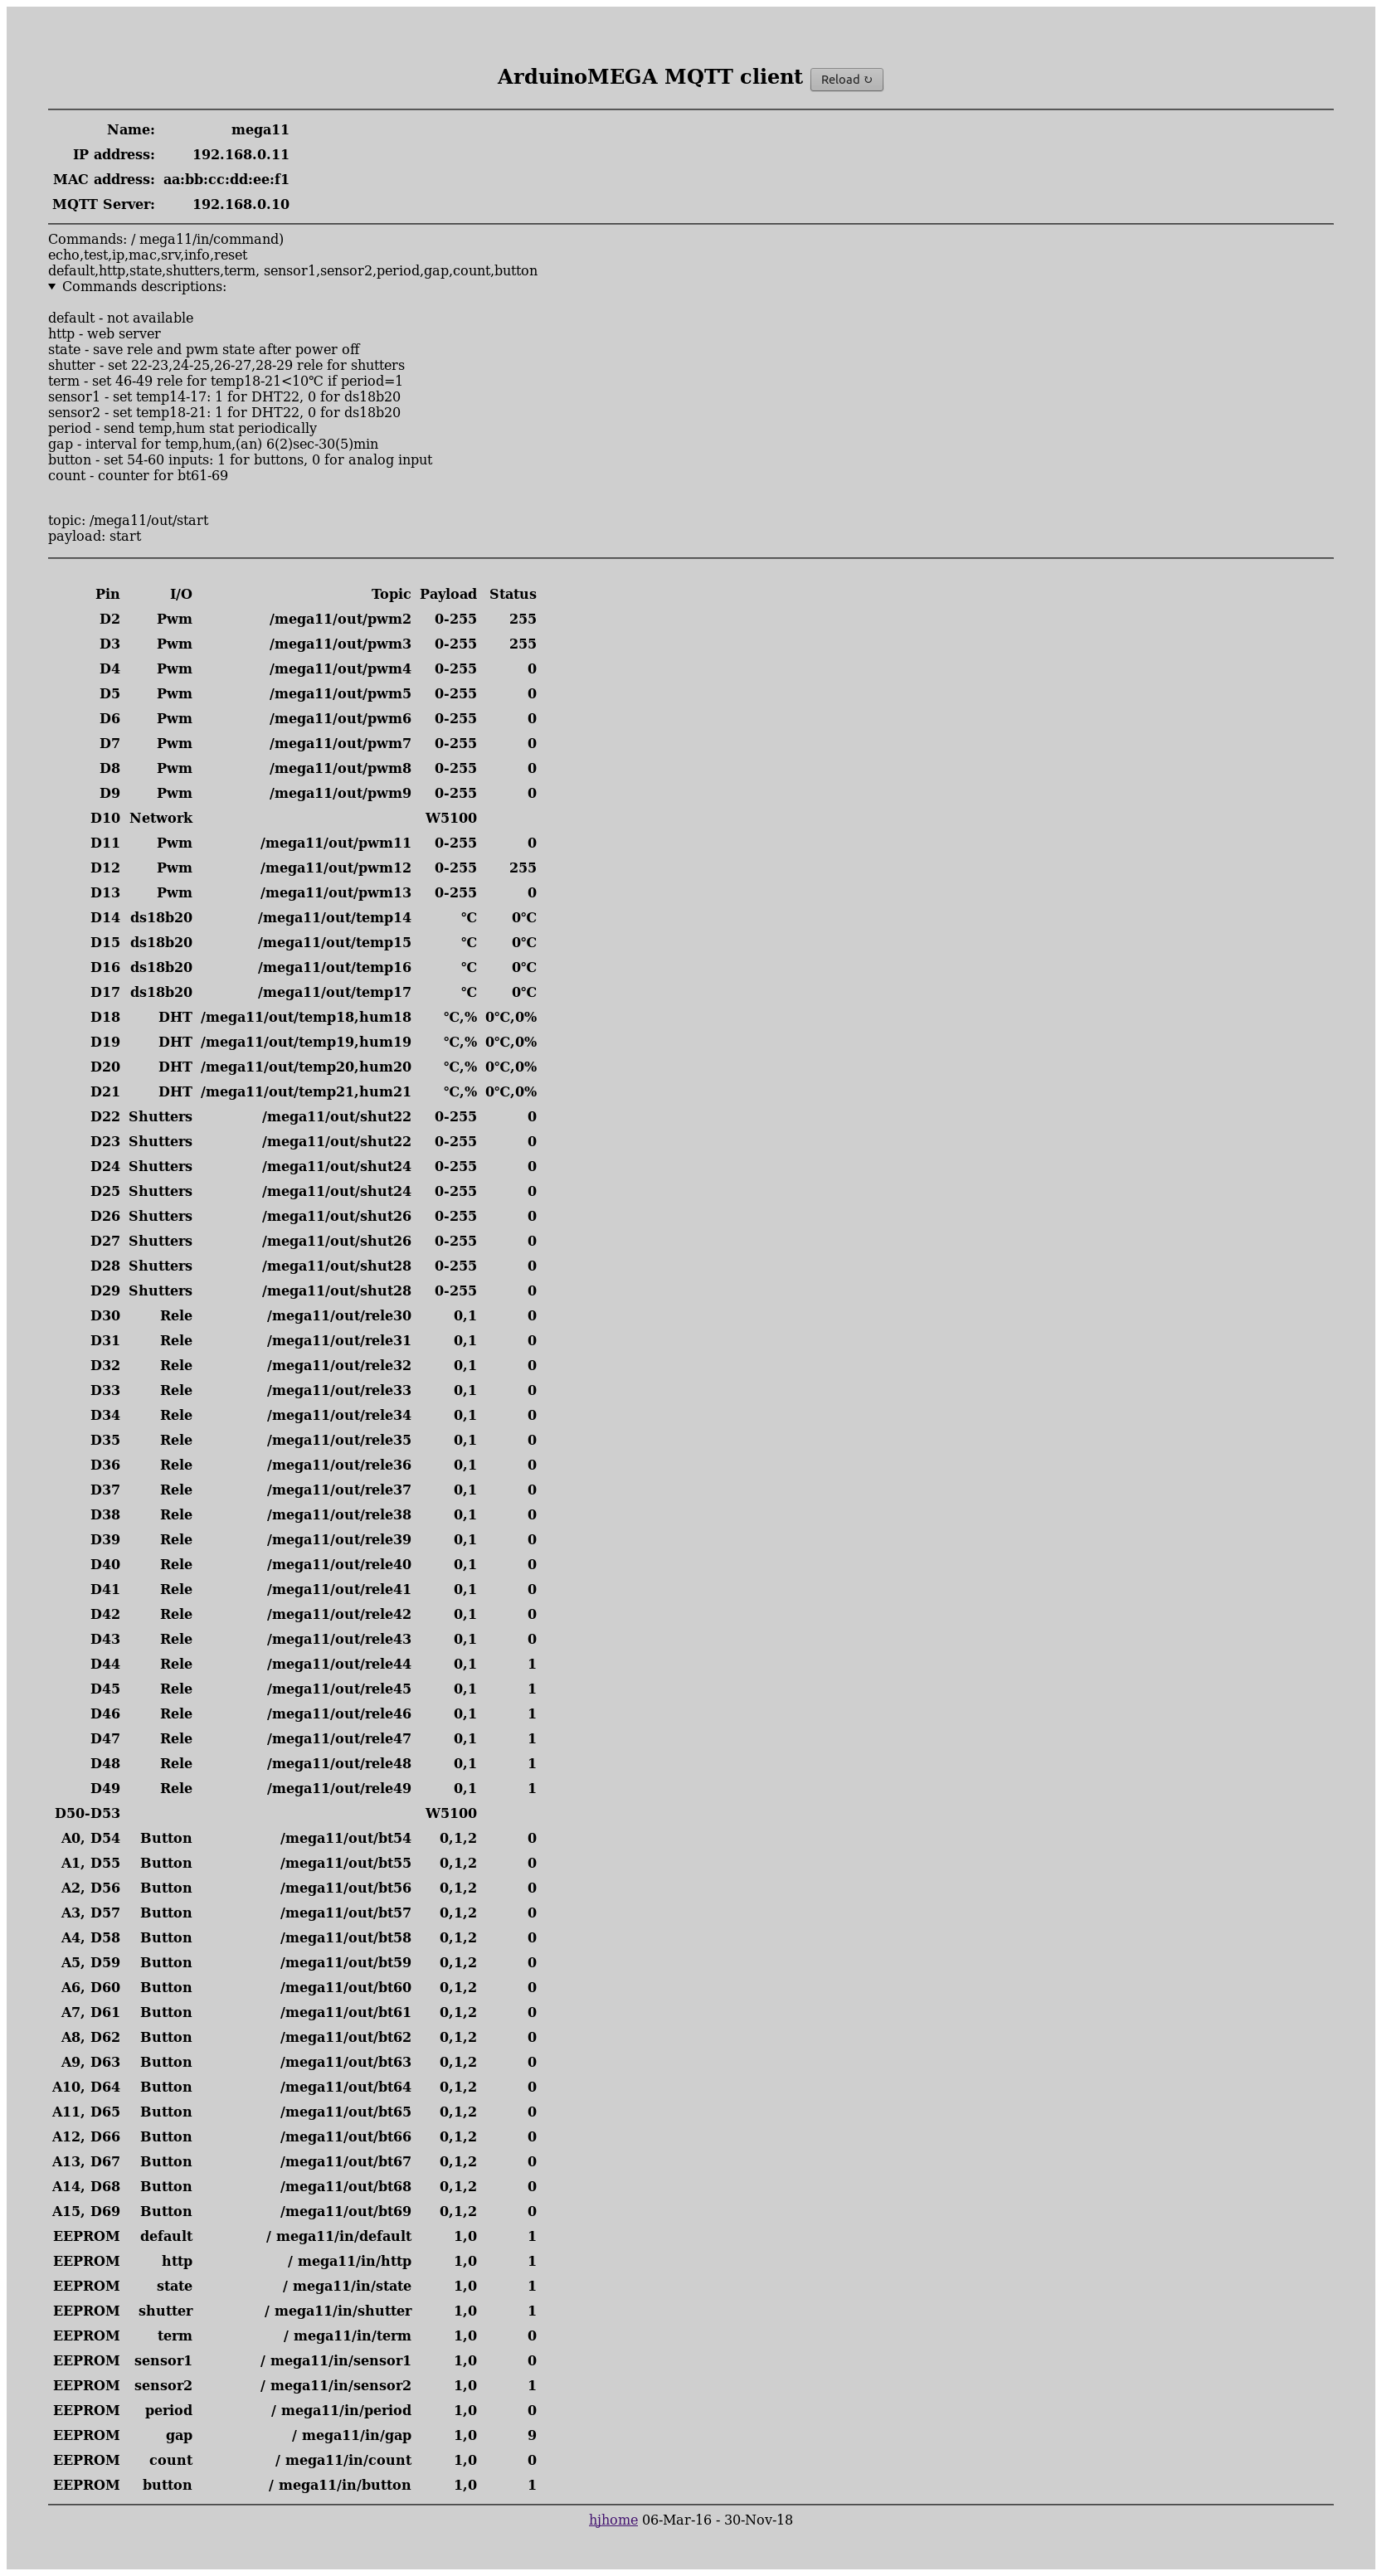
Dimmer on the BT137-600E triac.
Input 220 volts, PWM control 0-5 / 3.3 volts, set by setting a jumper. 0-5 volts for working with Arduino Mega or 0-3.3 volts in case of wemos. The PWM signal is fed to the analog input A0 Arduino Pro where it is converted into a delay for opening the triac, a connector is provided for flashing the arduino in place. Designated space for radiator. On the side of the arduino, there is a control and power connector for the arduino (PWM, -, +), on the side of the smimstor, there is a 4-pin power connector - power and load output, if necessary, it can also be equipped with a varistor or snubber. The dimmer board is designed for the D2MG chassis.
Dimmer Project:
Work demonstration
There is also a 28 channel triac unit in the D9MG package.
I apologize for the quality of the picture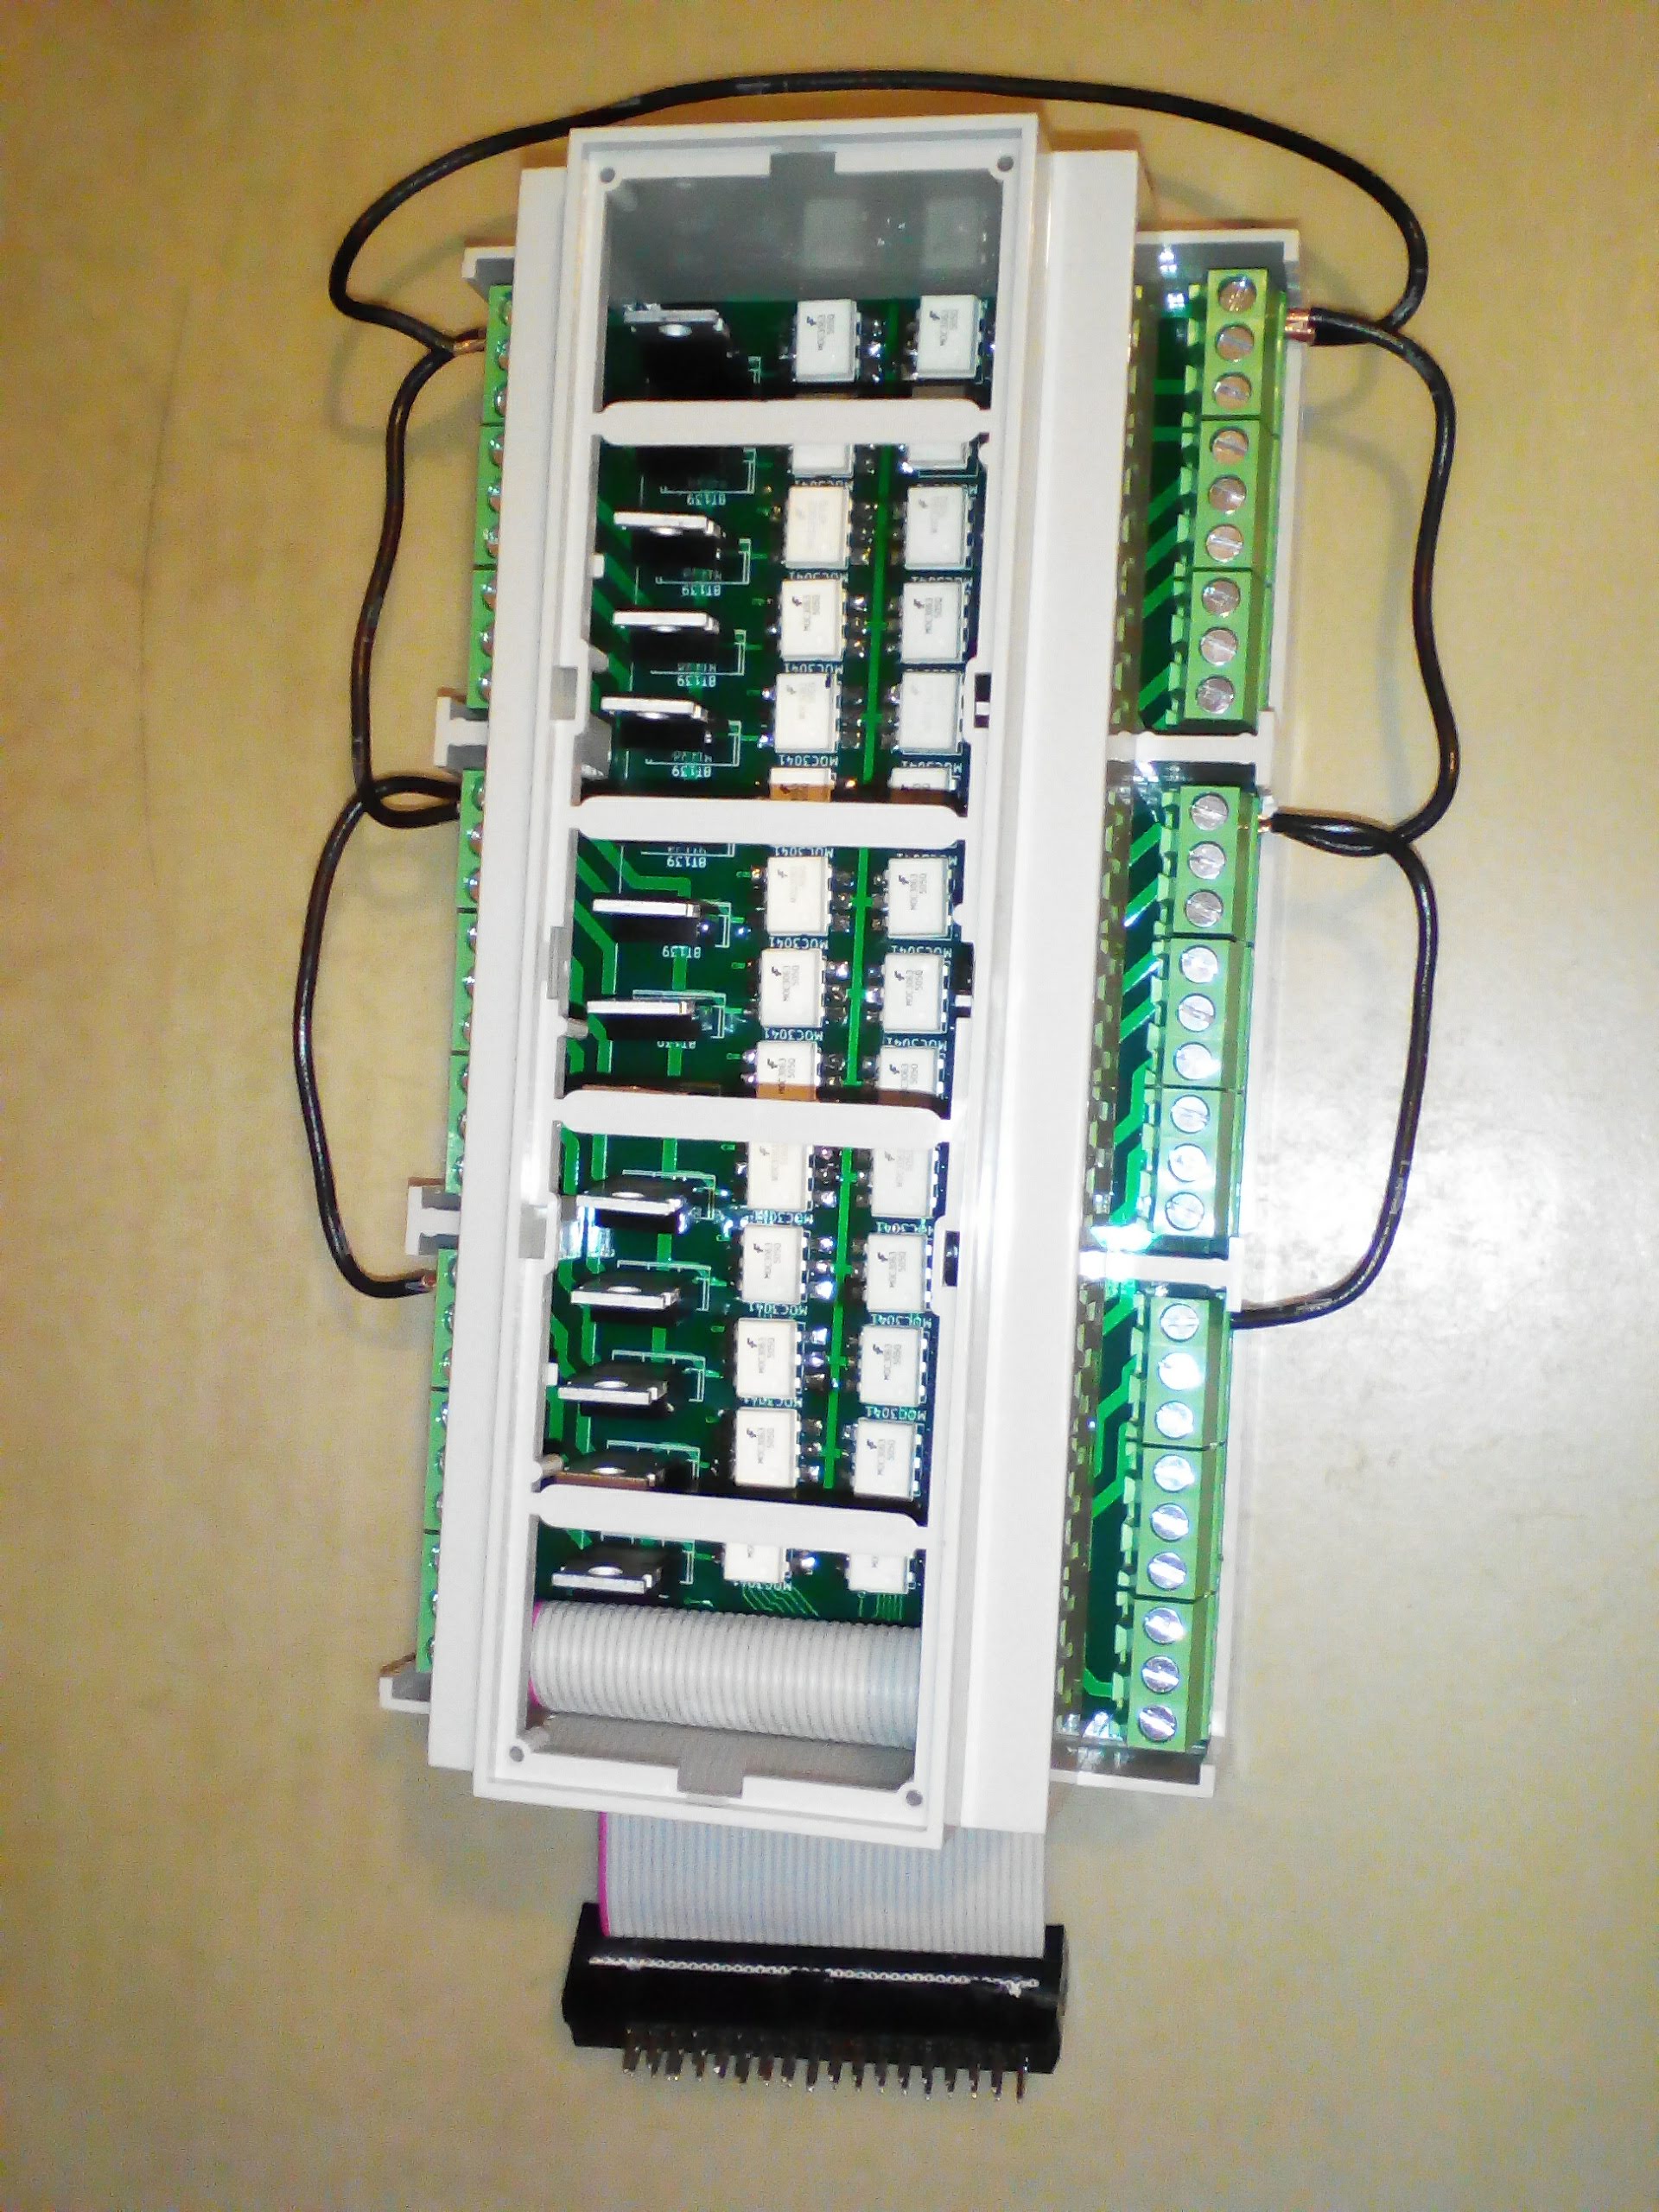
The equipment is connected through the Local Area Network, a protocol for MQTT communication. I am using the MQTT Mosquitto server.
Software part
For convenience, first you need to prepare an image of the operating system with all the necessary programs, I use Raspbian Stretch Lite. You will need to install nodejs, python-pip, python3-pip, supervisor, mosquitto, mosquitto-clients, sqlite3. And pip packages: paho-mqtt and psutil. You can also install Node-red, perfect for all kinds of experiments.
After the release of Apple Homekit in 2016, it turned out that all manufacturers and developers for the entire existence of Smart Home systems could not do anything close in terms of convenience and functionality compared to the homkit, this is similar to the situation with the release of the first iPhone, when it turned out that the whole zoo phones, smartphones, communicators turned into a bunch of junk. In any case, it is always pleasant to use a quality and finished product.
I chose the homekit2mqtt project as the main visualization system. Of course, you can use OpenHUB or Homeassistant, these systems also work with MQTT.
hjmqtt
Homekit2mqtt creates Homekit Bridge, it can be found in the Home program on Apple devices. Accessories (lighting, sensors, temperature controllers, etc.) must be registered in a special file in JSON format. The scripts filegen.sh and install.sh are responsible for creating this file. You need to register accessories in filegen.sh, install.sh adds homekit2mqtt to autoload and starts. The main thing happens in the hjmqtt.py file - the connection of accessories with equipment, also manually in the file, you need to register accessories and equipment parameters, addresses for KNX.
The functionality for accessories is registered in the files accessory.py and accessoryknx.py. The device statuses are stored in the sqlite database; the statdb.py library is used for database operations.
hjconnect
The following project is needed for remote telemetry. This is the use of memory, disks, load and temperature, and the psutil package is used for this. Now the hjconnect version is available for open access only for monitoring and without encryption, and with a separate project, the program for linking files is also on MQTT file-transfer-via-mqtt . Settings are directly in the main hjconnect.py file. If you run it with the -l option, you can test it on the local MQTT server, the settings for the remote server are on line 160
rclient.connect("test.mosquitto.org", 1883, 60)server test.mosquitto.org can be replaced with your domain or IP. To identify the Raspberry Pi, the processor’s serial number is included in the topic, if the program is run on another computer, instead of the serial number, there will be the string “SN”. The message interval is set on line 96.
th = threading.Timer(9, my_stat) # intervalwhere 9 is seconds.
An example of what monitoring looks like
sima
Now only Yandex has the only Russian-speaking column. Creating a skill for Alice is easy enough. Unlike Siri, there is complete freedom of action. And access on any device. Only, unfortunately, while there is no sane way to launch a skill, constantly running a skill is inconvenient.
Demo
This is a working skill example. To start the skill, you need an SSL certificate; it can be generated using openssl. In line sima.py on line 14 there is an example of certificate generation
openssl req -new -keyout crt.pem -out crt.pem -x509 -days 365 -nodes -subj '/CN=site.com/O=user/C=RU'site.com and user need to be replaced with their data.
When a skill is launched on a new device, its identifier is recorded. In order to link the identifier and the automation system, you first need to create a new csv file in the clients directory based on the sample my.csv file. The serial number is written in the file according to the template, this is the same serial number from the hjconnect program, and the control objects are written: name, type, topic. Topic is a significant part of the MQTT accessory topic from the JSON file for homekit2mqtt. Then, using sn.py, you need to convert the serial number to a password and name this password on the device from which you will manage. Communication is provided by the hjconnect program, and the MQTT monitoring server is the same computer on which the skill is running.
Thanks, bye.