Making a Game Boy Game
- Transfer
A few weeks ago, I decided to work on a Game Boy game, the creation of which gave me great pleasure. Her working title is “Aqua and Ashes”. The game has open source and is available on GitHub .
How did I come up with this idea
Recently, I got a job in the PHP and Python backend internship for my university's website. This is a good and interesting job, for which I am very grateful. But ... at the same time, all this high-level web development code infected me with an insatiable desire. And it was the pursuit of low-level work with bits.
I received a weekly digest of itch.io about game jams, announcing the start of Mini Jam 4 . It was a 48-hour (well, actually a little more) jam, in which the limitation was the creation of graphics in the Game Boy style. My first logical response was the desire to create a Game Boy homebrew game. The theme of the jam was “seasons” and “flame”.
After thinking a bit about the plot and the mechanics that can be implemented in 48 hours and fit into the limitations of the topic, I came up with a
I always liked how the creators of this level took an incredibly difficult sport, got rid of all the tricks, positions and strategic elements, as a result of getting an extremely interesting and easy game. Obviously, such a simplified view of American football will not replace Madden, just like the NBA Jam (a similar idea: only 4 players in a much smaller field with more straightforward gameplay than in a regular game) will not replace the 2K series. But this idea has a certain charm, and the NBA Jam sales figures confirm this.
How does all this relate to my idea? I decided to take this football level and remake it so that it remains similar to the original and at the same time is fresh. First, I cut the game to just four players - one defender and one attacking team. This is mainly due to the limitations of the hardware, but at the same time it will allow me to experiment a bit with a smarter AI, not limited to the principle of “run to the left and sometimes jump up” from the game on SNES.
For the sake of compliance with the topic, I will replace the gate with burning columns, or fires, or something like that (I have not decided yet), and a soccer ball with torches and a bucket with water. The winner will be the team controlling both fires, and around this simple concept you can easily come up with a plot. The seasons are also taken into account: I decided that the seasons would change at every turn, so that the fire team would take precedence in the summer and the fire fighting team in the winter. This advantage looks like obstacles on the field, hindering only the opposing team.
Of course, when creating two teams, we needed two animals that love and dislike fire. At first I thought about fire ants and some water beetle, a praying mantis and the like, but after studying the question, I did not find insects that were active in the winter, so I replaced them with polar foxes and geckos. Polar foxes love snow, geckos love to lie in the sun, so everything seems logical. In the end, it's just a game for Game Boy.
In addition, in case it is still not clear, by the end of the jam the game was not even close to completion. Anyway, it was still fun.
Game Boy Training
First you need to decide on the requirements. I decided to write for DMG (internal name for the Game Boy model, short for Dot Matrix Game). Mainly in order to meet the requirements of game jam, but also because I so wanted. Personally, I have never had games for DMG (although there are several games for Game Boy Color), but I find 2-bit aesthetics a very nice and interesting limitation for experiments. Perhaps I will add an additional color for SGB and CGB, but so far I have not thought about it.
I also decided to use a 32K ROM + cartridge without RAM, just in case I want to create a physical copy of the game. CatSkull, who published several Game Boy games, such as Sheep it Up!, Has very cheap 32-kilobyte flash cartridges for salewhich is perfect for me. This is another additional limitation, but I do not think that in the near future I will be able to overcome the volume of 32K with such a simple game. The hardest thing will be with graphics, and if everything is really bad, then I will try to squeeze it.
As for the work of the Game Boy, then everything is quite difficult. However, to be honest, of all the retroconsoles I had to work with, the Game Boy was the most enjoyable. I started with a great tutorial.(at least for the first time, because it was never added) by the “AssemblyDigest” author. I knew that it was best to write on ASM, no matter how painful it sometimes was, because the hardware was not designed for C, and I was not sure that the cool language Wiz mentioned in the tutorial would be applicable for the long term. Plus, I do it mainly because I can work with ASM.
Check with the 8c0a4ea commit.
The first thing to do is to get the Game Boy to boot. If by offset
$104the Nintendo logo will not be found, and the rest of the header will not be configured correctly, then the Game Boy equipment will assume that the cartridge is inserted incorrectly and refuses to boot. Solving this problem is very simple, because a lot of tutorials have already been written about it. Here is how I solved the problem with the title. There is nothing worthy of special attention. It will be harder to perform meaningful actions after loading. It is very easy to make the system go into an endless cycle of busy, in which it runs one line of code over and over again. The execution of the code begins with a label
main(where the passage to the address indicates $100), so some simple code should be inserted there. For example:main:
.loop:
halt
jr .loop
and it does nothing at all but wait for the interrupt to start, after which it returns to the label
.loop. (Hereinafter I will omit the detailed description of ASM operation. If you get confused, study the assembler documentation that I use .) You may be curious why I just don’t go back to the label main. This is done because I want everything up to the mark to .loopbe the initialization of the program, and everything after it happens every frame. Thus, I do not have to bypass the loading of data from the cartridge in a loop and clear the memory in each frame.Let's take one more step. The RGBDS assembler package used by me contains an image converter. Since at this stage I have not drawn any resources for the game yet, I decided to use the monochrome button from my About page as a test bit image. Using RGBGFX, I converted it to the Game Boy format and used the .incbin assembler command to insert it after the function
main.
To display it on the screen, I need the following:
- Turn off the LCD
- Set palette
- Set scrolling position
- Clear Video Memory (VRAM)
- Download tiled graphics to VRAM
- Upload a tile background map to VRAM
- Turn on the LCD display again
LCD off
For beginners, this becomes the most serious obstacle. On the first Game Boy it’s impossible to just write data to VRAM at any time. It is necessary to wait for the moment when the system does not draw anything. Mimicking the phosphorus glow in old CRT TVs, the interval between each frame, when VRAM is open, is called Vertical-Blank, or VBlank (in CRT this is the impulse to extinguish the kinescope beam during frame reversal). (There is also a HBlank between each line of the display, but it is very short.) However, you can bypass this problem by turning off the LCD screen, that is, we can record in VRAM regardless of where the phosphor trace of the CRT screen is located.
If you mess up, this review has a lot to explain.. It examines the issue from the point of view of SNES, so do not forget that there is no electron beam, but the numbers are different, but for the rest it is completely applicable. Essentially, we need to set the “FBlank” flag.
However, the Game Boy trick is that you can only turn off the LCD during VBlank. That is, we have to wait for VBlank. For this you need to use interrupts. Interrupts are signals that the Game Boy "hardware" sends to the central processor. If the interrupt handler is set, the processor stops its work and calls the handler. Game Boy supports five interrupts, and one of them starts when VBlank starts.
Interrupts can be processed in two different ways. The first and most common is the task of the interrupt handler.which works as explained above. However, we can enable a specific interrupt and disable all handlers by setting the interrupt enable flag and using the opcode
di. Usually, it does nothing, but it has the side effect of exiting the HALT opcode, which stops the CPU before an interrupt occurs. (This also happens when handlers are enabled, which allows us to exit the HALT c cycle main.) In case you are interested, we will eventually create a VBlank handler, but much of it will depend on certain values at certain addresses. Since we have not yet specified anything in RAM, an attempt to call the VBlank handler can lead to a system crash.To set the values, we must send commands to the Game Boy hardware registers. There are special memory addresses directly associated with various pieces of equipment, in our case with the CPU, which allow you to change the way it works. We are especially interested in addresses
$FFFF(interrupt enable bit field), $FF0F(bit field of an activated but unprocessed interrupt) and $FF40(LCD control). A list of these registers can be found on the pages associated with the “Documentation” section of the Awesome Game Boy Development list. To turn off the LCD, we enable only the VBlank interrupt, assign a
$FFFFvalue $01, perform HALT until the condition is met $FF0F == $01, and then assign the $FF40value 0 to address bit 7 of the address .Setting the palette and scrolling position
This is easy to do. Now that the LCD is off, we don’t need to worry about VBlank. To set the scrolling position, it is enough to set the X and Y registers to 0. With the palette, everything is a little trickier. In the Game Boy, you can assign the first to fourth shades of graphics of any of the 4 shades of gray (or marsh green, if you will), which is useful for making transitions and the like. I specify a simple gradient as a palette, defined as a list of bits
%11100100.Cleaning VRAM and Loading Tile Graphics
At startup, all image data and the background map will consist only of the scrolling Nintendo logo, which is displayed when the system boots. If I turn on sprites (they are disabled by default), they will be scattered around the screen. You need to clear the video memory to start from scratch.
To do this, I need a function like that
memsetfrom C. (I also need an analog memcpyto copy the graphic data.) The function memsetsets the specified memory fragment to a certain byte. It will be easy for me to implement myself, but AssemblyDigest already has these functions in the tutorial , so I use them. At this stage, I can clear the VRAM using
memsetit by writing to it $00(although the first commit used the value$FFwhich also came up), and then load the tile graphics into VRAM using memcpy. More specifically, I need to copy it to the address $9000, because these are tiles that are used only for background graphics. (addresses $8000-$87FFare used only for sprite tiles, and addresses $8800-$8FFFare common for both types.)Job tile card
Game Boy has one background layer, divided into 8x8 tiles. The background layer itself occupies about 32x32 tiles, that is, it has a total size of 256x256. (For comparison: the console screen has a resolution of 160x144.) I needed to manually specify the tiles that make up my image line by line. Fortunately, all the tiles were arranged in order, so I just needed to fill each line with values from
N*11to N*11 + 10, where Nis the line number, and fill in the remaining 22 tile elements $FF.Turn on the LCD
Here we don’t need to wait for VBlank, because the screen still willn’t turn on until VBlank, so I just made an entry again in the LCD control register. I also included background layers and sprites, as well as the correct addresses of the tile map and tile graphics. After that, I got the following results. I also enabled interrupt handlers using the opcode again
ei. At this stage, to make it even more interesting, I wrote a very simple interrupt handler for VBlank. By adding an
$40opcode to the address , I can make the handler any function I need. In this case, I wrote a simple function that scrolls the screen up and to the left. Here are the finished results. [Addition: I just realized that GIF is looped incorrectly, it must constantly transfer the image.]

So far, nothing particularly surprising, but still great that theoretically I can get my old Game Boy Color and see how my own code runs on it.
Plaid Sheet Fun
To draw something on the screen, I naturally need some kind of sprites. After examining the Game Boy console's PPU (Picture Processing Unit), I decided to stop at 8x8 or 8x16 sprites. Probably, I will need the last option, but just to feel the dimensions, I quickly scribbled on the checkered paper a screenshot of the game in 1: 8 scale.
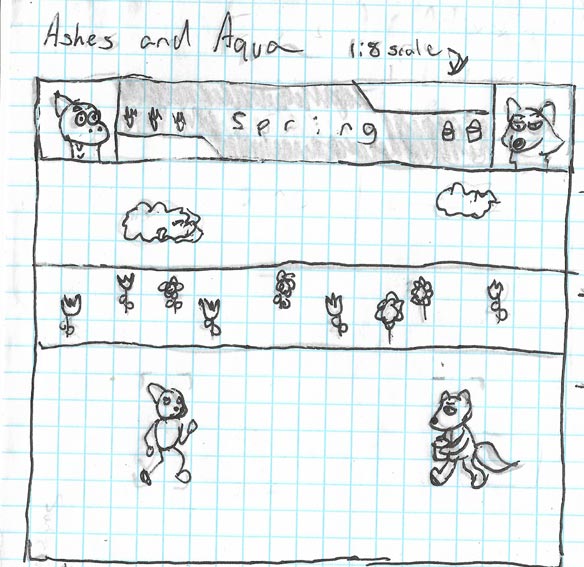
I wanted to leave the top of the screen under the HUD. It seemed to me that it would look more natural than the bottom, because when it is up, if the characters need to temporarily block the HUD, as in Super Mario Bros, they will be able to do it. In this game, there will not be any complex platforming, and in fact there will be no level design either, so I don’t need to show a very general field view. It is quite enough to position the characters on the screen and, possibly, from time to time obstacles. So I can afford big enough sprites.
So, if one square was one 8x8 tile, then one sprite was notwill be enough, no matter what size I choose. This is especially true given the fact that there will be almost no vertical movement in the game, with the exception of jumps. So I decided to create sprites from four 8x16 sprites. The exception was the tail of the fox, which occupies two 8x16 sprites. After a simple calculation, it became clear that two foxes and two geckos will occupy 20 of 40 sprites, that is, you can add many more additional sprites. (8x8 sprites would quickly exhaust my limit, which I don’t want to do in the early stages of development.)
For now, I just need to render the sprites. Below are rough sketches on checkered paper. I have a waiting sprite, a “thinking” sprite for choosing whether to make a pass or run like in a game on SNES ... and that’s it. I also planned to make sprites of running characters, jumping characters, and characters that opponents grab. But for a start I drew only waiting and thinking sprites in order not to complicate things. The rest I still did not do, I have to do it.
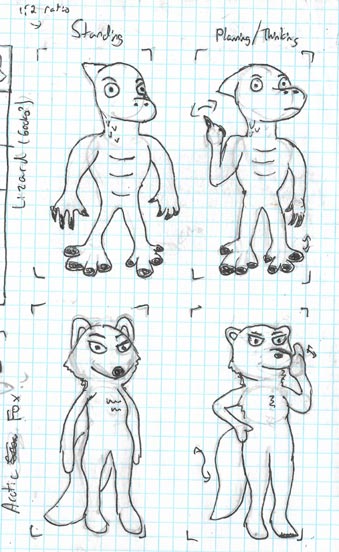
Yes, I know, I'm not drawing very well. Perspective is a complicated thing. (Yes, and this face of the polar fox is terrible.) But it suits me perfectly. Character design does not have any special features, but is suitable for game jam. Of course, I used real geckos and polar foxes as references. Is it imperceptible?

You can not tell. (For the record: having just looked at these pictures again, I realized that there is a huge difference between geckos and lizards. I don’t know what to do with this, except consider myself to be stupid ...) I think you can guess that the source of inspiration for Fox heads served Blaze the Cat from the Sonic game series.
Initially, I wanted defenders and attackers in each team to be of different sexes and it was easier to distinguish between them. (I was also going to allow players to choose the gender of their character.) However, this would require much more to draw. Therefore, I stopped at the male geckos and female foxes.
And finally, I drew the screen saver, because there was room for it on a sheet of checkered paper.
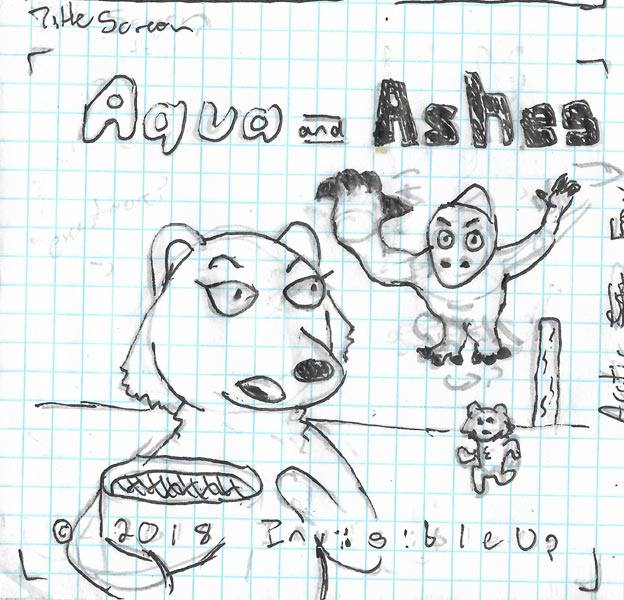
Yes, action postures are still far from ideal. The polar fox should be more upset and run, and the gecko look ominous. The defender-fox in the background is a fun reference to art on the Doom box.
Digitizing Sprites
Then I started to turn the paper drawings into sprites. For this, I used the program GraphicsGale, which I recently made free. (I know it was possible to use asesprite, but I prefer the GraphicsGale.) Working on sprites was much more difficult than I expected. Each of these squares of the sprites shown above takes up to 4 pixels in a 2x2 grid. And in these squares there was often MUCH more details than in 4 pixels. Therefore, I had to get rid of many details of sketches. Sometimes it was even difficult to adhere to a simple form, because it was necessary to leave a place acceptable for the eyes or the nose. But it seems to me that everything looks good, even if the sprite is completely different.

The eyes of the fox lost their almond shape and turned into a line two pixels high. The eyes of the gecko have retained their roundness. The head of the gecko had to be enlarged, getting rid of wide shoulders, and all the bends that a fox could have, were significantly smoothed. But to be honest, all these easy changes are not so bad. Sometimes I hardly managed to choose which of the variations is better.
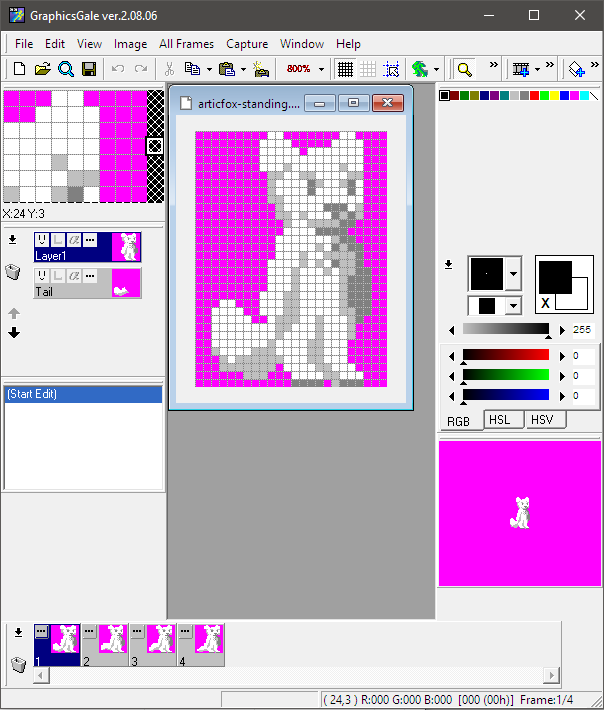
GraphicsGale also has handy layer and animation functions. This means that I can animate a fox's tail separately from its body. This is a great help to save precious VRAM space, because I don’t need to duplicate the tail in each frame. In addition, it meant that you can wag your tail with variable speed, slowing down when the character is standing, and accelerating while running. However, programming is a bit more complicated. But I still take on this task. I stopped at 4 frames of animation, because that's enough.
You can see that in the polar fox there are three of the lightest shades of gray, and in the gecko there are three of the darkest. On the GameBoy, this is permissible, because although there are only three colors in the sprite, the console allows you to set two palettes. I made it so that the fox uses a palette of 0, and for a gecko, palette 1. This completes the whole available set of palettes, but I don’t think I will need others.
I also needed to take care of the background. I did not bother with his sketches, because I planned that it would be a solid color or a simple geometric pattern. I also have not digitized the splash screen, because there was not enough time.
Download sprites to the game
Check with the be99d97 commit .
After each individual frame of the character graphics was saved, it was possible to start converting them into the GameBoy format. It turned out that the RGBDS for this is a very handy utility called RGBGFX. She can be called by the team
rgbgfx -h -o output.bin input.pngand she will create a GameBoy compatible tile set. (The -h switch sets the 8x16 compatible tile mode so that the conversion is performed from top to bottom, not from left to right.) However, it does not provide bindings and cannot track duplicate tiles when each frame is a separate picture. But we will leave this problem for later. After generating the output .bin files, simply add them to the assembler using
incbin "output.bin". To keep everything together, I created a common file "gfxinclude.z80", which contains all the added graphics. However, it was very boring to manually re-generate the graphics each time something changed. So I edited the build.bat file, adding a line
for %%f in (gfx/*.png) do rgbds\rgbgfx -h -o gfx/bin/%%f.bin gfx/%%fthat converts each .png file in the gfx / folder to the bin file and saves it to gfx / bin. This greatly simplified my life. To create background graphics, I used a much more lazy way. RGBASM has a directive
dw `. It is followed by a row of 8 values from 0 to 4, equal to one row of pixel data. Since the background sprites were very simple, it turned out to be easier to copy and paste a simple geometric pattern to create a solid, striped or checkerboard pattern. Here, for example, looks like a land tile. bg_dirt:
dw `00110011
dw `00000000
dw `01100110
dw `00000000
dw `11001100
dw `00000000
dw `10011001
dw `00000000He creates a series of shifted stripes with the illusion of perspective. This is a simple but smart approach. The grass was a bit more complicated. Initially, it was a group of horizontal lines with a height of 2 pixels, but I manually added a few pixels, giving a bit of noise with which the grass looks better:
bg_grass:
    dw `12121112
    dw `12121212
    dw `22112211
    dw `11121212
    dw `22112211
    dw `21212121
    dw `12121212
    dw `12211222
Graphics rendering
In GameBoy, sprites are stored in an area called OAM, or Object Attribute Memory. It contains only attributes (direction, palette and priority), as well as the tile number. It was enough for me to fill this area of memory to display the sprites on the screen.
Although there are some minor features. First, you need to load graphics from ROM to VRAM. GameBoy can only render tiles that are stored in a special area of memory called VRAM. Fortunately, to copy from ROM to VRAM, it’s enough to execute
memcpyat the initialization stage of the program. At the same time, it turned out that with only 6 characters sprites and 4 tail tiles, I already took a quarter of the VRAM area allocated for sprites. (VRAM is usually divided into background and sprites, and 128 bytes are common to them.)In addition, access to OAM is only possible during VBlank. I started by saying that before performing the calculations, the sprites were waiting for VBlank, but I ran into problems because the calculations of the sprites were stretched over all the time allocated to VBlank and could not be completed. The solution here is to write to a separate memory area outside VBlank and simply copy them into OAM during VBlank.
As it turned out, the GameBoy has a special hardware copy procedure, a kind of DMA (Direct Memory Access), which does just that. By writing to a specific register and going to the busy cycle in HiRAM (because during the DMA ROM is not available), you can copy data from RAM to OAM much faster than using the function
memcpy. If interested, you can find juicy details here . At this stage, all I had to do was create a procedure that determines what will eventually be recorded in the DMA. For this, I needed to store the state of the objects somewhere else. At a minimum, the following was required:
- Type (gecko, polar fox or portable item of one of the teams)
- Direction
- X position
- Y position
- Frame animation
- Animation timer
In the first, very untidy decision, I checked the type of the object, and depending on it, made the transition to the procedure that spritically rendered this type of object. The polar fox procedure, for example, took a position on X, added or subtracted 16 depending on the direction, added two tail sprites, and then moved up and down along the main sprite.
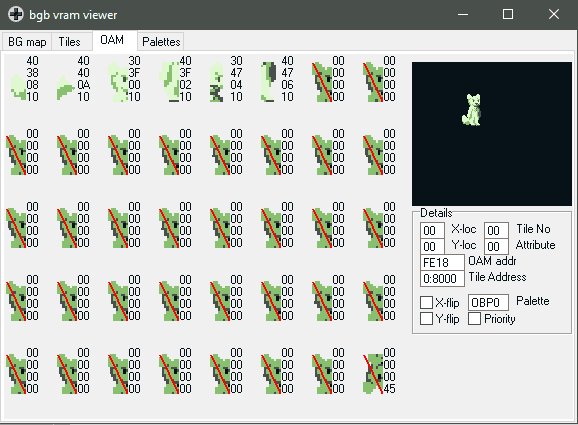
Here is a screenshot of what a sprite looked like on a screen while in VRAM. The left part is individual sprites, hexadecimal numbers next to them, from top to bottom - vertical and horizontal position, tile and attribute flags. On the right you can see how it all looked after assembly.
With tail animation, everything was a bit more complicated. In the first solution, I simply performed the animation timer increment in each frame and produced a Boolean
andwith the value %11to get the frame number. Then you could simply add to the first tail tile in VRAM 4 * frame number (each animation frame consists of 4 tiles) to get 4 different frames stored in VRAM. It worked (especially the tail tail search part), but the tail wagged insanely fast, and I needed to find a way to slow it down. In the second, better solution, I performed the increment of the global timer in each frame , and when the value of the operation
andwith itand the power of two chosen by me was equal to 0, the object timer increment was performed. Thus, each individual object could perform the countdown of its animation timer at any speed it needs. It worked perfectly and allowed me to slow the tail to a reasonable level.Difficulties
But if everything was so simple. Do not forget that I managed all of this in the code, using my own subprocedure for each object, and if it was necessary to continue, then it should be done in each frame. I had to specify how to proceed to the next sprite, as well as which tile it consists of, by manually manipulating the registers.
It was a completely unstable system. To draw a single frame, it was necessary to juggle a sufficiently large number of registers and CPU time. It was almost impossible to add support for other cadres, and even if I succeeded, the support of the system would be very painful. Believe me, it was real chaos.I needed a system in which the code for rendering sprites would be generalized and straightforward, so that it would not be an interweaving of conditions, manipulation of registers and mathematical operators.
How did I manage to fix it? I will tell about it in the following part of article.