February 22, 2016 at 21:56
Arduino code debugging (AVR). Part 1. Virtual debugging
Foreword
As you know, the Arduino (AVR) environment does not contain in-circuit debugging functions, which creates great inconvenience when searching for complex errors and maintaining projects. I want to show two ways with which you can debug your sketches of different difficulty levels. For the first method, you only need programs, and for the second, you need an inexpensive (compared to the original debugger) adapter, which you can either assemble yourself or buy ready-made.
In general, nothing new for those who use debuggers constantly, but may be useful for users of Arduino (AVR).
Build with Makefile
Before we come to the description of debugging in hardware (in the second part) we need to do some training. Probably many people know that the Arduino environment calls the avr-gcc compiler with the whole environment, automatically configures the parameters for calling it and starts the build process. So, we need to repeat this process explicitly. We will not do this manually, although some gestures will still be needed. This is necessary in order to get the debug object file in ELF format. The Arduino environment cleans up after itself and we do not have access to either the compiler options or the compilation results.
This brings us to the issue of using utilities to automatically build an avr-gcc project, or rather, a sketch with Arduino libraries. Here one could be sad, because this is not a simple matter, but as they say, everything has already been done before us. It turns out that github already has everything you need for assembling sketches with Arduino libraries. The project is called Arduino-Makefile . As it is not hard to guess from the description, this project contains a Makefile for automatically building projects on Arduino. Of the features listed in the description, we will pay attention only to a few.
The Arduino-Makefile package is a collection of configuration files, examples, and descriptions. There are no utilities that should use all this. There is also no development environment, i.e. assembly is done through the command line. This means that you can fasten any IDE that is convenient for you, which supports assembly through the Makefile. I usually use Visual Studio.
If you carefully look at the contents, you will notice that there is one global universal Makefile (Arduino.mk), which is included in specific local assembly files. You need to specify only private (minimum) settings for a specific purpose of the assembly, and the rest will be done in automatic mode (setting variables, searching for dependencies, etc.). This is very convenient, as will be shown below.
It is important to note that files with various extensions (* .ino, * .pde, * .c and * .cpp) are supported. The fact is that one of the debuggers will be AVR Studio 4. When you load a debug file into it, the sources in the project tree will be located in different folders: cpp-files in sources, and the rest in headers. If we leave the extension for the sketch (ino), the file will not get into sources and syntax highlighting will not act on it. It’s impossible to look at it. Therefore, we take note that the extension for sketches during assembly for debugging in AVR Studio needs to be changed to standard (.c or .cpp).
Tools
We found out that we can collect sketches. Now let's see how the assembly and debugging process will be organized. I promised to show two ways. Each of them has its pros and cons. Let's review them briefly.
Method 1 . We create a debug file, load it into Proteus, debug it there. Advantages: - relative ease of debugging (with the connection of a serial port monitor, you only need to torment yourself); - access to the outside world through a serial port; - construction of graphs (virtual measuring instruments are available); - the ability to simulate the circuit in real time;
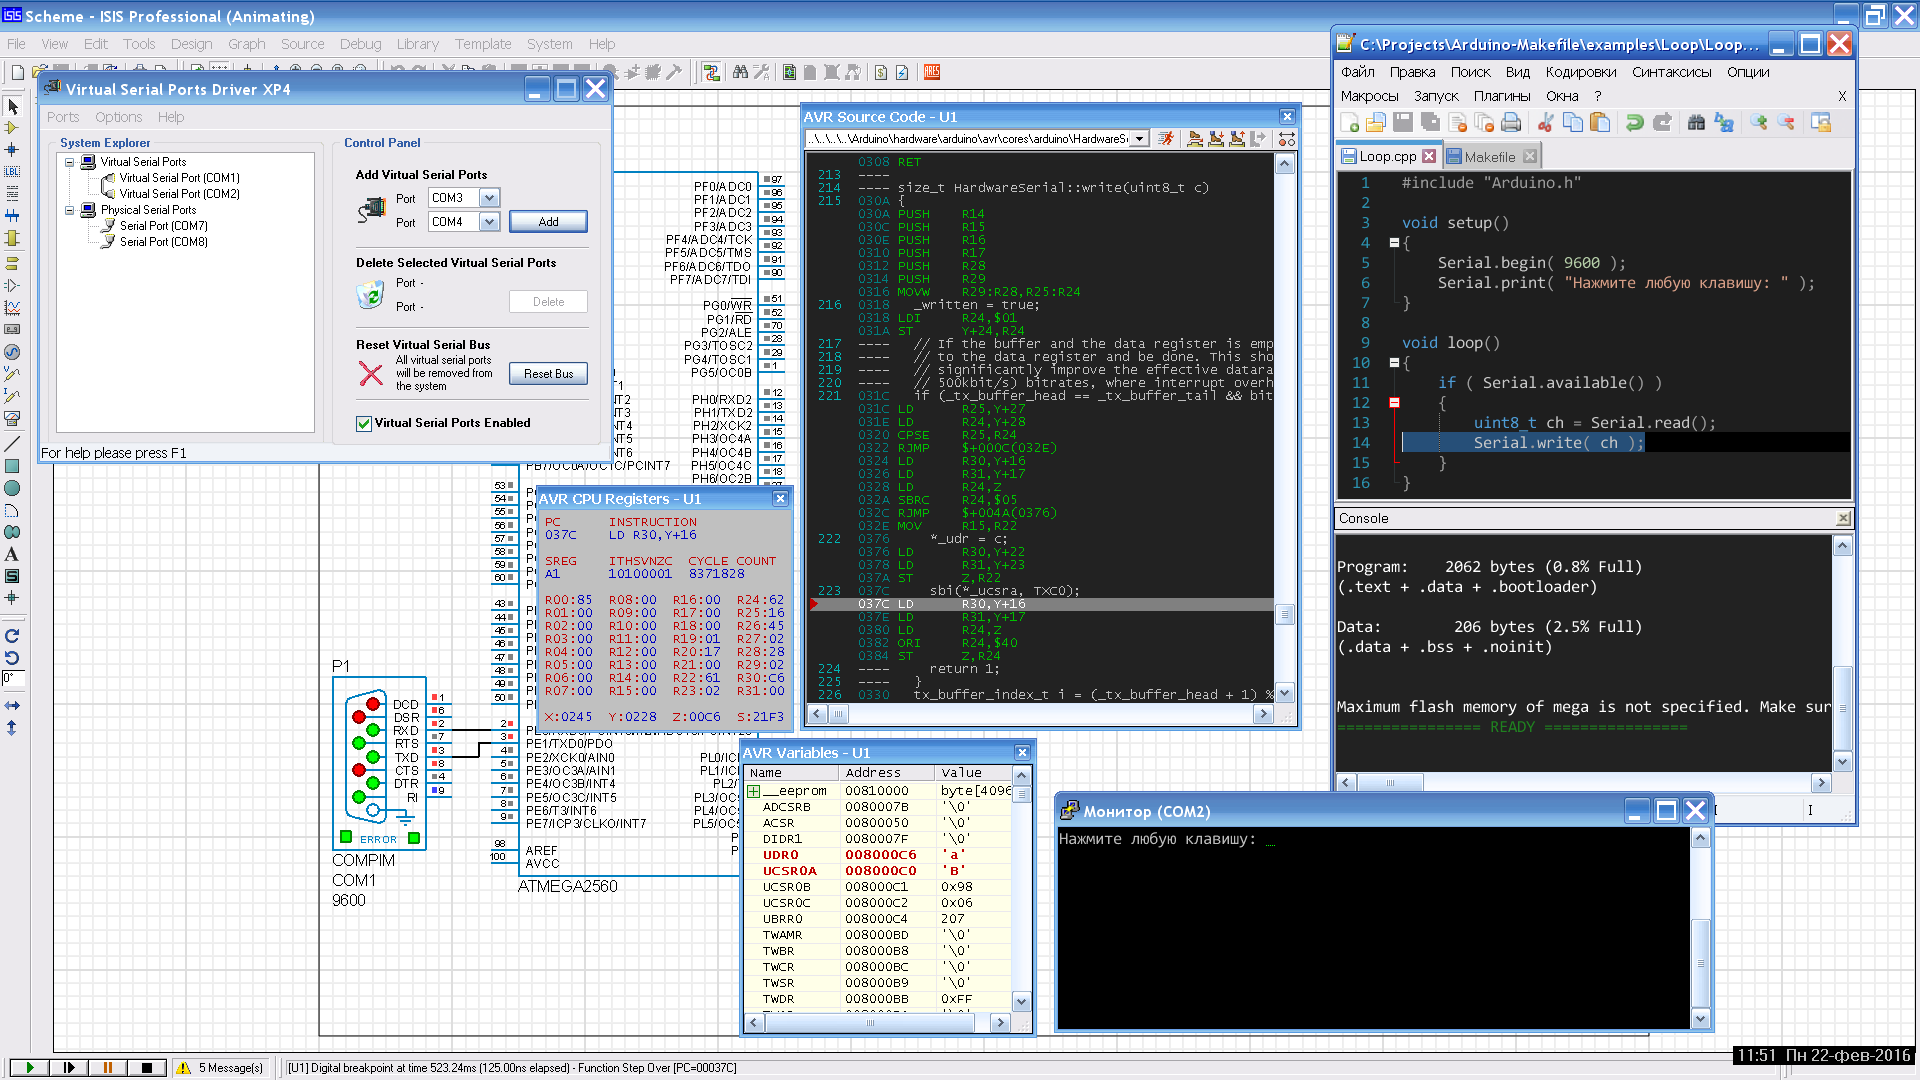
- In separate windows, registers mk, memory areas, global variables and source code are available, of course, including its assembler version.
Disadvantages:
- paid Proteus;
- a limited set of peripherals;
- complex models can not take into account all the features of the original components.
Method 2 . We create a debug file, load it into AVR Studio 4, debug it using the special Proteus VSM Viewer plugin for AVR Studio 4.
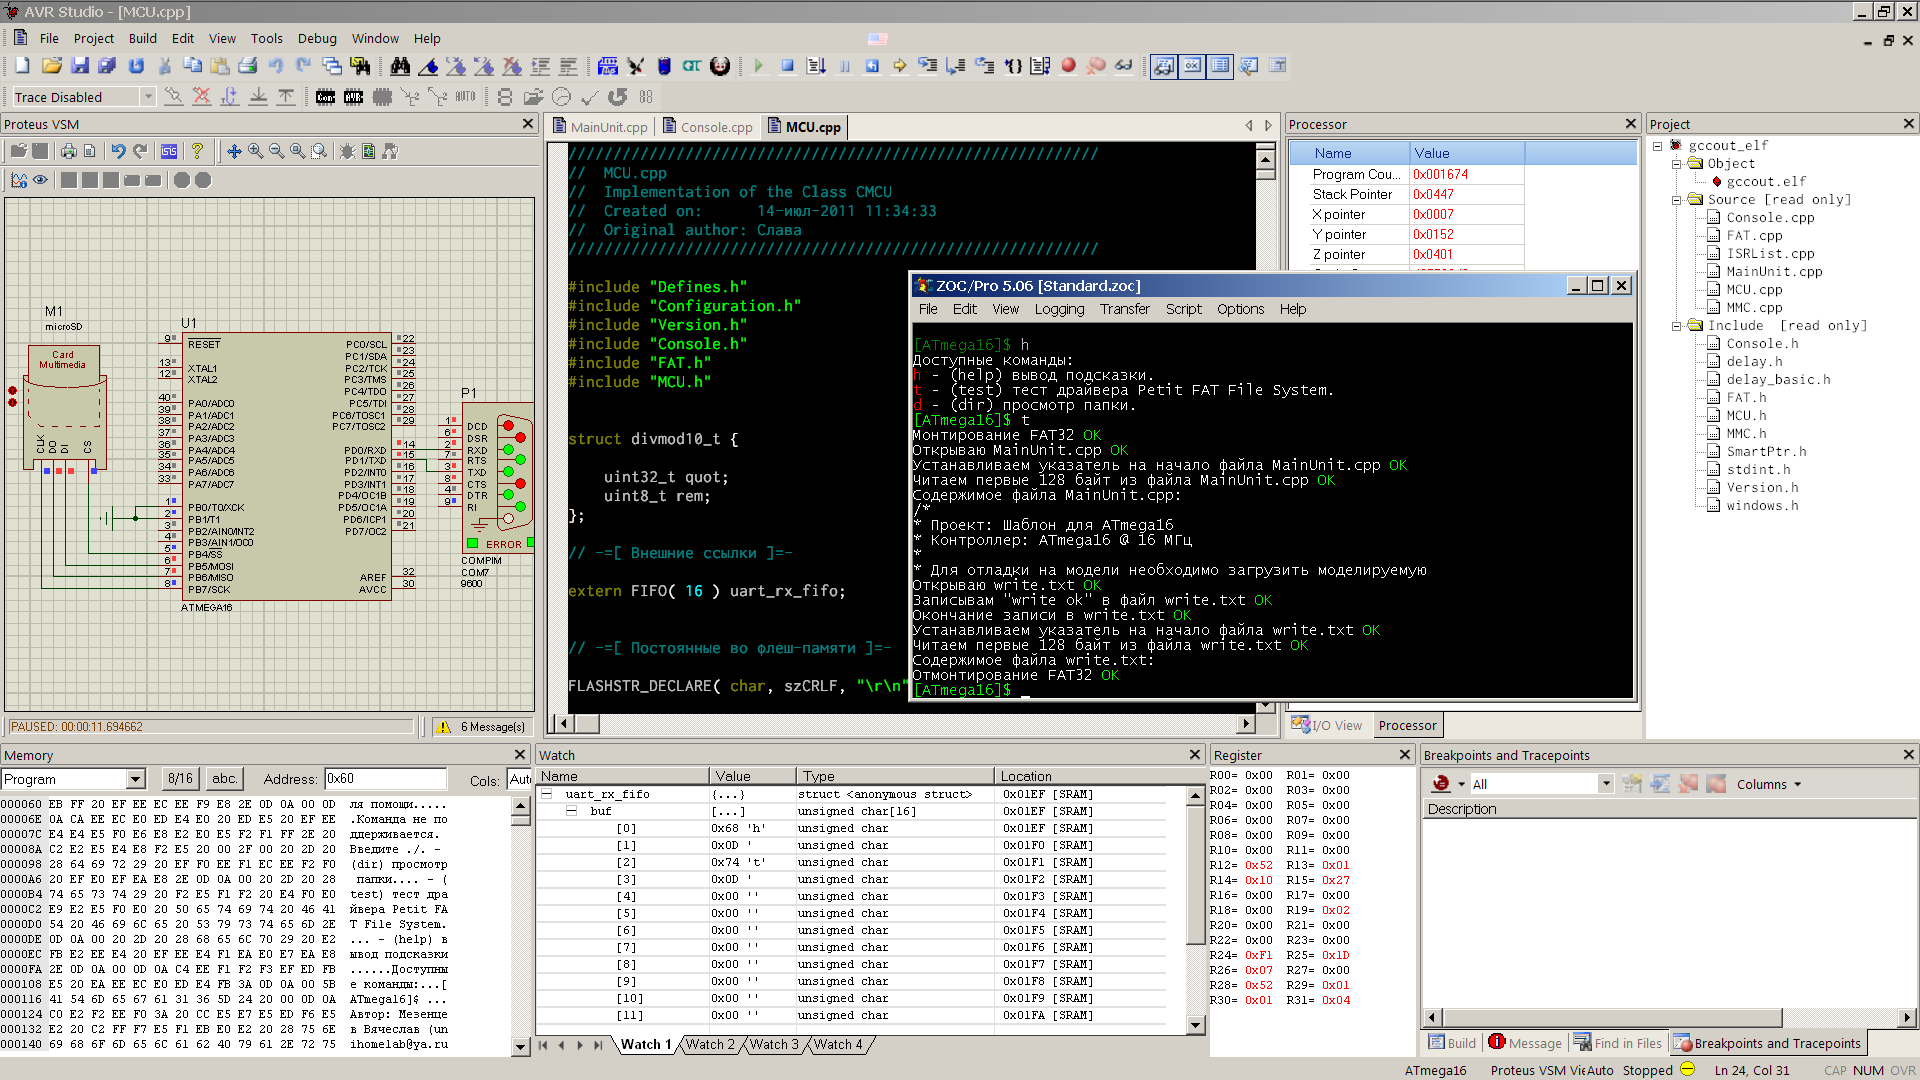
Its advantages and disadvantages are almost the same as that of method 1. You can add that AVR Studio shows a detailed tree of all the registers of the simulated microns, up to the bits, which is very convenient. Of the minuses, it is worth noting that debugging optimized code has its own characteristics and it is not so easy to understand how to make the debugger stop in the right places.
Method 3 . We create a debug file, load it into AVR Studio 4, debug it using the JTAG ICE mkII software emulator and a special adapter (HappyJTAG2). Advantages: - this is real debugging in real hardware using the JTAG ICE mkII debugger (mic support up to ATmega2560); - HappyJTAG 2.45 works on Windows 7 x64, you just need to skip one window, where they ask you to buy drivers anyway.
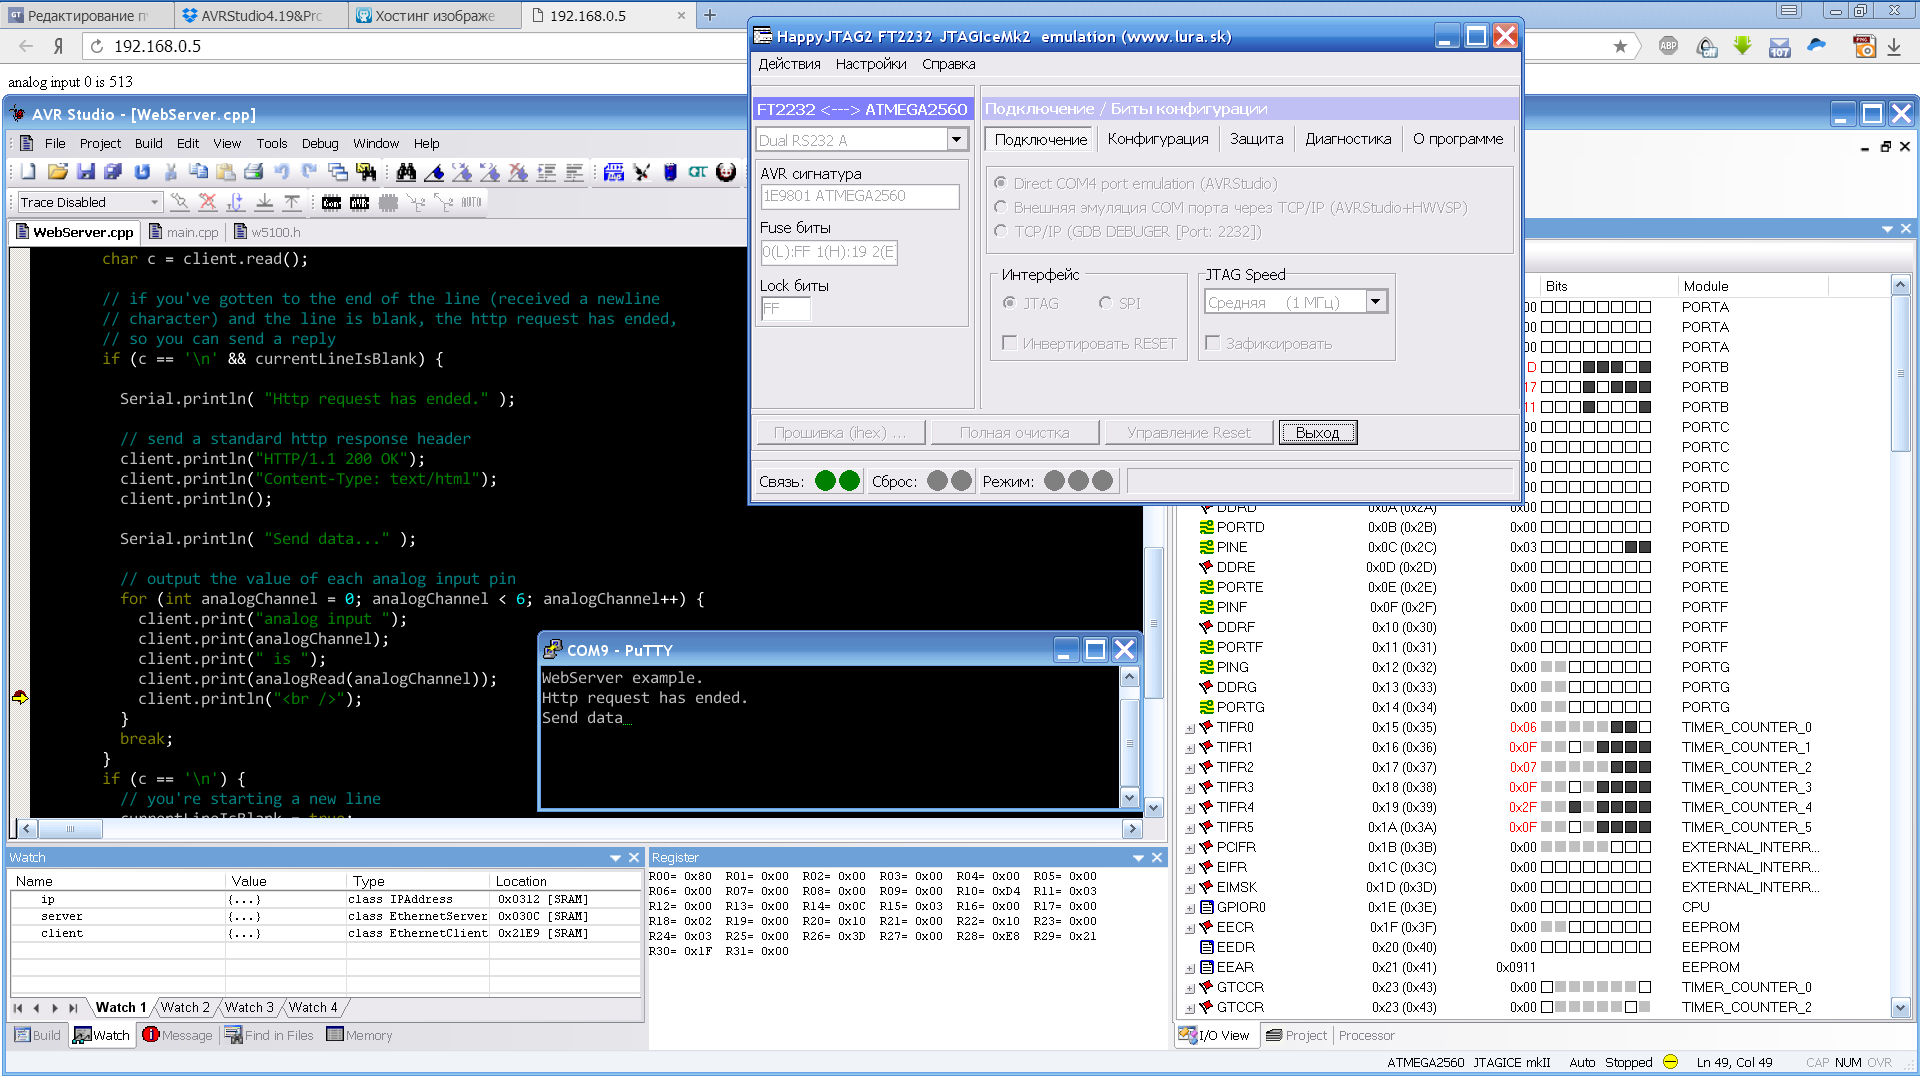

Disadvantages:
- unstable operation of HappyJTAG2 with small source codes was noticed;
- unstable work of AVR Studio when performing debugging operations;
- The author of HappyJTAG2 has long abandoned his brainchild (apparently with the advent of AVR Studio 5 and Atmel Studio);
- some features of the connection (COM4 or one of the first 4 serial ports should be free or absent, because AVR Studio iterates through COM1-COM4 in search of a debugger). It is free or absent , because HappyJTAG2 works, so to speak, from the inside.
As you can see, I showed three ways, but at present, only two of them have practically earned me. The first method will be described in this article. Unfortunately, I could not repeat the second method. You need to find a “compatible” combination of Proteus and AVR Studio. In the picture used the latest studio AVR Studio 4.19.730 and Proteus 7.7 SP2. Once upon a time I used this method, but in the presence of an iron debugger to use it does not make much sense. The third method I left for the second part. There you will need an adapter and a description of its connection to Arduino boards that support JTAG debugging.
And what do we need for this entire kitchen? First you need to forget about the wretched Arduino IDE, it can only be used for control checks when assembling sketches. Next, we will need:
-Arduino-Makefile - a set of configuration files for manual assembly of projects on Arduino;
- An editor with C ++ syntax highlighting and the ability to execute external commands ( Notepad ++ , VS20xx, Far, ...);
- Proteus 7.x - a well-known simulator of mixed (analog-digital) circuits;
- terminal program ( PuTTY , ZOC Pro), which will be an analogue of the monitor;
- A program that creates null-modem virtual serial ports (VSPD, ...);
- Arduino IDE 1.6.x (we need libraries and the avr-gcc compiler);
- WinAVR (we need binutils from its set, this is a set of unix commands for Windows);
- avr gcc 4.9.2(the compiler is fresher if you do not want to use the one that comes with the Arduino IDE);
- AVR Studio 4.19.730 - the latest version of the development environment from Atmel before switching to Visual Studio (only needed for the second part);
- HappyJTAG 2.45 (needed only for the second part).
We will assume that you know how to ask Google where to get this whole farm. Just in case, I will provide useful links at the end of the article. Some comments on the toolkit.
As you know, Proteus is paid, but this is not the saddest thing. Unfortunately, his libraries are not as close to the real world as we would like. For example, you cannot model Ethernet shield W5100 in it (at least in version 7.x). Therefore, dear followers of Arduino, go the true way. Only debugging and only in hardware will save your souls from incorrectly posed questions. We will use Proteus as a training tool, and in the field - only JTAG.
Debugging Arduino Sketches (AVR) in Proteus 7.x
Enough for common words, now specifics. There are many options for starting the assembly process, you can’t write them all down, so I will focus on just one and try to describe it clearly. Seeing the general scheme, you can apply it to your set of development tools. For convenience, I will break down the description of the entire process in steps, some can be skipped. I hope that even the most inexperienced Arduino users will understand what this is about.
Step 1 . Downloadand install the Arduino development environment. For definiteness, let us assume that it will be from the 1.6.x series. Here I will immediately make a few comments. In general, we only need libraries from Arduino. Apart from everything else, the very idea of a simplified form of the program is very good (if you compare C # and C ++ or, God forbid, C ++ / CLI, then this is heaven and earth). The lack of normal debugging tools led, frankly, to illiterate programming. Instead of consciously turning the conceived algorithm into program code, Arduino users are forced to make combinations of magic spells, filter out information through Serial.print (), and only a few try to statically read the library sources. It's hard to look at it all.
I was distracted, and you probably managed to put the environment in the standard ways. It is advisable that the Arduino folder be in the root of the partition (C: \ Arduino). This is due to makefile paths that don't like spaces in Program Files. We will configure the paths later for those who already have a folder in the “Program Files” and have to do one difficult thing for Windows users - a junction point on the folder. Perhaps the space can be escaped, but I have not tried this.
For definiteness, let's say that the path to the environment is: C: \ Program Files \ Arduino.
Step 2 . Downloadand unpack the Arduino-Makefile. Unpack the contents of the Arduino-Makefile-master folder into C: \ Arduino-Makefile. I want to immediately note that inside there is a README.md file, which is better to look at github, where a lot of things are described. You should also take note of the file arduino-mk-vars.md, which contains a description of the variables used in the user (project) Makefile.
For the make utility to work, you need the gnu bin utils kit, which was part of WinAVRin my time. I do not know if there is an official site for assembling these same utilities for Windows, but you can do the following. You will need to download the good old WinAVR of the latest version and pull out the utils folder from it, where the command utilities are located. You can install, copy the folder and uninstall WinAVR (because it includes the old avr-gcc compiler, which we do not need).
Next, for example, create a folder c: \ avr-gcc and copy utils to it. After that, add the path C: \ avr-gcc \ utils \ bin to the PATH variable (via Computer properties): The path should be one of the first in the search. Do not forget about this change, as it may affect other programs if you use other similar development environments . Step 3
set PATH=C:\avr-gcc\utils\bin;%PATH%
. You yourself know where you get / buy Proteus [7.2 - 7.8]. Why exactly this series and such an interval of versions? Because I tried them and seemingly on simple projects, they are quite good. Versions above 7.8 could not load the object file of one of my project in the IAR, and below I did not try. The eight is just buggy for now, maybe then someone will write something about her. Here we will take specifically Proteus 7.8 SP2.
Step 4 . Using the article , create a junction point on the folder with the installed Arduino environment, i.e. C: \ Arduino should reference C: \ Program Files \ Arduino. This is necessary so as not to be wiser with the support of spaces in makefiles. Thus, without copying the folder with Arduino, we got a copy of it in the right place. Who uses Far can use the combination Alt + F6 on the folder.
We change the settings of the Arduino environment. The path to the folder with the sketches: C: \ Arduino-Makefile \ examples. If you use an external editor (Notepd ++, ...), then you can check the settings. At the same time, when the window is activated, Arduino will update the contents of its editor automatically. We select the Arduino Mega 2560 board and the ATmega2560 processor (in fact, it’s not so important what to choose here, the main thing is to decide on the controller used).
We write an example program for testing the assembly from the Arduino environment, call it Example1 and save it in the sketches folder: Compile and verify that the assembly passes. In Arduino 1.6.7, the object file linker (ld.exe) crashed with an error, I replaced it with another one (for example, from this assembly). Step 5
void setup()

{

 DDRD |= ( 1 << DDD2 );

}


void loop()

{

 PIND |= ( 1 << PIND2 );

}
. Copy the file C: \ Arduino-Makefile \ examples \ WebServer \ Makefile to the folder with our sketch: C: \ Arduino-Makefile \ examples \ Example1. We fix its contents as follows:
Makefile
# Arduino Make file. Refer to https://github.com/sudar/Arduino-Makefile


# Suppress printing of Arduino-Makefile configuration.

#ARDUINO_QUIET = 1


# Directory where the Arduino IDE and/or core files are stored. Usually can be auto-detected as `AUTO_ARDUINO_DIR`.

ARDUINO_DIR = ../../../Arduino


# Directory where tools such as `avrdude`, `avr-g++`, `avr-gcc`, etc. are stored in the `bin/` subdirectory.

AVR_TOOLS_DIR = ../../../Arduino/hardware/tools/avr


# Directory where the `*.mk` files are stored.

# Usually can be auto-detected as parent of `Arduino.mk`.

ARDMK_DIR = ../../../Arduino-Makefile


# Device type as listed in `boards.txt` or `make show_boards`.

BOARD_TAG = mega


# Microcontroller model.

# Usually can be auto-detected as `build.mcu` from `boards.txt`

MCU = atmega2560


#CPU speed in Hz

#Usually can be auto-detected as `build.f_cpu` from `boards.txt`, except in

#some 1.5+ cores like attiny where there is a clock submenu.

#F_CPU = 16000000L


# What name you would like for generated target files.

# Defaults to the name of your current working directory, but with underscores (_) instead of spaces.

#TARGET = project


# Baudrate of the serial monitor.

# Defaults to `9600` if it can't find it in the sketch `Serial.begin()`

MONITOR_BAUDRATE = 9600


DEBUG = 1


DEBUG_FLAGS = -O1 -gdwarf-2 -gstrict-dwarf


include ../../Arduino.mk
We insert at the beginning of our source a line that explicitly connects Arduino.h (this is not necessary if there are library dependencies indicated in the ARDUINO_LIBS variable): Do not forget to save the source and Makefile. Next, being in the Example1 folder, we enter the make command (using the console or in Far, or in another convenient way), a large footcloth should appear, similar to that displayed in the Arduino IDE when you turn on the output of complete information about the build process. This is if everything was done correctly, but if something did not work, then first try to independently understand what is wrong, and then write comments on the article.
#include "Arduino.h"


void setup()

{

 DDRD |= ( 1 << DDD2 );

}


void loop()

{

 PIND |= ( 1 << PIND2 );

}
Since we commented out the line ARDUINO_QUIET = 1 in the Makefile, there is a header with the values of the variables of the Makefile itself before the assembly information. Some of them are specified, while others are calculated as they progress. This helps to find errors when editing the Makefile of the project.
The beginning of the footcloth
-------------------------

Arduino.mk Configuration:

- [AUTODETECTED] CURRENT_OS = WINDOWS

- [USER] ARDUINO_DIR = ../../../Arduino

Usage: egrep [OPTION]... PATTERN [FILE]...

Try `egrep --help' for more information.

- [USER] ARDMK_DIR = ../../../Arduino-Makefile

- [AUTODETECTED] ARDUINO_VERSION = 167

- [DEFAULT] ARCHITECTURE = avr

- [DEFAULT] ARDMK_VENDOR = arduino

- [DEFAULT] ARDUINO_SKETCHBOOK =

- [USER] AVR_TOOLS_DIR = ../../../Arduino/hardware/tools/avr

- [COMPUTED] ARDUINO_LIB_PATH = ../../../Arduino/libraries (from ARDUINO_DIR)

- [COMPUTED] ARDUINO_PLATFORM_LIB_PATH = ../../../Arduino/hardware/arduino/avr/libraries (from ARDUINO_DIR)

- [COMPUTED] ARDUINO_VAR_PATH = ../../../Arduino/hardware/arduino/avr/variants (from ARDUINO_DIR)

- [COMPUTED] BOARDS_TXT = ../../../Arduino/hardware/arduino/avr/boards.txt (from ARDUINO_DIR)

- [DEFAULT] USER_LIB_PATH = /libraries (in user sketchbook)

- [DEFAULT] PRE_BUILD_HOOK = pre-build-hook.sh

- [USER] BOARD_TAG = mega

- [COMPUTED] CORE = arduino (from build.core)

- [COMPUTED] VARIANT = mega (from build.variant)

- [COMPUTED] OBJDIR = build-mega (from BOARD_TAG)

- [COMPUTED] ARDUINO_CORE_PATH = ../../../Arduino/hardware/arduino/avr/cores/arduino (from ARDUINO_DIR, BOARD_TAG and boards.txt)

- [USER] MONITOR_BAUDRATE = 9600

- [DEFAULT] OPTIMIZATION_LEVEL = s

- [DEFAULT] MCU_FLAG_NAME = mmcu

- [DEFAULT] CFLAGS_STD =

- [DEFAULT] CXXFLAGS_STD =

- [AUTODETECTED] DEVICE_PATH =

- [DEFAULT] FORCE_MONITOR_PORT =

- [AUTODETECTED] Size utility: AVR-aware for enhanced output

- [COMPUTED] BOOTLOADER_PARENT = ../../../Arduino/hardware/arduino/avr/bootloaders (from ARDUINO_DIR)

- [COMPUTED] ARDMK_VERSION = 1.5

- [COMPUTED] CC_VERSION = 4.8.1 (avr-gcc)

-------------------------

mkdir -p build-mega
We assume that everything went well, then you should have a build-mega daddy, in which our long-awaited Example1.elf is the very file for which all the action was started. With this file we will “brainwash” the virtual mic in Proteus and heal ... with another degree of freedom.
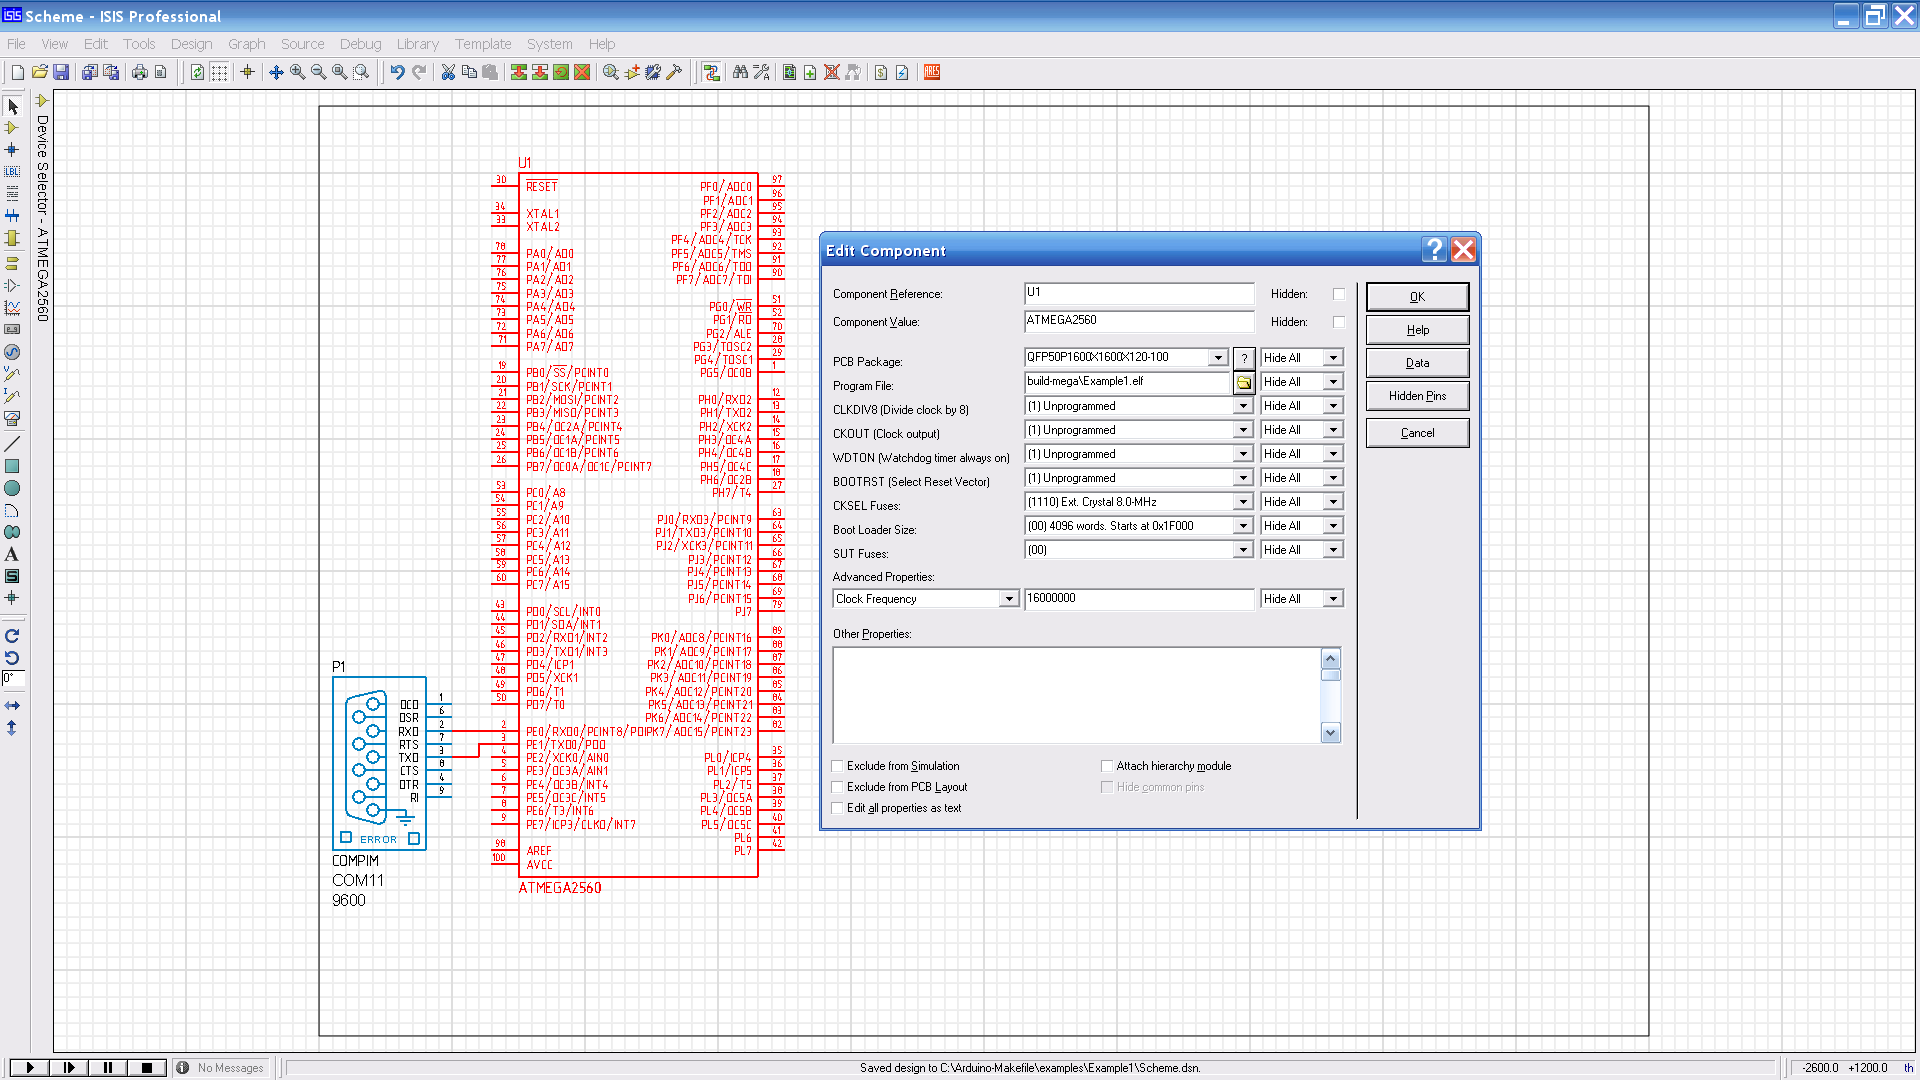
Step 6 . Back to Proteus. Create a new project (dsn file) in the source folder . We take out the component - the ATmega2560 microcontroller from the bowels of the library and insert it where it fits, it’s really painful. Fill the properties of the component in the picture. Installing COMPIM is not yet necessary, it will be needed to work with the monitor. Then we enter debug mode Debug \ Start / Restart Debugging. Get a picture that looks like this.
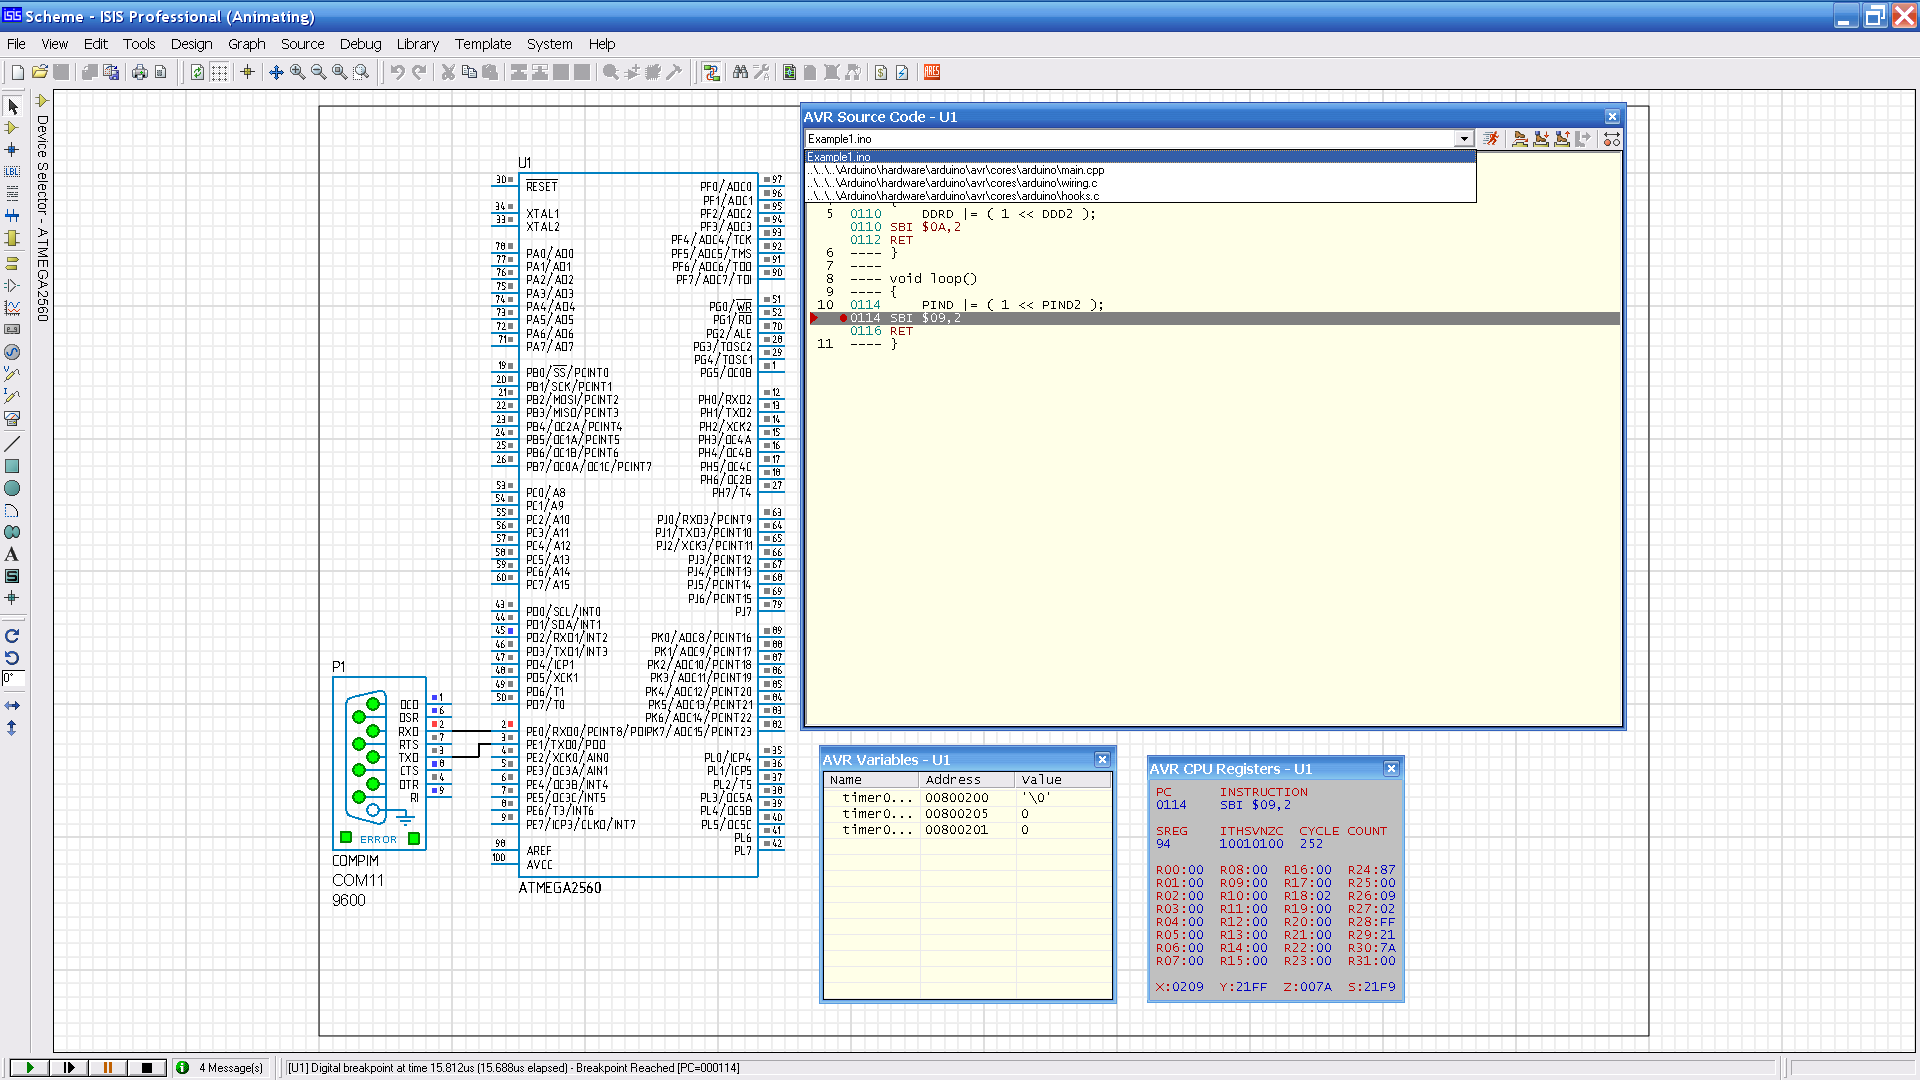
Well, and then, it all depends on the flight of your imagination. Not only Example1.ino, but also other dependent sources will be available in the source window. You can open the assembler code, processor registers, memory, and something else like that. Read the dock on Proteus.
Step 7 . You need to set up a monitor. To write laziness, I hope to do it yourself. The meaning, in short, is this. You create two virtual serial ports connected by a null modem (preferably with numbers greater than COM4). You prescribe one in the COMPIM Proteus component, and the second in the terminal program (PuTTY). Do not forget to correct the speed and encoding of the output in the terminal program, in theory it should coincide with the encoding of the source files, if you want to make output to the monitor in Russian.
Step 8 . If you want to useavr gcc 4.9.2 , you need to put the contents of the archive in the root of the disk and fix the path in the variable AVR_TOOLS_DIR. Only there, avr-size did not work for me, it seems. You can change it to the one that comes with WinAVR (or Arduino).
By the way, that the size of the output in the normal form need to add the option to call avr-size (file Arduino.mk): Useful links : 1. the Arduino the IDE 1.6.x . 2. Arduino-Makefile . 3. WinAVR . 4. avr the gcc 4.9.2 . 5. Hard links, etc. in Windows . 6. PuTTY . 7. Notepad ++ .
avr_size = $(SIZE) $(SIZEFLAGS) --format=avr $(1)