NOC Project. Where to start and how to continue?

I walked around the NOC for a very long time and licked at it like that fox on grapes. Set, poked and threw. And then he returned again, for he seduced the scoundrel with his capabilities. And the understanding that it was he who was lacking in life for “happiness” ultimately made him restrain his nerves and take up the NOC seriously.
If someone else does not know what a noc project is, then this is the center for managing the network infrastructure. The program allows you to organize failure monitoring, performance monitoring, service activation, knowledge base management, address space management, virtual entity management (VLAN, DLCI), configuration database archiving and maintenance, DNS operation, report generation. Right hereyou can read about him, go nuts from his coolness and come back here. Specifically, here I’ll talk a little about the features of the installation, I will touch on the topic of adding equipment a bit, go a little deeper into the issues of its configuration, go over some of the features of this software package and end up with something positive or not. How it works :)
About the installation features
So, there are several ways to install NOC. The easiest way is to download a virtual machine image. It runs well in VirtualBox, however if your virtual environment is something like ESXi, you will have to convert it there. You will find how to do it yourself, not small ones. There is also another elegant way.
For Ubuntu:
apt-get install ca-certificates
wget -q -O- https://cdn.nocproject.org/bs/Ubuntu-12.04.txt | sh | tee /tmp/install.log
For Debian:
apt-get install ca-certificates
wget -q -O- https://cdn.nocproject.org/bs/Debian-7.0.txt | sh | tee /tmp/install.log
Warning to ubuntuders! If you, like me, have decided to deploy noc on a virtual ubunt, say hello to the Oblomingo bird - it won’t get up. On a virtual debian, the system deploys perfectly, but the ubunta accepts it only while living on hardware. Alas. But there is a life hack. Put your favorite OS on any piece of hardware, roll noc, then remove the Clonezilla image and upload it to ESXi. In this way, I managed to transfer the installation from an old laptop to ESXi 5.1. Everything went without a hitch.
The main drawback of the noc project, until recently, was the lack of documentation. But now, developers are actively correcting this gap, and they are doing it in Russian. So those who want to plunge into the abyss of the source can go here .
Actually installation is the easiest. Further setup. It's more fun here. I will not paint where there is what and why it is needed. I’ll write my setup sequence, after which the NOC gives the expected result. :)
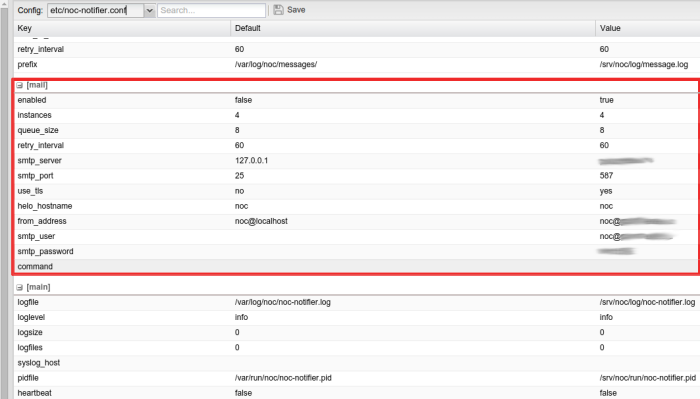
So, you installed NOC or launched its virtual image. Set up alerts. We go to the topmost directory Main - Setup - Configs. In the Config field, select etc / noc-notifier.conf.

In the mail section, in the enabled field, in the Value column, write True. We also fill in the fields smtp_server, smtp_port, if use_tls, from_address, smtp_user, smtp_password are required. Xmpp alerts and file notifications are also available. Fill them at your discretion. Press the Save button.
In the Users directory, you can create new users. There are no subtleties.
In the Notification Group, create an alert group. Click Add. Fill in the fields. In the Users section, specify the Time Pattern and the user. They are selected from the drop-down list. In the Other section, we also select the time and method of notification.
Attention! I also fill out the Params field, indicating for mail the address of the recipient, for file the name of the file. Without this, my alerts do not work. However, in the irc-channel, people claim that everything works for them without the Params field based on the addresses entered in the user's properties. To the bewildered “How so?”, There was an answer: “This is noc, baby” :))
To verify that the alerts work, check the group with a checkbox and click the Test selected groups button on the toolbar. If the messages do not go away and are delayed in Main - Pending Notification, restart noc in the server terminal /etc/init.d/noc-launcher restart. If this does not help, study the logs in /srv/noc/log/noc-notifier.log

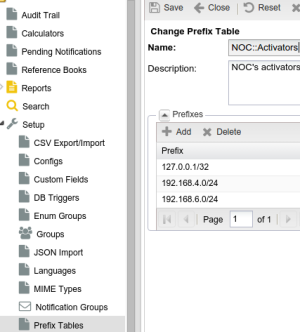
And more. I’m not sure how necessary this is, but somewhere on the project’s website I saw what was needed, in Main - Setup - Prefix Tables, I registered the networks in the Prefixes section in both activators. Do not forget about Save.
A little touch on the topic of adding equipment
So, with Main it seems finished. Now we go to Service Activation - Managed Objects. Here, in fact, is the equipment that we will manage. I will not copy-paste the installation description, but just give a linkbecause I will not write more fully and in detail.
Some important clarifications:
Snmp community, snmp traps must be configured on your devices and the correct time must be set !!!
When adding a device, write tags to it.
Do not create, much less install Collector. This recommendation was given to me directly in the project irc-channel. By default, it is not in the system, which seems to hint ...
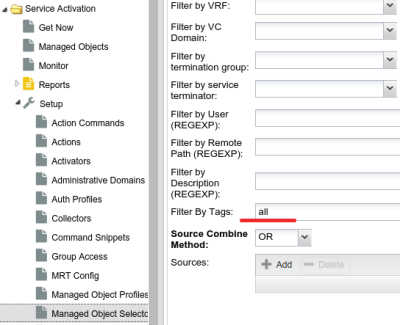
Do not forget to create a selector in Service Activation - Managed Object Selector that will filter devices by a specific parameter, in my case, by tag.
I’ll go a little deeper into the issues of its configuration.
And now a small in-depth discussion on the topic of equipment, and in particular in SA Profile. SA Profile IMHO the most important part of the configuration. It is she who sets how NOC will communicate with the equipment. How correctly they (devices and NOC) understand each other can be viewed in Discovery on the device page.
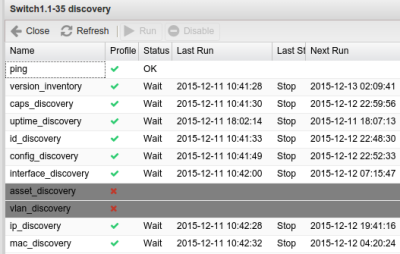
Green checkmarks indicate that everything is OK. The most important ones, again for me, are version_inventory, config_discovery and interface_discovery. Ideally, green was everything. In my case, I had to suffer a lot. The fact is that we have several Cisco SG500 switches in our company. Despite the eminent brand, in essence, these are typical Linksys. And the profile most suitable for these pieces of iron turned out to be, who would you think? - Eltex! Until that day, I had not even heard about such a manufacturer. How to choose the most suitable profile, there are no clear recommendations. It can be a long search. Please note that not all profiles are displayed in the drop-down list at once. The rest are on adjacent pages. Or, if you know which particular command you need, you can search for the contents of the scripts that are located in / opt / noc / sa / profiles / This is in the operating system itself, if anything. I found mine this way. If you have a similar situation and you have found the most suitable profile not where you expected it, you can create the necessary Sa Profile yourself. We go to the file system in the aforementioned / opt / noc / sa / profiles / Brand /, create a directory with the desired name, fill it with scripts from a suitable profile. Then, inside the scripts, we replace the Manufacturer and model with our own. I changed Eltex.MES accordingly to Cisco.SG5XX. Also, do not forget to change the name in the __init__.py script. In my opinion, it is here that sets the name SA Profile in the drop-down list. After that, reboot noc - /etc/init.d/noc-launcher restart and go to look at the new profile, substitute it in the equipment and see what happened. In order for the new profile to be applied, it is necessary to mark the device with a tick, Click the Group Actions button and select Run Discovery Now. You can see the result again in Discovery.
I’ll go over some of the features of this software package.
So, we added the equipment and correctly selected the profile. What do we have now?
On the device page, with the Config button, we can see the configuration of the equipment, as well as when and what changes were made.
The Interfaces button will show the network ports of the device.
Service Activation - Tasks - Mac Report - allows you to search by MAC address and determine which port of which switch the device with this MAC is connected to.
Service Activation - Tasks - Run commands - will help to launch several operations of the same type on several devices at once.
Service Activation - Tasks - Version Inventory - will show the firmware version of one or all devices.
Address Space Managment - Assigned Addresses - displays a list of your IP addresses, shows how much is occupied and how much is free.
Notifications will begin to arrive in the mail if the device configuration is changed.
What else can we tighten up?
Make a map of the added devices and display the connections between them. Important!!! Associations will be displayed only if the device has interface_discovery.
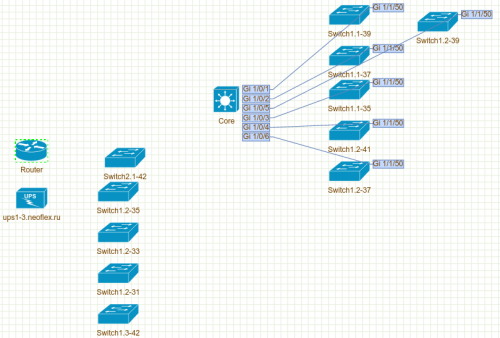
Go to Inventory - Setup - Network Charts, click Add, fill out the form. Remember to specify Selector. Then, in Inventory - Interfaces, select the device, click on the “Link / Unlink” icon of the network interface, select Object, indicate which port is connected, click Connect. After that, we can go to Inventory - Network Map. in Chart, select the name of the card, see what happened.
And further. The creators of the project themselves pay special attention to the Fault Managment module. Actually the name - “Incident and Accident Management Module” says it all. At this stage, it is practically not configured and only collects snmp traps in the Events section. Classification of ladder data, setting alerts and reaction to events is a separate huge topic that I am just starting to understand.
I’ll end up on something positive or not.
Here is a small part of the NOC functionality that I managed to comprehend and implement. If you want more, smoke kb.nocproject.org , ask on the official IRC channel is # nocproject.org at irc.freenode.net and figure it out yourself by studying the interface and digging the logs. Good luck.