Another article about making a home media server
On Giktayms more than once and not two articles were posted about the assembly of their home NAS / media server / TV set-top box and similar works of itchy and relatively direct hands. For those who like this masturbation, or plan to do it themselves, below is another variation on this topic.

It all started26 yearsa couple of months ago, when a clear lull began to appear at work, and the level of solving technical problems in the blood began to fall slightly. I wanted to take something with my hands and head. Since starting repairs in the apartment on the eve of winter is not a good, but generally expensive idea, the choice fell on something not so global. In particular, to the system unit connected to the TV in the living room, used to watch locally lying movies / TV shows, torrent TV, store heaps of hard drives with "very useful information" and most importantly - a music collection and a dump of the base of one not-so-legal Internet libraries.
Yes Yes Yes. As someone said:
The decision was made: I want to get rid of the big noisy box that chatter a bunch of hard drives, as well as replace the control model from the mouse and keyboard with something like a remote control or smartphone. Also, along the way, it would be nice to organize access to a music collection from the outside world with the ability to listen from anywhere.
In the best traditions of time management, we set ourselves a list of goals that we want to achieve:
Iron:
By software:
So it's time to finish procrastinating the idea and begin to implement it. We are counting on the use of components of easily accessible and easily upgraded forms of factors, because firstly, to simplify the possibility of a subsequent upgrade, and secondly, since I already have a MicroATX Elitegroup H81H3-M4 motherboard , as well as a core I3 4150 processor and a couple of slats DDR3 memory for her.
First of all, it is necessary to determine the form factor of the case and the location of the components inside it. In addition to the motherboard, we will still have 4 full-size hard drives of various capacities and manufacturers inside us, and we also need to come up with something with power and no noise.
Initially, I really did not want to have a disassembled ATX power supply inside the case. Firstly, it requires some kind of additional cooling, and secondly, by itself, is not quite small. Fortunately, our Chinese brothers come to the rescue with this wonderful thing: At

one end, this wonderful product connects directly to the 24-pin power connector on the motherboard, and the second to an external 12-volt power supply unit of the required power. The description of the converter says that it works at loads up to 160 watts, which should be more than enough for our task.
In order to immediately order a power supply for this converter, it was necessary to calculate the estimated power for it on the knee. According to the data on hard drives, each of them will consume about 7-10W during operation. Plus, it should be borne in mind that when starting up disks, their consumption can shortly reach 150% of the nominal. Accordingly, for 4 hard drives with a margin of about 60W should be enough. Further, it is more difficult: for processors and motherboards it is very difficult to find similar values: for processors only TDP is indicated everywhere - the amount of heat dissipated, but Intel does not indicate power consumption in any specification (although I will be glad to know that I'm wrong if someone pokes me in the place where it can be seen), a similar situation with the manufacturers of motherboards. For a motherboard, I could approximately recall that a couple of years ago I read somewhere that the consumption of a typical representative of a Low-end class does not exceed 20-30W. Accordingly, given that now everyone is fixated on the economics of iron, this value can be safely reduced to 18-20W. For the processor, there was nothing left but to soberly imagine that the modern Core I3, by no means, can consume more than 40-50W. The total result was that theoretically I should have enough 120 watts of power supply.
Looking ahead, I can say that my calculations were justified, and the 12-volt 10A power supply ordered by me completely coped with the task and successfully feeds the media server, despite my doubts that the Chinese inscriptions will be very different from the real ones power supply.
Having got rid of the most controversial component, without philosophizing for a long time, we outline an approximate diagram of the future box, and imagine how many and what parts we will need to produce:
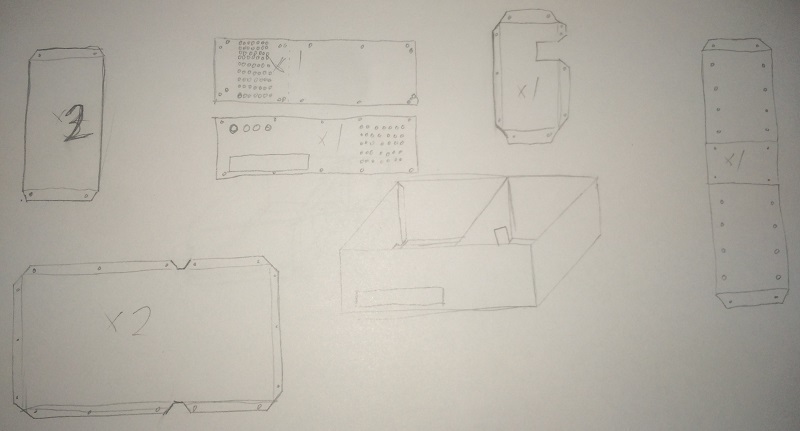
Not really philosophizing the motherboard and the hard drive bay, it was decided to place it in a horizontal plane, next to each other. Hard drives are first assembled together with a separate unit made of a long part located on the right side of the sketch, bent in the form of the letter "P", after which it is installed inside the main body and screwed to its bottom wall. To damp the vibration, the inside of the part will be glued with thin foam.
An additional partition is installed between the hard drive bay and the motherboard, which will be an additional stiffener, as well as an emphasis on the top cover of the case, and will not allow it to “play” due to the lack of emphasis.
The initial draft undergoes several improvements, it is thought over how cooling, ports, buttons will be implemented, after which it smoothly develops into a very accurate drawing ( FRW , DWG , PDF ), made in the spirit of complete spit on all design standards:

By this moment, the question arose very sharply from what actually to make all this “happiness” and how to fasten together. The choice, of course, fell on the most accessible material at hand: the side panels from the old tower server that had gone to the better world. Again, looking ahead, I can say that this solution was both successful and unsuccessful at the same time: on the one hand, the case turned out to be very monumental, not creaky and not “playing,” but on the other hand, when assembled, the box weighs ~ 7 kg, which, to put it mildly, is not enough for a compact media server. Also, the thickness and quality of the metal greatly reduced the speed of work.
But since the choice has been made. there is no turning back. Not really inventing how to quickly quickly transfer drawings to metal, I just printed out the details in the amount of 1 to 1 (by the way, the drawing was made to such proportions, in case someone tries to follow in my footsteps), and stuck it to the metal clerical glue stick. By the way, it’s a very convenient solution: the glued drawing is held tight enough not to fall off during cutting or drilling (just make sure that the glue is applied over the entire contact surface of the metal and paper) and at the same time, upon completion of work, the exhausted drawing removed in place with glue from the metal in a matter of seconds under a stream of warm water. After gluing, the front of work becomes clear:

Initially, it was supposed to perform a cut using a grinder, followed by glossing. However, the first tests (on a single sheet of metal) showed that after trimming, performed in this way, I was unlikely to be able to collect anything, because of which I had to abandon this venture in favor of a completely manual and leisurely hacksaw for metal, and also dremel for emergency cases and places where you need special accuracy.
The first pancake, contrary to expectations, turned out to be not at all lumpy, and “only” after an hour and a half of active work with a hacksaw (do not take thick server cases for crafts), the output was the first material result of the labors:
Subsequently, the cutting stage was delayed for two to three weeks, since in any case it was necessary to allocate at least 2-3 hours for one part (after cutting, it is necessary to finish the edges with a dremel with an abrasive nozzle so as not to be left without a finger), due to why every evening there was no desire to do this. But, as you know, water wears away the stone, and after a while this set was ready:
As you can see, of the eight planned parts, there are only 6. Here, this is because, as soon as the bottom of the case and the stand for the disks were cut, hands are here but they were drawn to parallel deployment and debugging of the software part, in connection with which the following engineering design temporarily settled over the TV:

In the process of assembling the skeleton of the case, a fundamental and incorrigible bug was discovered, which had to be put up with: the board, the converter connecting the 24-pin power connector on the motherboard turned out to be quite thick (since there are 2 boards) and rested against one of the operating brackets memory, because of which both of them were at a slight angle of 5-7 degrees, as can be seen in the terrible picture below:

The converter naturally heats up during operation. And, of course, the hottest part is pressed to the memory bar. However, it partially reassures me that the converter and memory are located close to the edge of the board on the side where the case fan will later be. Since it will be literally 2 centimeters from all this disgrace - we hope that the heat from the converter will be removed efficiently enough so as not to lead to the failure of one of the memory slats.
I’ll tell you about the software part after the hardware part, so we won’t be distracted by it yet, and continue our exercises with a hacksaw and a dremel. More precisely, the hacksaw will no longer help us and it will have to be put aside. A drill will now take its place. Using a drill and dremel, we drill and cut all the technical holes provided by the design:
Note to the hostess: in spite of the fact that the more expensive “diamond” cutting wheels for dremel (from 100r) are much more durable, they cut much worse than ordinary cutting wheels for metal for 20r, since they themselves are made of metal, and the cutting process is very hot. We have to make a stop every 5-7 cm (hello once again to the thick metal of the server enclosure) and resort to a glass of cold water to cool the disk. The metal itself, when cutting with such a disk, is also very hot.
However, such a disk is simply indispensable for marking bends. In the absence of special equipment for bending metal, at home, this can be done as follows:
The more slowly this procedure is performed, the more even the bend will result. The key role is played by the gradual raising of the bending part of the part, since too sharp bending will lead to the appearance of very large waves at the curved edge, which will be very difficult to get rid of.
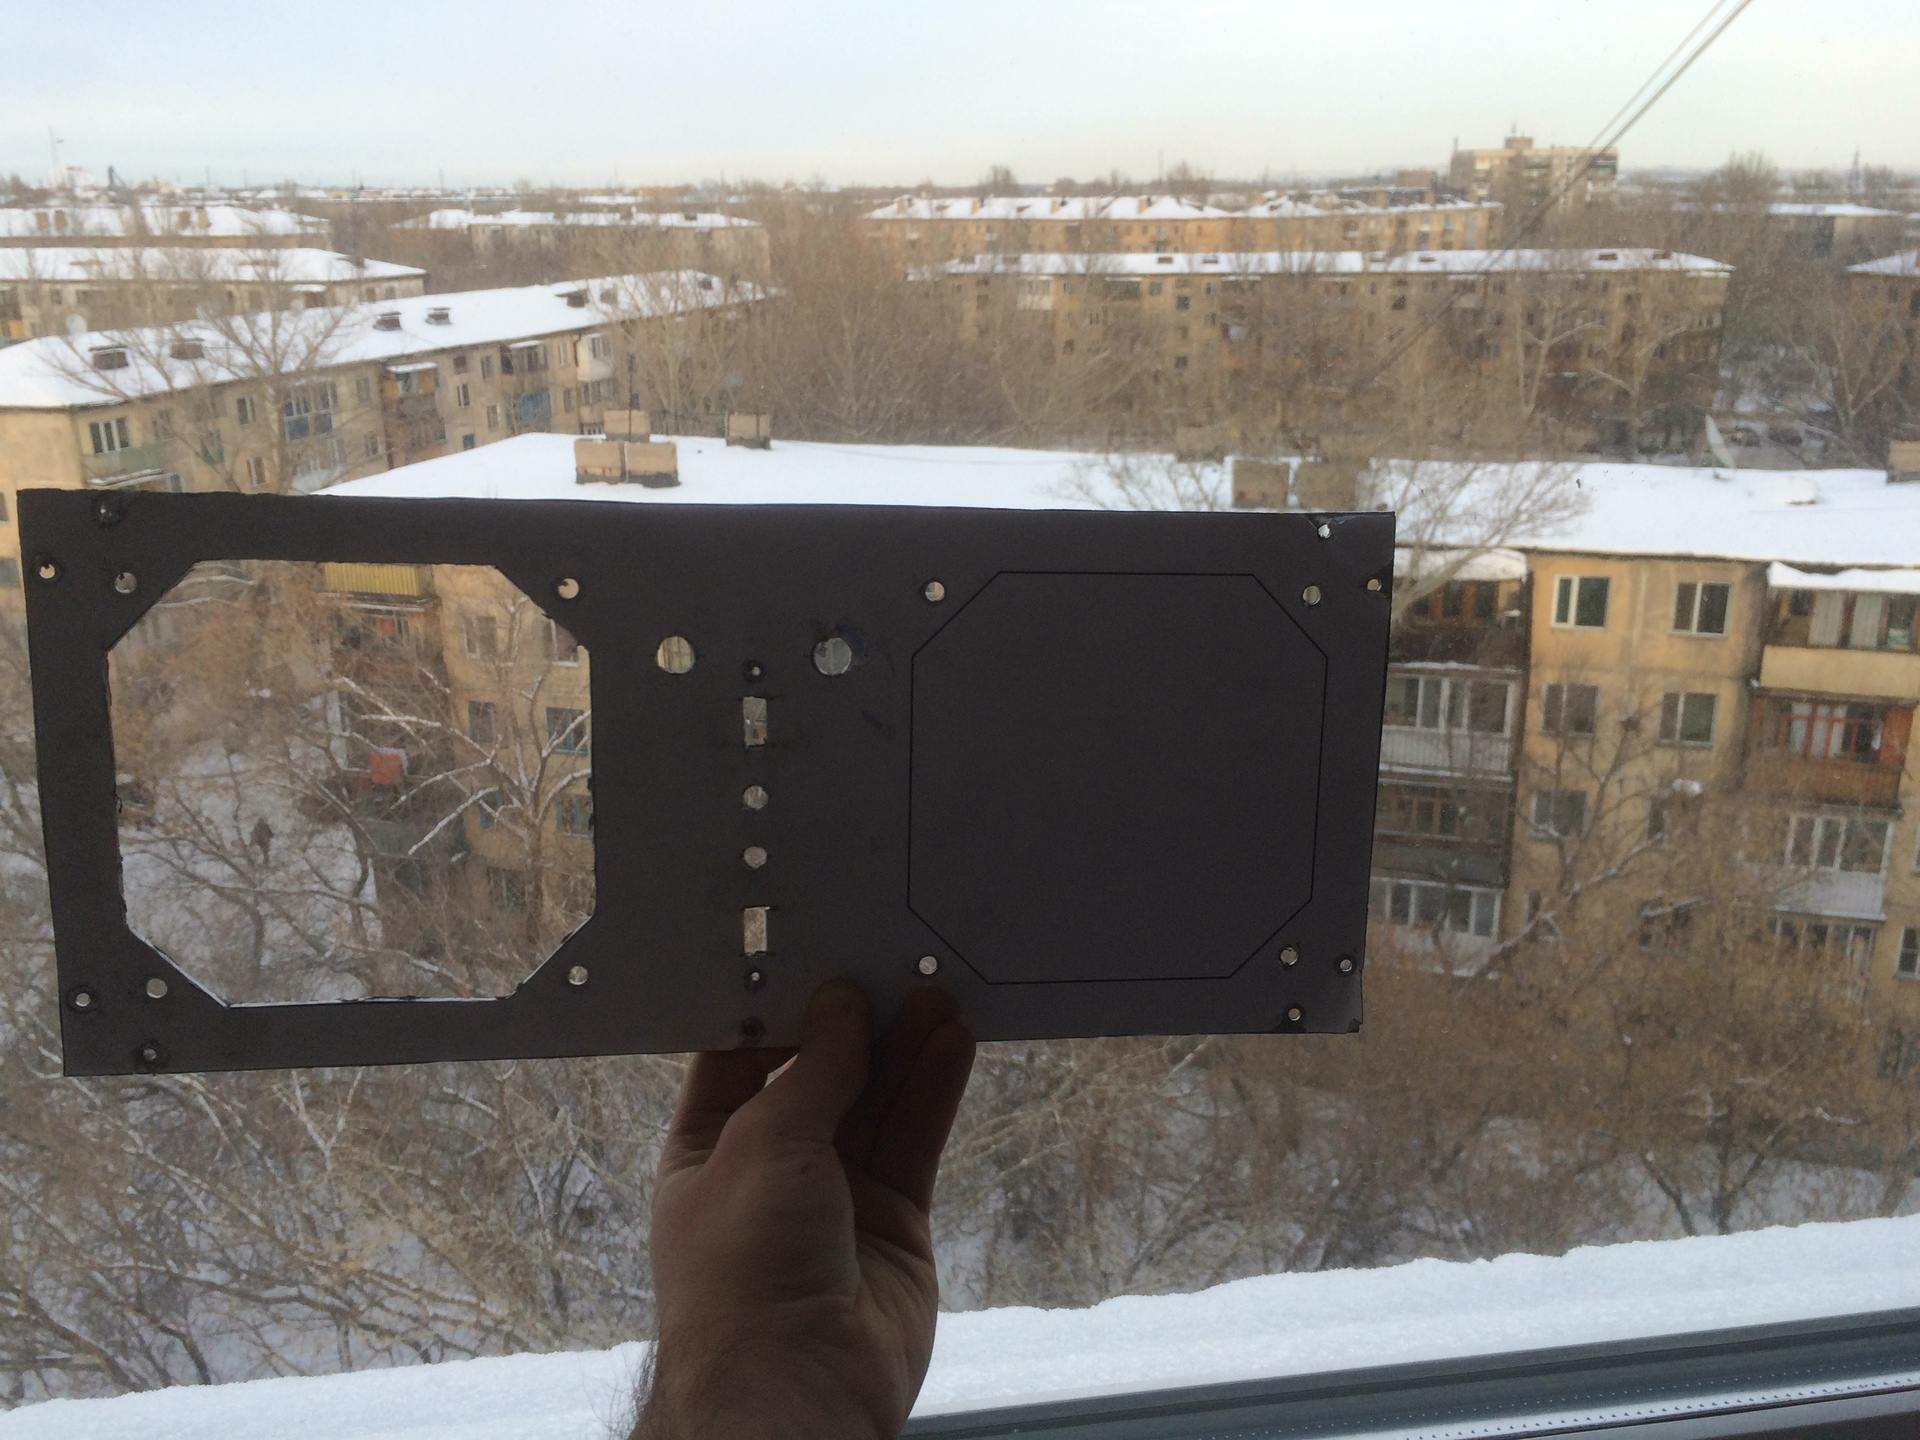
So, we have the parts, all the necessary holes are cut out in them, bends are made in the right places, in which the parts will be fastened together, it's time to put it all together to make the final fit, and smooth out the inevitable bumps. We are not going to put the “guts” into the case yet, since after the assembly we will have one more stage of grinding, and maybe trimming the edges, but we still need to fix some technical elements on the case to make sure that they fit into place , and do not interfere with the assembly and installation of other components:

Since the core of our media center is never the cold Core I3, and there are quite a few hard drives inserted in it, we could not refuse active cooling. Therefore, to minimize noise, we took two 12-centimeter case fans without speed control (they were mercilessly cut from old power supplies along with chrome grilles and turned out to be bingo bearings, which is very good) and connected to a 5-volt power supply. At minimum speed, the noise level is on the verge of audibility - any, even the quietest household sound - whether it be the birds outside the window, walking around the room or the cat's snoring completely drowns out the quiet rustle of coolers. The power and reset buttons are purchased in the nearest department of radio components to your taste.
Since the chrome-plated cooler grilles set the tone, we will use aluminum blind rivets to assemble the body that will be placed on top of the cladding material - they are cheap, easy to install and will dilute our sadly black box a little.
After an hour of assembly and fitting parts to each other, our beta version of the case is obtained:

The rigidity of the metal again played a cruel joke with us - because of the manual bending of the bottom and the lid of the body (on these parts, bending was carried out from all 4 sides), both parts led slightly diagonally. to fix this annoying bug, we had to make perpendicular cuts in the bent parts to give the parts some flexibility. After these, as well as several more minor corrections, all the protruding parts were gently polished, all the uneven corners were ruthlessly straightened, and all not perfect cuts were resolutely corrected.
When a balance began to emerge on the scales of perfectionism and a sense of reality, a strong-willed decision was made that it was time to bring beauty and final assembly (especially considering that the software part was already ready for a long time, approved by the wife and was used to the full even as separate components).
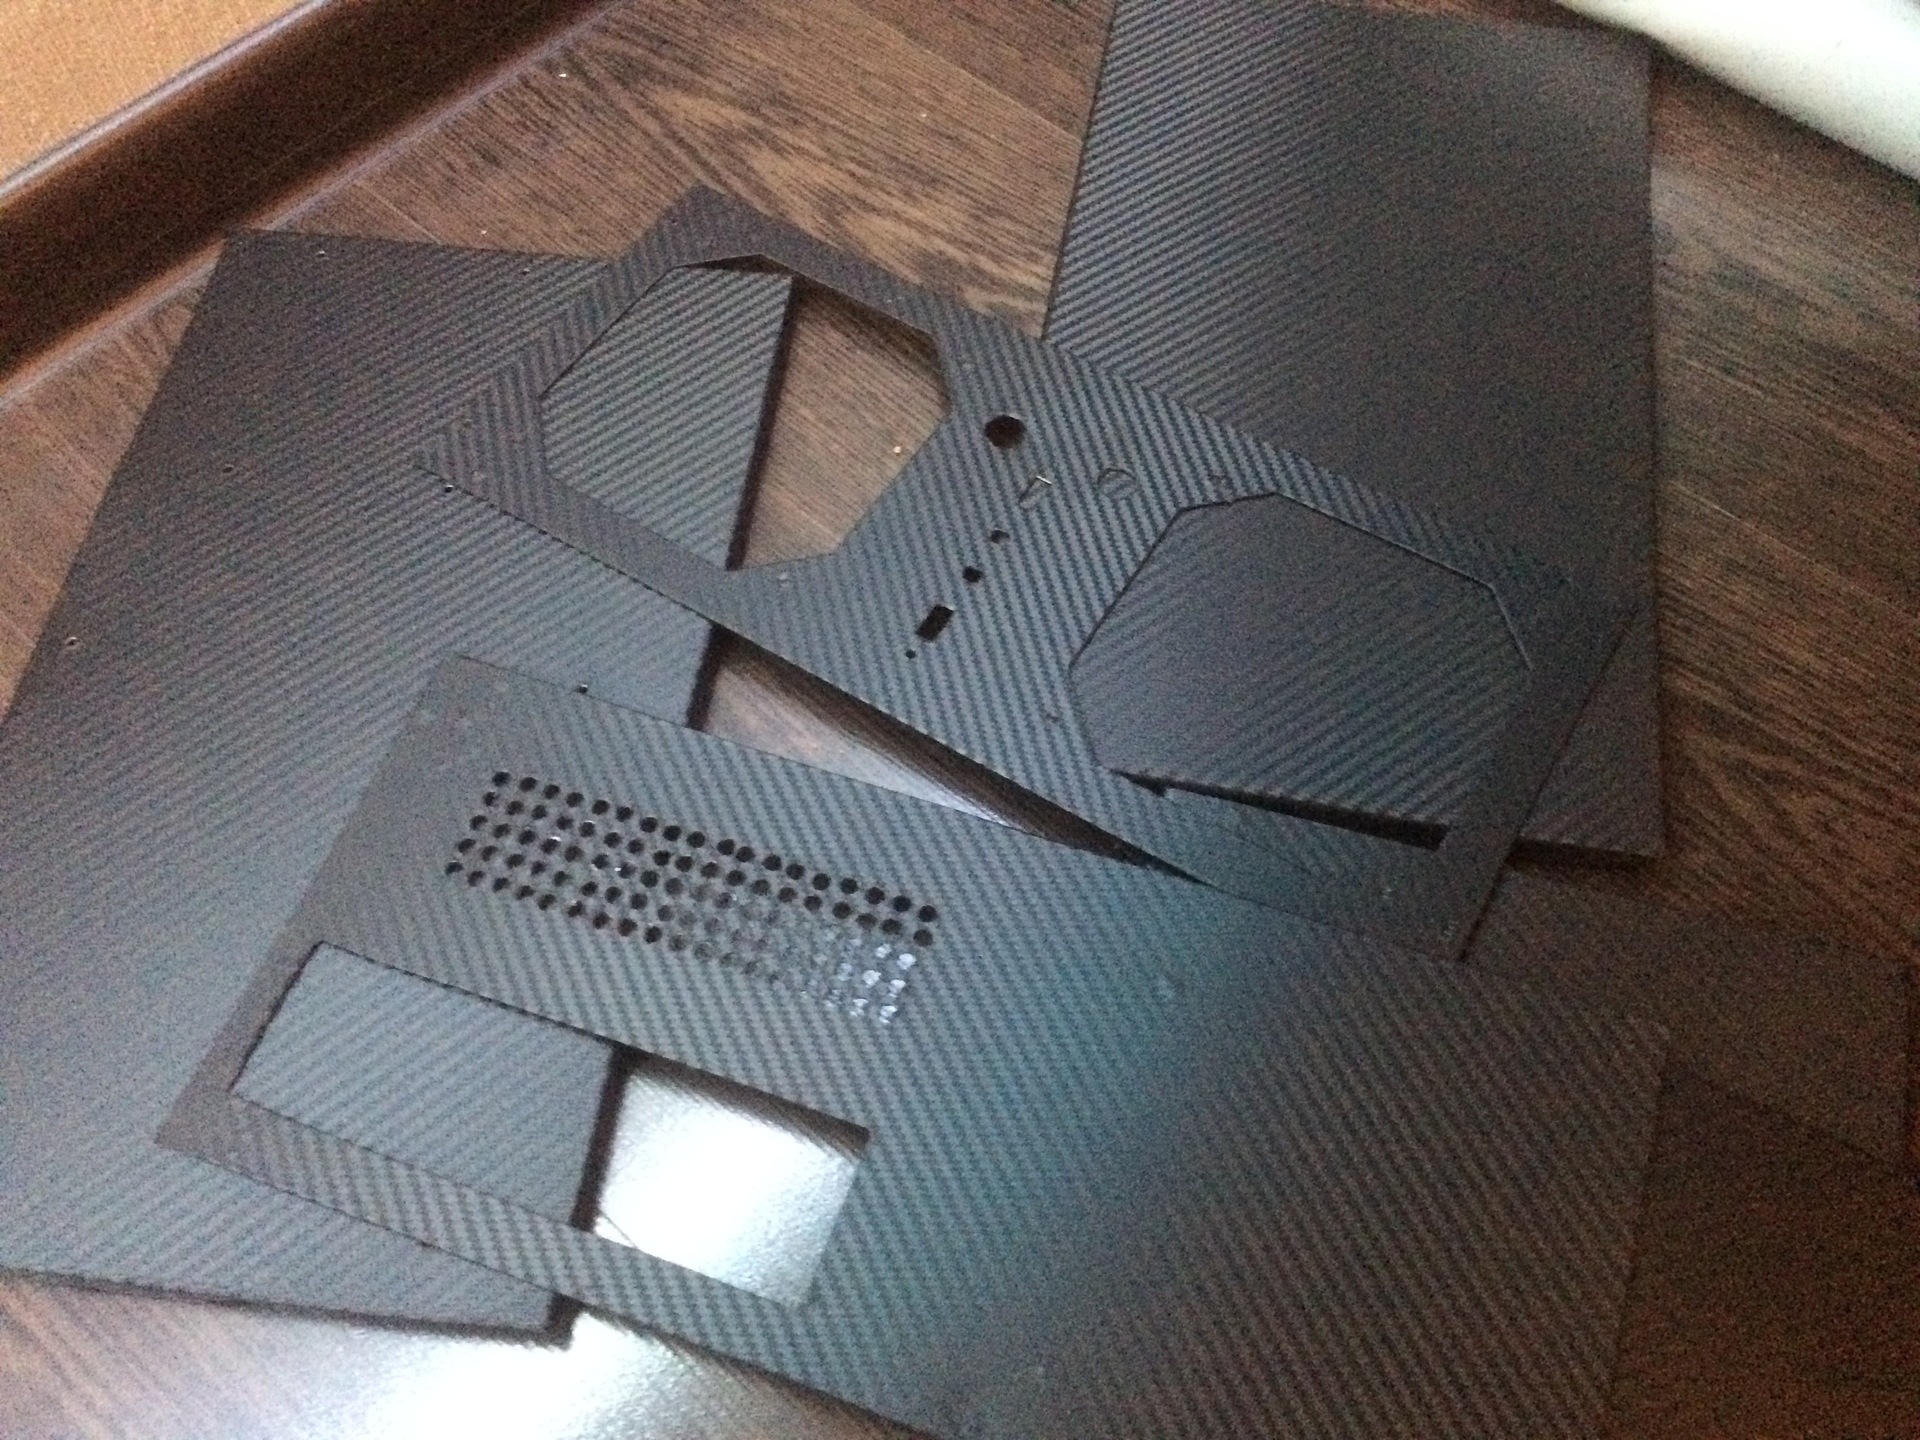
Since for a high-quality painting of metal, which was originally intended, ideally, it is necessary to remove the old paint, to smooth out all the flaws and to look somewhere for a place where the painting itself will be performed (on the street by this moment it was already deep behind zero), I had to spit on this matter, and resort to the services of a vinyl self-adhesive film. And again: it was a very good decision: it took less than 10 minutes to process one part (with the exception of the back cover with its ventilation grill), and the result made it possible to hide minor flaws that inevitably strike the eye.
Already after an hour and a half, instead of a ugly but whole body, in front of me lay a pile of pretty, but again disassembled parts:
Due to an attack of inflammation of the feeling of beauty, even the internal details hidden from the eyes were pasted:

So, all the way back was completely cut off and it was time to make the final assembly after which it would be time to either triumph in victory or feel the bitterness of defeat.
A small fakap: a block of hard drives with power and SATA cables and front-mounted coolers did not appear in the case at the same time, and therefore an unpleasant surprise was found during assembly: it was very difficult to fit the cables so that they did not fit into the cooler. Because of this, I had to do a neat laying of wires, although this was not originally planned (anyway, I decided to put the top cover on rivets so that my hands would not scratch my fingers).

Since initially only one SATA and one MOLEX connectors were available on the converter, they had to be cut and remade to fit your needs: replace one SATA connector with 4, and MOLEX was left to connect the cooling. It turned out to be very convenient that the converter is very compact, and only 2 sets of wires come out of it (PSU input and output for the periphery) - it does not interfere with the cable laying process, and it can be connected when everything is ready and hidden.
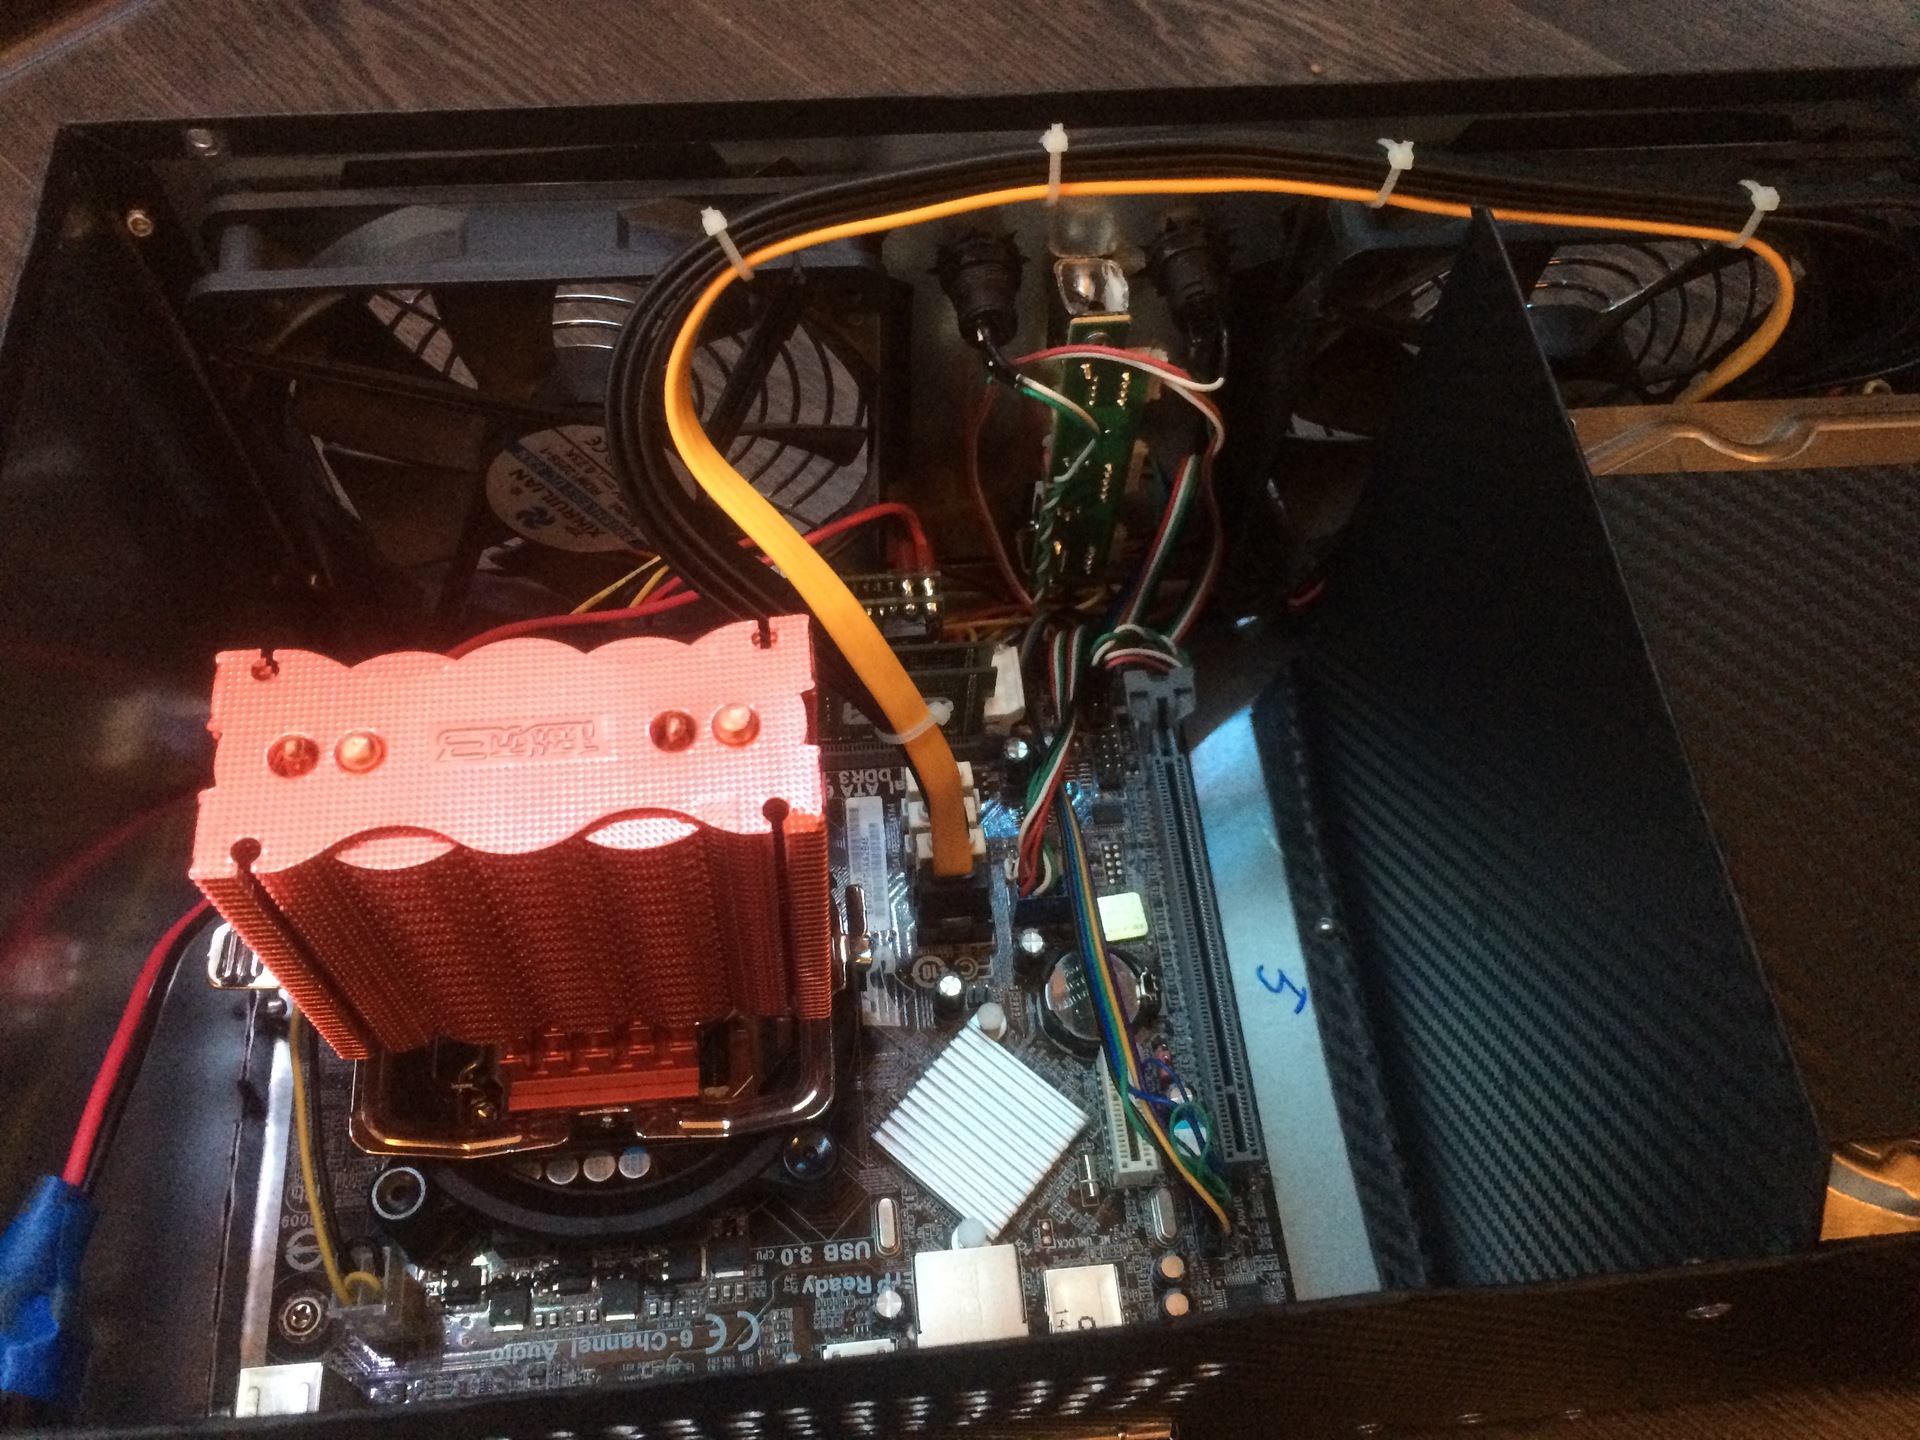
Due to the design features of the case, the motherboard had to be raised to a non-standard height (3 standard racks for the motherboard screwed into each other were used). This allowed all kilometers of wires to fit directly under the board. The whole view only spoils a bunch of chaotic multi-colored wires from the front panel and power buttons, going to the cache under the board. One of the SATA loops is red, so after 5 years you still remember which drive the system is installed on (well, and this is just stylish). A bit of blue electrical tape (bottom left corner) for peace of mind - the manufacturer did not bother to insulate the junction of the wires and contacts of the connector, but I was too lazy to unsolder them to put on heat shrink. In addition, the connector is far enough away from everything else:
As truly risky people, first we close the top cover, fasten it with rivets and take a few photos, and after that we connect all this to the TV, and we check if we forgot to connect something:

You know how difficult it is to manually drill exactly 100 holes in metal? So I don’t know - I drilled them unevenly:
Self-adhesive cork legs for furniture came in handy: with considerable weight, the case stands thoroughly, when you try to move it it makes it reluctantly and silently. Waves at the junction between the lower and front walls of the casing are also visible - the very result of the rhyme of hasty bending of metal:

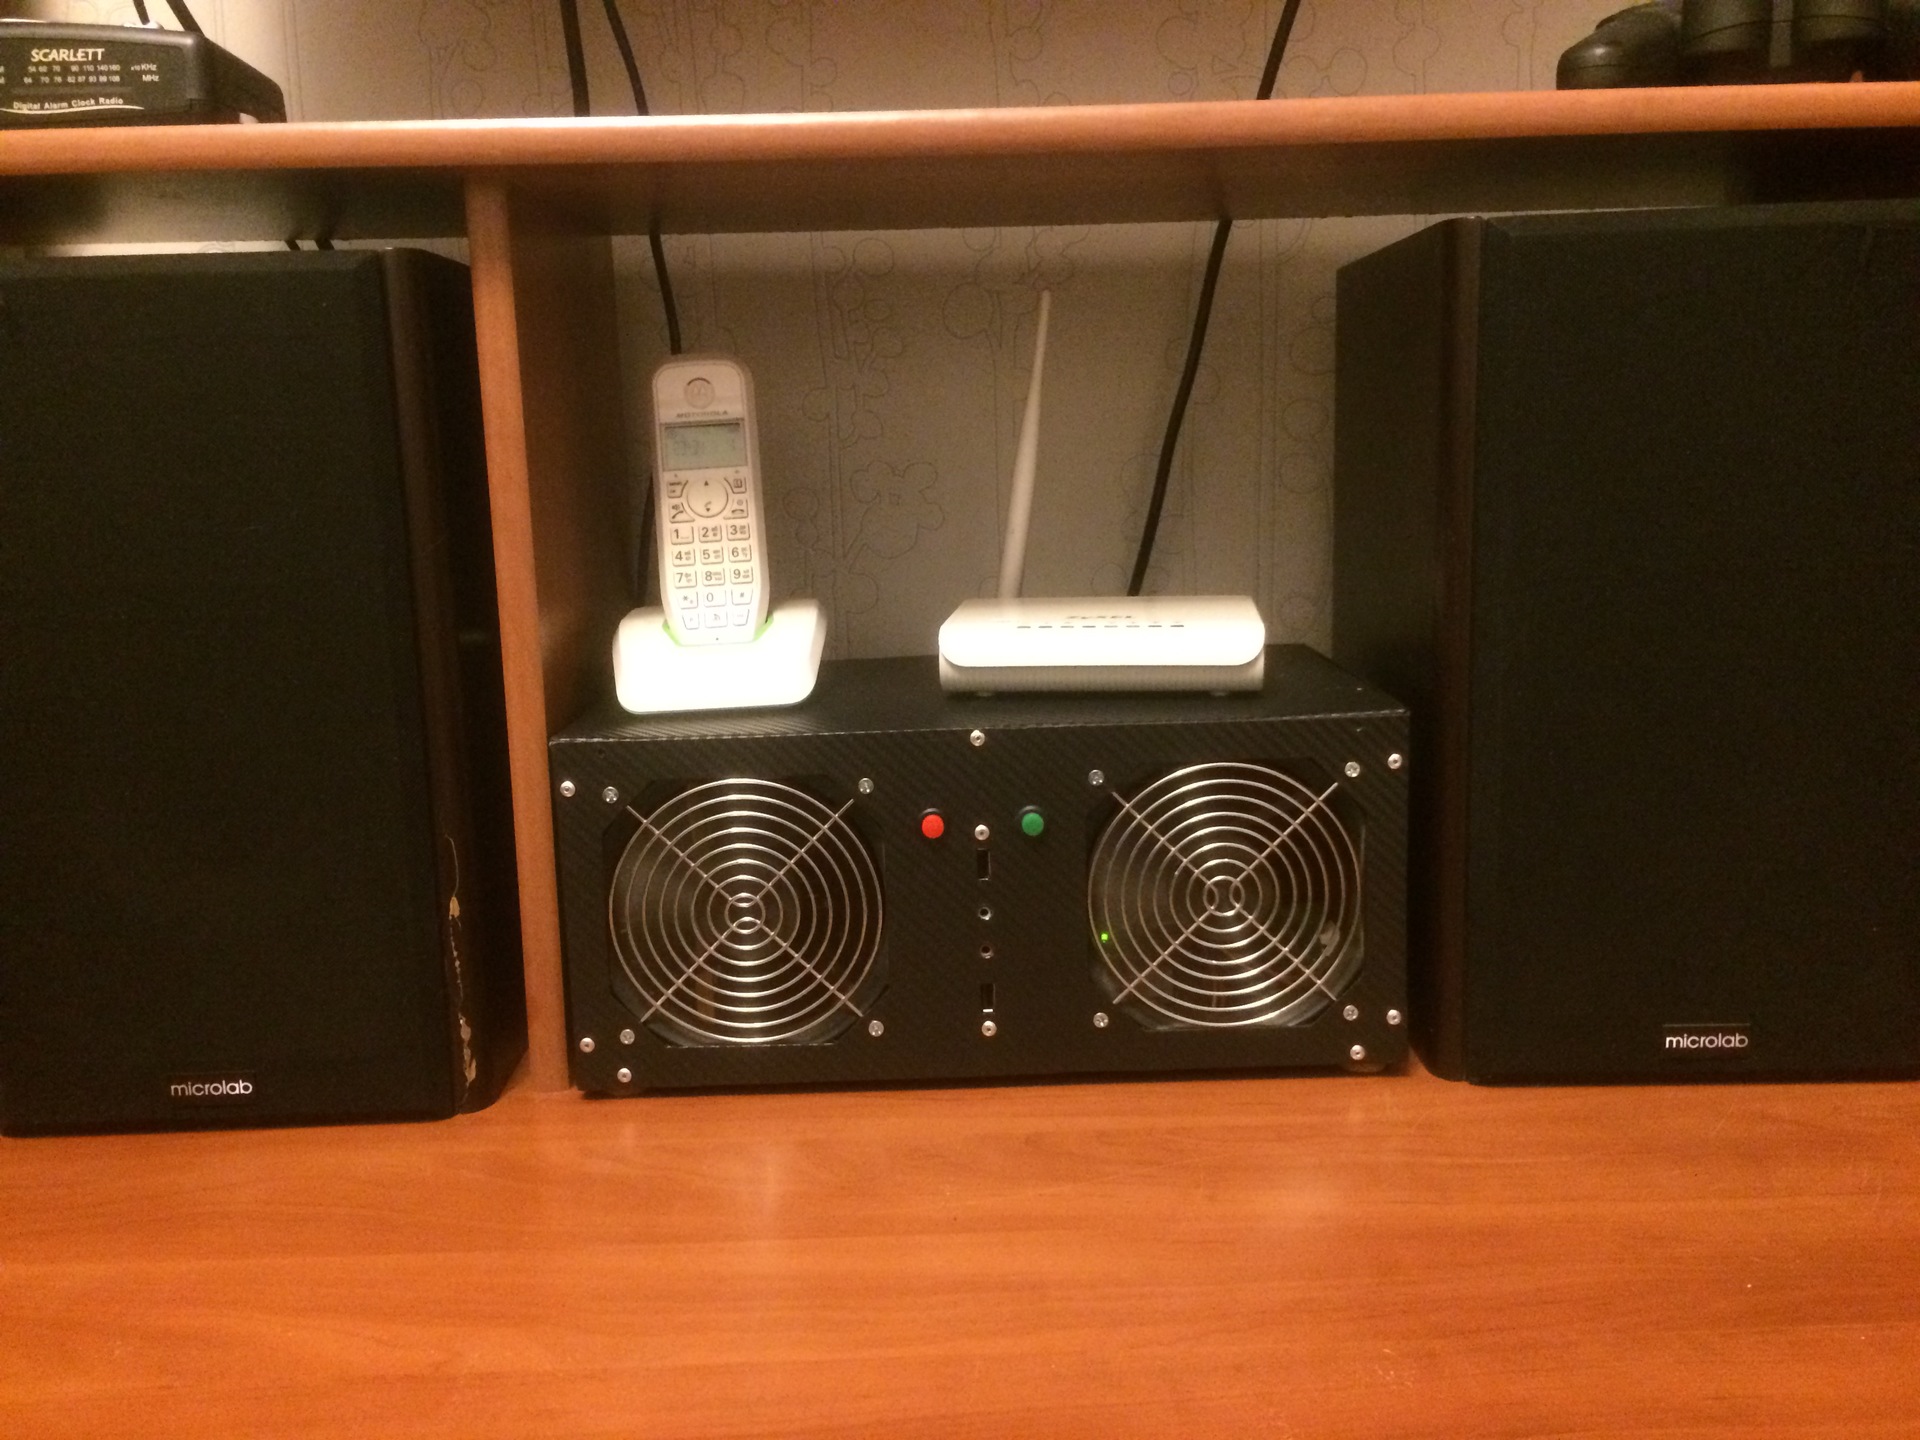
But despite the remaining minor flaws, it all quite organically settled under the TV, next to the good old Microlab SOLO 2:
Throughout the assembly process, it seemed to me that I still went a little too far with the dimensions, but in the end the case turned out to be quite acceptable sizes: 35x22x15 cm. Would it cost me to buy a factory case cheaper? Yes. Definitely yes. More than just 2 thousand rubles were bought of tool materials and other little things alone. And this does not take into account the fact that it took me at least 50 hours to slowly manufacture the case. Does the result live up to expectations? Personally, I got what I wanted: a small and very quiet building, as well as a lesson for hands and head in my free time (after all, this was the initial task). If the goal is simply to get a case, then it is much more profitable to spend these 50 hours making money and buy a factory version.
We figured out the iron part. Now let's see what we have with the software, and what we got from this box. The stars turned out so that I turned out to be more like a Windows administrator, and therefore the choice of a software platform was not a special torment for me, however, all the products I use as “extra dodgers” have their own Linux and MacOS versions and are open or just free .
The first thing that was installed after deploying the OS, updating it and creating a user without administrator rights was the open KODI home theater system(formerly also known as XBMC). Of all the tested options for shells for home theaters, this is perhaps the most flexible and expandable. In addition to the built-in functionality for managing local content, KODI supports additional plugins that are installed from both official and third-party repositories. Without much work, KODI was very easy to make friends with Torrent TV (according to the instructions on the website of Torrent TV itself), as well as with cinema search and rutracker (let's see if it stops working in Kazakhstan after blocking). The interaction with the player works according to the following scheme: by name, or by any criteria, a movie / series is selected from the base of the movie search, all information about it is displayed on the screen, as well as a magic “download / watch” button, when clicked, a list is displayed distributions of this movie found on the tracker. After selecting the distribution, it is automatically transferred to the torrent clients for download. Downloading will be performed in consecutive blocks, which makes it possible to start watching a movie immediately after setting it to download. Managed by all this miracle using applications forAndroid and iOS . Just in case for a backup, or for special “aesthetes”, the following thing is also connected:

I don’t see much point in examining the KODI platform in more detail, since a lot of words can be said about it, and it can be implemented very little few ideas. At the request of the community - about this I can write a separate article, so we move on.
Since all the main goals for the software have been achieved, let's look at additional points: posting your music collection face on the Internet, so that you always have access to it. A kind of pocket-sized, Google Play Music, so beloved and used by me even after the transition from Android to iOS. For certain reasons, for another 10 months I will not be able to use this service: it turned out to be an unpleasant surprise that only 10 devices can be connected to it in a year and only 4 can be disconnected. This fact drives me into insurmountable sadness. Initially, I tried to dispel it using the KODI web interface, but it worked surprisingly unstable on a 40-megabyte channel, and did not solve the problem of playing music on a smartphone. Although I can forgive him, After all, it is designed primarily to work inside the local network and play video / audio locally. Therefore, I had to turn to the search engine, which gave me just a wonderful tool to solve my problem:Media Server Plex .
The essence of the software is very simple: it takes your uPnP library, and allows you to access it from anywhere in the world through a web browser, or mobile applications for any platform. Since part of the platform is implemented on the developer's side, the setup is extremely simple: it is enough on the server and client / site app.plex.tv/web to log in using your record, and the magic will happen: in the client or browser you can access your audio / video / photo library. At the same time, on the server side during playback, video / audio will be transcoded on the fly to the format guaranteed to be understood by the device. For narrow channels, you can select the playback quality. Access works even if the server does not look directly at the Internet, or does not have a static IP address (not critical,
However, there is one unpleasant limitation for mobile clients: if you want to watch / listen through the application on your phone / tablet, you will have to pay either for a subscription or for unlocking this function. At the same time, it’s quite comfortable to use the application through the browser even on the phone, but for the sake of such a nice feature I didn’t greed and honestly got a paid client for myself and for my spouse - now she is also delighted: her favorite series in FullHD quality without brakes (download speed within the city \ uploading files to my makeshift server is about 3-4Mb / s) always at hand.
The next question is access to the library. Everything turned out to be even simpler than I thought: my library is a bunch of zip archives and inpx file index. For viewing all my life I used open freelib, in which after setting one checkmark in the settings, the web interface is turned on for searching books in the catalog, or the OPDS server is launched , for which there are many applications for all platforms.
It would seem that what else is needed for happiness? Ann no. It’s not so easy to stop now. The essence of man is such that he will always want something more than he already has. So I went on about feelings, and decided that leaving another server application in my conditions would be simply unforgivable, and deployed the SeaFile server on it . Of course, home cloud storage is far from being run for fault tolerance in such giants as Google or Microsoft, but they are not able to give me unlimited disk space with a download / upload speed of 3-4 MB.
At this point, I realized that my ideas about the payload of this unfortunate box were exhausted and the last thing that remained puzzling was the backup issue (yes, I already belong to the second group of people - who already make backups), which I, truth, I haven’t mastered it yet, because I am hesitating between some simple and free solution and Acronis, so beloved by me, but paid.
The part of the article devoted to the software turned out to be somewhat crumpled, but this is due to the fact that each of the products deserves a separate article, therefore, literally in a couple of sentences, I had to describe the possible functional load of each of them.
I hope that someone will find my notes useful, and someone will discover the wonderful free software products described by me.
If you still have any questions that I think you did not reveal enough, or that deserve a separate article, write about this to the comments.
And I thank for the attention of those few who have read to this place.
PS: I put the extremely basic habrastorage on the side of all the vertical pictures (in principle, I agree with him - that’s how it should be done with them), but I won’t disassemble everything again to make the “right” pictures, so please accept all as it is.
It all started
Yes Yes Yes. As someone said:
Madam, I am an old pirate, and I do not know the words of the license agreement.
The decision was made: I want to get rid of the big noisy box that chatter a bunch of hard drives, as well as replace the control model from the mouse and keyboard with something like a remote control or smartphone. Also, along the way, it would be nice to organize access to a music collection from the outside world with the ability to listen from anywhere.
In the best traditions of time management, we set ourselves a list of goals that we want to achieve:
Iron:
- Need a compact body
- In which you can cram a lot of hard drives
- He must be quiet
- We will do it ourselves (all because in order to keep ourselves busy)
- The result should not be very scary (otherwise, do not get the good spouse to install it in a conspicuous place)
By software:
- The result should be controlled without a mouse / keyboard.
- In addition to the local video library, access to Torrent TV is required
- Torrent rocking chair, what really there
- All of this should have a simple and intuitive interface.
- Add. Goal 1: Access the music library from the outside
- Add. Goal 2: Get the ability to search and download books from your home library to your smartphone
Iron part
So it's time to finish procrastinating the idea and begin to implement it. We are counting on the use of components of easily accessible and easily upgraded forms of factors, because firstly, to simplify the possibility of a subsequent upgrade, and secondly, since I already have a MicroATX Elitegroup H81H3-M4 motherboard , as well as a core I3 4150 processor and a couple of slats DDR3 memory for her.
First of all, it is necessary to determine the form factor of the case and the location of the components inside it. In addition to the motherboard, we will still have 4 full-size hard drives of various capacities and manufacturers inside us, and we also need to come up with something with power and no noise.
Initially, I really did not want to have a disassembled ATX power supply inside the case. Firstly, it requires some kind of additional cooling, and secondly, by itself, is not quite small. Fortunately, our Chinese brothers come to the rescue with this wonderful thing: At
one end, this wonderful product connects directly to the 24-pin power connector on the motherboard, and the second to an external 12-volt power supply unit of the required power. The description of the converter says that it works at loads up to 160 watts, which should be more than enough for our task.
In order to immediately order a power supply for this converter, it was necessary to calculate the estimated power for it on the knee. According to the data on hard drives, each of them will consume about 7-10W during operation. Plus, it should be borne in mind that when starting up disks, their consumption can shortly reach 150% of the nominal. Accordingly, for 4 hard drives with a margin of about 60W should be enough. Further, it is more difficult: for processors and motherboards it is very difficult to find similar values: for processors only TDP is indicated everywhere - the amount of heat dissipated, but Intel does not indicate power consumption in any specification (although I will be glad to know that I'm wrong if someone pokes me in the place where it can be seen), a similar situation with the manufacturers of motherboards. For a motherboard, I could approximately recall that a couple of years ago I read somewhere that the consumption of a typical representative of a Low-end class does not exceed 20-30W. Accordingly, given that now everyone is fixated on the economics of iron, this value can be safely reduced to 18-20W. For the processor, there was nothing left but to soberly imagine that the modern Core I3, by no means, can consume more than 40-50W. The total result was that theoretically I should have enough 120 watts of power supply.
Looking ahead, I can say that my calculations were justified, and the 12-volt 10A power supply ordered by me completely coped with the task and successfully feeds the media server, despite my doubts that the Chinese inscriptions will be very different from the real ones power supply.
Having got rid of the most controversial component, without philosophizing for a long time, we outline an approximate diagram of the future box, and imagine how many and what parts we will need to produce:
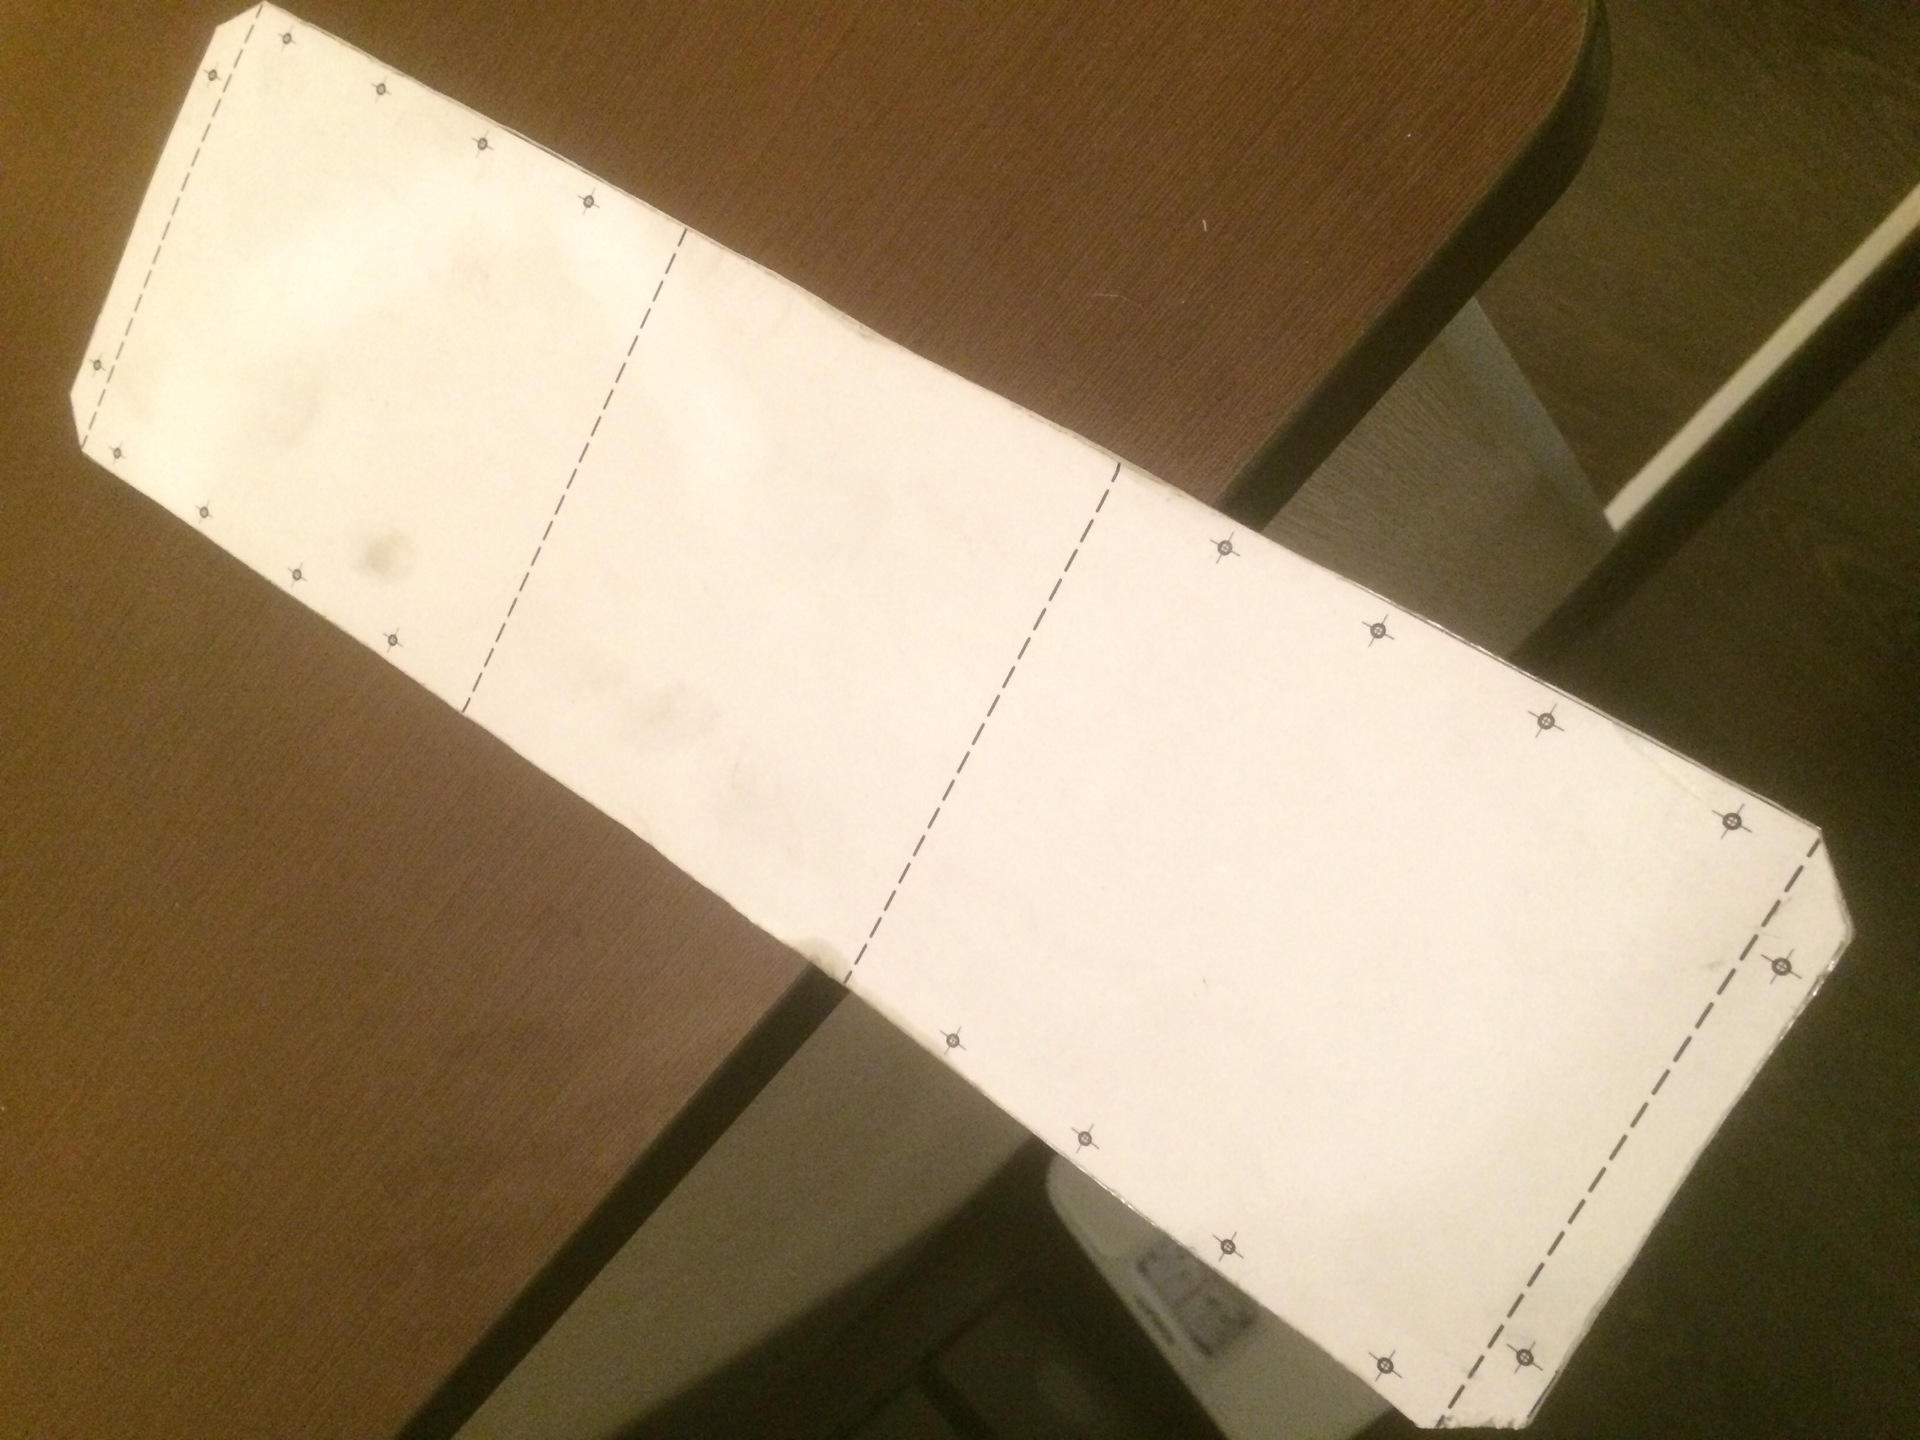
Not really philosophizing the motherboard and the hard drive bay, it was decided to place it in a horizontal plane, next to each other. Hard drives are first assembled together with a separate unit made of a long part located on the right side of the sketch, bent in the form of the letter "P", after which it is installed inside the main body and screwed to its bottom wall. To damp the vibration, the inside of the part will be glued with thin foam.
An additional partition is installed between the hard drive bay and the motherboard, which will be an additional stiffener, as well as an emphasis on the top cover of the case, and will not allow it to “play” due to the lack of emphasis.
The initial draft undergoes several improvements, it is thought over how cooling, ports, buttons will be implemented, after which it smoothly develops into a very accurate drawing ( FRW , DWG , PDF ), made in the spirit of complete spit on all design standards:
By this moment, the question arose very sharply from what actually to make all this “happiness” and how to fasten together. The choice, of course, fell on the most accessible material at hand: the side panels from the old tower server that had gone to the better world. Again, looking ahead, I can say that this solution was both successful and unsuccessful at the same time: on the one hand, the case turned out to be very monumental, not creaky and not “playing,” but on the other hand, when assembled, the box weighs ~ 7 kg, which, to put it mildly, is not enough for a compact media server. Also, the thickness and quality of the metal greatly reduced the speed of work.
But since the choice has been made. there is no turning back. Not really inventing how to quickly quickly transfer drawings to metal, I just printed out the details in the amount of 1 to 1 (by the way, the drawing was made to such proportions, in case someone tries to follow in my footsteps), and stuck it to the metal clerical glue stick. By the way, it’s a very convenient solution: the glued drawing is held tight enough not to fall off during cutting or drilling (just make sure that the glue is applied over the entire contact surface of the metal and paper) and at the same time, upon completion of work, the exhausted drawing removed in place with glue from the metal in a matter of seconds under a stream of warm water. After gluing, the front of work becomes clear:
Initially, it was supposed to perform a cut using a grinder, followed by glossing. However, the first tests (on a single sheet of metal) showed that after trimming, performed in this way, I was unlikely to be able to collect anything, because of which I had to abandon this venture in favor of a completely manual and leisurely hacksaw for metal, and also dremel for emergency cases and places where you need special accuracy.
The first pancake, contrary to expectations, turned out to be not at all lumpy, and “only” after an hour and a half of active work with a hacksaw (do not take thick server cases for crafts), the output was the first material result of the labors:
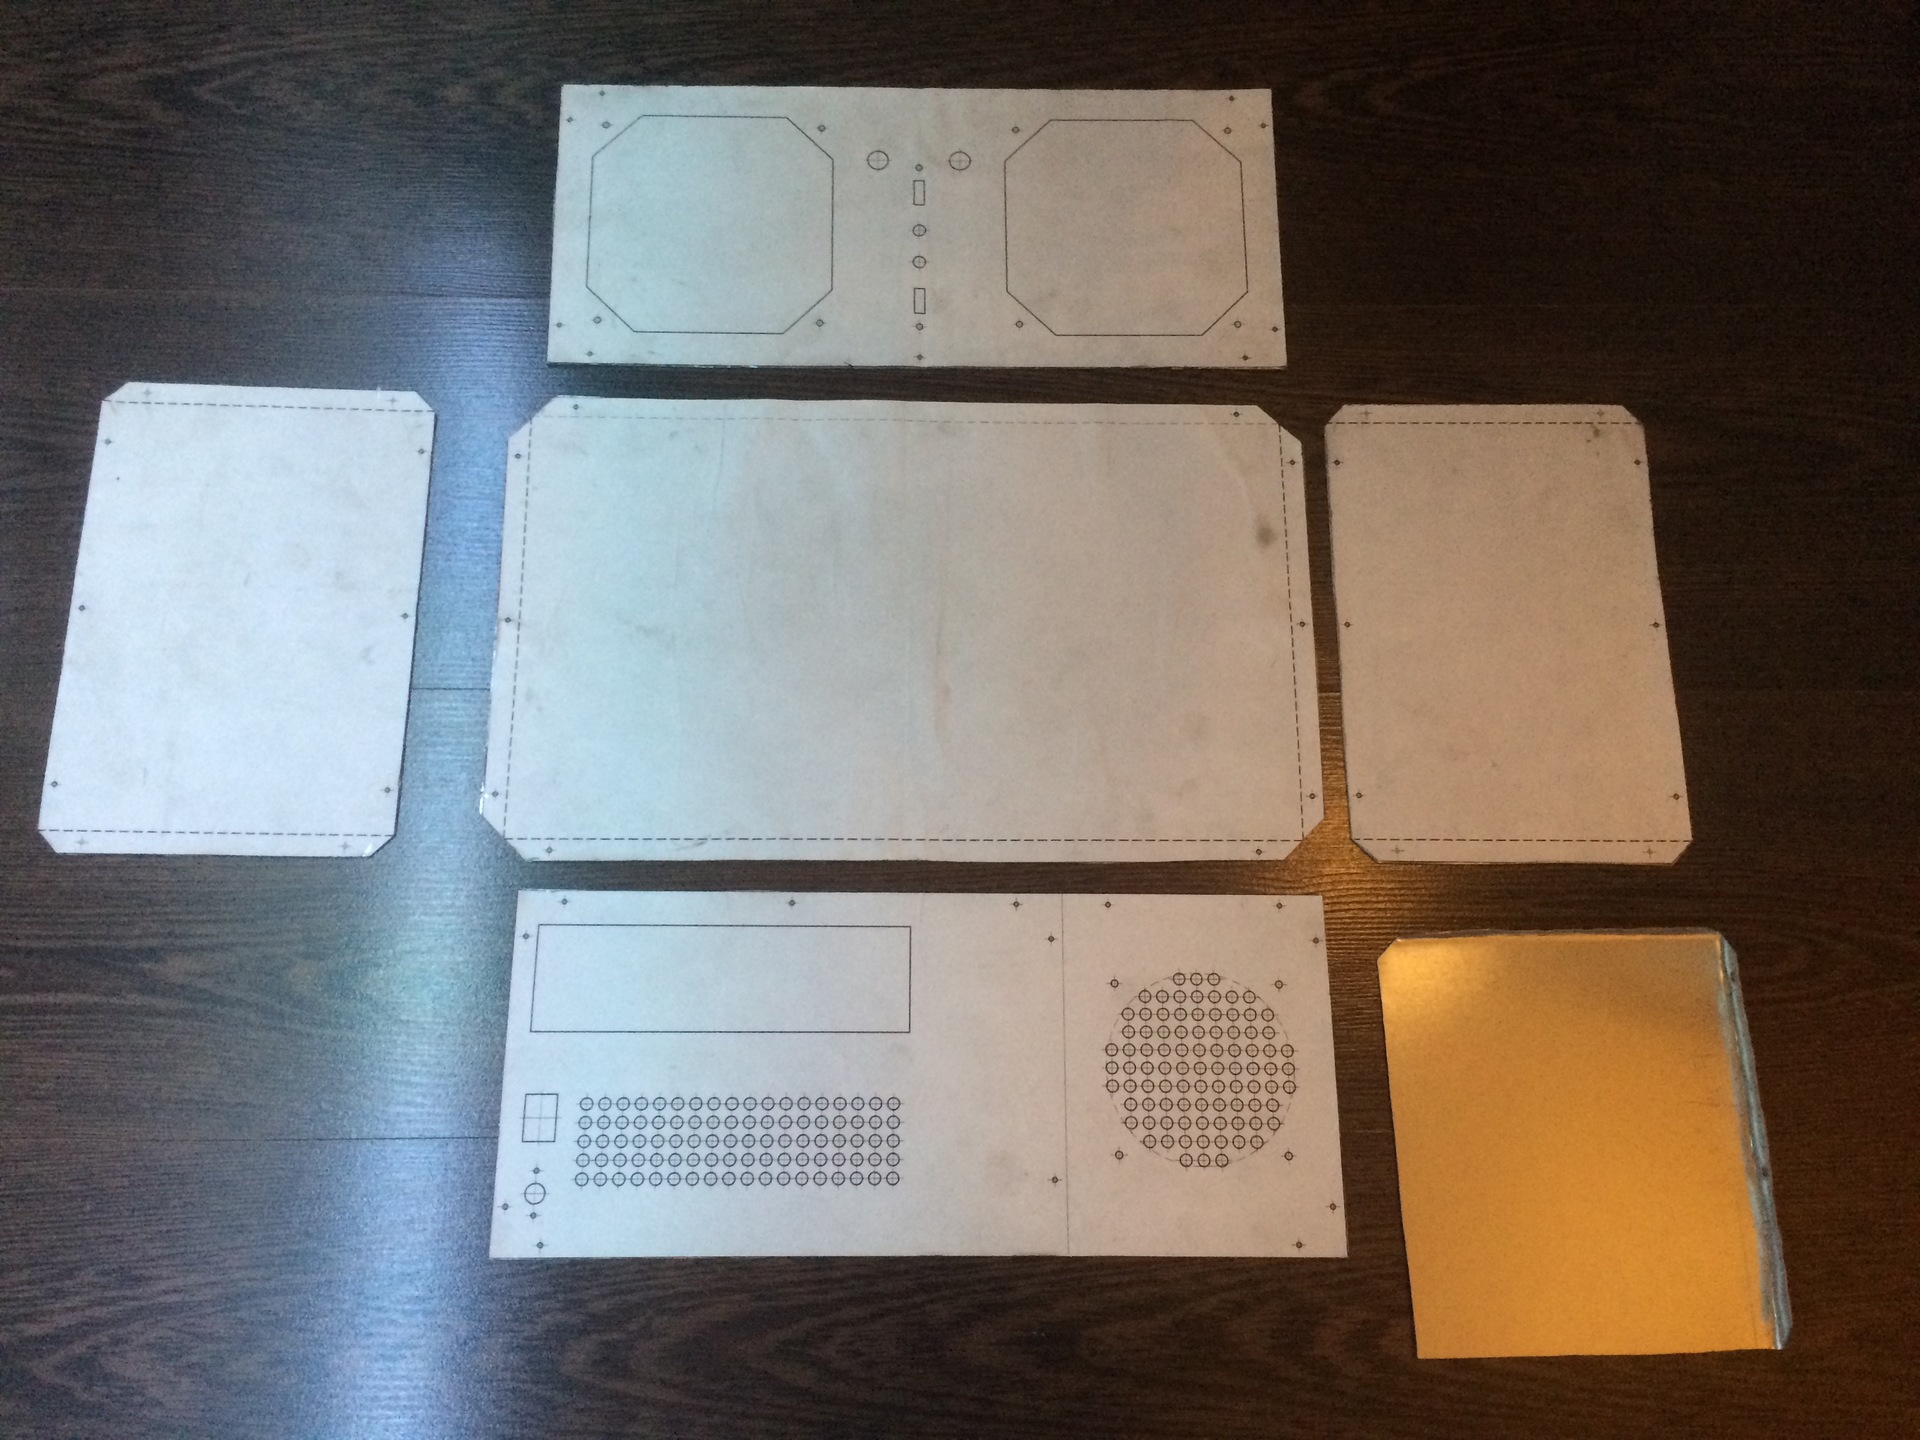
Subsequently, the cutting stage was delayed for two to three weeks, since in any case it was necessary to allocate at least 2-3 hours for one part (after cutting, it is necessary to finish the edges with a dremel with an abrasive nozzle so as not to be left without a finger), due to why every evening there was no desire to do this. But, as you know, water wears away the stone, and after a while this set was ready:
As you can see, of the eight planned parts, there are only 6. Here, this is because, as soon as the bottom of the case and the stand for the disks were cut, hands are here but they were drawn to parallel deployment and debugging of the software part, in connection with which the following engineering design temporarily settled over the TV:
In the process of assembling the skeleton of the case, a fundamental and incorrigible bug was discovered, which had to be put up with: the board, the converter connecting the 24-pin power connector on the motherboard turned out to be quite thick (since there are 2 boards) and rested against one of the operating brackets memory, because of which both of them were at a slight angle of 5-7 degrees, as can be seen in the terrible picture below:
The converter naturally heats up during operation. And, of course, the hottest part is pressed to the memory bar. However, it partially reassures me that the converter and memory are located close to the edge of the board on the side where the case fan will later be. Since it will be literally 2 centimeters from all this disgrace - we hope that the heat from the converter will be removed efficiently enough so as not to lead to the failure of one of the memory slats.
I’ll tell you about the software part after the hardware part, so we won’t be distracted by it yet, and continue our exercises with a hacksaw and a dremel. More precisely, the hacksaw will no longer help us and it will have to be put aside. A drill will now take its place. Using a drill and dremel, we drill and cut all the technical holes provided by the design:
Note to the hostess: in spite of the fact that the more expensive “diamond” cutting wheels for dremel (from 100r) are much more durable, they cut much worse than ordinary cutting wheels for metal for 20r, since they themselves are made of metal, and the cutting process is very hot. We have to make a stop every 5-7 cm (hello once again to the thick metal of the server enclosure) and resort to a glass of cold water to cool the disk. The metal itself, when cutting with such a disk, is also very hot.
However, such a disk is simply indispensable for marking bends. In the absence of special equipment for bending metal, at home, this can be done as follows:
- On the future bend line (in my drawings - a dotted line) we cut a small groove with a diamond cutting disc (we are not carried away - no more than a third of a millimeter, we just need the metal to bend exactly along it, and not begin to break along this line)
- Starting from the edge, use a pair of pliers to slightly raise the bend edge (15 degrees or less), continue the exercise throughout the entire length of the part, displacing the pliers no more than a centimeter at a time
- As soon as we get an angle of ~ 15 degrees, we start from the beginning, bringing the angle to ~ 45 degrees
- In 2-3 iterations we bring the angle to a straight line
- we place the part on the edge of the workbench with an even right angle, and tap the resulting bend with a hammer in order to equalize the inevitably resulting waves on the metal
The more slowly this procedure is performed, the more even the bend will result. The key role is played by the gradual raising of the bending part of the part, since too sharp bending will lead to the appearance of very large waves at the curved edge, which will be very difficult to get rid of.
So, we have the parts, all the necessary holes are cut out in them, bends are made in the right places, in which the parts will be fastened together, it's time to put it all together to make the final fit, and smooth out the inevitable bumps. We are not going to put the “guts” into the case yet, since after the assembly we will have one more stage of grinding, and maybe trimming the edges, but we still need to fix some technical elements on the case to make sure that they fit into place , and do not interfere with the assembly and installation of other components:
Since the core of our media center is never the cold Core I3, and there are quite a few hard drives inserted in it, we could not refuse active cooling. Therefore, to minimize noise, we took two 12-centimeter case fans without speed control (they were mercilessly cut from old power supplies along with chrome grilles and turned out to be bingo bearings, which is very good) and connected to a 5-volt power supply. At minimum speed, the noise level is on the verge of audibility - any, even the quietest household sound - whether it be the birds outside the window, walking around the room or the cat's snoring completely drowns out the quiet rustle of coolers. The power and reset buttons are purchased in the nearest department of radio components to your taste.
Since the chrome-plated cooler grilles set the tone, we will use aluminum blind rivets to assemble the body that will be placed on top of the cladding material - they are cheap, easy to install and will dilute our sadly black box a little.
After an hour of assembly and fitting parts to each other, our beta version of the case is obtained:
The rigidity of the metal again played a cruel joke with us - because of the manual bending of the bottom and the lid of the body (on these parts, bending was carried out from all 4 sides), both parts led slightly diagonally. to fix this annoying bug, we had to make perpendicular cuts in the bent parts to give the parts some flexibility. After these, as well as several more minor corrections, all the protruding parts were gently polished, all the uneven corners were ruthlessly straightened, and all not perfect cuts were resolutely corrected.
When a balance began to emerge on the scales of perfectionism and a sense of reality, a strong-willed decision was made that it was time to bring beauty and final assembly (especially considering that the software part was already ready for a long time, approved by the wife and was used to the full even as separate components).
Since for a high-quality painting of metal, which was originally intended, ideally, it is necessary to remove the old paint, to smooth out all the flaws and to look somewhere for a place where the painting itself will be performed (on the street by this moment it was already deep behind zero), I had to spit on this matter, and resort to the services of a vinyl self-adhesive film. And again: it was a very good decision: it took less than 10 minutes to process one part (with the exception of the back cover with its ventilation grill), and the result made it possible to hide minor flaws that inevitably strike the eye.
Already after an hour and a half, instead of a ugly but whole body, in front of me lay a pile of pretty, but again disassembled parts:
Due to an attack of inflammation of the feeling of beauty, even the internal details hidden from the eyes were pasted:
So, all the way back was completely cut off and it was time to make the final assembly after which it would be time to either triumph in victory or feel the bitterness of defeat.
A small fakap: a block of hard drives with power and SATA cables and front-mounted coolers did not appear in the case at the same time, and therefore an unpleasant surprise was found during assembly: it was very difficult to fit the cables so that they did not fit into the cooler. Because of this, I had to do a neat laying of wires, although this was not originally planned (anyway, I decided to put the top cover on rivets so that my hands would not scratch my fingers).
Since initially only one SATA and one MOLEX connectors were available on the converter, they had to be cut and remade to fit your needs: replace one SATA connector with 4, and MOLEX was left to connect the cooling. It turned out to be very convenient that the converter is very compact, and only 2 sets of wires come out of it (PSU input and output for the periphery) - it does not interfere with the cable laying process, and it can be connected when everything is ready and hidden.
Due to the design features of the case, the motherboard had to be raised to a non-standard height (3 standard racks for the motherboard screwed into each other were used). This allowed all kilometers of wires to fit directly under the board. The whole view only spoils a bunch of chaotic multi-colored wires from the front panel and power buttons, going to the cache under the board. One of the SATA loops is red, so after 5 years you still remember which drive the system is installed on (well, and this is just stylish). A bit of blue electrical tape (bottom left corner) for peace of mind - the manufacturer did not bother to insulate the junction of the wires and contacts of the connector, but I was too lazy to unsolder them to put on heat shrink. In addition, the connector is far enough away from everything else:
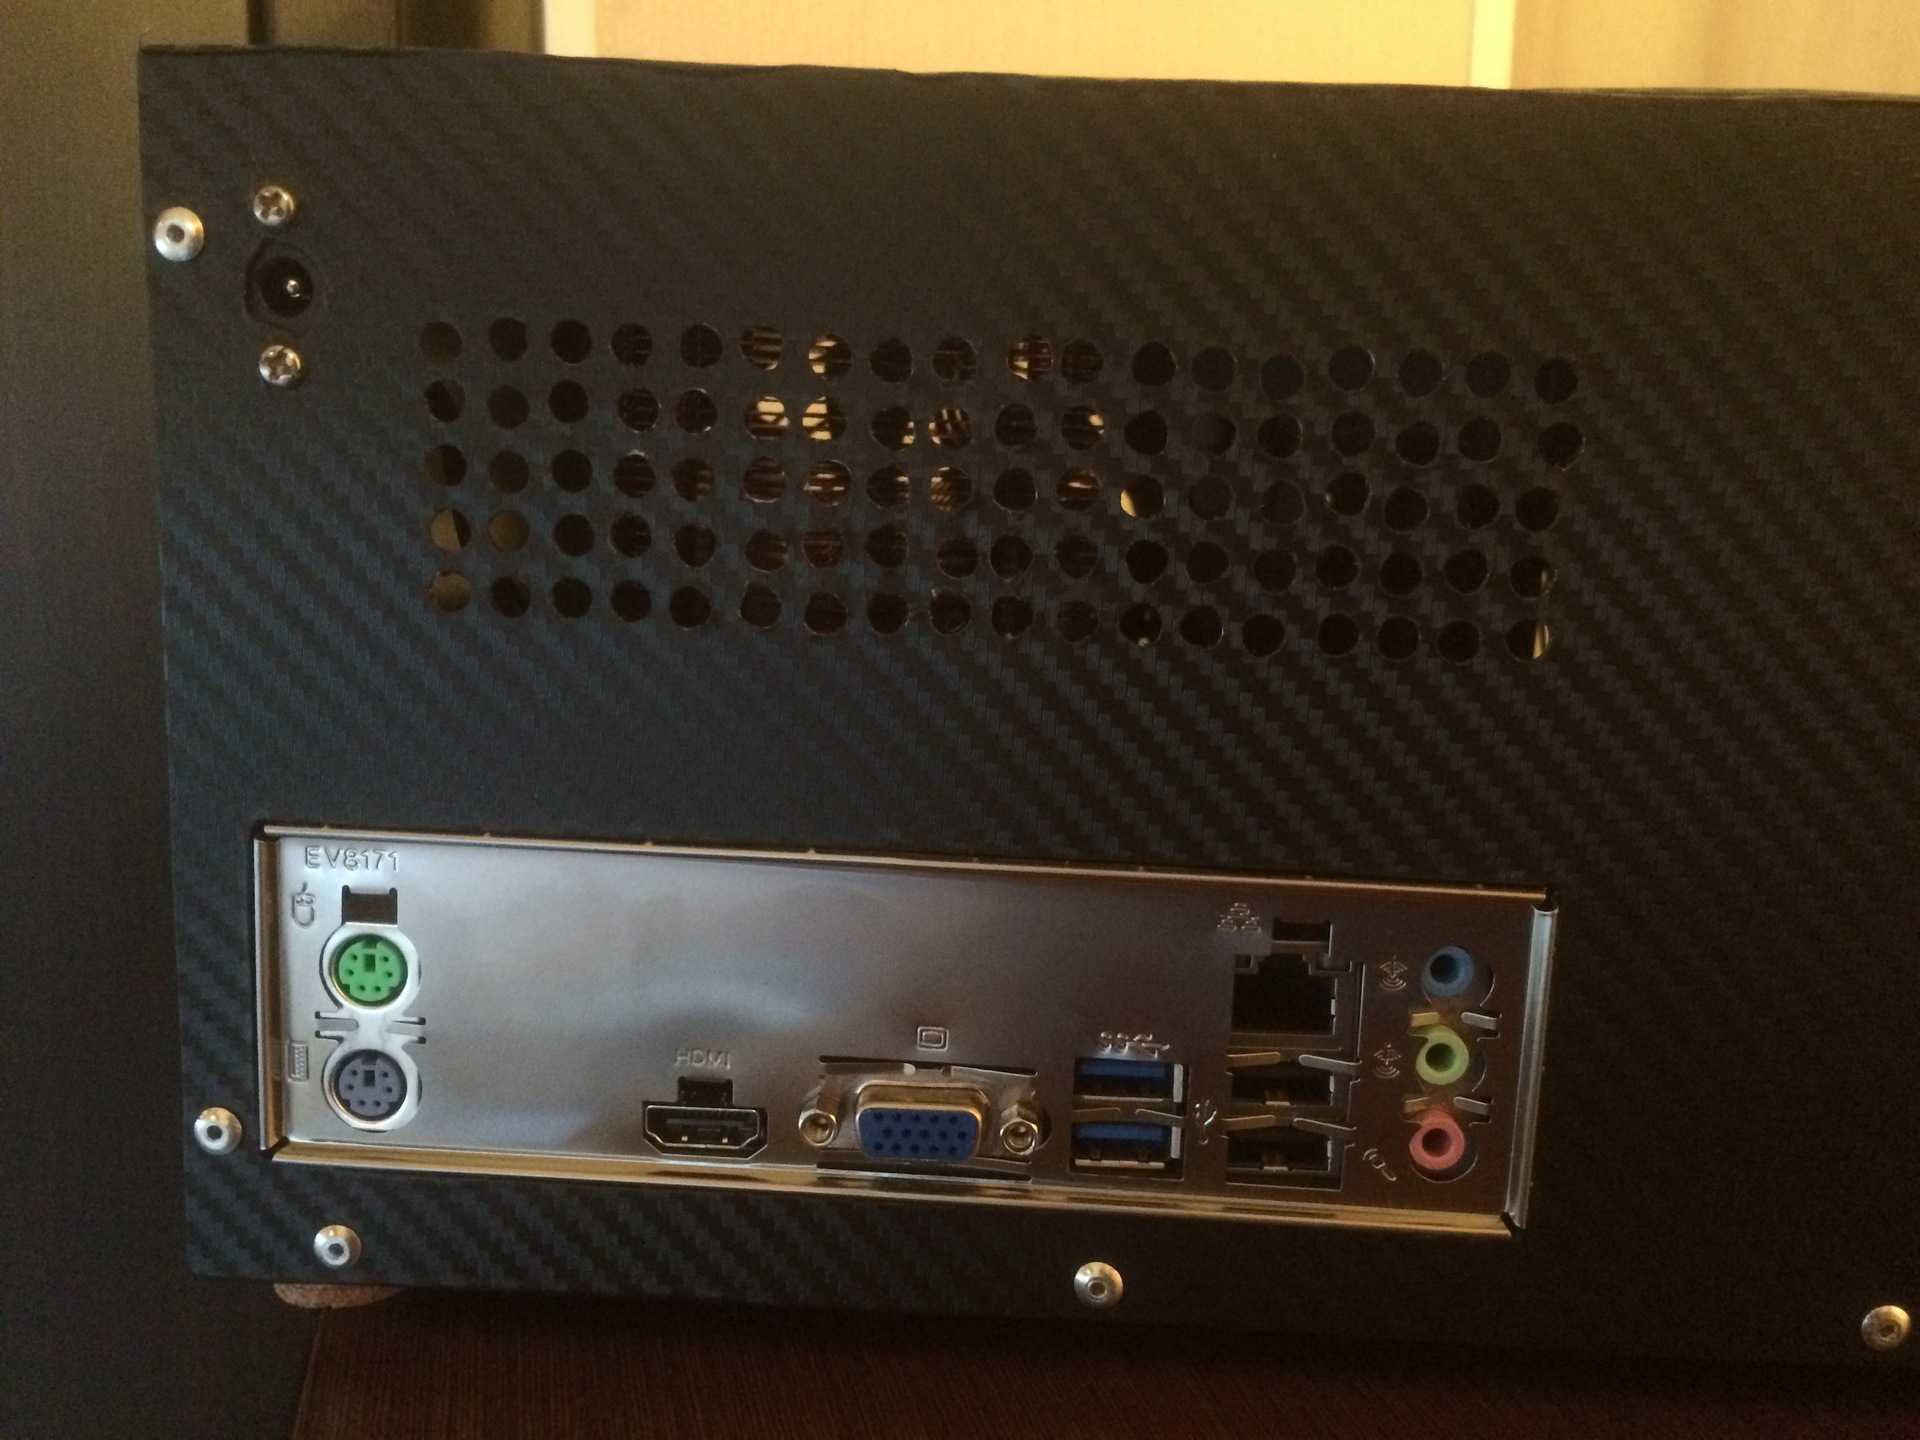
As truly risky people, first we close the top cover, fasten it with rivets and take a few photos, and after that we connect all this to the TV, and we check if we forgot to connect something:
You know how difficult it is to manually drill exactly 100 holes in metal? So I don’t know - I drilled them unevenly:
Self-adhesive cork legs for furniture came in handy: with considerable weight, the case stands thoroughly, when you try to move it it makes it reluctantly and silently. Waves at the junction between the lower and front walls of the casing are also visible - the very result of the rhyme of hasty bending of metal:
But despite the remaining minor flaws, it all quite organically settled under the TV, next to the good old Microlab SOLO 2:
Throughout the assembly process, it seemed to me that I still went a little too far with the dimensions, but in the end the case turned out to be quite acceptable sizes: 35x22x15 cm. Would it cost me to buy a factory case cheaper? Yes. Definitely yes. More than just 2 thousand rubles were bought of tool materials and other little things alone. And this does not take into account the fact that it took me at least 50 hours to slowly manufacture the case. Does the result live up to expectations? Personally, I got what I wanted: a small and very quiet building, as well as a lesson for hands and head in my free time (after all, this was the initial task). If the goal is simply to get a case, then it is much more profitable to spend these 50 hours making money and buy a factory version.
Software part
We figured out the iron part. Now let's see what we have with the software, and what we got from this box. The stars turned out so that I turned out to be more like a Windows administrator, and therefore the choice of a software platform was not a special torment for me, however, all the products I use as “extra dodgers” have their own Linux and MacOS versions and are open or just free .
The first thing that was installed after deploying the OS, updating it and creating a user without administrator rights was the open KODI home theater system(formerly also known as XBMC). Of all the tested options for shells for home theaters, this is perhaps the most flexible and expandable. In addition to the built-in functionality for managing local content, KODI supports additional plugins that are installed from both official and third-party repositories. Without much work, KODI was very easy to make friends with Torrent TV (according to the instructions on the website of Torrent TV itself), as well as with cinema search and rutracker (let's see if it stops working in Kazakhstan after blocking). The interaction with the player works according to the following scheme: by name, or by any criteria, a movie / series is selected from the base of the movie search, all information about it is displayed on the screen, as well as a magic “download / watch” button, when clicked, a list is displayed distributions of this movie found on the tracker. After selecting the distribution, it is automatically transferred to the torrent clients for download. Downloading will be performed in consecutive blocks, which makes it possible to start watching a movie immediately after setting it to download. Managed by all this miracle using applications forAndroid and iOS . Just in case for a backup, or for special “aesthetes”, the following thing is also connected:
I don’t see much point in examining the KODI platform in more detail, since a lot of words can be said about it, and it can be implemented very little few ideas. At the request of the community - about this I can write a separate article, so we move on.
Since all the main goals for the software have been achieved, let's look at additional points: posting your music collection face on the Internet, so that you always have access to it. A kind of pocket-sized, Google Play Music, so beloved and used by me even after the transition from Android to iOS. For certain reasons, for another 10 months I will not be able to use this service: it turned out to be an unpleasant surprise that only 10 devices can be connected to it in a year and only 4 can be disconnected. This fact drives me into insurmountable sadness. Initially, I tried to dispel it using the KODI web interface, but it worked surprisingly unstable on a 40-megabyte channel, and did not solve the problem of playing music on a smartphone. Although I can forgive him, After all, it is designed primarily to work inside the local network and play video / audio locally. Therefore, I had to turn to the search engine, which gave me just a wonderful tool to solve my problem:Media Server Plex .
The essence of the software is very simple: it takes your uPnP library, and allows you to access it from anywhere in the world through a web browser, or mobile applications for any platform. Since part of the platform is implemented on the developer's side, the setup is extremely simple: it is enough on the server and client / site app.plex.tv/web to log in using your record, and the magic will happen: in the client or browser you can access your audio / video / photo library. At the same time, on the server side during playback, video / audio will be transcoded on the fly to the format guaranteed to be understood by the device. For narrow channels, you can select the playback quality. Access works even if the server does not look directly at the Internet, or does not have a static IP address (not critical,
However, there is one unpleasant limitation for mobile clients: if you want to watch / listen through the application on your phone / tablet, you will have to pay either for a subscription or for unlocking this function. At the same time, it’s quite comfortable to use the application through the browser even on the phone, but for the sake of such a nice feature I didn’t greed and honestly got a paid client for myself and for my spouse - now she is also delighted: her favorite series in FullHD quality without brakes (download speed within the city \ uploading files to my makeshift server is about 3-4Mb / s) always at hand.
The next question is access to the library. Everything turned out to be even simpler than I thought: my library is a bunch of zip archives and inpx file index. For viewing all my life I used open freelib, in which after setting one checkmark in the settings, the web interface is turned on for searching books in the catalog, or the OPDS server is launched , for which there are many applications for all platforms.
It would seem that what else is needed for happiness? Ann no. It’s not so easy to stop now. The essence of man is such that he will always want something more than he already has. So I went on about feelings, and decided that leaving another server application in my conditions would be simply unforgivable, and deployed the SeaFile server on it . Of course, home cloud storage is far from being run for fault tolerance in such giants as Google or Microsoft, but they are not able to give me unlimited disk space with a download / upload speed of 3-4 MB.
At this point, I realized that my ideas about the payload of this unfortunate box were exhausted and the last thing that remained puzzling was the backup issue (yes, I already belong to the second group of people - who already make backups), which I, truth, I haven’t mastered it yet, because I am hesitating between some simple and free solution and Acronis, so beloved by me, but paid.
Instead of a conclusion
The part of the article devoted to the software turned out to be somewhat crumpled, but this is due to the fact that each of the products deserves a separate article, therefore, literally in a couple of sentences, I had to describe the possible functional load of each of them.
I hope that someone will find my notes useful, and someone will discover the wonderful free software products described by me.
If you still have any questions that I think you did not reveal enough, or that deserve a separate article, write about this to the comments.
And I thank for the attention of those few who have read to this place.
PS: I put the extremely basic habrastorage on the side of all the vertical pictures (in principle, I agree with him - that’s how it should be done with them), but I won’t disassemble everything again to make the “right” pictures, so please accept all as it is.