We work with the nRF24LU1 + USB stack. Part 1
- Tutorial
This article describes the USB stack operation of the nRF24LU1 + module. In the first part, a small introduction, installation of software and SDK, Hello World.
In the second part we will consider initialization, enumeration, WinUSB support and data exchange with the host. It is assumed that the reader has an initial understanding of USB. If not, I advise you to familiarize yourself with the excellent manual .

I ordered my chips on ebay . Included were 2 modules and an SPI programmer. Direct fly in the ointment for those who order the same set. There is no reset line in the programming connector on the module itself. Without it, ISP programming does not work. I had to carefully solder.

In principle, the chips can be programmed through the built-in bootloader (and even write your own). There is also a bunch of SPI-based flashers basedftdi , arduino and more. The programming process is similar to the nrf24le1 chip.
The nRF24LU1 + chip is:
The internal device of the chip:
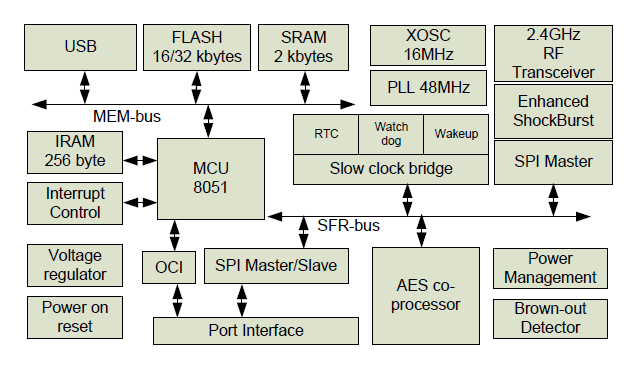
Of the features it is worth mentioning that the fast RAM is only 256 bytes (IRAM). The remaining 2 kb (SRAM) are located on the external bus, respectively, access to them is slower. There is also an encryption module.
All development will be conducted in the environment of Keil and nRFgo SDK. Download, install ( tyts , tyts ).
A few words about the organization of the project. I created this structure. Compiler, HAL and LIB copied from the nRFgo SDK. Projects will already be directly in the Projects folder.
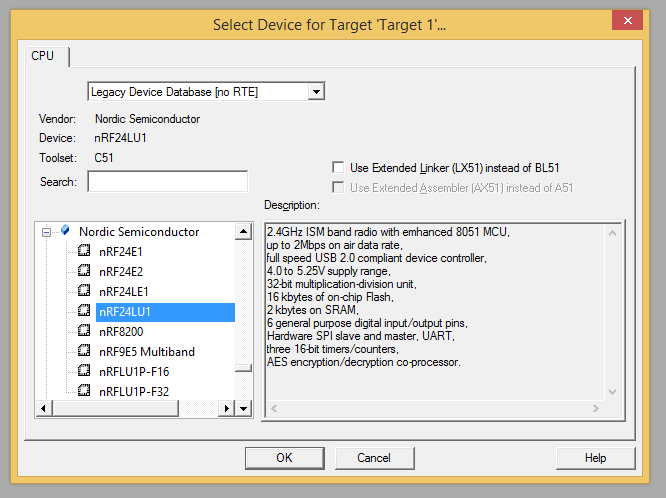
We go in Keil. Project - New uVision Prject. We select the catalog with the project, enter the name of the project. Next, select the chip as in the picture, agree with everything.
Next, add a new source to the project (right-click on Source Group 1 - Add New Iteam).
First program, endlessly print in Hello World! UART
Also, you need to add two files to the project:
The reader probably already understood that we are connecting the source code for exactly our chip.
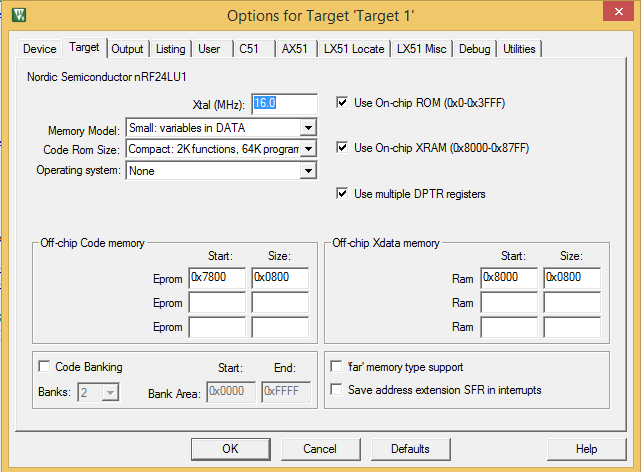
To get everything together correctly, you need to put a few ticks and register Include Path for the compiler.
The right wedge for the project is Options.
In the Output masonry, check the Create HEX file checkbox.
Next, in the C51 tab, write Include
Putting together a project. The resulting hex file is filled with the programmer in the controller. In my case, the Chinese sent this kind of software. The programmer itself is defined as a HID device, it does not require drivers. Before programming, the chip must be erased.
Software can be downloaded here .

If everything was done correctly, Hello World will be poured once a second in UART.
Continued in the next part. USB initialization, enumeration, WinUSB support and host exchange will be considered.
Second part
In the second part we will consider initialization, enumeration, WinUSB support and data exchange with the host. It is assumed that the reader has an initial understanding of USB. If not, I advise you to familiarize yourself with the excellent manual .
I ordered my chips on ebay . Included were 2 modules and an SPI programmer. Direct fly in the ointment for those who order the same set. There is no reset line in the programming connector on the module itself. Without it, ISP programming does not work. I had to carefully solder.
In principle, the chips can be programmed through the built-in bootloader (and even write your own). There is also a bunch of SPI-based flashers basedftdi , arduino and more. The programming process is similar to the nrf24le1 chip.
The nRF24LU1 + chip is:
- 2.4GHz nRF24l01 + transceiver
- full speed USB 2.0 controller
- 8 bit microcontroller with Intel MCS 51 core
- 16 or 32 kb flash
The internal device of the chip:
Of the features it is worth mentioning that the fast RAM is only 256 bytes (IRAM). The remaining 2 kb (SRAM) are located on the external bus, respectively, access to them is slower. There is also an encryption module.
Configure Keil, nRFgo SDK, and Hello World
All development will be conducted in the environment of Keil and nRFgo SDK. Download, install ( tyts , tyts ).
A few words about the organization of the project. I created this structure. Compiler, HAL and LIB copied from the nRFgo SDK. Projects will already be directly in the Projects folder.
├───compiler
│   ├───c51
│   ├───common
│   └───icc8051
├───hal
│   ├───nrf24l01p
│   ├───nrf24le1
│   └───nrf24lu1p
├───lib
│   ├───adns7530
│   ├───assertions
│   ├───crypt
│   ├───display
│   ├───eeprom
│   ├───eeprom255
│   └───rf_test
└───projects
     └───HelloWolrd
We go in Keil. Project - New uVision Prject. We select the catalog with the project, enter the name of the project. Next, select the chip as in the picture, agree with everything.
Next, add a new source to the project (right-click on Source Group 1 - Add New Iteam).
First program, endlessly print in Hello World! UART
#include
#include "nrf24lu1p.h"
#include "hal_uart.h"
#include "hal_delay.h"
char putchar(char c)
{
  hal_uart_putchar(c);
  return c;
}
void putstring(char *s)
{
  while(*s != 0)
    putchar(*s++);
}
void main(void)
{
	P0DIR = 0x00;
	hal_uart_init(UART_BAUD_57K6);
	EA = 1;
  for(;;)
  {
		putstring("\r\nHello World!\r\n");
		delay_ms(1000);
   }
}
Also, you need to add two files to the project:
hal\nrf24lu1p\hal_uart.c
hal\hal_delay.c
The reader probably already understood that we are connecting the source code for exactly our chip.
To get everything together correctly, you need to put a few ticks and register Include Path for the compiler.
The right wedge for the project is Options.
In the Output masonry, check the Create HEX file checkbox.
Next, in the C51 tab, write Include
..\..\hal;..\..\hal\nrf24lu1p;..\..\compiler\c51;..\..\compiler\common;
Putting together a project. The resulting hex file is filled with the programmer in the controller. In my case, the Chinese sent this kind of software. The programmer itself is defined as a HID device, it does not require drivers. Before programming, the chip must be erased.
Software can be downloaded here .
If everything was done correctly, Hello World will be poured once a second in UART.
Continued in the next part. USB initialization, enumeration, WinUSB support and host exchange will be considered.
Second part