How to assemble a quadrocopter of the 250th scale
I’ve been engaged in RC models for more than a year, I flew for hours on toys and no less on a serious copter: 450 ke. I got the urge to build a “baby” for fast flights.
Looking ahead, I will show them in comparison:
I will try to write in a clear language.
So let's get started.
What is needed for assembly?
Main components:
1) Frame (the basis of everything)
2) Flight controller (brains)
3) VMG (propeller group)
* BK motor
* speed controller for BK motor
* propeller
Tool:
* universal set of screwdrivers
* soldering iron
Many small auxiliary components.
Evaluate the front of work:

We assemble the frame (do not tighten much, do it for fitting): We place the

board
We roughly determine the location
We conduct the power wires of the regulators:

We begin soldering.
Solder the input power for the board:

Solder the power of the regulators:

Add ubek (to power the brains and the receiver):

Mount racks:

Cut the excess length of wires from the motors, solder the connector 2mm dad, carefully close the heat shrink (used 4mm):

Mount the motor on the beam:

Put the bottom part of the frame: we install the beams, we fix the carrier plates together.

Self-locking nuts are included (they will not loosen):

* I draw your attention to: directional rotation motors with a self-locking nut; dark - left front and right rear, light - vice versa.
The order of connection to the regulators

Thus, we obtain the desired direction of rotation.
We attach the regulators to the beam using double tape and a nylon screed.

Looks good. We assemble the damper pad and install the flight controller on it.

Time to set the brain in its place. We focus on the arrow, it should point forward.

We put Ubek: We

install the receiver: We

connect Ubek to the receiver in the battery connector (5v): We

connect the regulators to the brain according to the scheme: We


connect the complete cable from the brain to the receiver (it may differ, the essence does not change):

Keep in mind that, minus is always outside.
Set the top plate.

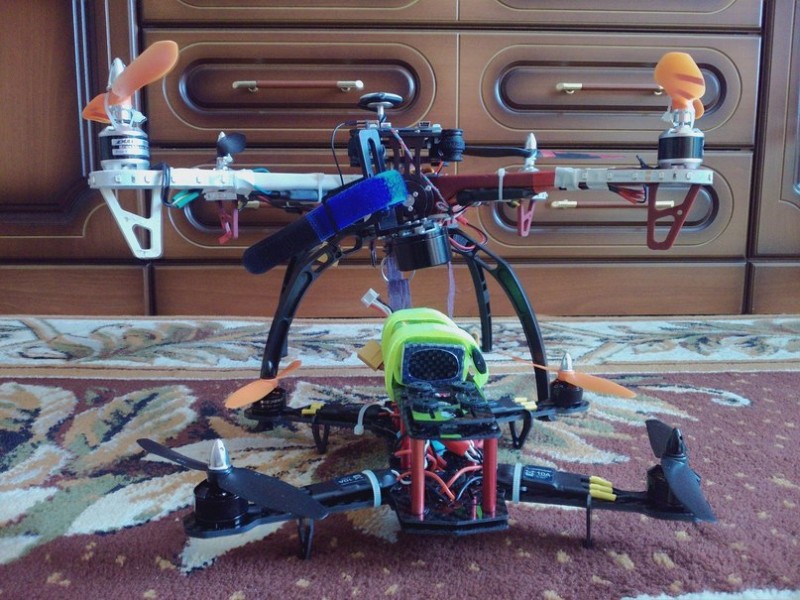
Quadric is almost ready:

It looks like at the moment after all the improvements:


TTX motors (2280kv).
Perform all manipulations with the copter without propellers. At full throttle, the engine makes almost 500 revolutions per second (3s). Take care of your health and those around you.

The estimated thrust of the motors is 1600 g (3s). The
weight of the copter without a battery is 430 g (FPV installed). The
weight from the batteries is 603 g (when installing the GoPro analog + 73 g)
. I will try to put FPV installation and brain settings in one review a little later, subject to availability. I draw your attention - the cost of the quadric is $ 118, without control equipment ($ 90) and batteries ($ 13-20) with a charger ($ 30).
Total: approximately $ 250.
Video build option:
First flight:
To summarize: the 250th grade deserves attention, but I do not advise starting with it. Even for me, passably managing 450, it’s hard to keep a quadric. If a beginner decides on a 250-ku, then I advise you to put your brains with autopilot and GPS.
Thank you all for a good day.
I will be glad to answer your questions.
Looking ahead, I will show them in comparison:
I will try to write in a clear language.
So let's get started.
What is needed for assembly?
Main components:
1) Frame (the basis of everything)
2) Flight controller (brains)
3) VMG (propeller group)
* BK motor
* speed controller for BK motor
* propeller
Tool:
* universal set of screwdrivers
* soldering iron
Many small auxiliary components.
Photo needed from the parcel


Evaluate the front of work:
We assemble the frame (do not tighten much, do it for fitting): We place the
board
power wiring
between the bearing plates, because there is not enough space inside the frame. We roughly determine the location
regulators
and the required wire length: it turned out to be sufficient. We conduct the power wires of the regulators:
We begin soldering.
Solder the input power for the board:
Solder the power of the regulators:
Add ubek (to power the brains and the receiver):
Mount racks:
Cut the excess length of wires from the motors, solder the connector 2mm dad, carefully close the heat shrink (used 4mm):
Mount the motor on the beam:
Put the bottom part of the frame: we install the beams, we fix the carrier plates together.
Self-locking nuts are included (they will not loosen):
* I draw your attention to: directional rotation motors with a self-locking nut; dark - left front and right rear, light - vice versa.
The order of connection to the regulators
Thus, we obtain the desired direction of rotation.
We attach the regulators to the beam using double tape and a nylon screed.
ATTENTION!!!!
Carbon conducts electric current. It is necessary to isolate the scarf from contact with carbon fiber. He smeared the solder with nail polish, covered it with masking tape on top.

Looks good. We assemble the damper pad and install the flight controller on it.
Time to set the brain in its place. We focus on the arrow, it should point forward.
We put Ubek: We
install the receiver: We
connect Ubek to the receiver in the battery connector (5v): We
connect the regulators to the brain according to the scheme: We
connect the complete cable from the brain to the receiver (it may differ, the essence does not change):
Keep in mind that, minus is always outside.
Set the top plate.
Quadric is almost ready:
It looks like at the moment after all the improvements:
mini FAQ (collected basic questions)
* Does it stabilize somehow?
Answer: YES, there is a simple stabilization system with a choice of several flight modes.
* Can it freeze at a point?
Answer: NO, to hang at a point you need a GPS module.
* Can I connect GPS to it?
Answer: YES. Difficult, but possible (non-native firmware required).
* Can HE return to the take-off point?
Answer: NO, you need GPS.
* Can He hold high?
Answer: NO, there is no baroder.
* Will he pull the GoPro and similar cameras?
Answer: YES.
* Can I attach a BC suspension to it?
Answer: possible, but not worth it. The tasks are not the same.
* Can I use a 3000mAh battery to increase the duration?
Answer: Formally, no. The maximum battery capacity is 2200mah. It's easier to sit down and change the battery. A further increase in capacity reduces battery efficiency,
* What is the range?
Answer: More line of sight.
TTX motors (2280kv).
Perform all manipulations with the copter without propellers. At full throttle, the engine makes almost 500 revolutions per second (3s). Take care of your health and those around you.
The estimated thrust of the motors is 1600 g (3s). The
weight of the copter without a battery is 430 g (FPV installed). The
weight from the batteries is 603 g (when installing the GoPro analog + 73 g)
. I will try to put FPV installation and brain settings in one review a little later, subject to availability. I draw your attention - the cost of the quadric is $ 118, without control equipment ($ 90) and batteries ($ 13-20) with a charger ($ 30).
Total: approximately $ 250.
Video build option:
First flight:
To summarize: the 250th grade deserves attention, but I do not advise starting with it. Even for me, passably managing 450, it’s hard to keep a quadric. If a beginner decides on a 250-ku, then I advise you to put your brains with autopilot and GPS.
Thank you all for a good day.
I will be glad to answer your questions.
References