Program for 3D-printers Cura 15.02.1
Cura is another free G-code application for 3D printers available.

It can also be used to control a 3D printer via a COM port, but I did not test this possibility due to the lack of a relatively old BFB Rapman printer , which can print only from a USB flash drive.
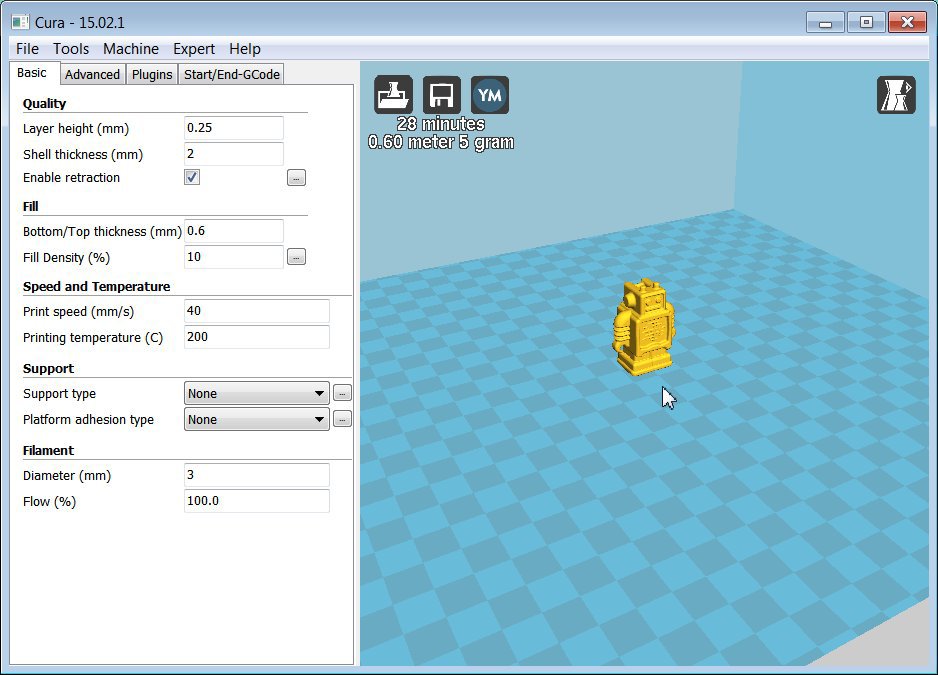
The first thing we see after the first launch of Cura is the main screen of the application with the basic settings:
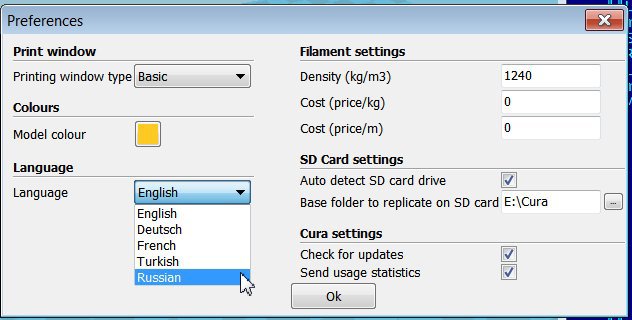
In the current version, support for the Russian language has appeared, which, however, is still partial:
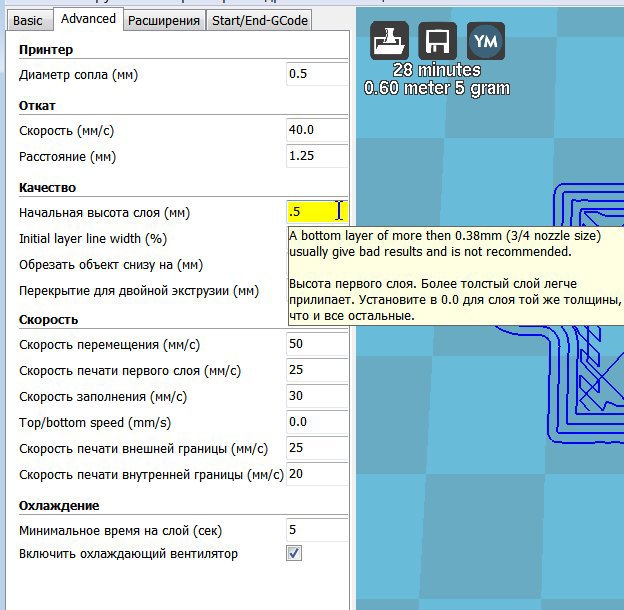
In the Russian version, the main screen looks like this:

In the window on the right, you can see a 3d view of the model , and on the generated path in the "many layers" or "single layer" mode:

At the same time, in the “many layers” mode, for some reason, for the code flavor ( type of G-code ) of BFB and Mach3 / LinuxCNC, a gap is obtained between the blue and green layers. For the rest of the code flavor, the paths in this gap are drawn with a smooth transition from yellow to green, which should probably symbolize the cooling of the layers.
Installing a simple "top view" for the authors of the program is probably too simple, and therefore, to achieve what you want, you need to tinker with the mouse. The keyboard can also be used - we use arrows to rotate, and to move through layers in the path viewing mode - up / down arrows when Shift or Control is pressed.
For code flavorBFB and Mach3 / LinuxCNC the path is shown as blue lines without thickness, including idle transitions.

For other types of G-code, the color of the paths is different for the outer / inner walls, filling and idle, and the path itself has a thickness:

However, with a large increase instead of solid lines, we will see a shaped disgrace:

All settings have tooltips, which helps to understand what's what.
It is a little confusing that the print speed is indicated in the basic tab , and the remaining speeds are indicated in the advanced tab :
Curious tab "Extensions":

The Tweak extension leads to the appearance of such a path:

And in the real process it will look like this:

As a result, the robot will have an “antenna”. Is it possible to use these extensions in real life - it’s not clear, but these applications cannot be turned off again otherwise than “clear the profile”.
On the last tab (which does not appear for all types of G-code), you can edit the start and end sections for the G-code of your printer, and which is taken from the corresponding ini-file (see below)

3D printer settings look like this:

The most significant - this is a type of G-code ( code flavor ), which is proposed to choose from the following options:

What kind of options are indicated in the prompt:

When setting up a new printer (or during the initial installation of the program) a wizard appears:

If you select the last item, then the following options will be offered:

The Custom option leaves very little chance:

But in other cases, the printer profiles are located in the \ resources \ machine_profiles folder: The

profiles look at first glance so that it seems that you can configure anything:

Cura allows you to read the following file types:

The presence of gcode in the list of formats is very pleasing, but the joy disappears when viewing in layers. There are no layers at all, some left only“horns and legs” blank transitions:

Importing images allows you to get a relief image at which the height corresponds to brightness:

STL files are read relatively quickly and correctly. However, one of the 35 test files, with the name, as if on purpose, sample did not load without any diagnostics.
STL processing occurs "on the fly" - after reading the file and with any change in parameters. For small files, this is not scary, but, for example, you need to rotate an object like a skull at the right angle to the horizon slowly and sadly.
Supports are generated automatically, of two types. Internal filling is only one option of a square grid at an angle of 45 degrees to the axes.
Customization for a specific printer BFB pleased neatly spread out rake.
Firstly, when choosing the type of the G-code BFB in the file with the G-code, instead of the “correct” line ends 0x0D 0x0A, you get 0x0D 0x0D 0x0A:

And the printer controller reacts to this in a very peculiar way - everything works, except for feeding the thread, which is set by the M108 command. You can deal with this by reading and writing a file in any text editor, but you still had to think of it before that.
Secondly, I still did not understand how and where Cura takes the value for the thread feed speed in this command.
If it’s not entirely clear to anyone what it is: M108 S400 Set Extruder 1 speed to S value / 10 = 40rpm
As a result, in order to achieve a “nominal feed rate”, it was necessary to set the yield coefficient (Flow%) to an abnormal value of 4250%. In the regular case, this is “fluidity of the material, the amount of extruded material is multiplied by this coefficient” and usually should be no more than 150. As a result, the length of the fishing line and the weight of the model are not considered correctly.
If you set the turnover to 100%, then for the robot from the example, the weight of 4 grams will be calculated.
Actual weighting showed 3.4.

Yes, the “antenna” bent like I didn’t turn on the pause at height extension .
Update : the density of the material is set in the "program settings" (well, it’s logical ), and by default there is a PLA density of 1240 kg / m3, and for ABS you need to set 1040, and then the program will estimate the weight of the robot at 3 grams.
Update 2 : It should be added that the “alien” G-code Cura does not read, and for a BFB of the G-code type, filling is not shown in the path viewing mode.

What Cura shows

What turns out in reality (in the picture contrast is lifted up).
It can also be used to control a 3D printer via a COM port, but I did not test this possibility due to the lack of a relatively old BFB Rapman printer , which can print only from a USB flash drive.
The first thing we see after the first launch of Cura is the main screen of the application with the basic settings:
In the current version, support for the Russian language has appeared, which, however, is still partial:
In the Russian version, the main screen looks like this:
In the window on the right, you can see a 3d view of the model , and on the generated path in the "many layers" or "single layer" mode:
At the same time, in the “many layers” mode, for some reason, for the code flavor ( type of G-code ) of BFB and Mach3 / LinuxCNC, a gap is obtained between the blue and green layers. For the rest of the code flavor, the paths in this gap are drawn with a smooth transition from yellow to green, which should probably symbolize the cooling of the layers.
Installing a simple "top view" for the authors of the program is probably too simple, and therefore, to achieve what you want, you need to tinker with the mouse. The keyboard can also be used - we use arrows to rotate, and to move through layers in the path viewing mode - up / down arrows when Shift or Control is pressed.
For code flavorBFB and Mach3 / LinuxCNC the path is shown as blue lines without thickness, including idle transitions.
For other types of G-code, the color of the paths is different for the outer / inner walls, filling and idle, and the path itself has a thickness:
However, with a large increase instead of solid lines, we will see a shaped disgrace:
All settings have tooltips, which helps to understand what's what.
It is a little confusing that the print speed is indicated in the basic tab , and the remaining speeds are indicated in the advanced tab :
Curious tab "Extensions":
The Tweak extension leads to the appearance of such a path:
And in the real process it will look like this:
As a result, the robot will have an “antenna”. Is it possible to use these extensions in real life - it’s not clear, but these applications cannot be turned off again otherwise than “clear the profile”.
On the last tab (which does not appear for all types of G-code), you can edit the start and end sections for the G-code of your printer, and which is taken from the corresponding ini-file (see below)
3D printer settings look like this:
The most significant - this is a type of G-code ( code flavor ), which is proposed to choose from the following options:
What kind of options are indicated in the prompt:
When setting up a new printer (or during the initial installation of the program) a wizard appears:
If you select the last item, then the following options will be offered:
The Custom option leaves very little chance:
But in other cases, the printer profiles are located in the \ resources \ machine_profiles folder: The
profiles look at first glance so that it seems that you can configure anything:
Cura allows you to read the following file types:
The presence of gcode in the list of formats is very pleasing, but the joy disappears when viewing in layers. There are no layers at all, some left only
Importing images allows you to get a relief image at which the height corresponds to brightness:
STL files are read relatively quickly and correctly. However, one of the 35 test files, with the name, as if on purpose, sample did not load without any diagnostics.
STL processing occurs "on the fly" - after reading the file and with any change in parameters. For small files, this is not scary, but, for example, you need to rotate an object like a skull at the right angle to the horizon slowly and sadly.
Supports are generated automatically, of two types. Internal filling is only one option of a square grid at an angle of 45 degrees to the axes.
Customization for a specific printer BFB pleased neatly spread out rake.
Firstly, when choosing the type of the G-code BFB in the file with the G-code, instead of the “correct” line ends 0x0D 0x0A, you get 0x0D 0x0D 0x0A:
And the printer controller reacts to this in a very peculiar way - everything works, except for feeding the thread, which is set by the M108 command. You can deal with this by reading and writing a file in any text editor, but you still had to think of it before that.
Secondly, I still did not understand how and where Cura takes the value for the thread feed speed in this command.
If it’s not entirely clear to anyone what it is: M108 S400 Set Extruder 1 speed to S value / 10 = 40rpm
As a result, in order to achieve a “nominal feed rate”, it was necessary to set the yield coefficient (Flow%) to an abnormal value of 4250%. In the regular case, this is “fluidity of the material, the amount of extruded material is multiplied by this coefficient” and usually should be no more than 150. As a result, the length of the fishing line and the weight of the model are not considered correctly.
If you set the turnover to 100%, then for the robot from the example, the weight of 4 grams will be calculated.
Actual weighting showed 3.4.
Yes, the “antenna” bent like I didn’t turn on the pause at height extension .
Update : the density of the material is set in the "program settings" (
Update 2 : It should be added that the “alien” G-code Cura does not read, and for a BFB of the G-code type, filling is not shown in the path viewing mode.
What Cura shows
What turns out in reality (in the picture contrast is lifted up).
Only registered users can participate in the survey. Please come in.
What 3D printer software do you use?
- 42.9% Cura 49
- 43.8% Slice3r 50
- 6.1% Polygon for Designer (Picaso) (uses Slice3r) 7
- 15.7% other 18