Radio transmission with HackRF
HackRF is a unique device designed for enthusiasts and radio enthusiasts keen on studying radio signals, and everything connected with it.
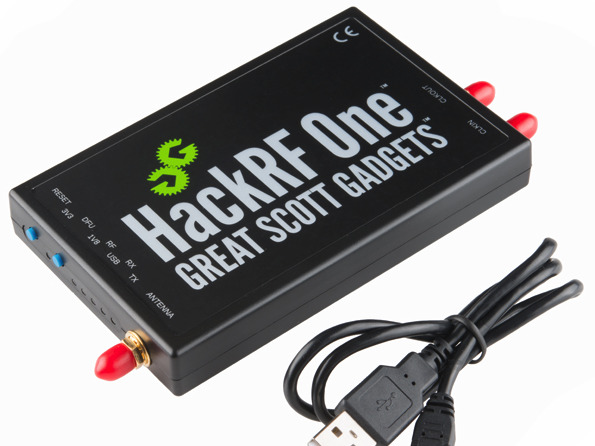
The uniqueness of HackRF in its technical parameters - at a price of about $ 300, the device allows you to not only receive, but also transmit radio signals in the 1 MHz-6 GHz range with a bandwidth of up to 20 MHz. The use of HackRF was practically not covered on Habré and Gytayms, it is time to fill this gap.
As for the reception of radio signals, everything is simple, and practically does not differ from the popular 10-dollar RTL-SDR, which only the most lazy did not write about. The necessary DLL is put, the program is launched, that's all. Those who have not heard of such a “miracle” can read here on the website:
habrahabr.ru/post/149698
habrahabr.ru/post/149702
habrahabr.ru/post/280454
habrahabr.ru/post/200914
With the reception, everything is quite simple and trivial, the technology is cheap and long-established. With the transfer, everything is a little more complicated. What will we do now.
The first way is to communicate directly with the device. HackRF has a library with an open API, an example of its use can be viewed on the author’s website in the hackrf_transfer utility: github.com/mossmann/hackrf/blob/master/host/hackrf-tools/src/hackrf_transfer.c. For those who have at least once worked with a sound card, the principle will be clear - a certain number of times per second a callback function is called, the buffer for which must be filled with data. It would seem simple, but there is one “but” - HackRF is an SDR. Software Defined Radio. This means that just sending a WAV file to the buffer will not work, nothing will be transmitted. We must programmatically generate a complex (IQ) signal for the entire required band of the receiver, so that its DAC, in turn, sends “this” to the air. It is also necessary to set a number of settings (frequency, gain, bandwidth), which can also be seen in the source.
HackRF supports operation with various bandwidths, from 1 to 20 MHz, and this band must be formed programmatically. We will not do this. We need serious mathematics, so let's move on to the second method - using the GNU Radio package.
GNU Radio is an open and free software package designed for digital signal processing for scientific, educational or commercial purposes. The system consists of a large number of ready-made blocks that have an interface in the Python language, the blocks themselves are written in C ++. GNU Radio also includes the visual editor GNURadio Companion, which allows you to visually connect the blocks into a finished “device” without using a programming language at all.
So, install the drivers for Hack RF, install GNU Radio (it can be installed on Linux or Mac OS, or downloaded as a Linux Live CD), run the “gnuradio-companion” console. Now everything is ready, you can start the transfer.
Formally, HackRF can transmit anything within its bandwidth, for example, knowing the data transfer protocol, you can steer a radio-controlled machine or control a doorbell. Consider the most trivial examples: amplitude (AM) and frequency (FM) modulation.
To transmit in FM mode, run gnuradio-companion and create such a graph in the program.

Its structure is quite simple. A WAV file with a sampling frequency of 44100 was chosen as the source, the Multiply Const block multiplies the signal by 2 (the original sound was pretty quiet), the next WBFM Transmit block does all the “magic” - converts our material signal with a frequency of 44100 into a complex a signal with a sampling frequency of 88200. The next Resampler block increases the sampling frequency to the 2.4 MHz selected for this example. The transmission frequency was set to 87.5MHz, it was the lowest FM radio frequency supported by my smartphone, and it was free of FM stations.
Result - start the graph in GNU Radio, the red TX LED on HackRF lights up, our file is heard on the smartphone.
It is interesting to see how it really works. The following output can be seen in the GNU Radio console:
Executing /opt/local/Library/Frameworks/Python.framework/Versions/2.7/Resources/Python.app/Contents/MacOS/Python -u / Users / XXXX / Documents / Projects / Gnuradio /top_block.py
Its contents are a finished Python program that implements our program!
It can be saved in a separate folder and used as you like, modified, etc. This is quite convenient, because for example, it allows you to add your own UI, make a scheduled launch, in general, everything is limited only by the imagination of the programmer.
We modify the graph a bit to run the program in the “narrow FM” mode, which is used in walkie-talkies and baby monitors:

The difference is small - we installed the NBFM unit, and the transmission frequency was set to 433.075 MHz - the first channel of the LPD band. Turn on the radio, and hear the sound. By the way, GNU Radio allows you to use not only a WAV file, but also a microphone as a source, so it’s easy to remake the program to send voice messages.
For those who still have a grandmother's HF receiver (although it is better, of course, at least Degen 1103 or IC-R9500), it will be interesting to try the AM mode. To do this, create the following graph:

Here, to convert data into a complex signal, we use the Hilbert transform block. Otherwise, the essence has not changed, the signal is resampled to the desired sampling rate and sent to HackRF.
Finally, we show that HackRF can do much more than just a walkie-talkie from the "Connected" at a cost of 1000r. This is a full-fledged Software Defined Radio, on which you can transfer anything. To show the ease of working with the “digit” in GNU Radio, we supplement the FM broadcast graph so that HackRF transmits information simultaneously at 2 frequencies.
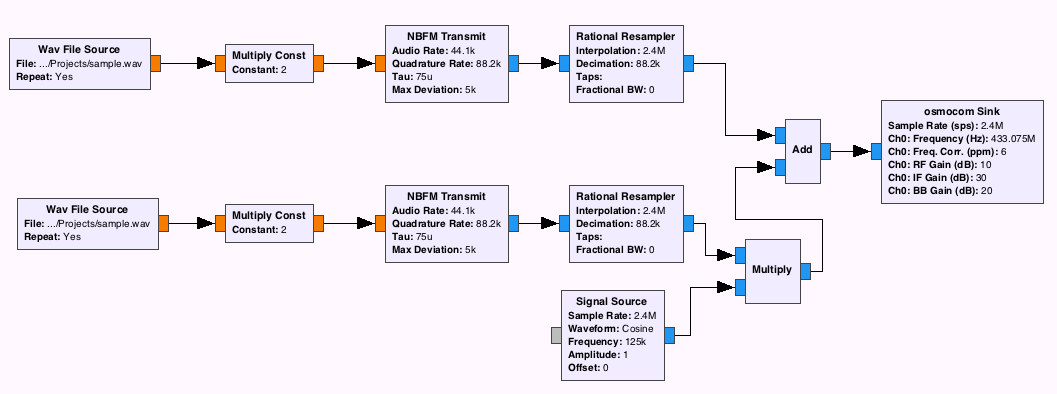
Here we add the second file, repeat the same structure. But we multiply the obtained data by a complex sinusoidal signal with a frequency of 125KHz, which is equivalent to a frequency shift of these 125KHz, as a result, the second data stream will be broadcast at a frequency of 433075 + 125 = 433200, which corresponds to the 6th LPD channel. Now HackRF transmits simultaneously 2 audio files at 2 different frequencies. You can add the 3rd, everything is limited only by the bandwidth and computer power.
That's all. Those interested in the GNU Radio theme can find tutorials on the net, there are quite a lot of them.
Finally. HackRF is not a full-fledged radio station, its power is too low and is about 20mW, and the efficiency of a standard antenna is less than 1%. It is rather a device for experimenting with signals in the "near zone", within the office or apartment. If someone wants to experiment with more powerful signals, be sure to follow the rules for the distribution of the radio frequency spectrum so as not to disturb others.
The uniqueness of HackRF in its technical parameters - at a price of about $ 300, the device allows you to not only receive, but also transmit radio signals in the 1 MHz-6 GHz range with a bandwidth of up to 20 MHz. The use of HackRF was practically not covered on Habré and Gytayms, it is time to fill this gap.
As for the reception of radio signals, everything is simple, and practically does not differ from the popular 10-dollar RTL-SDR, which only the most lazy did not write about. The necessary DLL is put, the program is launched, that's all. Those who have not heard of such a “miracle” can read here on the website:
habrahabr.ru/post/149698
habrahabr.ru/post/149702
habrahabr.ru/post/280454
habrahabr.ru/post/200914
With the reception, everything is quite simple and trivial, the technology is cheap and long-established. With the transfer, everything is a little more complicated. What will we do now.
Low Level - C / C ++
The first way is to communicate directly with the device. HackRF has a library with an open API, an example of its use can be viewed on the author’s website in the hackrf_transfer utility: github.com/mossmann/hackrf/blob/master/host/hackrf-tools/src/hackrf_transfer.c. For those who have at least once worked with a sound card, the principle will be clear - a certain number of times per second a callback function is called, the buffer for which must be filled with data. It would seem simple, but there is one “but” - HackRF is an SDR. Software Defined Radio. This means that just sending a WAV file to the buffer will not work, nothing will be transmitted. We must programmatically generate a complex (IQ) signal for the entire required band of the receiver, so that its DAC, in turn, sends “this” to the air. It is also necessary to set a number of settings (frequency, gain, bandwidth), which can also be seen in the source.
HackRF supports operation with various bandwidths, from 1 to 20 MHz, and this band must be formed programmatically. We will not do this. We need serious mathematics, so let's move on to the second method - using the GNU Radio package.
GNU Radio
GNU Radio is an open and free software package designed for digital signal processing for scientific, educational or commercial purposes. The system consists of a large number of ready-made blocks that have an interface in the Python language, the blocks themselves are written in C ++. GNU Radio also includes the visual editor GNURadio Companion, which allows you to visually connect the blocks into a finished “device” without using a programming language at all.
So, install the drivers for Hack RF, install GNU Radio (it can be installed on Linux or Mac OS, or downloaded as a Linux Live CD), run the “gnuradio-companion” console. Now everything is ready, you can start the transfer.
Formally, HackRF can transmit anything within its bandwidth, for example, knowing the data transfer protocol, you can steer a radio-controlled machine or control a doorbell. Consider the most trivial examples: amplitude (AM) and frequency (FM) modulation.
Frequency modulation
To transmit in FM mode, run gnuradio-companion and create such a graph in the program.
Its structure is quite simple. A WAV file with a sampling frequency of 44100 was chosen as the source, the Multiply Const block multiplies the signal by 2 (the original sound was pretty quiet), the next WBFM Transmit block does all the “magic” - converts our material signal with a frequency of 44100 into a complex a signal with a sampling frequency of 88200. The next Resampler block increases the sampling frequency to the 2.4 MHz selected for this example. The transmission frequency was set to 87.5MHz, it was the lowest FM radio frequency supported by my smartphone, and it was free of FM stations.
Result - start the graph in GNU Radio, the red TX LED on HackRF lights up, our file is heard on the smartphone.
It is interesting to see how it really works. The following output can be seen in the GNU Radio console:
Executing /opt/local/Library/Frameworks/Python.framework/Versions/2.7/Resources/Python.app/Contents/MacOS/Python -u / Users / XXXX / Documents / Projects / Gnuradio /top_block.py
Its contents are a finished Python program that implements our program!
Source
##################################################
# GNU Radio Python Flow Graph
# Title: Top Block
# Generated: Sun May  1 18:29:52 2016
##################################################
if __name__ == '__main__':
    import ctypes
    import sys
    if sys.platform.startswith('linux'):
        try:
            x11 = ctypes.cdll.LoadLibrary('libX11.so')
            x11.XInitThreads()
        except:
            print "Warning: failed to XInitThreads()"
from gnuradio import analog
from gnuradio import blocks
from gnuradio import eng_notation
from gnuradio import filter
from gnuradio import gr
from gnuradio.eng_option import eng_option
from gnuradio.filter import firdes
from grc_gnuradio import wxgui as grc_wxgui
from optparse import OptionParser
import osmosdr
import time
import wx
class top_block(grc_wxgui.top_block_gui):
    def __init__(self):
        grc_wxgui.top_block_gui.__init__(self, title="Top Block")
        ##################################################
        # Variables
        ##################################################
        self.samp_rate = samp_rate = 2.4e6
        ##################################################
        # Blocks
        ##################################################
        self.rational_resampler_xxx_1 = filter.rational_resampler_ccc(
                interpolation=int(samp_rate),
                decimation=88200,
                taps=None,
                fractional_bw=None,
        )
        self.osmosdr_sink_0 = osmosdr.sink( args="numchan=" + str(1) + " " + "" )
        self.osmosdr_sink_0.set_sample_rate(samp_rate)
        self.osmosdr_sink_0.set_center_freq(87.5e6, 0)
        self.osmosdr_sink_0.set_freq_corr(6, 0)
        self.osmosdr_sink_0.set_gain(10, 0)
        self.osmosdr_sink_0.set_if_gain(30, 0)
        self.osmosdr_sink_0.set_bb_gain(20, 0)
        self.osmosdr_sink_0.set_antenna("", 0)
        self.osmosdr_sink_0.set_bandwidth(0, 0)
        self.blocks_wavfile_source_0 = blocks.wavfile_source("/Users/XXXX/Documents/Projects/sample.wav", True)
        self.blocks_multiply_const_vxx_0 = blocks.multiply_const_vff((2, ))
        self.analog_wfm_tx_0 = analog.wfm_tx(
        	audio_rate=44100,
        	quad_rate=88200,
        	tau=75e-6,
        	max_dev=75e3,
        )
        ##################################################
        # Connections
        ##################################################
        self.connect((self.analog_wfm_tx_0, 0), (self.rational_resampler_xxx_1, 0))
        self.connect((self.blocks_multiply_const_vxx_0, 0), (self.analog_wfm_tx_0, 0))
        self.connect((self.blocks_wavfile_source_0, 0), (self.blocks_multiply_const_vxx_0, 0))
        self.connect((self.rational_resampler_xxx_1, 0), (self.osmosdr_sink_0, 0))
    def get_samp_rate(self):
        return self.samp_rate
    def set_samp_rate(self, samp_rate):
        self.samp_rate = samp_rate
        self.osmosdr_sink_0.set_sample_rate(self.samp_rate)
def main(top_block_cls=top_block, options=None):
    tb = top_block_cls()
    tb.Start(True)
    tb.Wait()
if __name__ == '__main__':
    main()
It can be saved in a separate folder and used as you like, modified, etc. This is quite convenient, because for example, it allows you to add your own UI, make a scheduled launch, in general, everything is limited only by the imagination of the programmer.
We modify the graph a bit to run the program in the “narrow FM” mode, which is used in walkie-talkies and baby monitors:
The difference is small - we installed the NBFM unit, and the transmission frequency was set to 433.075 MHz - the first channel of the LPD band. Turn on the radio, and hear the sound. By the way, GNU Radio allows you to use not only a WAV file, but also a microphone as a source, so it’s easy to remake the program to send voice messages.
Amplitude modulation
For those who still have a grandmother's HF receiver (although it is better, of course, at least Degen 1103 or IC-R9500), it will be interesting to try the AM mode. To do this, create the following graph:
Here, to convert data into a complex signal, we use the Hilbert transform block. Otherwise, the essence has not changed, the signal is resampled to the desired sampling rate and sent to HackRF.
More SDRs
Finally, we show that HackRF can do much more than just a walkie-talkie from the "Connected" at a cost of 1000r. This is a full-fledged Software Defined Radio, on which you can transfer anything. To show the ease of working with the “digit” in GNU Radio, we supplement the FM broadcast graph so that HackRF transmits information simultaneously at 2 frequencies.
Here we add the second file, repeat the same structure. But we multiply the obtained data by a complex sinusoidal signal with a frequency of 125KHz, which is equivalent to a frequency shift of these 125KHz, as a result, the second data stream will be broadcast at a frequency of 433075 + 125 = 433200, which corresponds to the 6th LPD channel. Now HackRF transmits simultaneously 2 audio files at 2 different frequencies. You can add the 3rd, everything is limited only by the bandwidth and computer power.
That's all. Those interested in the GNU Radio theme can find tutorials on the net, there are quite a lot of them.
Finally. HackRF is not a full-fledged radio station, its power is too low and is about 20mW, and the efficiency of a standard antenna is less than 1%. It is rather a device for experimenting with signals in the "near zone", within the office or apartment. If someone wants to experiment with more powerful signals, be sure to follow the rules for the distribution of the radio frequency spectrum so as not to disturb others.