May 24, 2016 at 09:46
Android Floating Action Button animation
- Transfer

Since the inception of the Material design concept, one of the easiest to implement elements has become a floating action button - FAB, Floating Action Button. This element quickly gained widespread popularity among developers and designers. In this post, we will look at how you can animate a FAB and make it interactive. But first, let's figure out how to add this element to your project altogether.
FAB looks like a colored circle in the lower right corner of the screen. If you create a new Blank Activity project in Android Studio, a floating action button will be automatically generated in it.

Floating Action Button
FAB can be one of two sizes: 56 dp (default) or 40 dp. If you want to learn more about the principles of using FAB in application design, then pay attention to the official Google guidelines .
In the latest Android apps, FAB reacts to scrolling through a list of items. It would be more logical to hide it while scrolling. Here's what you have in mind:

To display this animation, we create
recyclerViewby means of which the FAB responds to scrolling. There are many libraries available today that can achieve this with a couple of lines of code. For instance:public class FAB_Hide_on_Scroll extends FloatingActionButton.Behavior {
    public FAB_Hide_on_Scroll(Context context, AttributeSet attrs) {
        super();
    }
@Override
public void onNestedScroll(CoordinatorLayout coordinatorLayout, FloatingActionButton child, View target, int dxConsumed, int dyConsumed, int dxUnconsumed, int dyUnconsumed) {
super.onNestedScroll(coordinatorLayout, child, target, dxConsumed, dyConsumed, dxUnconsumed, dyUnconsumed);
//child -> Floating Action Button
if (child.getVisibility() == View.VISIBLE && dyConsumed > 0) {
child.hide();
} else if (child.getVisibility() == View.GONE && dyConsumed < 0) {
child.show();
}
}
@Override
public boolean onStartNestedScroll(CoordinatorLayout coordinatorLayout, FloatingActionButton child, View directTargetChild, View target, int nestedScrollAxes) {
return nestedScrollAxes == ViewCompat.SCROLL_AXIS_VERTICAL;
}
}Here we used a class
FloatingActionButton.Behavior()whose main task, according to official documentation, is to move the species FloatingActionButtonso that none of Snackbar them overlap. But in our case, this class is extended, so we can use it to implement the desired button behavior. What does this class do? Each time the scroll down is initialized, the method
onStartNestedScroll()returns true. After that, the method onNestedScroll()displays or hides the button, depending on its current visibility. The class constructor FloatingActionButton.Behavior()is an important part of the described view behavior and is retrieved from the XML file. public FAB_Hide_on_Scroll(Context context, AttributeSet attrs) {
super();
}Add to FAB an attribute
layout_behaviorcontaining the name of the package, and at the end - the name of the class. In other words, the attribute must indicate the exact placement of the class in the project. For instance:app:layout_behavior="com.valdio.valdioveliu.floatingactionbuttonproject.Scrolling_Floating_Action_Button.FAB_Hide_on_Scroll"
The animation looks good, but you can do even better. For example, for a button to go off the screen while scrolling is a more realistic behavior:

The same logic is used here as in the previous version, except for the way the FAB disappears. The animation is pretty simple. The button goes down using the LinearInterpolator . The distance she needs to go is equal to the height of the button plus the width of the bottom margin.
Please note that there are
if no checks in the expressions View.VISIBLEand View.GONE, since in this case the view is not hidden, it just floats off the screen.public class FAB_Float_on_Scroll extends FloatingActionButton.Behavior {
public FAB_Float_on_Scroll(Context context, AttributeSet attrs) {
super();
}
@Override
public void onNestedScroll(CoordinatorLayout coordinatorLayout, FloatingActionButton child, View target, int dxConsumed, int dyConsumed, int dxUnconsumed, int dyUnconsumed) {
super.onNestedScroll(coordinatorLayout, child, target, dxConsumed, dyConsumed, dxUnconsumed, dyUnconsumed);
//child -> Floating Action Button
if (dyConsumed > 0) {
CoordinatorLayout.LayoutParams layoutParams = (CoordinatorLayout.LayoutParams) child.getLayoutParams();
int fab_bottomMargin = layoutParams.bottomMargin;
child.animate().translationY(child.getHeight() + fab_bottomMargin).setInterpolator(new LinearInterpolator()).start();
} else if (dyConsumed < 0) {
child.animate().translationY(0).setInterpolator(new LinearInterpolator()).start();
}
}
@Override
public boolean onStartNestedScroll(CoordinatorLayout coordinatorLayout, FloatingActionButton child, View directTargetChild, View target, int nestedScrollAxes) {
return nestedScrollAxes == ViewCompat.SCROLL_AXIS_VERTICAL;
}
}Menu from FABs
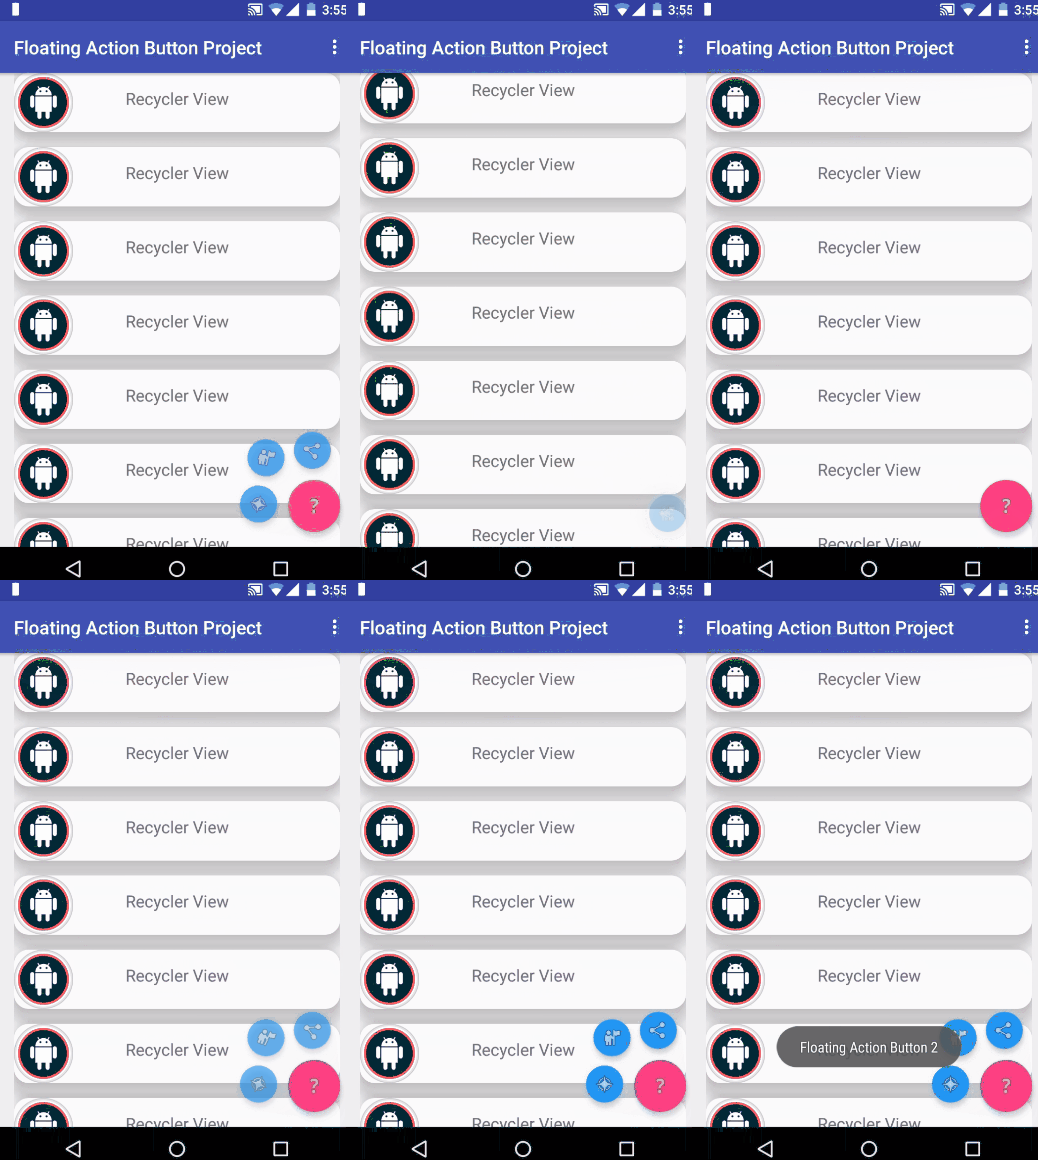
There are many applications whose authors have created beautiful and well-functioning menus consisting of floating action buttons.

Let's do something similar. First, create a layout containing three small buttons. They are invisible and are located at the very bottom of the layout, under the main FAB. The contents of fab_layout.xml :
This layout needs to be included in the activity layout under the main FAB.
Now you need to add the animation of the disappearance and appearance of each of the small buttons.
Note : here you may encounter a problem associated with practicing clicking on the small buttons. When the animation ends, the actual position of the button does not change, only the view moves. Therefore, you cannot correctly handle the touch of a button. To solve this problem, you can configure the layout parameters of each button taking into account their new position, and only then do the animation of moving the view.
You can see the animation itself at the end of this publication. The procedure for all buttons is the same, only the coordinates of movement differ.
Menu display:
  FrameLayout.LayoutParams layoutParams = (FrameLayout.LayoutParams) fab1.getLayoutParams();
  layoutParams.rightMargin += (int) (fab1.getWidth() * 1.7);
  layoutParams.bottomMargin += (int) (fab1.getHeight() * 0.25);
  fab1.setLayoutParams(layoutParams);
  fab1.startAnimation(show_fab_1);
  fab1.setClickable(true);
fab1 It is moved by adding to the layoutParams fields on the right and bottom, after which the animation is initiated. Hiding the menu:
FrameLayout.LayoutParams layoutParams = (FrameLayout.LayoutParams) fab1.getLayoutParams ();
layoutParams.rightMargin - = (int) (fab1.getWidth () * 1.7);
layoutParams.bottomMargin - = (int) (fab1.getHeight () * 0.25);
fab1.setLayoutParams (layoutParams);
fab1.startAnimation (hide_fab_1);
fab1.setClickable (false);
The hiding process is a reverse playback of the previous animation.
// Animations of one of the small buttons
Animation show_fab_1 = AnimationUtils.loadAnimation (getApplication (), R.anim.fab1_show);
Animation hide_fab_1 = AnimationUtils.loadAnimation (getApplication (), R.anim.fab1_hide);
Now create in the res / anim / folder the files for each of the animations. This is done simply, but if you have any difficulties, you can refer to the documentation .
Contents fab1_show.xml :
Content fab1_hide.xml :
If you look at the translate tag, which is responsible for the movement of the view, you will see that the movement coefficient (170% and 25%) corresponds to the coefficients used when adding fields and extracted into Java code.
We repeat all the above steps for the remaining small buttons. Only the movement coefficients differ:
fab2 - 150% and 150%, fab3 - 25% and 170%. The result of our efforts:
This is not the end
I hope this article helped you understand how you can animate the Floating Action Button in your project. Then you can explore Android animation resources and start creating your own types of animations. All the code described in this publication of the project is available on GitHub .