Haiku installation and initial system setup
This manual is intended to help novice users of the Haiku operating system to familiarize themselves with the installation process and initial system setup.
To get started, download the latest Haiku x86 GCC 2 Hybrid nightly build (this is currently the main and most stable development branch of Haiku).
Depending on how you install Haiku, download the ISO or Anyboot system image.
If the Haiku boot from the bootable media (which you selected in the computer BIOS) started successfully, then you should see the following image on the screen:

Haiku boot screen
This means that the loading of the operating system has begun and is accompanied by a consistent coloring of the icons corresponding to the current Haiku boot phase:
If a crash occurs at some stage during system boot, the KDL (Kernel Debugging Land) debugging window will probably appear with a log containing information about the error and the ability to enter commands:
If you encounter problems with booting the system, you can try to boot with special parameters. To activate the menu of special boot parameters, you need to hold down the SHIFT key before the boot screen with icons appears. Then you should see the following image on the screen:

Haiku boot menu with advanced options The
boot menu contains four items:
Try changing the options listed below under Select safe mode options , maybe this will help you boot the system:
To get detailed information about the boot process, I advise you to enable debug mode in the Select debug options item with the output on the screen Enable on screen debug output , while disabling the page output Disable on screen debug paging .
Do not forget about a few general tips that can help you:
If none of this helps to load Haiku and the system stays stable in KDL, then create a bug report using this instruction and publish it in the Haiku bug report .
Upon successful completion of all stages of booting the system from bootable media, you will see a window with a choice of language and method for further installation of Haiku:

Choosing a language and method of installing Haiku
Here you can select a language and click the "Run Installer" button to proceed with installing the system on a hard disk, or click “Download Desktop” to launch Haiku in Live CD mode (in this mode you can also start installing the system on your hard drive by running the Installer program, which is located in the Applications menu).
By launching the installation of Haiku on your hard drive, you will first be asked to read important information. Read carefully to the end and click the "Continue" button.

Important information before starting to install Haiku.
Then the Installer program will start, which will prompt you to select the partition on the hard disk for installing Haiku.

Installer offers to select a partition for installing Haiku.
If the partition initialized in Be File System is not ready yet, you can create it by clicking the "Partition setup" button. Then the DriveSetup program will start , in which you can easily create the desired partition. DriveSetup program for creating a Be File System partition If you want to give the entire hard drive to Haiku, select the desired hard drive in the list of media and initialize the entire hard drive (without creating additional partitions on it) in the Be File System , as shown in the screenshot above. In the end, you should get it, as shown in this screenshot: The hard drive is fully initialized in the Be File System


A Haiku installed on a hard drive configured in this way will boot from it without additional bootloaders, provided that this hard drive is selected as bootable media in the computer BIOS .
But this configuration does not load on all computers due to the peculiarities of the old BIOS . In such cases, it is necessary to create a partition table on the hard disk. To do this, select the hard drive from the list, go to the menu and select the item: Disk> Initialize> Intel Partition Map . An empty area will be created on the disk. Select this empty area and create a Be File System section in it , checking the “Active section” checkbox, and then initialize it as a Be File System .
If the system boot fails even with this configuration of the hard disk, then after installing Haiku on this section, set the boot menu so that the system boots from this section. How to install the boot menu is described below, using the example of installing Haiku in an additional section of the hard disk.
If you plan to install Haiku in an additional partition on your hard drive (the minimum partition size is 4 gigabytes) and save the ability to load other OSs installed in other partitions, then you need to initialize the selected partition in the Be File System , as shown in this screenshot: Additional partition on the hard drive disk initialized in Be File System

After successfully preparing the partition, close the DriveSetup program and select this partition in the Installer program, as shown in this screenshot:

Everything is ready to install Haiku on the selected partition.
To start the installation of Haiku, click the “Start” button, then the process of copying system data to the selected partition will begin, accompanied by visualization of progress. After the installation process is completed, you will be prompted to restart the computer (do not forget to select the hard drive on which the installation was performed as the boot device in the BIOS of the computer).
If Haiku was installed in an additional partition of the hard disk, then in order to be able to choose between boot partitions, you should install an additional bootloader in the MBR area of the hard disk. To do this, select the “Install the boot menu” section in the “Tools” menu, as shown in this screenshot:

Choosing to install the boot menu in the MBR area of the hard disk
Next, follow the instructions on the screen, proceeding step by step, as shown in the following screenshots:

Selecting the hard disk for installing the boot menu

Configuring the boot menu
After the installation of the boot menu is completed, restart the computer (do not forget to select the hard disk on which the installation was performed as the boot device in the BIOS of the computer), and then when you boot the computer you should see a menu with a selection of boot sections, as in this screenshot:

Boot menu with choice of sections
After the system boots up, the cursor appears on the screen and the Tracker and Deskbar , analogues of Explorer and the Taskbar in Windows , start up . At this point, the system is loaded and ready to go.
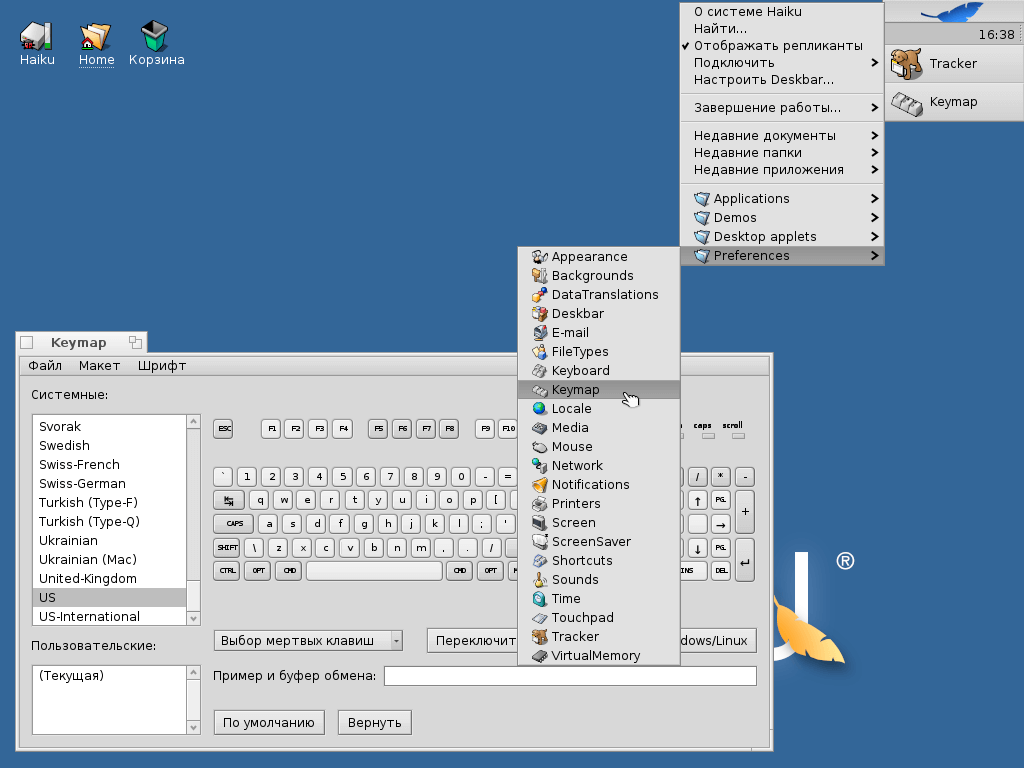
First, you can configure Deskbar, as shown in this screenshot: Configure Deskbar and the system information window First of all, you need to switch the system keyboard layout to English (for further system configuration). Press the button with the image of a pen and select the section in the Preferences settings in the menu that opens , then select the Keymap item . The window for setting the system keyboard layout will open. In this window, from the "System:" list, select US

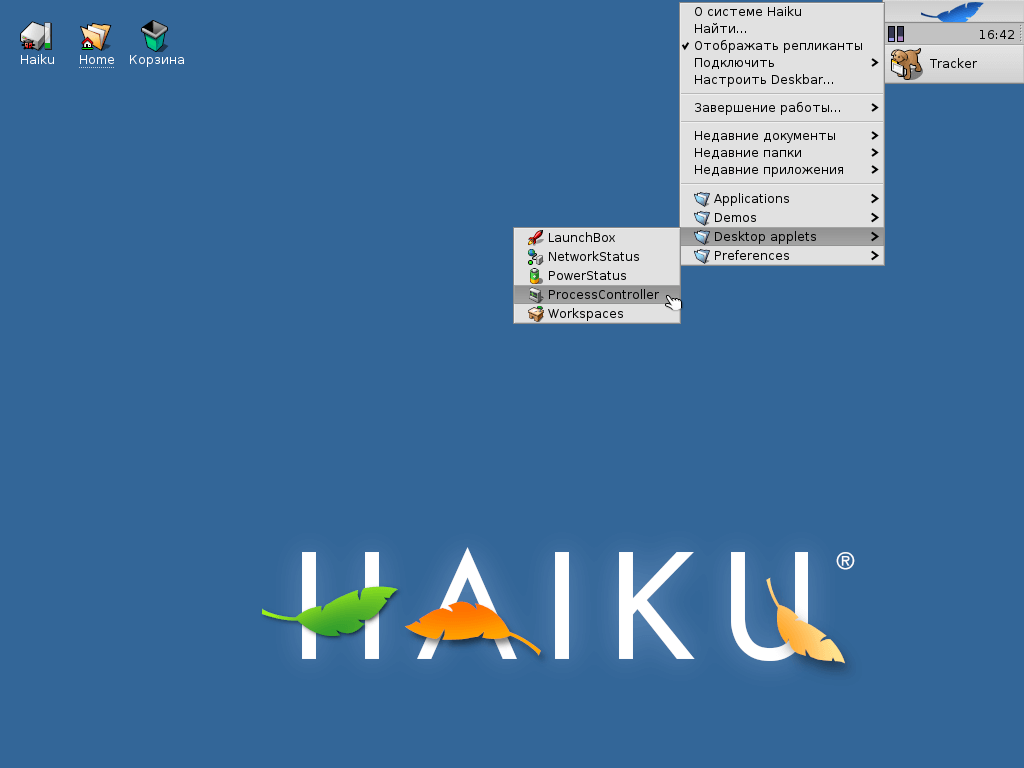
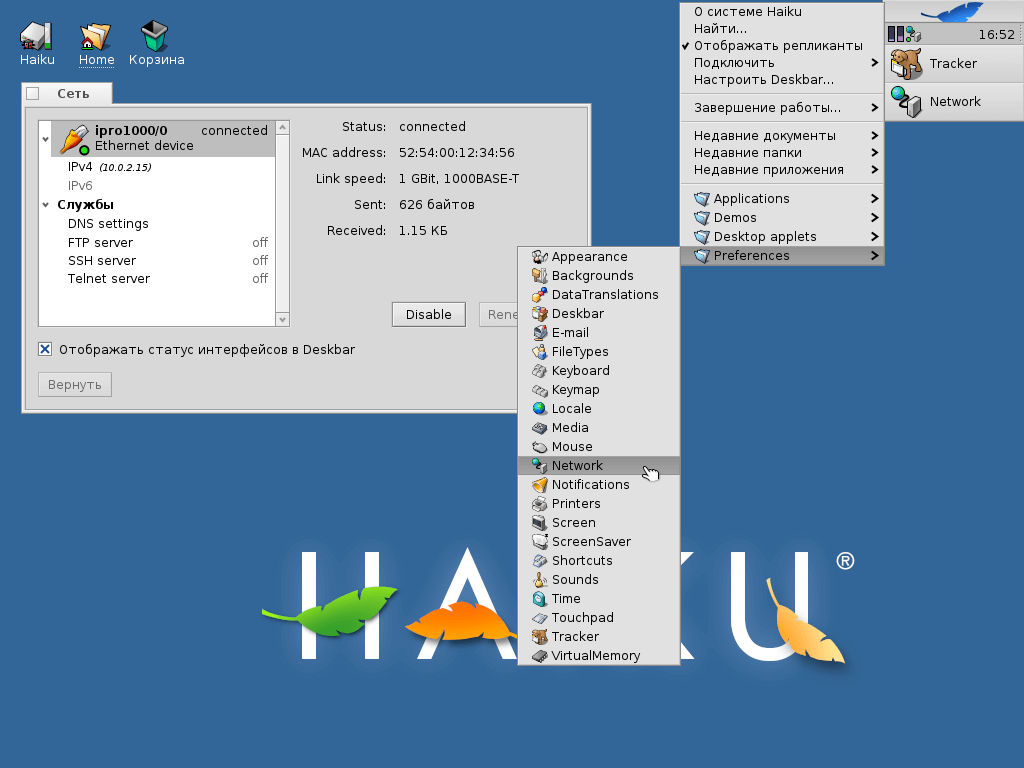
and you can click the button “Switch layout to Windows / Linux mode” so that the main key combinations are more familiar. Setting up the system keyboard layout in Haiku Next, install the process controller applet in Deskbar to visually manage resources and processes in the system. Open the main menu, go to the Desktop applets menu and select ProcessController . Then in the window that opens, click the "Install in Deskbar" button. Installing the process controller applet in Deskbar If your computer is connected to the network, then it makes sense to check the network settings. To do this, open the main menu and go to the Preferences section and select Network
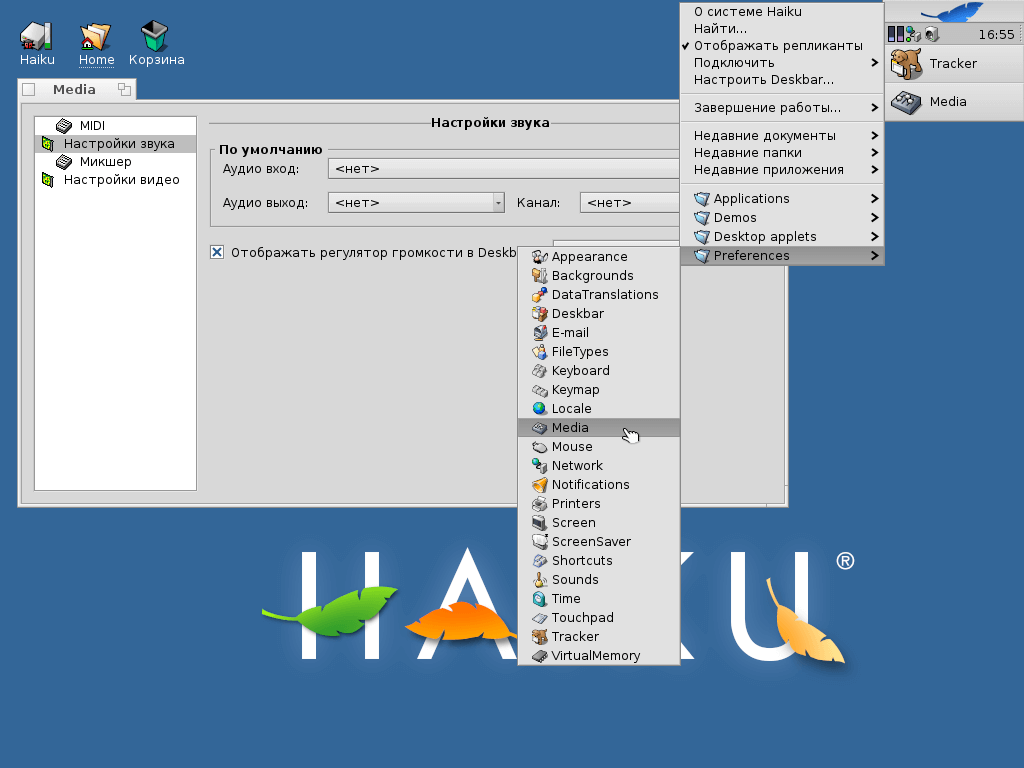
. A window with network settings will open in which you can check the box “Display interface status in Deskbar”. If you connect to the network through a Wi-Fi adapter, then check its support by the system on this page: a list of supported Wi-Fi devices . A quick tip: change the network settings after turning off the connection. Network settings in Haiku To set the volume control in Deskbar, open the main menu, go to the Preferences section and select Media. The sound settings window opens, in which you can check the "Display volume control in Deskbar" checkbox. Sound settings in Haiku Now we will create application shortcuts on the desktop. To do this, open the main menu and once click on the section
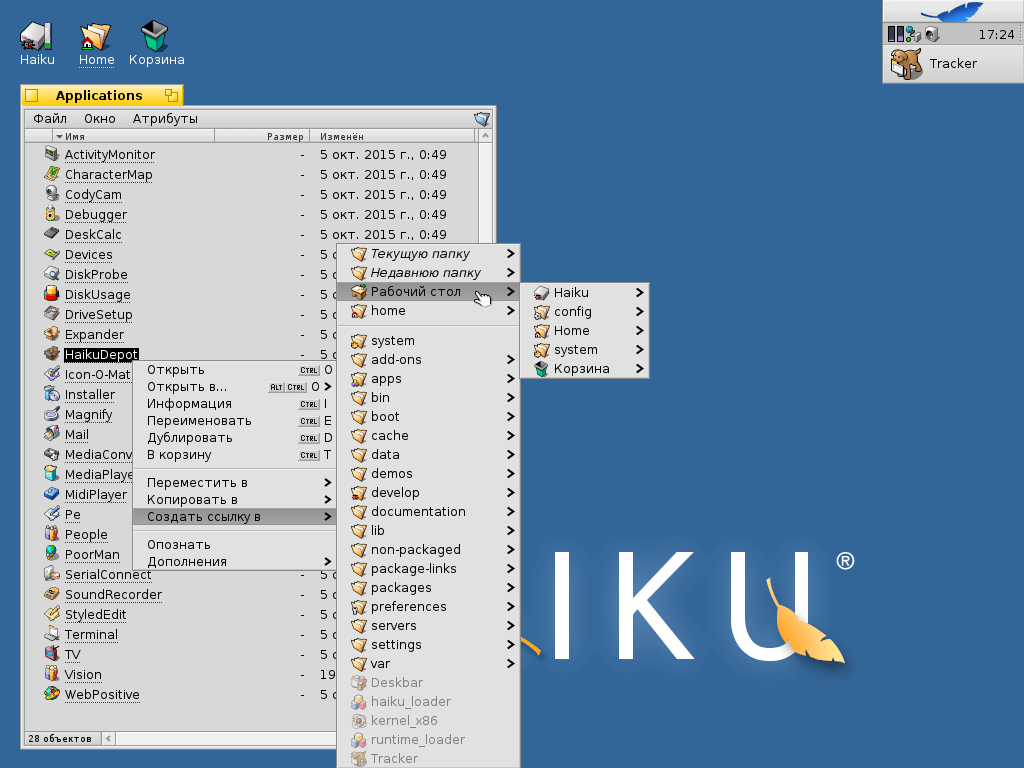
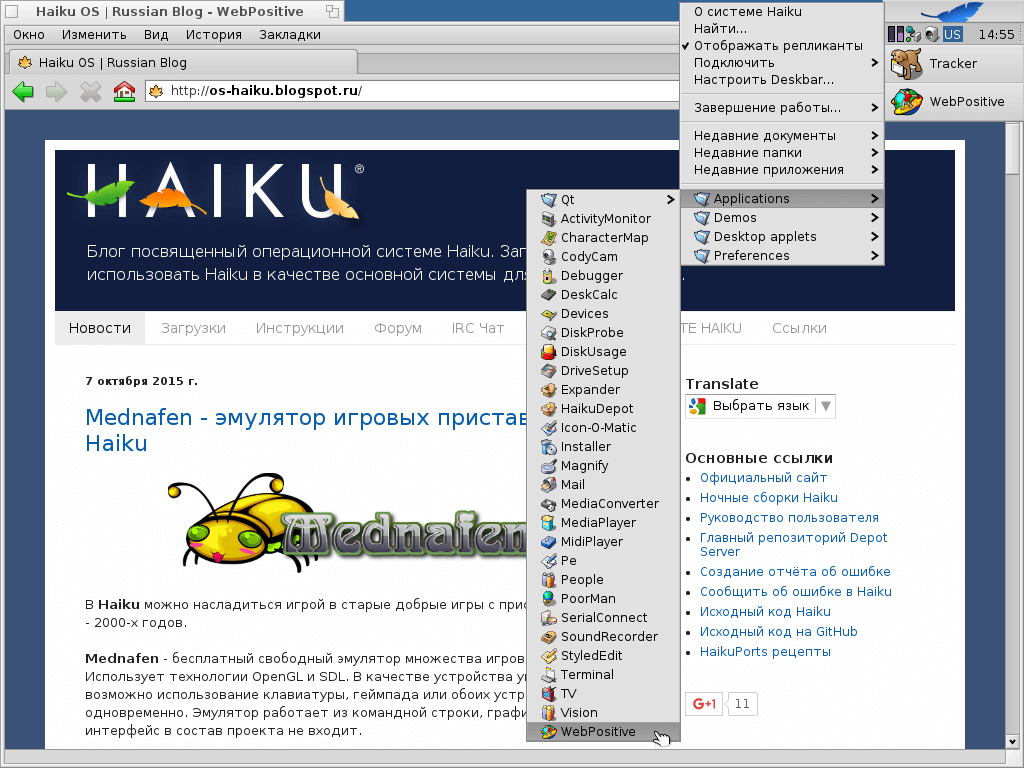
Applications . The contents of this section will open in a window. Example in the screenshot: A window with a list of installed programs Then right-click on the desired program and in the menu that opens, go to the "Create link to" item. Holding the mouse on this item, a menu opens with a list of the contents of the file system. Click on the “Desktop” item and a link (shortcut) to this program will be created on your desktop. In the future, you can run this program by double-clicking the shortcut on the desktop. Create a shortcut for the HaikuDepot program on the desktop (you need it to install programs from the Haiku repository). Example in the screenshot: Creating a HaikuDepot shortcut on the desktop

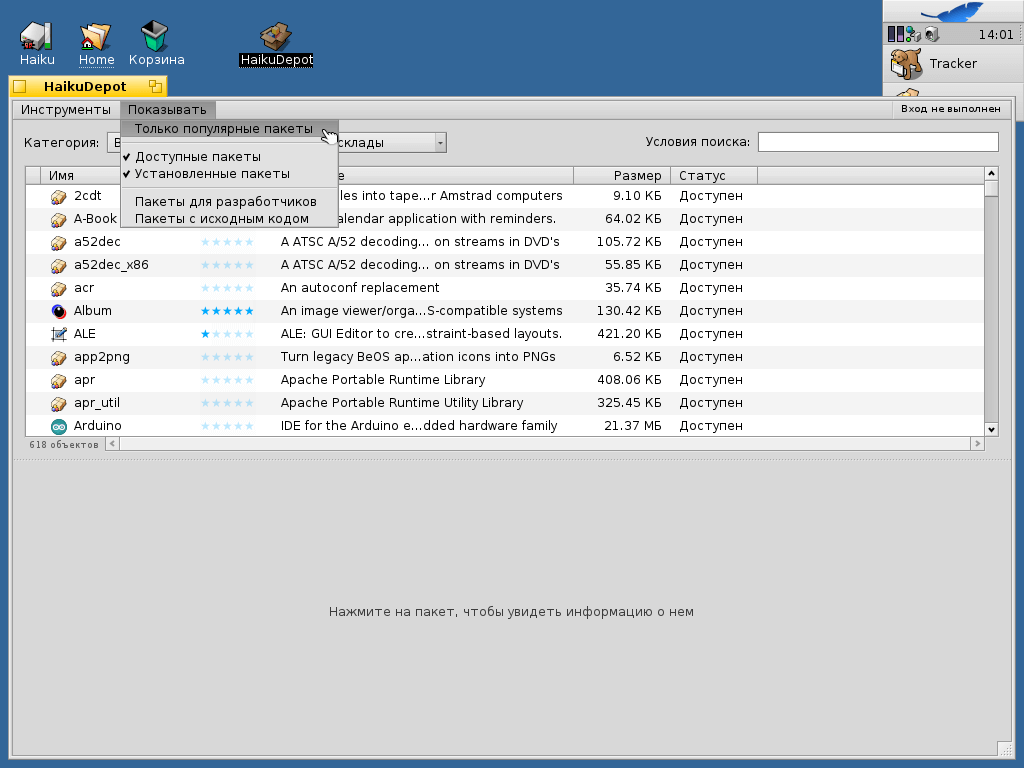
Launch the HaikuDepot program by double-clicking on its shortcut on the desktop (Internet access should already be configured by this moment). The HaikuDepot program starts and automatically updates the list of packages available in the Haiku repository via the Internet. For ease of installation, removal and storage of programs and components, Haiku has developed its own HPKG package format . You can familiarize yourself with this format in more detail by reading this manual: Creating an installation package in the HPKG format for Haiku . HaikuDepot displays a list of popular packages in the repository. To see a list of all packages available in the repository, you can uncheck the box to display “Only popular packages”.

HaikuDepot displays a list of available packages in the repository.
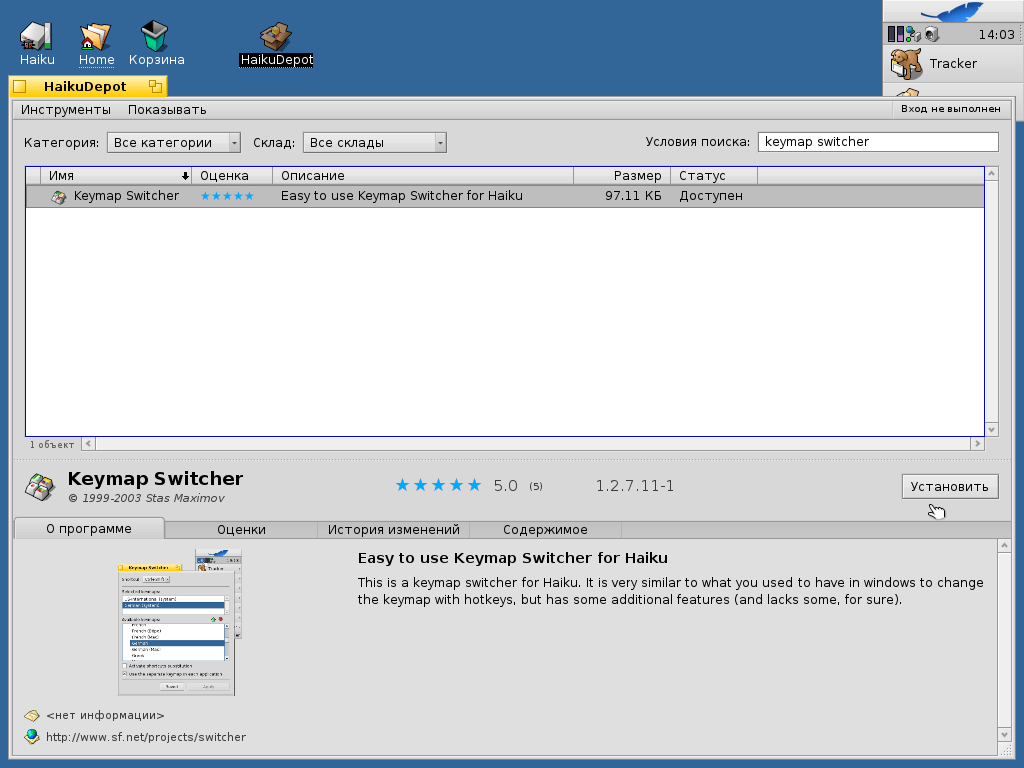
Now, using the HaikuDepot program, we will install a very useful add-on. The program Keymap Switcher for quick and intuitive keyboard layout switching. In the search bar, type the name of the program and the list of available packages is sorted in accordance with the search conditions. Now select the package you need and click the "Install" button. After installing the package, HaikuDepot can be closed. Installing the Keymap Switcher package from the repository Now run the installed program. Open the main menu and go to the Preferences section and select the KeymapSwitcher item (which appeared after installing the program). Launch the installed program Keymap Switcher program starts

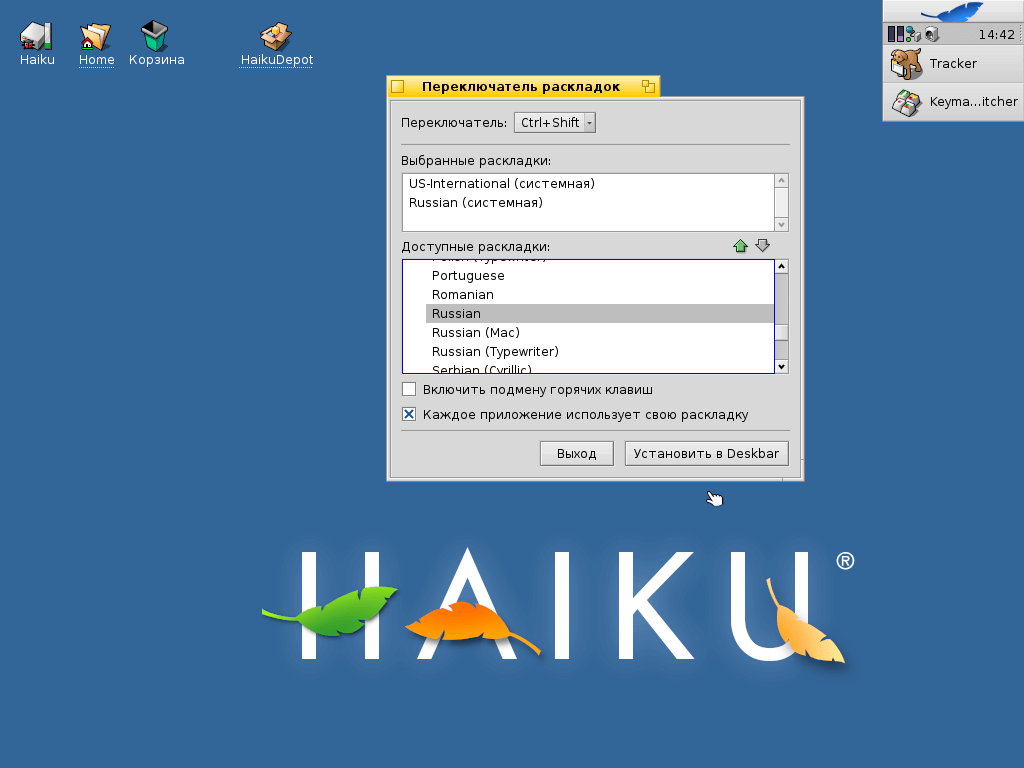
Keymap Switcher and a window appears with the settings for switching keyboard layouts. Select and add the layouts you need from the list, then click the “Install in Deskbar” button to see the display of the current keyboard layout in the Deskbar. Configuring Keymap Switcher The main program in the modern operating system is an Internet browser. Haiku has its own pre-installed browser called WebPositive. If you are having difficulty displaying some sites correctly in the WebPositive browser, you can download a special assembly: QupZilla browser v1.7.0 (Qt v5.3.1) portable assembly for Haiku . WebPositive browser in action
You probably already know that the yellow window titles - tabs, are like tabs. Holding down the Shift key , they can be moved within the upper border of the window, thus gaining easy access to any window overlapped by other windows - in other words, to organize the workspace from tab windows. This has been the case since BeOS. Haiku developers continued the development of this idea by automating the overlapping of windows on each other: now, when you drag one title to another with the Win key pressed , any windows are combined into a single meta-window with tabs. This method is called Stack .
In the same way, windows can be glued together, by pressing the same Win keyand bringing one of the borders of the window to the border of the other - the so-called Tile .
Combinations of windows combined and combined in such a way allow you to fine-tune the workspace to the user's needs: for example, the window of the Tracker , Pe file manager , syntax-highlighted source code editor and Terminal are transformed into a single IDE.
Double-clicking on the window title collapses it into the Deskbar .
Right-clicking on the window title brings it to the background.
If the window has gone beyond the bounds of the screen, then you can return it to its place by holding down the key combination Ctrl + Alt and dragging the window with the mouse over its any area.
Quick switching between windows is carried out using the key combination: Alt + Tab .
If some application freezes and does not respond to requests, then there are two ways to force it to terminate:
Actually, all the functionality of the file manager (which is part of Haiku) is described in detail in the user guide , but I will still mention some important Tracker functionality and give some tips for setting it up.
The most convenient way to navigate the file system is the drop-down context menu. Imagine: from any Tracker window or desktop, you can go to any other place in the file system with just two clicks.
Another indispensable tool is the "Add-ons" menu, also located in the context menu. Among the installed add-ons there are important ones such as “Open Terminal Window” (Open Terminal), “Folder Compression” (ZipОmatic) or “Full Text Search” (Text Search), which apply to the folder from which they are called. The main additions correspond to hotkey combinations, which allows you to further accelerate the work with the system.
Now let's talk about the settings. By default, each Tracker folder opens in a new window. For me, as for many other users, this is inconvenient, so the first thing I do is turn on single-window navigation and display the full path in the window title. To do this, open the settings in the menu: Window> Settings> Windows and check the boxes “Open folders in one window” and “Show navigation panel”. It is also worth mentioning the function of dynamic filtering of files by keyboard input (included in the window settings: “Enable file filtering when typing”), which hides files that do not contain character sequences in the names.
To update the system to the current state of development, it is enough to periodically check for updates according to this instruction: Updating Haiku batch from repositories .
Unfortunately, it's hard to predict what changes await Haiku in the near future. From time to time, developers switch between tasks, take vacations, fix bugs, and take part in the mail list debate. Alas, the task count goes to hundreds, while there are no more than a dozen active developers. But this does not leave us hope.
Of course, everything related to Haiku, and BeOS, too, always had the property of a certain chamberness, not mass character. The community, which was formed at the peak of BeOS popularity, is changing slowly, retaining in its ranks the most devoted followers, imbued with elegant innovative ideas by the creators from Be, Inc. Infrequently, these ranks are replenished with new participants: of course, not everyone likes Haiku's world. But, if the system “hooks”, then for a long time: the people left with Haiku try to make it better by taking a feasible part in its development. In addition, the society itself is interested in attracting new participants - therefore, it is here that we are happy to help any newcomer.
If you have difficulties or suggestions, join us.
Questions can be asked at the Russian-language jabber-conferencehaiku-os@conference.jabber.ru where they will always help you solve problems with the system, and even write a bug report on the developers website. As well as a general English-language chat for all who care about Haiku, it is located on the freenode.net IRC server (channel #haiku).
If among the readers who are keen there are those who want to help Haiku: port software or write your own, destroy bugs or develop system functionality - welcome! And here you have links to the indispensable BeBook (where the entire BeAPI is described) and a good programming tutorial for Haiku from Darkwyrm. And good luck!
To get started, download the latest Haiku x86 GCC 2 Hybrid nightly build (this is currently the main and most stable development branch of Haiku).
Depending on how you install Haiku, download the ISO or Anyboot system image.
- If you start the installation of the system from a laser disc, then download the ISO image. Then unpack the downloaded archive and write the resulting file with the extension .iso to a regular laser disc, through a program for recording images.
- If you want to start the installation from a USB flash drive, then use this instruction: How to create a multiboot USB flash drive with Haiku .
If the Haiku boot from the bootable media (which you selected in the computer BIOS) started successfully, then you should see the following image on the screen:
Haiku boot screen
This means that the loading of the operating system has begun and is accompanied by a consistent coloring of the icons corresponding to the current Haiku boot phase:
- Atom - module initialization.
- Disk with a magnifying glass - creating a root file system.
- Extension card - initialization of the device manager.
- Boot disk - mount the boot disk.
- Chip - loading processor modules.
- Folder - final initialization of subsystems.
- Rocket - The boot script starts the system.
If a crash occurs at some stage during system boot, the KDL (Kernel Debugging Land) debugging window will probably appear with a log containing information about the error and the ability to enter commands:
- continue - try to continue the download.
- reboot - restart the computer.
If you encounter problems with booting the system, you can try to boot with special parameters. To activate the menu of special boot parameters, you need to hold down the SHIFT key before the boot screen with icons appears. Then you should see the following image on the screen:
Haiku boot menu with advanced options The
boot menu contains four items:
- Select boot volume.
- Select safe mode options.
- Select debug options.
- Select fail-safe video mode.
Try changing the options listed below under Select safe mode options , maybe this will help you boot the system:
- Safe mode - restricts the start of non-critical servers (servers in Haiku are the system processes responsible for the graphical interface, network, sound, and more).
- Use fail-safe video mode - sets the forced use of the VESA driver.
- Disable IO-APIC - Disables IO-APIC.
- Disable local APIC - Disables local APIC and SMP.
- Don't call the BIOS - prohibits the use of BIOS calls.
- Disable ACPI - Disables ACPI and SMP.
To get detailed information about the boot process, I advise you to enable debug mode in the Select debug options item with the output on the screen Enable on screen debug output , while disabling the page output Disable on screen debug paging .
Do not forget about a few general tips that can help you:
- Enable or disable PnP in BIOS.
- Disable excess peripherals.
- Switch controller mode to IDE or AHCI.
- Use a different media or a different distribution format.
If none of this helps to load Haiku and the system stays stable in KDL, then create a bug report using this instruction and publish it in the Haiku bug report .
Upon successful completion of all stages of booting the system from bootable media, you will see a window with a choice of language and method for further installation of Haiku:
Choosing a language and method of installing Haiku
Here you can select a language and click the "Run Installer" button to proceed with installing the system on a hard disk, or click “Download Desktop” to launch Haiku in Live CD mode (in this mode you can also start installing the system on your hard drive by running the Installer program, which is located in the Applications menu).
Install Haiku to your hard drive
By launching the installation of Haiku on your hard drive, you will first be asked to read important information. Read carefully to the end and click the "Continue" button.
Important information before starting to install Haiku.
Then the Installer program will start, which will prompt you to select the partition on the hard disk for installing Haiku.
Installer - The Haiku installer, in fact, copies system and user files from one partition to another. Imagine how much easier it is to create a full-fledged functional copy of the OS for your experiments or transfer a customized system to another computer.
Installer offers to select a partition for installing Haiku.
If the partition initialized in Be File System is not ready yet, you can create it by clicking the "Partition setup" button. Then the DriveSetup program will start , in which you can easily create the desired partition. DriveSetup program for creating a Be File System partition If you want to give the entire hard drive to Haiku, select the desired hard drive in the list of media and initialize the entire hard drive (without creating additional partitions on it) in the Be File System , as shown in the screenshot above. In the end, you should get it, as shown in this screenshot: The hard drive is fully initialized in the Be File System

A Haiku installed on a hard drive configured in this way will boot from it without additional bootloaders, provided that this hard drive is selected as bootable media in the computer BIOS .
But this configuration does not load on all computers due to the peculiarities of the old BIOS . In such cases, it is necessary to create a partition table on the hard disk. To do this, select the hard drive from the list, go to the menu and select the item: Disk> Initialize> Intel Partition Map . An empty area will be created on the disk. Select this empty area and create a Be File System section in it , checking the “Active section” checkbox, and then initialize it as a Be File System .
If the system boot fails even with this configuration of the hard disk, then after installing Haiku on this section, set the boot menu so that the system boots from this section. How to install the boot menu is described below, using the example of installing Haiku in an additional section of the hard disk.
If you plan to install Haiku in an additional partition on your hard drive (the minimum partition size is 4 gigabytes) and save the ability to load other OSs installed in other partitions, then you need to initialize the selected partition in the Be File System , as shown in this screenshot: Additional partition on the hard drive disk initialized in Be File System
After successfully preparing the partition, close the DriveSetup program and select this partition in the Installer program, as shown in this screenshot:
Everything is ready to install Haiku on the selected partition.
To start the installation of Haiku, click the “Start” button, then the process of copying system data to the selected partition will begin, accompanied by visualization of progress. After the installation process is completed, you will be prompted to restart the computer (do not forget to select the hard drive on which the installation was performed as the boot device in the BIOS of the computer).
If Haiku was installed in an additional partition of the hard disk, then in order to be able to choose between boot partitions, you should install an additional bootloader in the MBR area of the hard disk. To do this, select the “Install the boot menu” section in the “Tools” menu, as shown in this screenshot:
Choosing to install the boot menu in the MBR area of the hard disk
Next, follow the instructions on the screen, proceeding step by step, as shown in the following screenshots:
Selecting the hard disk for installing the boot menu
Configuring the boot menu
After the installation of the boot menu is completed, restart the computer (do not forget to select the hard disk on which the installation was performed as the boot device in the BIOS of the computer), and then when you boot the computer you should see a menu with a selection of boot sections, as in this screenshot:
Boot menu with choice of sections
Haiku setup after installation
After the system boots up, the cursor appears on the screen and the Tracker and Deskbar , analogues of Explorer and the Taskbar in Windows , start up . At this point, the system is loaded and ready to go.
First, you can configure Deskbar, as shown in this screenshot: Configure Deskbar and the system information window First of all, you need to switch the system keyboard layout to English (for further system configuration). Press the button with the image of a pen and select the section in the Preferences settings in the menu that opens , then select the Keymap item . The window for setting the system keyboard layout will open. In this window, from the "System:" list, select US
and you can click the button “Switch layout to Windows / Linux mode” so that the main key combinations are more familiar. Setting up the system keyboard layout in Haiku Next, install the process controller applet in Deskbar to visually manage resources and processes in the system. Open the main menu, go to the Desktop applets menu and select ProcessController . Then in the window that opens, click the "Install in Deskbar" button. Installing the process controller applet in Deskbar If your computer is connected to the network, then it makes sense to check the network settings. To do this, open the main menu and go to the Preferences section and select Network
. A window with network settings will open in which you can check the box “Display interface status in Deskbar”. If you connect to the network through a Wi-Fi adapter, then check its support by the system on this page: a list of supported Wi-Fi devices . A quick tip: change the network settings after turning off the connection. Network settings in Haiku To set the volume control in Deskbar, open the main menu, go to the Preferences section and select Media. The sound settings window opens, in which you can check the "Display volume control in Deskbar" checkbox. Sound settings in Haiku Now we will create application shortcuts on the desktop. To do this, open the main menu and once click on the section
Applications . The contents of this section will open in a window. Example in the screenshot: A window with a list of installed programs Then right-click on the desired program and in the menu that opens, go to the "Create link to" item. Holding the mouse on this item, a menu opens with a list of the contents of the file system. Click on the “Desktop” item and a link (shortcut) to this program will be created on your desktop. In the future, you can run this program by double-clicking the shortcut on the desktop. Create a shortcut for the HaikuDepot program on the desktop (you need it to install programs from the Haiku repository). Example in the screenshot: Creating a HaikuDepot shortcut on the desktop
Launch the HaikuDepot program by double-clicking on its shortcut on the desktop (Internet access should already be configured by this moment). The HaikuDepot program starts and automatically updates the list of packages available in the Haiku repository via the Internet. For ease of installation, removal and storage of programs and components, Haiku has developed its own HPKG package format . You can familiarize yourself with this format in more detail by reading this manual: Creating an installation package in the HPKG format for Haiku . HaikuDepot displays a list of popular packages in the repository. To see a list of all packages available in the repository, you can uncheck the box to display “Only popular packages”.
HaikuDepot displays a list of available packages in the repository.
Now, using the HaikuDepot program, we will install a very useful add-on. The program Keymap Switcher for quick and intuitive keyboard layout switching. In the search bar, type the name of the program and the list of available packages is sorted in accordance with the search conditions. Now select the package you need and click the "Install" button. After installing the package, HaikuDepot can be closed. Installing the Keymap Switcher package from the repository Now run the installed program. Open the main menu and go to the Preferences section and select the KeymapSwitcher item (which appeared after installing the program). Launch the installed program Keymap Switcher program starts
Keymap Switcher and a window appears with the settings for switching keyboard layouts. Select and add the layouts you need from the list, then click the “Install in Deskbar” button to see the display of the current keyboard layout in the Deskbar. Configuring Keymap Switcher The main program in the modern operating system is an Internet browser. Haiku has its own pre-installed browser called WebPositive. If you are having difficulty displaying some sites correctly in the WebPositive browser, you can download a special assembly: QupZilla browser v1.7.0 (Qt v5.3.1) portable assembly for Haiku . WebPositive browser in action
Some useful features
You probably already know that the yellow window titles - tabs, are like tabs. Holding down the Shift key , they can be moved within the upper border of the window, thus gaining easy access to any window overlapped by other windows - in other words, to organize the workspace from tab windows. This has been the case since BeOS. Haiku developers continued the development of this idea by automating the overlapping of windows on each other: now, when you drag one title to another with the Win key pressed , any windows are combined into a single meta-window with tabs. This method is called Stack .
In the same way, windows can be glued together, by pressing the same Win keyand bringing one of the borders of the window to the border of the other - the so-called Tile .
Combinations of windows combined and combined in such a way allow you to fine-tune the workspace to the user's needs: for example, the window of the Tracker , Pe file manager , syntax-highlighted source code editor and Terminal are transformed into a single IDE.
Key shortcuts
Double-clicking on the window title collapses it into the Deskbar .
Right-clicking on the window title brings it to the background.
If the window has gone beyond the bounds of the screen, then you can return it to its place by holding down the key combination Ctrl + Alt and dragging the window with the mouse over its any area.
Quick switching between windows is carried out using the key combination: Alt + Tab .
If some application freezes and does not respond to requests, then there are two ways to force it to terminate:
- Press the key combination Ctrl + Alt + Delete to call up the process monitor window and having selected the hung application in the list, press the "Kill the application" key.
- Hold down the key combination Ctrl + Alt + Shift and click on the button of the frozen application in the Deskbar.
Tracker File Manager
Actually, all the functionality of the file manager (which is part of Haiku) is described in detail in the user guide , but I will still mention some important Tracker functionality and give some tips for setting it up.
The most convenient way to navigate the file system is the drop-down context menu. Imagine: from any Tracker window or desktop, you can go to any other place in the file system with just two clicks.
Another indispensable tool is the "Add-ons" menu, also located in the context menu. Among the installed add-ons there are important ones such as “Open Terminal Window” (Open Terminal), “Folder Compression” (ZipОmatic) or “Full Text Search” (Text Search), which apply to the folder from which they are called. The main additions correspond to hotkey combinations, which allows you to further accelerate the work with the system.
Now let's talk about the settings. By default, each Tracker folder opens in a new window. For me, as for many other users, this is inconvenient, so the first thing I do is turn on single-window navigation and display the full path in the window title. To do this, open the settings in the menu: Window> Settings> Windows and check the boxes “Open folders in one window” and “Show navigation panel”. It is also worth mentioning the function of dynamic filtering of files by keyboard input (included in the window settings: “Enable file filtering when typing”), which hides files that do not contain character sequences in the names.
System update
To update the system to the current state of development, it is enough to periodically check for updates according to this instruction: Updating Haiku batch from repositories .
Future system
Unfortunately, it's hard to predict what changes await Haiku in the near future. From time to time, developers switch between tasks, take vacations, fix bugs, and take part in the mail list debate. Alas, the task count goes to hundreds, while there are no more than a dozen active developers. But this does not leave us hope.
Community
Of course, everything related to Haiku, and BeOS, too, always had the property of a certain chamberness, not mass character. The community, which was formed at the peak of BeOS popularity, is changing slowly, retaining in its ranks the most devoted followers, imbued with elegant innovative ideas by the creators from Be, Inc. Infrequently, these ranks are replenished with new participants: of course, not everyone likes Haiku's world. But, if the system “hooks”, then for a long time: the people left with Haiku try to make it better by taking a feasible part in its development. In addition, the society itself is interested in attracting new participants - therefore, it is here that we are happy to help any newcomer.
If you have difficulties or suggestions, join us.
Questions can be asked at the Russian-language jabber-conferencehaiku-os@conference.jabber.ru where they will always help you solve problems with the system, and even write a bug report on the developers website. As well as a general English-language chat for all who care about Haiku, it is located on the freenode.net IRC server (channel #haiku).
Instead of an afterword
If among the readers who are keen there are those who want to help Haiku: port software or write your own, destroy bugs or develop system functionality - welcome! And here you have links to the indispensable BeBook (where the entire BeAPI is described) and a good programming tutorial for Haiku from Darkwyrm. And good luck!