Smart toilet in an ordinary apartment
Every year our homes become more and more electrical appliances. Now almost everyone has televisions, refrigerators, washing machines, media centers and DVD (Blue Ray) players, dishwashers and food processors, microwave ovens, electric kettles and multicookers, air conditioners and humidifiers, and many, many more things that we no longer have want to refuse. Electricity consumption is growing and at the end of the month an impressive amount is coming up. Willingly, one has to think about how to reduce these costs.
This problem did not bypass me either. Due to decent electricity bills at the family council, it was decided to get rid of the electric kettle as one of the most powerful electrical appliances, especially since there is a gas stove in the kitchen. Households flatly refused to reduce the amount of other electrical engineering. I had to look for other ways to save electricity. The first step was to replace all the lamps in the house with LED ones. The second step was to make sure that the electric and lighting devices did not stay on for a long time when no one was using them. After analyzing, I identified two sources of electricity consumption that need to be limited: a burning light and a TV in the kitchen, turned on when there are no people there and a light in the toilet, which the children (and I) forget to turn off.
I decided to deal with the kitchen later. Firstly, it is more controlled. And the burning light and the working TV are audible and visible, the main thing is not to be lazy to go on and off. Secondly, I already have a system plan for the Arduino, several motion sensors and an infrared transmitter. It remains only to find the time to implement it.
But the light burning in the toilet is not visible from the room and the corridor. Therefore, it can burn there all day, especially when no one is at home. Although, to be honest, the problem of turning off the lights and saving energy in this case was not the main one for me. Since there are small children in the family, they primarily experience inconvenience, because they do not reach the switch and cannot turn on the lights themselves. They have to call someone from the adults, distracting from business, or drag a chair out of the kitchen and climb on it. Needless to say, most often in both cases the light remains turned on even after the child left the toilet room (he was in a hurry, he had things to do: cartoons, toys, an unfinished poem ...). But it’s a sin to hide, I myself sometimes sometimes do not turn off the light because of the distraction. Add a second switch lower, especially for children, of course, can. And I would do so if there were 60s of the XX century on the street. In the XXI century, I want more elegant and technological solutions.
The ideal solution would be to put a presence sensor. But these sensors are unreasonably expensive, they are not so easy to find on sale. From budget decisions, only put an infrared motion sensor with a delay off.
I decided to implement this option. The only doubt was the fact that these sensors often have low sensitivity and if you make the delay time small, the light will periodically go out, causing a person in the room to periodically make movements and annoy. Immediately in my head there was an option to build a system on Arduino with several PIR sensors located in different places, the signal from which would be added up, thereby increasing sensitivity, but then I rejected this idea. Is it worth it to “fence the garden” in order to solve such a simple task, especially since the apartment has recently been repaired, which I barely survived, the walls of the toilet are tiled, and I immediately swept away any options with tearing out the tiles, ditching the walls and new repairs. The only place
Having rummaged in bins I found in myself 4 types of PIR sensors.
Sensor # 1:

The sensor consists of two parts. PIR-sensor and ambient light sensor are placed in a separate unit.


Features of this sensor:
• control board and pir-sensor are located in separate cases;
• the pir-sensor is connected to the board by a loop with a connector, which facilitates installation and repair;
• the sensor works both on and off; he is able to both turn on the load when a person appears, and turn it off;
• the load is switched on via a relay;
• there is a photocell that prevents the sensor from triggering when the level of illumination is higher than the specified one, the response level is set by the resistor value on the board and is not adjustable;
• when the sensor is connected, if the lighting level is higher than the set, the sensor signals its serviceability by tripping the load on and off;
Advantages:
• small and inconspicuous sensor, which is easy to fit into any design;
• there is no heating of the control element;
• work both on and off.
• The load on-time countdown is reset each time a motion is detected.
Disadvantages:
• low sensitivity of the dachik due to the design of the Fresnel lens. This lens forms a small number of rays, most of which are located in the same plane;
• there is no simple control of the load on time, which is set by one of the resistors on the control board.
• the relay clicks loudly enough, which is not suitable for use to control the light in the apartment.
• even though the sensor is placed on a separate board and in a separate case, the control board should still be somewhere nearby to avoid interference when using a long loop, which eliminates the possibility of hidden sensor placement on the wall. The only possible use is for installation in suspended ceilings or false walls.
Sensor No. 2:

Features of this sensor:
• control board and pir-sensor are located in one housing;
• the case is “technological” and is more suitable for use in non-residential premises;
• required connection of the “phase” and “zero”;
Advantages:
• silent operation of a solid-state power element (triac);
• The Fresnel lens has a different structure and forms a larger number of rays evenly distributed in the hemisphere, which ensures greater sensor sensitivity and more stable operation.
• The load on-time countdown is reset each time a motion is detected.
Disadvantages:
• there are no simple adjustments to the level of illumination at which the sensor stops functioning and the load on time.
Sensor No. 3:


Features of this sensor:
• the sensor is designed to be used as a substitute for a conventional wall switch; therefore, it is designed for placement in a standard mounting box;
• the sensor is included in the open circuit and it does not require the mandatory connection of the "phase" and "zero";
• the load is switched on through the triac.
• there is a photocell that prevents the sensor from triggering when the level of illumination is higher than the specified one, the response level is regulated by a trimmer resistor.
Advantages:
• easily replaces a standard switch;
• Mandatory connection of the “phase” and “zero” is not required;
• silent operation of a solid-state power element (triac);
• The Fresnel lens has a more complex (facet) structure and forms a larger number of rays evenly distributed in the hemisphere, which provides greater sensor sensitivity and more stable operation.
• there are adjustments to the level of illumination at which the sensor stops responding and the load on time.
• The load on-time countdown is reset each time a motion is detected.
Disadvantages:
• installation only in the installation box (of course, installation in the suspended ceiling is possible, but in this case it will be necessary to cut a too large hole);
I liked this sensor most of all, I already tried on where to cut a hole in a suspended ceiling. But something was holding me back, there was no certainty that during ceiling placement there would be a stable response, especially for the appearance of a child, and that the sensor would go out of time at the wrong time without feeling the slight movements of the person in relative calm. As it turned out, I was not in vain dragging out a hole in the ceiling.
Some time later, another sensor came to me that I liked the most and with which the implementation of the task has become easier, more reliable, and better in functionality.
Sensor # 4:

Features of this sensor:
• a wireless sensor, designed to control the power blocks of the nooLite system (I just bought such a kit from a block and a switch just recently to make light control from the desktop in the room. Well, the room will wait. I will use the control unit from the kit for this project, and then, if everything works out, I will buy another control unit, because they are of the same system and compatible with each other);
• power units turn on the load through a solid-state element (triac), which means they are silent;
• transmitter power from two AAA elements for at least a year
• range up to 50 m (depending on the signal transmission environment).
Advantages:
• the sensor is flat and light, it can be mounted using self-tapping screws or double-sided tape.
• the sensor is wireless, so it can be mounted anywhere and, if necessary, moved to another place.
• the sensor has an adjustable threshold of sensitivity, illumination, and shutdown time;
Disadvantages:
• Powered by batteries (the manufacturer promises at least a year of work on one set).
A few more photos of this sensor:

On the reverse side there are three tuning resistors that regulate sensitivity, the level of illumination at which the sensor stops working and the load on time when it is triggered. Everything is simple and intuitive: arrows in the directions "+" and "-".
There is also a “snap / untie” button, with which the sensor is “attached” to the power unit, which it will control. The power unit also has a snap / untap button. Up to 37 control panels, key fobs, sensors and other control devices of the nooLite system can be connected to the power unit.

The device of the sensor resembles the device of a standard switch.

Inside we see a control board, an antenna and two places for AAA elements.
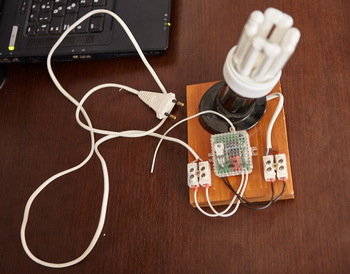
And finally, I’m starting to install. First of all, before starting to disassemble the ceiling, I decided to tie the sensor and the power unit and check how this system will work and at the same time choose the location of the sensor and the delay time for switching off the load (lighting). This is more convenient on the table than standing on a stepladder.
Therefore, a test bench was assembled, which simply plugged into the outlet.

It was decided to temporarily fix the sensor using small squares of double-sided tape so that it would be easy to peel off and move it during the experiments.

Since in this case there are no restrictions on the location of the sensor, first I fixed it on the rear false wall directly opposite the door, directly above the toilet bowl. Experiments have shown that with this arrangement, the sensor completely responds to the appearance of a person (child) inside the room with almost no delay. Since the sensor is close, most likely the person simultaneously crosses a lot (or even all) of the rays formed by the Fresnel lens and reacts even to the slightest movements, resetting the load off timer. After conducting several experiments with different delay times, I set this time to 40 seconds from the principle of reasonable sufficiency, this turned out to be quite enough so that the light did not turn off while the person was in the room (for 3 weeks of use,
After experiments at the stand, I proceeded directly to the installation.

The lamp is screwed into the luminaire built into the ceiling. To get access to this lamp you have to partially disassemble the ceiling.

The control unit at the stand was "tied" to the sensor. I connect its outputs directly to the contacts of the lamp. The mains voltage of 220V will be supplied to the inputs.

The control unit has mounting ears. The luminaire has a special mounting plate with two screws. This makes it possible to fix the power unit directly to the ceiling lamp housing.
Good thing I had to climb the ceiling. Jumshuts from the Belarusian regional center, who did repairs in the toilet, pulled up where possible. Wiring is no exception. From the wires connected to the lamp, the insulation was partially cut off and bare wires hung under the ceiling. It is good that I noticed this on time and did without a short circuit.

The wire under the suspended ceiling is quite long, so you could connect the lamp directly standing on the floor. By the way, a temporarily glued sensor is visible behind.

In order to put the lamp in place, the power unit had to be unscrewed, otherwise the assembled structure did not crawl into the hole in the suspended ceiling.

After the lamp is installed, the power unit takes its place.
Before the final assembly of the ceiling, I check everything for performance. And here I have a problem. The light for some reason burns and does not turn off. I thought that when I connected, I burned the triac in the power unit. Understanding came later: I turned off the power unit several times, and yet it remembers the state when it was turned off. The change of state (on / off) occurs only with a command from the control panel or, in my case, the sensor. If at the moment the sensor gave the shutdown command, the unit is disconnected, then the control unit, when connected to the network, saved the state it was in when it was disconnected, that is, it will connect the load and wait for the shutdown command. And since the light is on in this room, the light sensor will block the transmission of commands to turn on the light, and accordingly, the shutdown command will no longer be received and the light will remain on all the time. Having realized this, I decided to block the light sensor by sealing the window of the photocell with an opaque black adhesive tape, since there are no windows in the toilet and there is no need to block the inclusion of light in the afternoon. I was about to disassemble the sensor, but first I decided to try to minimize the sensitivity of the light sensor. It turned out that if the “Sensitivity” adjustment resistor is twisted to the minimum position, the light sensor is completely turned off and is not involved in the work. Thus, even if the power supply is turned off during the burning of light from the power unit (for example, the light is turned off), then the next time a person appears, the PIR sensor, regardless of whether the light is already on,
Now, after all the checks and the assembly of the ceiling, it remains to lock the switch in the corridor, because I myself, and other family members, out of habit, will click this switch for a long time and the power supply of the power unit will sometimes turn off and then, most importantly, why it all started : so that the light stably turns itself on and off when the children enter the toilet, it will not be realized.

With a switch, it’s not so simple either. The wall between the corridor and the bathroom with the toilet is so thin (less than 50 mm) that it does not fit a standard mounting box. Earlier in this place there were very thin Soviet switches in square boxes. When it came time to change the switches, I chose the thinnest and cut the mounting box. And now the switch is inserted to the full depth and rests against the bottom of the mounting box, it just does not work to close the two wires under the switch, there simply is no place for these wires.

It is good that there are two contacts on the switch terminals. Since there is no place at the back of the switch, I did not disconnect the wires from it, but simply shunted it with a loop of wire in insulation, which I put on the side of the switch itself, where there is a place. Now, no matter what position the key of this switch is in, the power unit is always connected to the network and the light comes on when a person appears.
On this my work was completed. The youngest member of the family responsibly participated in the experiments and we were convinced that the sensor responds confidently to even the most inconspicuous movements, the light always turns on and does not go out when a person is present.
Finally, I noticed another small nuance. The sensor, when it is hanging on the far wall, only works when a person appears in the door leaf. And since the corridor is narrow, any person, opening the door, stands a little to the side and the light does not come on. And when the door is open, there is still a slight delay in the operation of the motion sensor. Of course, family members can get used to it, but at first it will cause some discomfort. Not to mention the guests who will stand in the hallway and click the switch, not realizing that you just need to go through the door leaf. They will have to explain how to light the light. I don't like this option at all.
And then I realized what to do. The sensor is completely autonomous. Who is stopping me from attaching it directly to the door? Now, when a door is opened, a person, even standing away from the doorway, will still be in the field of view of the sensor and it doesn’t matter that it is not the person who will move but the sensor itself, the main thing is that he will give a command to turn on the light.
Since the PIR sensor was mounted on small pieces of double-sided tape, re-sticking it to a new location did not take much time. Now it is located even closer to the person and even more sensitive to the slightest movements.

My younger family member and I continued to experiment. Now I was completely satisfied with their results.
1. The light comes on when the door moves, even if a person does not fall into the field of view of the sensor. I specifically checked this by opening the door and hiding behind it so that I could not be seen. So the sensor picks up the difference in the temperatures of the rear and side walls during movement, and this is enough for him to give a command to turn on the light.
2. The sensor responds to the slightest movements of a person, extending the time the light is turned on by 40 seconds with each operation.
3. Exactly 40 seconds after the person left the room, the light goes out.
4. The light does not light itself when moving and noise in the corridor or rooms.
5. The sensor confidently detects the presence of a person, greatly facilitating the lives of both children and adults.

And most importantly, the youngest and most important member of the family is most satisfied. Now he has become completely independent and does without the help of adults. Well, the first step has been taken towards the construction of the "Smart House".