May 17, 2018 at 11:01
Receiving user data (voluntary)
Hello, Habr! We continue our experimental series of articles, observing which you can in real time influence the process of creating a game on UWP. Today on the agenda is getting user data. Indeed, in almost all applications, this is the necessary procedure. Join now!
I give the floor to the author, Alexei Plotnikov .
User authentication is the cornerstone of most modern applications and, especially, games. It is difficult to imagine a game without social functions such as rating tables, achievements and clans. In applications lacking social functions, identification is needed, for example, to improve the synchronization process between devices. For the most part, it was precisely the problems of synchronization that became the starting point for my research in this matter.
Each UWP application has a dedicated cloud storage (roaming data), in which it can save data accessible from any device, provided that the user uses the same MS account. Unfortunately, this storage has a number of serious limitations.
First, the data that can be placed in the cloud is limited in size. For most tasks, allocated size is sufficient, but this is still a limitation. A much more important limitation is the principle of placing data in the cloud. The internal algorithm of this function takes into account many factors such as, for example, energy saving or limited Internet connection and ultimately the synchronization process between devices can not only take more than ten minutes, but it is not guaranteed at all (more here ).
Such restrictions are not at all suitable for my tasks, so the synchronization process was decided to be implemented independently and the first thing I had to do was to determine the devices belonging to the same player.
Many games and applications use a user account on Facebook to synchronize, although in most cases this is due to the transfer of existing algorithms to the Microsoft Store, rather than ease of implementation. Others have their own services in which the player needs to register, but this is also an unnecessary complication. As a result, the most logical solution, of course, is to use a Microsoft account, which the user definitely has, since without it it is impossible to purchase and install applications from the Windows store. The only thing left is to get user data in order to identify it on different devices.
Going deep into the question, I found out that Microsoft account information is obtained using the Microsoft Live API, which is associated with some difficulties. The fact is that in order to receive any data about the user, he must log in to his account, and we must receive an access token, which will allow us to request them. This procedure was created for security and is part of the OAuth authentication standard , but its independent implementation for beginners seems complicated and inconvenient.
Fortunately, the creators of UWP understood the potential horror that OAuth could cause for a novice developer and created an elegant and fairly simple way to work with a Microsoft account (and not only). This tool is called the “Account Manager Web Accounts” and we will consider it later.
Create an empty project and replace the main Grid in the MainPage.xaml file with the following XAML:
XAML is quite simple and requires no explanation, so go to the button click event and paste the following code:
Remember to add the import of the Windows.UI.ApplicationSettings namespace, otherwise this code will not work.
Now the application can be executed and look at the result.

An empty window is not quite what we expected, but it is just a shell that must first be filled. We will fill it with the so-called “teams”, which in our case will be a list of accounts available for entry.
The Web Account Manager tool is very flexible and allows you to create these commands either manually or download them from the required provider. In the second case, the FindAccountProviderAsync function is used, where the login.microsoft.com address will be the provider for the accounts .
However, it is impossible to fill the panel with commands before it is initialized, so the first thing you need to do is subscribe to the corresponding event. Add this line before the panel display code and immediately form the procedure called by the event:
By the way, in the official guide, the subscription to the AccountCommandsRequested event occurs at the moment of transition to the current page, and unsubscribing at the transition from it. This makes sense if you select a separate page for the authentication process, but I think this approach is not flexible enough.
Fill BuildPaneAsync:
And immediately, we’ll take a few extra steps:
We will deal with this code. Firstly, since it may take time to get a list of commands, we need to delay the display of the panel until it is full. To do this, a deferred Deferral object is created. Then, using the previously mentioned FindAccountProviderAsync function, the provider is loaded. Please note that the parameter with the value “consumers” is also passed to this function. This tells the vendor that we want to get a standard Microsoft account, not an organization account (then it would be “organizations”).
After we create a new team using the obtained provider, specify the procedure that is called when the team is clicked, and add the result to the panel. The last line we inform that the panel is formed and it can be displayed.
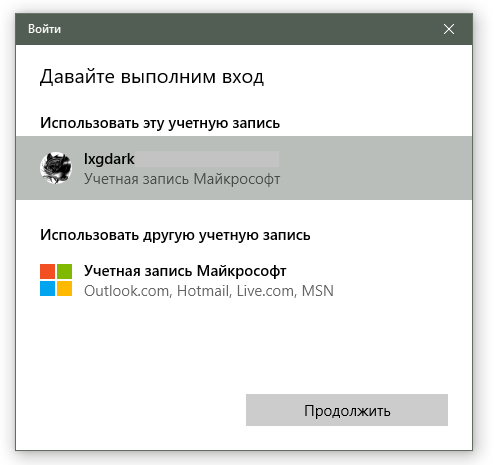
Now, after starting and clicking on the “Login” button, a filled panel with several login options is displayed. You may be confused by the fact that we added one command to the panel, but there are two on it. In fact, this is another reason why I like “Account Manager Web Accounts”, because he independently determined the current user account and offered it as the main login option, and in case the user wants to use another account, he’s created separate option. From the point of view of internal logic, both options are identical and, as a result, send us to the GetMsaTokenAsync procedure that we created earlier.
Further actions can be divided into several stages. First, inside GetMsaTokenAsync, you need to make a request to the data provider indicating the type of data that we request, and then generate the result of this request:
Note the “wl.basic” parameter, which is passed to the first function. This is an indication of the permissions that the application receives when working with user data. By specifying different permissions, we can work with the address book, calendar, photos and many other data, but we only need the name, avatar and user ID, therefore wl.basic is used, which is enough in this case. A full list of permissions can be found here .
After successfully receiving the query result, we can form an object of type WebAccount, which will help to obtain account access tokens:
For this code to work, you will need to import the Windows.Security.Credentials and Windows.Storage namespaces .
The received markers are relevant for the current user for a long time, which means we do not need to repeat the login procedure constantly. Instead, we store these tokens in the local settings of the application so that they can be used in the future for background authentication. Actually, we proceed to background authentication by calling the BackgroundConnectUser procedure.
First, add the imports that we need for the further code to work:
Now go to BackgroundConnectUser and load the saved tokens:
If the tokens are not empty, then we form the provider and account objects from them to receive the token, and also carry out the request:
If successful, you can get the API access token and perform direct requests:
Request addresses for obtaining user data can be found in the Microsoft Live API documentation, but we are only interested in two: “https://apis.live.net/v5.0/me” for general data and “https: // apis. live.net/v5.0/me/picture "to get an avatar. User data is returned in Json format, so a parser is used for their convenient analysis.
Finally, you can run the program and make sure that nothing works anyway. This is due to the fact that the Microsoft Live APIs do not provide data for nothing. To use them, the application must have an identifier in the Microsoft Live service to which data access permissions are then bound. Fortunately, an identifier is generated automatically when creating a new application in the developer’s information panel. To load this identifier into the current project, simply link it to the Windows Store. To do this, go to the menu "Project> Store> Associate the application with the Store ..." and select the desired name from the list (or register a new one). We do not need to do anything else, since the necessary data in the Microsoft Live API will be transferred automatically.
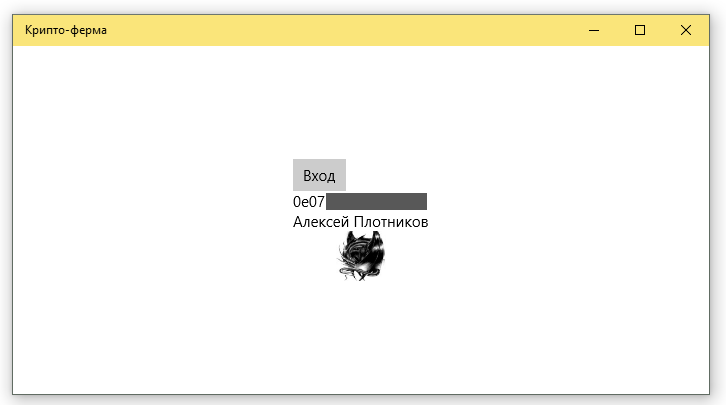
We restart the project and finally observe the result.
On this, the consideration of obtaining user data could be completed if I set myself the goal of simply retelling material from the official guide.
Below I will give the full project code with the changes made to it, and then I will explain and justify each such change.
XAML:
The page layout has undergone not very large adjustments. The most important difference is the addition of an exit button for the account, as well as a line to monitor the connection status. The rest of the changes made the data display more visual, because ultimately the task of the page is to demonstrate the result of code execution, in which the main changes took place. Consider them.
Firstly, I completely took out the logic of working with the account manager Web accounts in a separate class. This is done in order to have access to this code from anywhere in the application. For example, in the article “ Advanced splash screen ”, I mentioned the lengthy operations that it made sense to perform inside the splash screen, and the process of obtaining user data in BackgroundConnectUser is just such an operation.
As a result of the code transfer to a separate class, almost nothing remained in the class of the page itself. All work inside the page is reduced to a reaction to pressing two buttons and setting the data context for the page (in the MainPage_Loaded procedure). It is not difficult to guess that the instance of the UserManager class acts as the data context in which the main work is already taking place. The class implements the INotifyPropertyChanged interface, which allows you to bind to its fields from the page layout.
The ported code received some changes, and I will try to parse them in the same order in which the original example was created:
This is where my implementation for Web Account Manager ends. It goes without saying that during the development process, some improvements will be made that will meet the tasks that I personally set for this tool, however, the given class is quite functional and you can safely copy it to your project in order to start implementing your tasks related with receiving user data.
Now that the user data has been received, we can begin to study the issue of data synchronization between devices and I will start by finding a suitable site and technology. This is what we will talk about in the next article.
- Part 1: Where to start
- Part 2: Advanced splash screen
- Part 3: Mom’s friend’s son style
- Part 4: Obtaining user data (voluntary)
- Part 5: Where do you store the data?
I give the floor to the author, Alexei Plotnikov .
User authentication is the cornerstone of most modern applications and, especially, games. It is difficult to imagine a game without social functions such as rating tables, achievements and clans. In applications lacking social functions, identification is needed, for example, to improve the synchronization process between devices. For the most part, it was precisely the problems of synchronization that became the starting point for my research in this matter.
Each UWP application has a dedicated cloud storage (roaming data), in which it can save data accessible from any device, provided that the user uses the same MS account. Unfortunately, this storage has a number of serious limitations.
First, the data that can be placed in the cloud is limited in size. For most tasks, allocated size is sufficient, but this is still a limitation. A much more important limitation is the principle of placing data in the cloud. The internal algorithm of this function takes into account many factors such as, for example, energy saving or limited Internet connection and ultimately the synchronization process between devices can not only take more than ten minutes, but it is not guaranteed at all (more here ).
Such restrictions are not at all suitable for my tasks, so the synchronization process was decided to be implemented independently and the first thing I had to do was to determine the devices belonging to the same player.
Many games and applications use a user account on Facebook to synchronize, although in most cases this is due to the transfer of existing algorithms to the Microsoft Store, rather than ease of implementation. Others have their own services in which the player needs to register, but this is also an unnecessary complication. As a result, the most logical solution, of course, is to use a Microsoft account, which the user definitely has, since without it it is impossible to purchase and install applications from the Windows store. The only thing left is to get user data in order to identify it on different devices.
Going deep into the question, I found out that Microsoft account information is obtained using the Microsoft Live API, which is associated with some difficulties. The fact is that in order to receive any data about the user, he must log in to his account, and we must receive an access token, which will allow us to request them. This procedure was created for security and is part of the OAuth authentication standard , but its independent implementation for beginners seems complicated and inconvenient.
Fortunately, the creators of UWP understood the potential horror that OAuth could cause for a novice developer and created an elegant and fairly simple way to work with a Microsoft account (and not only). This tool is called the “Account Manager Web Accounts” and we will consider it later.
Create an empty project and replace the main Grid in the MainPage.xaml file with the following XAML:
XAML is quite simple and requires no explanation, so go to the button click event and paste the following code:
AccountsSettingsPane.Show()Remember to add the import of the Windows.UI.ApplicationSettings namespace, otherwise this code will not work.
Now the application can be executed and look at the result.
An empty window is not quite what we expected, but it is just a shell that must first be filled. We will fill it with the so-called “teams”, which in our case will be a list of accounts available for entry.
The Web Account Manager tool is very flexible and allows you to create these commands either manually or download them from the required provider. In the second case, the FindAccountProviderAsync function is used, where the login.microsoft.com address will be the provider for the accounts .
However, it is impossible to fill the panel with commands before it is initialized, so the first thing you need to do is subscribe to the corresponding event. Add this line before the panel display code and immediately form the procedure called by the event:
AddHandler AccountsSettingsPane.GetForCurrentView().AccountCommandsRequested, AddressOf BuildPaneAsync
…
    Private Sub BuildPaneAsync(sender As AccountsSettingsPane, e As AccountsSettingsPaneCommandsRequestedEventArgs)
        'Тут будет код добавления команд
End Sub
By the way, in the official guide, the subscription to the AccountCommandsRequested event occurs at the moment of transition to the current page, and unsubscribing at the transition from it. This makes sense if you select a separate page for the authentication process, but I think this approach is not flexible enough.
Fill BuildPaneAsync:
Dim Deferral = e.GetDeferral
Dim msaProvider = Await WebAuthenticationCoreManager.FindAccountProviderAsync("https://login.microsoft.com", "consumers")
Dim command = New WebAccountProviderCommand(msaProvider, AddressOf GetMsaTokenAsync)
e.WebAccountProviderCommands.Add(command)
Deferral.Complete()
And immediately, we’ll take a few extra steps:
- Add Async keyword to the procedure;
- Add Windows.Security.Authentication.Web.Core namespace import;
- Create a GetMsaTokenAsync procedure with a command parameter of type WebAccountProviderCommand
We will deal with this code. Firstly, since it may take time to get a list of commands, we need to delay the display of the panel until it is full. To do this, a deferred Deferral object is created. Then, using the previously mentioned FindAccountProviderAsync function, the provider is loaded. Please note that the parameter with the value “consumers” is also passed to this function. This tells the vendor that we want to get a standard Microsoft account, not an organization account (then it would be “organizations”).
After we create a new team using the obtained provider, specify the procedure that is called when the team is clicked, and add the result to the panel. The last line we inform that the panel is formed and it can be displayed.
Now, after starting and clicking on the “Login” button, a filled panel with several login options is displayed. You may be confused by the fact that we added one command to the panel, but there are two on it. In fact, this is another reason why I like “Account Manager Web Accounts”, because he independently determined the current user account and offered it as the main login option, and in case the user wants to use another account, he’s created separate option. From the point of view of internal logic, both options are identical and, as a result, send us to the GetMsaTokenAsync procedure that we created earlier.
Further actions can be divided into several stages. First, inside GetMsaTokenAsync, you need to make a request to the data provider indicating the type of data that we request, and then generate the result of this request:
Dim request As WebTokenRequest = New WebTokenRequest(command.WebAccountProvider, "wl.basic")
Dim result As WebTokenRequestResult = Await WebAuthenticationCoreManager.RequestTokenAsync(request)
Note the “wl.basic” parameter, which is passed to the first function. This is an indication of the permissions that the application receives when working with user data. By specifying different permissions, we can work with the address book, calendar, photos and many other data, but we only need the name, avatar and user ID, therefore wl.basic is used, which is enough in this case. A full list of permissions can be found here .
After successfully receiving the query result, we can form an object of type WebAccount, which will help to obtain account access tokens:
If result.ResponseStatus = WebTokenRequestStatus.Success Then
            Dim account As WebAccount = result.ResponseData(0).WebAccount
            ApplicationData.Current.LocalSettings.Values("CurrentUserProviderId") = account.WebAccountProvider.Id
            ApplicationData.Current.LocalSettings.Values("CurrentUserId") = account.Id
            BackgroundConnectUser()
End If
For this code to work, you will need to import the Windows.Security.Credentials and Windows.Storage namespaces .
The received markers are relevant for the current user for a long time, which means we do not need to repeat the login procedure constantly. Instead, we store these tokens in the local settings of the application so that they can be used in the future for background authentication. Actually, we proceed to background authentication by calling the BackgroundConnectUser procedure.
First, add the imports that we need for the further code to work:
Imports System.Net.Http
Imports Windows.Data.Json
Now go to BackgroundConnectUser and load the saved tokens:
Dim providerId As String = ApplicationData.Current.LocalSettings.Values("CurrentUserProviderId")
Dim accountId As String = ApplicationData.Current.LocalSettings.Values("CurrentUserId")
If the tokens are not empty, then we form the provider and account objects from them to receive the token, and also carry out the request:
Dim provider As WebAccountProvider = Await WebAuthenticationCoreManager.FindAccountProviderAsync(providerId)
Dim account As WebAccount = Await WebAuthenticationCoreManager.FindAccountAsync(provider, accountId)
Dim request As WebTokenRequest = New WebTokenRequest(provider, "wl.basic")
Dim result As WebTokenRequestResult = Await WebAuthenticationCoreManager.GetTokenSilentlyAsync(request, account)
If successful, you can get the API access token and perform direct requests:
If result.ResponseStatus = WebTokenRequestStatus.Success Then
        Dim token As String = result.ResponseData(0).Token
        Dim restApi = New Uri("https://apis.live.net/v5.0/me?access_token=" + token)
        Dim client = New HttpClient()
        Dim infoResult = Await client.GetAsync(restApi)
        Dim Content As String = Await infoResult.Content.ReadAsStringAsync()
        Dim jsonO = JsonObject.Parse(Content)
        UserIdTextBlock.Text = jsonO("id").GetString
        UserNameTextBlock.Text = jsonO("name").GetString
        UserAvatarImage.Source = New BitmapImage(New Uri("https://apis.live.net/v5.0/me/picture?access_token=" + token))
End If
Request addresses for obtaining user data can be found in the Microsoft Live API documentation, but we are only interested in two: “https://apis.live.net/v5.0/me” for general data and “https: // apis. live.net/v5.0/me/picture "to get an avatar. User data is returned in Json format, so a parser is used for their convenient analysis.
Finally, you can run the program and make sure that nothing works anyway. This is due to the fact that the Microsoft Live APIs do not provide data for nothing. To use them, the application must have an identifier in the Microsoft Live service to which data access permissions are then bound. Fortunately, an identifier is generated automatically when creating a new application in the developer’s information panel. To load this identifier into the current project, simply link it to the Windows Store. To do this, go to the menu "Project> Store> Associate the application with the Store ..." and select the desired name from the list (or register a new one). We do not need to do anything else, since the necessary data in the Microsoft Live API will be transferred automatically.
We restart the project and finally observe the result.
On this, the consideration of obtaining user data could be completed if I set myself the goal of simply retelling material from the official guide.
Below I will give the full project code with the changes made to it, and then I will explain and justify each such change.
XAML:
Window Code
Imports Windows.Security.Authentication.Web.Core
Imports Windows.UI.ApplicationSettings
Imports Windows.Security.Credentials
Imports Windows.Storage
Imports System.Net.Http
Imports Windows.Data.Json
Imports Windows.System
Public NotInheritable Class MainPage
Inherits Page
Private CurUser As New UserManager
Private Sub MainPage_Loaded(sender As Object, e As RoutedEventArgs) Handles Me.Loaded
DataContext = CurUser
End Sub
Private Async Sub LoginButton_Click(sender As Object, e As RoutedEventArgs)
If Not Await CurUser.BackgroundConnectUser Then
CurUser.ConnectUser()
End If
End Sub
Private Async Sub LogOutButton_Click(sender As Object, e As RoutedEventArgs)
CurUser.LogOutUser(Await CurUser.GetWebAccount)
End Sub
End Class
Public Class UserManager
Implements INotifyPropertyChanged
#Region "Реализация интерфейса"
Public Event PropertyChanged(sender As Object, e As PropertyChangedEventArgs) Implements INotifyPropertyChanged.PropertyChanged
Private Sub OnPropertyChanged(PropertyName As String)
RaiseEvent PropertyChanged(Me, New PropertyChangedEventArgs(PropertyName))
End Sub
#End Region
Private UserIdValue As String
Private UserNameValue As String
Private UserAvatarValue As BitmapImage
Private ConnectStatusValue As UserConnectStatusEnum = UserConnectStatusEnum.None
#Region "Свойства"
'''
''' ID текущего пользователя
'''
'''
''' Имя текущего пользователя
'''
'''
''' Аватар пользователя
'''
'''
''' Статус подключения
'''
'''
''' Запускает процедуру входа пользователя
'''
Public Sub ConnectUser()
AddHandler AccountsSettingsPane.GetForCurrentView().AccountCommandsRequested, AddressOf BuildPaneAsync
AccountsSettingsPane.Show()
End Sub
Public Async Sub LogOutUser(account As WebAccount)
ApplicationData.Current.LocalSettings.Values.Remove("CurrentUserProviderId")
ApplicationData.Current.LocalSettings.Values.Remove("CurrentUserId")
Await account.SignOutAsync()
UserId = ""
UserName = ""
UserAvatar = New BitmapImage
ConnectStatus = UserConnectStatusEnum.None
End Sub
Public Async Function BackgroundConnectUser() As Task(Of Boolean)
Dim result As Boolean = False
Dim account As WebAccount = Await GetWebAccount()
If account Is Nothing Then Return result
ConnectStatus = UserConnectStatusEnum.Logon
Dim request As WebTokenRequest = New WebTokenRequest(account.WebAccountProvider, "wl.basic")
Dim requestResult As WebTokenRequestResult = Await WebAuthenticationCoreManager.GetTokenSilentlyAsync(request, account)
If requestResult.ResponseStatus = WebTokenRequestStatus.Success Then
Try
Dim token As String = requestResult.ResponseData(0).Token
Dim restApi = New Uri("https://apis.live.net/v5.0/me?access_token=" + token)
Dim client = New HttpClient()
Dim infoResult = Await client.GetAsync(restApi)
Dim Content As String = Await infoResult.Content.ReadAsStringAsync()
Dim jsonO = JsonObject.Parse(Content)
UserId = jsonO("id").GetString
UserName = jsonO("name").GetString
UserAvatar = New BitmapImage(New Uri("https://apis.live.net/v5.0/me/picture?access_token=" + token))
ConnectStatus = UserConnectStatusEnum.Ssuccessful
result = True
Catch ex As Exception
ConnectStatus = UserConnectStatusEnum.None
End Try
Else
ConnectStatus = UserConnectStatusEnum.None
End If
Return result
End Function
#End Region
#Region "Внутренние функции, процедуры и типы"
'''
''' Создает варианты логина на панели
'''
'''
'''
Private Async Sub BuildPaneAsync(sender As AccountsSettingsPane, e As AccountsSettingsPaneCommandsRequestedEventArgs)
RemoveHandler AccountsSettingsPane.GetForCurrentView().AccountCommandsRequested, AddressOf BuildPaneAsync
Dim Deferral = e.GetDeferral
Dim msaProvider = Await WebAuthenticationCoreManager.FindAccountProviderAsync("https://login.microsoft.com", "consumers")
Dim command = New WebAccountProviderCommand(msaProvider, AddressOf GetMsaTokenAsync)
e.WebAccountProviderCommands.Add(command)
e.HeaderText = "Для доступа к ферме требуется выполнить вход в ваш аккаунт Microsoft"
Dim settingsCmd As SettingsCommand = New SettingsCommand("settings_privacy", "Политика конфиденциальности", Async Sub()
Await Launcher.LaunchUriAsync(New Uri("https://privacy.microsoft.com/ru-ru/"))
End Sub)
e.Commands.Add(settingsCmd)
Deferral.Complete()
End Sub
'''
''' Логин и получение токина
'''
'''
Private Async Sub GetMsaTokenAsync(command As WebAccountProviderCommand)
ConnectStatus = UserConnectStatusEnum.Logon
Dim request As WebTokenRequest = New WebTokenRequest(command.WebAccountProvider, "wl.basic")
Dim result As WebTokenRequestResult = Await WebAuthenticationCoreManager.RequestTokenAsync(request)
If result.ResponseStatus = WebTokenRequestStatus.Success Then
Dim account As WebAccount = result.ResponseData(0).WebAccount
ApplicationData.Current.LocalSettings.Values("CurrentUserProviderId") = account.WebAccountProvider.Id
ApplicationData.Current.LocalSettings.Values("CurrentUserId") = account.Id
Await BackgroundConnectUser()
Else
ConnectStatus = UserConnectStatusEnum.None
End If
End Sub
'''
''' Получает аккаунт пользователя на основе сохраненных маркеров
'''
'''
''' Перечислитесь статуса подключения
'''
Public Enum UserConnectStatusEnum
'''
''' Вход не выполнен
'''
None = 0
'''
''' Осуществляется вход
'''
Logon = 1
'''
''' Вход выполнен
'''
Ssuccessful = 2
End Enum
#End Region
End Class
Public Class ConnectStatusToEnabledConverter
Implements IValueConverter
Public Function Convert(value As Object, targetType As Type, parameter As Object, language As String) As Object Implements IValueConverter.Convert
Return CStr(parameter).IndexOf(CStr(value)) > -1
End Function
Public Function ConvertBack(value As Object, targetType As Type, parameter As Object, language As String) As Object Implements IValueConverter.ConvertBack
Throw New NotImplementedException()
End Function
End ClassThe page layout has undergone not very large adjustments. The most important difference is the addition of an exit button for the account, as well as a line to monitor the connection status. The rest of the changes made the data display more visual, because ultimately the task of the page is to demonstrate the result of code execution, in which the main changes took place. Consider them.
Firstly, I completely took out the logic of working with the account manager Web accounts in a separate class. This is done in order to have access to this code from anywhere in the application. For example, in the article “ Advanced splash screen ”, I mentioned the lengthy operations that it made sense to perform inside the splash screen, and the process of obtaining user data in BackgroundConnectUser is just such an operation.
As a result of the code transfer to a separate class, almost nothing remained in the class of the page itself. All work inside the page is reduced to a reaction to pressing two buttons and setting the data context for the page (in the MainPage_Loaded procedure). It is not difficult to guess that the instance of the UserManager class acts as the data context in which the main work is already taking place. The class implements the INotifyPropertyChanged interface, which allows you to bind to its fields from the page layout.
The ported code received some changes, and I will try to parse them in the same order in which the original example was created:
- ConnectUser procedure. It essentially duplicates the code that was previously called by clicking on the "Login" button. You will only need to call this procedure if we do not have tokens for the background connection.
- BuildPaneAsync received several significant, and not very changes. To begin, unsubscribing from the AccountCommandsRequested event, which after calling this procedure we no longer need. This is followed by the already known code, which is complemented by setting a subtitle in the dispatcher window and adding a link to the privacy policy. Both of these points are optional and are fully implemented at your discretion. Moreover, in the second case, you can add a link that executes any of your code, and it’s not necessary to go to a page with a privacy policy.

- After clicking on the “Continue” button, the GetMsaTokenAsync procedure starts, so the very first line in it sets the Logon status to which you can respond to display progress indicators or block interface elements. Then comes the code we already know, but with the addition of a reaction to situations when the input was canceled or failed. I admit, I fought all day for this seemingly banal place. The catch is that when you first run this code, immediately after the window with the choice of input options, another window appears asking for permission to access the data. A relatively large period of time (up to 2 seconds) may elapse between the switchings of these two windows, therefore it is logical to maintain the Logon status during this period in order to exclude the repeated pressing of the “Login” button.
- The BackgroundConnectUser procedure in the new variation has turned into an asynchronous function, so that we can accordingly respond to an unsuccessful (or successful) attempt to receive data in the background. Since this function can be called from different places (for example, from the splash screen), we must make sure that the loaded access tokens are not empty. For the convenience of loading saved markers, a separate function GetWebAccount has been created and, if there are no markers in the local settings, it returns Nothing. If the WebAccount object fails, return the default result (False), and if it is successful, set the status to Logon and continue the procedure. Next, we repeat the already known actions with the only difference being that in case of refusal to receive a token, you need to return the None status, and with a successful request, Ssuccessful.
- The LogOutUser procedure contains code not previously used. It implements the ability to exit the account and remove markers from the saved settings. Be sure to implement this feature in your application, as this will give complete freedom to the user in terms of ensuring confidentiality, not to mention the potential need to log in with other credentials.
- Well, the last thing to mention is the ConnectStatus property that I created in this class. This property is of the UserConnectStatusEnum native enumerator type and is required to set login status. This is an important element of interaction with the class, because due to binding to this property, we can block buttons that are not desirable to be pressed at the moment of execution of certain sections of the code, or, on the contrary, unlock those that are available only after the login. To correctly interpret the binding of the IsEnabled property to ConnectStatus, the ConnectStatusToEnabledConverter converter was also created.
This is where my implementation for Web Account Manager ends. It goes without saying that during the development process, some improvements will be made that will meet the tasks that I personally set for this tool, however, the given class is quite functional and you can safely copy it to your project in order to start implementing your tasks related with receiving user data.
Now that the user data has been received, we can begin to study the issue of data synchronization between devices and I will start by finding a suitable site and technology. This is what we will talk about in the next article.