 April 25, 2018 at 14:59
Veeam Backup & Replication: 10 Beginner Tips
- Transfer
- Tutorial
Something quite a while ago we did not write about our flagship product. We are correcting, especially since another portion of useful tips from the guys from the Veeam Support Team has arrived. Today with you again my colleague Evgeny Ivanov, now from Bucharest, where he was called up as a mentor for the Romanian technical support team.
In the course of their work, Eugene and his companions put together a decent collection of "rakes", which are often attacked by novice users when deploying and configuring Veeam Backup & Replication. And so that you do not repeat their mistakes, Eugene explains how to do it right.
So welcome to cat.

“Direct incremental” or “infinitely incremental” are generally recommended, as they are the fastest. An infinitely-incremental chain (without periodic full backups) takes up less space and is processed quite quickly. The usual incremental chain of space takes up more, but it is also more “resilient”, so to speak, since it contains not only incremental backups, but also periodically created full ones.
The reverse (reverse) incremental method is the oldest and, naturally, the slowest. Depending on the storage system, it can be 3 or even more times slower than others. Nevertheless, there are some advantages to using it: the last in the chain is always a full backup, and therefore you can recover faster than from chains of other types. We note, however, that the difference with a normal incremental chain is not very significant (unless you keep such a chain unreasonably long, that is, more than 30 days).
Details about the methods are described here .
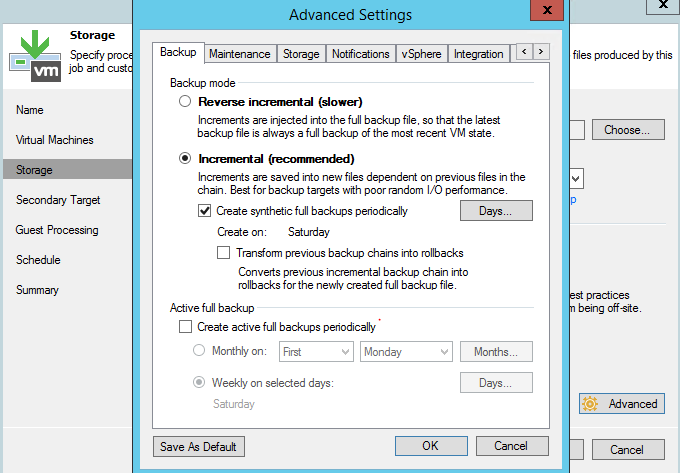
The synthetic full backup operation uses restore points that are stored in the repository. But you need to keep in mind that not all storage systems are able to provide sufficient performance for this operation. Therefore, we recommend creating active full backups as an alternative.
When you specify the settings for creating a synthetic full backup, pay attention to the option “Transform previous backup chains into rollbacks” (convert previous chains to rollback points). Its use will lead to the fact that the task of converting the incremental backup (.VIB) to rollback points (.VRB) (which will, however, consume a significant part of the storage resources of the repository) will be launched. For example, with this option you can convert the current chain to inverse-incremental, in particular, for archive storage.
But if you use this option as a backup method, then in the end a very peculiar chain will be created from a full backup file and incremental and reverse-incremental backup files.
Guest OS processing allows you to create consistent backups of virtual machines. And if applications such as Microsoft Exchange, Active Directory, SharePoint, SQL Server or Oracle are running on the VM, then you can use the Veeam Explorers tools to restore them granularly. Work with the guest OS is based on the VSS functionality (supported by Windows), which must be correctly configured, otherwise the backup jobs will not be able to complete successfully.
To activate guest OS processing settings:
If you activate the VM Guest File System Indexing option in the backup settings, then Veeam Backup & Replication will create VM file directories. This allows you to perform file search and 1-click recovery through the Veeam Backup Enterprise Manager web interface.
If you are not working with Enterprise Manager, then we recommend that you do not enable this option - this will reduce the backup window (sometimes quite significantly) and save disk space on the C: Veeam backup server. This will not affect the recovery of VM files through the Veeam Backup & Replication console.
No storage vendor guarantees absolute data integrity. Of course, Veeam checks the backup file when writing to disk, but despite the fact that millions of operations are performed on the storage system, random permutation of the bits is still possible, and the result is “invisible” damage. Veeam Backup & Replication offers SureBackup and health checks for early detection of such damage. But this is not a panacea, so we recommend adopting the 3-2-1 rule , which requires the use of different types of media for backup and store them on at least 2 sites.
To do this, it is recommended that after creating the main backup task, set up the backup transfer task. Such a task can use backup storage or cloud storage as the target storage location. You can also archive backups to magnetic tape.
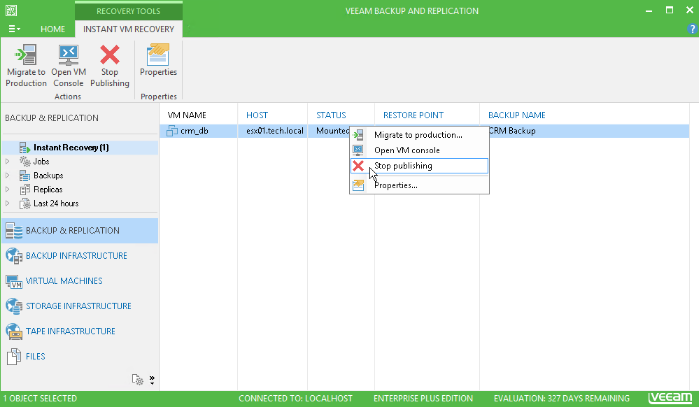
The function of instant recovery VM Instant VM Recovery allows you to start the machine in the shortest possible time directly from backup. However, you need to remember that this machine is hosted in your repository and consumes its resources until you transfer it to production. Do not forget about this important final step - believe me, over the years of working in Veeam technical support, we have seen many cases with VMs that have been functioning in backup mode for weeks without being transferred to production. The result was usually rather deplorable: overflow of storage and data loss.
Details on how to properly perform instant recovery, read here .
Veeam supports a variety of repositories as repositories. Many of our users from year to year prefer to use a physical Windows or Linux server for this purpose, since in most cases this gives maximum performance. You can read about it on our forum .
Repositories on CIFS share are also quite popular, despite the fact that their performance compared to others is the lowest.
Many modern NAS devices support iSCSI, so it’s better to configure the iSCSI drive and make it available to the Veeam backup server (or proxy). It should be borne in mind that in such a scenario (using the repository on the NAS), it is not recommended to use the back-incremental backup method, because it gives a large load on storage due to the read / write intensity.
If you intend to perform replication through the WAN, we recommend that you configure the backup proxy server on a remote site and specify it in the replication job settings. This way you get a reliable channel between the two sites. We recommend that you enable this proxy in Network (NBD) mode , since working in the Virtual Appliance (hot-add) mode during replication can lead to the appearance of "lost" snapshots.
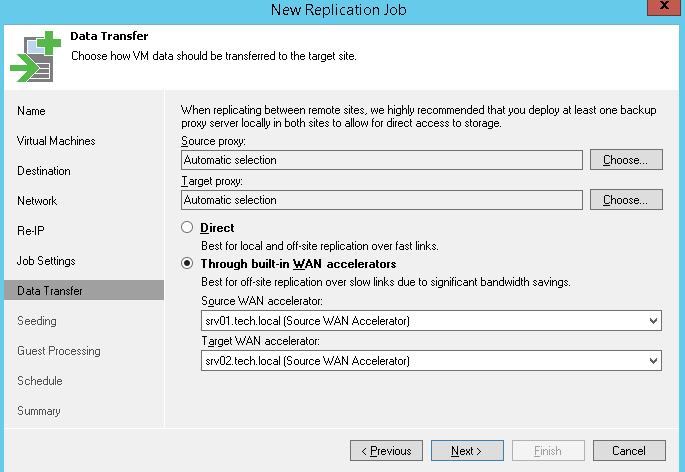
We recommend using proxies at a remote site in case of work through a WAN accelerator. You can deploy a WAN accelerator and proxies on different machines or even on one (of course, if it has enough resources).
To transfer data to the tape device, Veeam uses an auxiliary server (tape server). It is put on the physical server to which this tape device is connected.
Important! Connecting to a VM with forwarding through an ESXi host is not supported!
Veeam Backup & Replication receives information about the tape library from the operating system, so be sure to check that you have the latest drivers installed and that the tape device displays correctly in the device manager console.
You can read more helpful tips on working with tape in this article .
There is nothing to be done, you will have to make an application on the technical support portal. We urge you to do a couple of simple things:
I hope our recommendations help someone avoid common mistakes when deploying and configuring Veeam Backup & Replication. That's all for today. Best wishes, Veeam Support Team.
In the course of their work, Eugene and his companions put together a decent collection of "rakes", which are often attacked by novice users when deploying and configuring Veeam Backup & Replication. And so that you do not repeat their mistakes, Eugene explains how to do it right.
So welcome to cat.
# 1: Choose the best backup method
“Direct incremental” or “infinitely incremental” are generally recommended, as they are the fastest. An infinitely-incremental chain (without periodic full backups) takes up less space and is processed quite quickly. The usual incremental chain of space takes up more, but it is also more “resilient”, so to speak, since it contains not only incremental backups, but also periodically created full ones.
The reverse (reverse) incremental method is the oldest and, naturally, the slowest. Depending on the storage system, it can be 3 or even more times slower than others. Nevertheless, there are some advantages to using it: the last in the chain is always a full backup, and therefore you can recover faster than from chains of other types. We note, however, that the difference with a normal incremental chain is not very significant (unless you keep such a chain unreasonably long, that is, more than 30 days).
Details about the methods are described here .
# 2: Think about synthetic full backup settings
The synthetic full backup operation uses restore points that are stored in the repository. But you need to keep in mind that not all storage systems are able to provide sufficient performance for this operation. Therefore, we recommend creating active full backups as an alternative.
When you specify the settings for creating a synthetic full backup, pay attention to the option “Transform previous backup chains into rollbacks” (convert previous chains to rollback points). Its use will lead to the fact that the task of converting the incremental backup (.VIB) to rollback points (.VRB) (which will, however, consume a significant part of the storage resources of the repository) will be launched. For example, with this option you can convert the current chain to inverse-incremental, in particular, for archive storage.
But if you use this option as a backup method, then in the end a very peculiar chain will be created from a full backup file and incremental and reverse-incremental backup files.
# 3: Set up guest OS processing
Guest OS processing allows you to create consistent backups of virtual machines. And if applications such as Microsoft Exchange, Active Directory, SharePoint, SQL Server or Oracle are running on the VM, then you can use the Veeam Explorers tools to restore them granularly. Work with the guest OS is based on the VSS functionality (supported by Windows), which must be correctly configured, otherwise the backup jobs will not be able to complete successfully.
To activate guest OS processing settings:
- In the properties of the backup job, go to the Guest Processing step .
- Turn on the Application-aware processing option .
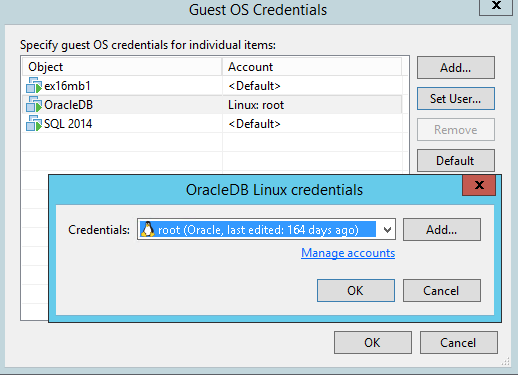
- In the Guest OS credentials section, specify an account with administrator rights to access the guest OS.
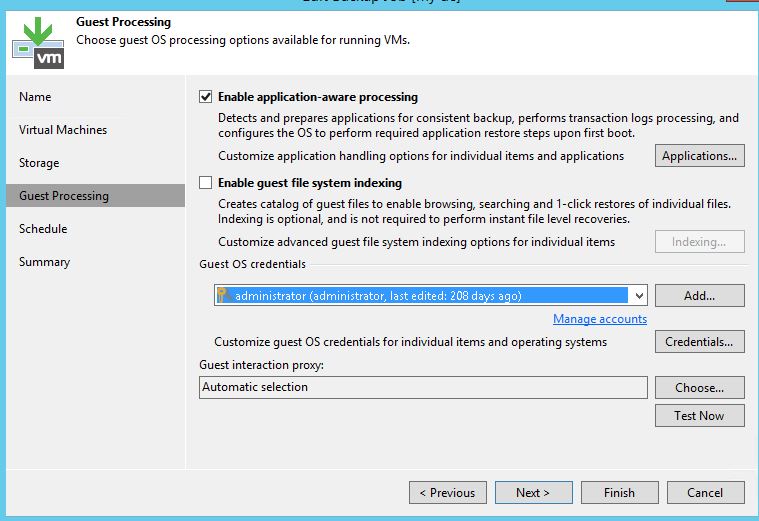
- If for any VM as part of the backup job you need a separate account, then click the Credentials button . Next, click on Set User ... and specify the necessary data.
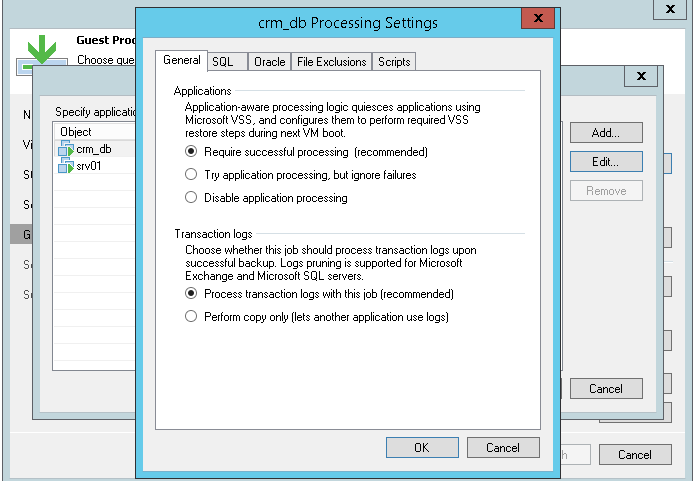
- Settings for the treatment of specific applications are specified in a separate dialog, which opens after clicking the Applications ... . If necessary, you can also disable guest OS processing for individual machines.
# 4: Do not index files unnecessarily
If you activate the VM Guest File System Indexing option in the backup settings, then Veeam Backup & Replication will create VM file directories. This allows you to perform file search and 1-click recovery through the Veeam Backup Enterprise Manager web interface.
If you are not working with Enterprise Manager, then we recommend that you do not enable this option - this will reduce the backup window (sometimes quite significantly) and save disk space on the C: Veeam backup server. This will not affect the recovery of VM files through the Veeam Backup & Replication console.
# 5: do extra backups
No storage vendor guarantees absolute data integrity. Of course, Veeam checks the backup file when writing to disk, but despite the fact that millions of operations are performed on the storage system, random permutation of the bits is still possible, and the result is “invisible” damage. Veeam Backup & Replication offers SureBackup and health checks for early detection of such damage. But this is not a panacea, so we recommend adopting the 3-2-1 rule , which requires the use of different types of media for backup and store them on at least 2 sites.
To do this, it is recommended that after creating the main backup task, set up the backup transfer task. Such a task can use backup storage or cloud storage as the target storage location. You can also archive backups to magnetic tape.
# 6: Finalize Instant Recovery
The function of instant recovery VM Instant VM Recovery allows you to start the machine in the shortest possible time directly from backup. However, you need to remember that this machine is hosted in your repository and consumes its resources until you transfer it to production. Do not forget about this important final step - believe me, over the years of working in Veeam technical support, we have seen many cases with VMs that have been functioning in backup mode for weeks without being transferred to production. The result was usually rather deplorable: overflow of storage and data loss.
Details on how to properly perform instant recovery, read here .
# 7: Think about where to put the repository
Veeam supports a variety of repositories as repositories. Many of our users from year to year prefer to use a physical Windows or Linux server for this purpose, since in most cases this gives maximum performance. You can read about it on our forum .
Repositories on CIFS share are also quite popular, despite the fact that their performance compared to others is the lowest.
Many modern NAS devices support iSCSI, so it’s better to configure the iSCSI drive and make it available to the Veeam backup server (or proxy). It should be borne in mind that in such a scenario (using the repository on the NAS), it is not recommended to use the back-incremental backup method, because it gives a large load on storage due to the read / write intensity.
# 8: Use a proxy when replicating
If you intend to perform replication through the WAN, we recommend that you configure the backup proxy server on a remote site and specify it in the replication job settings. This way you get a reliable channel between the two sites. We recommend that you enable this proxy in Network (NBD) mode , since working in the Virtual Appliance (hot-add) mode during replication can lead to the appearance of "lost" snapshots.
We recommend using proxies at a remote site in case of work through a WAN accelerator. You can deploy a WAN accelerator and proxies on different machines or even on one (of course, if it has enough resources).
# 9: Consider important nuances when archiving to tape
To transfer data to the tape device, Veeam uses an auxiliary server (tape server). It is put on the physical server to which this tape device is connected.
Important! Connecting to a VM with forwarding through an ESXi host is not supported!
Veeam Backup & Replication receives information about the tape library from the operating system, so be sure to check that you have the latest drivers installed and that the tape device displays correctly in the device manager console.
You can read more helpful tips on working with tape in this article .
# 10: If something went wrong anyway
There is nothing to be done, you will have to make an application on the technical support portal. We urge you to do a couple of simple things:
- Check what severity level you set for your application - for this, correlate it with the relevant criteria. We understand that all problems are serious for our users (otherwise they would not have contacted us), and our responsibility is to consider applications as soon as possible. But if you set the level to Severity 1, and the application does not meet the criteria of this level, you risk losing valuable time, which will be required to re-qualify your application and redirect it to the appropriate queue.
- To make it easier and faster to find the cause of the problem, be sure to prepare the logs for sending to us. How to do it right is written here. In some cases, our engineers may ask for logs of other components of your infrastructure, so you should be prepared.

I hope our recommendations help someone avoid common mistakes when deploying and configuring Veeam Backup & Replication. That's all for today. Best wishes, Veeam Support Team.









