Using SQLite in Flutter
- Tutorial
Hi, Habr! We present to your attention the translation of the article “Using SQLite in Flutter” .

Saving data is very important for users, since it is impractical to load the same data from the network. It would be wiser to save them locally.
In this article, I will demonstrate how to do this using SQLite in Flutter-e.
SQLite is the most popular way to store data on mobile devices. In this article, we will use the sqflite package to use SQLite. Sqflite is one of the most frequently used and relevant libraries for connecting SQLite databases in Flutter.
In our project, open the file pubspec.yaml . Under dependencies add the latest version of sqflite and path_provider.
Now create a new Database.dart file. In it we will create singleton.
Why we need a singleton: we use this pattern to make sure that we only have one class entity and to provide a global entry point to it.
1. Create a private constructor that can only be used inside this class.
2. Set up the database
The next step is to create a database object and provide a getter, where we will create a database object if it has not yet been created (lazy initialization)
If there is no object assigned to the database, then we call the initDB function to create the database. In this function, we will get a path to save the database and create the desired tables.
The data inside the database will be converted to Dart Maps. We need to create classes of models with toMap and fromMap methods.
To create classes of models, I am going to use this site
Our model:
Create
Using rawInsert:
Using insert:
Another example of using a large ID as a new ID.
Read
Get Client by id
Get all Clients with a condition
Get blocked customers only
Update
Update an existing Client
Lock / Unlock Client
Delete
Delete one Client
Delete All Clients

For our demo, we will create a simple application that displays our database.
To begin with we will impose the screen
Notes:
1. FutureBuilder is used to retrieve data from the database
2. FAB to initialize test clients
3. CircularProgressIndicator is shown when there is no data
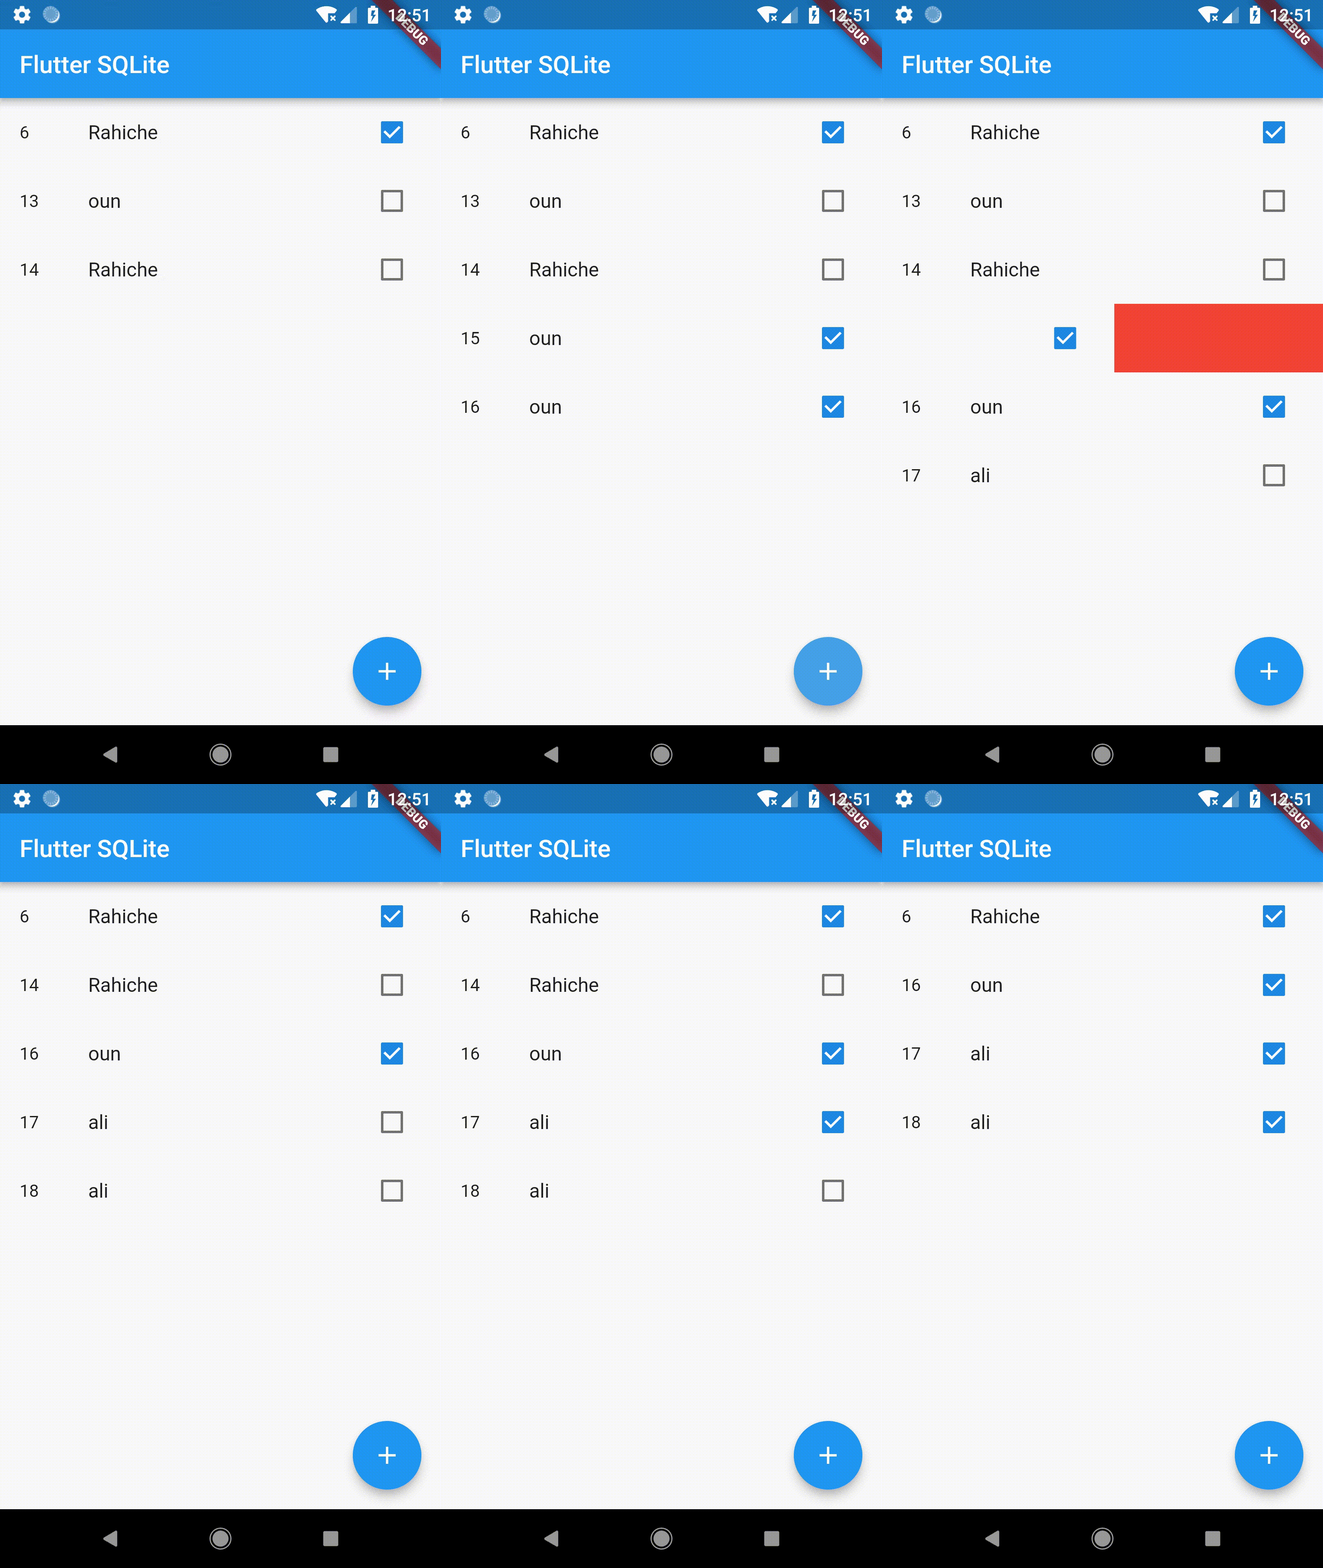
4. When a user clicks on the client’s checkboxes is locked / unlocked
Now it’s very easy to add new features, for example, if we want to delete a client, when he’s tapping, just wrap the ListTile in the Dismissible widget like this:

We have done a lot in this article, but in applications in the real world, initializing states in the UI layer is not a good idea. Separate the logic from the UI.
There are many patterns in Flutter, but we will use BLoC as it is the most flexible to configure.
Create a BLoC
Notes:
Notes:
1. getClients retrieves data from the database (Client table) asynchronously. We will use this method whenever we need to update the table, therefore it is worth putting it into the body of the constructor.
2. We created StreamController.broadcast, in order to listen to broadcast events more than once. In our example, this does not really matter, since we listen to them only once, but it would be nice to implement this for the future.
3. Do not forget to close the threads. This way we prevent the memory of the faces. In our example, we close them using the dispose method in StatefulWidget.
Now let's look at the code.
Finally, the final result

Sources can be viewed here - Github

Saving data is very important for users, since it is impractical to load the same data from the network. It would be wiser to save them locally.
In this article, I will demonstrate how to do this using SQLite in Flutter-e.
Why SQLite?
SQLite is the most popular way to store data on mobile devices. In this article, we will use the sqflite package to use SQLite. Sqflite is one of the most frequently used and relevant libraries for connecting SQLite databases in Flutter.
1. Add dependencies
In our project, open the file pubspec.yaml . Under dependencies add the latest version of sqflite and path_provider.
dependencies:
  flutter:
    sdk: flutter
  sqflite: any
  path_provider: any
2. Create DB Client
Now create a new Database.dart file. In it we will create singleton.
Why we need a singleton: we use this pattern to make sure that we only have one class entity and to provide a global entry point to it.
1. Create a private constructor that can only be used inside this class.
class DBProvider {
  DBProvider._();
  static final DBProvider db = DBProvider._();
}
2. Set up the database
The next step is to create a database object and provide a getter, where we will create a database object if it has not yet been created (lazy initialization)
static Database _database;
  Future<Database> get database async {
    if (_database != null)
    return _database;
    // if _database is null we instantiate it
    _database = await initDB();
    return _database;
  }
If there is no object assigned to the database, then we call the initDB function to create the database. In this function, we will get a path to save the database and create the desired tables.
initDB() async {
    Directory documentsDirectory = await getApplicationDocumentsDirectory();
    String path = join(documentsDirectory.path, "TestDB.db");
    return await openDatabase(path, version: 1, onOpen: (db) {
    }, onCreate: (Database db, int version) async {
      await db.execute("CREATE TABLE Client ("
          "id INTEGER PRIMARY KEY,"
          "first_name TEXT,"
          "last_name TEXT,"
          "blocked BIT"
          ")");
    });
  }
3. Create a model class
The data inside the database will be converted to Dart Maps. We need to create classes of models with toMap and fromMap methods.
To create classes of models, I am going to use this site
Our model:
/// ClientModel.dart
import 'dart:convert';
Client clientFromJson(String str) {
    final jsonData = json.decode(str);
    return Client.fromJson(jsonData);
}
String clientToJson(Client data) {
    final dyn = data.toJson();
    return json.encode(dyn);
}
class Client {
    int id;
    String firstName;
    String lastName;
    bool blocked;
    Client({
        this.id,
        this.firstName,
        this.lastName,
        this.blocked,
    });
    factory Client.fromJson(Map<String, dynamic> json) => new Client(
        id: json["id"],
        firstName: json["first_name"],
        lastName: json["last_name"],
        blocked: json["blocked"],
    );
    Map<String, dynamic> toJson() => {
        "id": id,
        "first_name": firstName,
        "last_name": lastName,
        "blocked": blocked,
    };
}
4. CRUD operations
Create
Using rawInsert:
newClient(Client newClient) async {
    final db = await database;
    var res = await db.rawInsert(
      "INSERT Into Client (id,first_name)"
      " VALUES (${newClient.id},${newClient.firstName})");
    return res;
  }
Using insert:
newClient(Client newClient) async {
    final db = await database;
    var res = await db.insert("Client", newClient.toMap());
    return res;
  }
Another example of using a large ID as a new ID.
newClient(Client newClient) async {
    final db = await database;
    //get the biggest id in the table
    var table = await db.rawQuery("SELECT MAX(id)+1 as id FROM Client");
    int id = table.first["id"];
    //insert to the table using the new id
    var raw = await db.rawInsert(
        "INSERT Into Client (id,first_name,last_name,blocked)"
        " VALUES (?,?,?,?)",
        [id, newClient.firstName, newClient.lastName, newClient.blocked]);
    return raw;
  }
Read
Get Client by id
getClient(int id) async {
    final db = await database;
    var res =await  db.query("Client", where: "id = ?", whereArgs: [id]);
    return res.isNotEmpty ? Client.fromMap(res.first) : Null ;
  }
Get all Clients with a condition
getAllClients() async {
    final db = await database;
    var res = await db.query("Client");
    List<Client> list =
        res.isNotEmpty ? res.map((c) => Client.fromMap(c)).toList() : [];
    return list;
  }
Get blocked customers only
getBlockedClients() async {
    final db = await database;
    var res = await db.rawQuery("SELECT * FROM Client WHERE blocked=1");
    List<Client> list =
        res.isNotEmpty ? res.toList().map((c) => Client.fromMap(c)) : null;
    return list;
  }
Update
Update an existing Client
updateClient(Client newClient) async {
    final db = await database;
    var res = await db.update("Client", newClient.toMap(),
        where: "id = ?", whereArgs: [newClient.id]);
    return res;
  }
Lock / Unlock Client
blockOrUnblock(Client client) async {
    final db = await database;
    Client blocked = Client(
        id: client.id,
        firstName: client.firstName,
        lastName: client.lastName,
        blocked: !client.blocked);
    var res = await db.update("Client", blocked.toMap(),
        where: "id = ?", whereArgs: [client.id]);
    return res;
  }
Delete
Delete one Client
deleteClient(int id) async {
    final db = await database;
    db.delete("Client", where: "id = ?", whereArgs: [id]);
  }
Delete All Clients
deleteAll() async {
    final db = await database;
    db.rawDelete("Delete * from Client");
  }
Demo

For our demo, we will create a simple application that displays our database.
To begin with we will impose the screen
Widget build(BuildContext context) {
    return Scaffold(
      appBar: AppBar(title: Text("Flutter SQLite")),
      body: FutureBuilder<List<Client>>(
        future: DBProvider.db.getAllClients(),
        builder: (BuildContext context, AsyncSnapshot<List<Client>> snapshot) {
          if (snapshot.hasData) {
            return ListView.builder(
              itemCount: snapshot.data.length,
              itemBuilder: (BuildContext context, int index) {
                Client item = snapshot.data[index];
                return ListTile(
                  title: Text(item.lastName),
                  leading: Text(item.id.toString()),
                  trailing: Checkbox(
                    onChanged: (bool value) {
                      DBProvider.db.blockClient(item);
                      setState(() {});
                    },
                    value: item.blocked,
                  ),
                );
              },
            );
          } else {
            return Center(child: CircularProgressIndicator());
          }
        },
      ),
      floatingActionButton: FloatingActionButton(
        child: Icon(Icons.add),
        onPressed: () async {
          Client rnd = testClients[math.Random().nextInt(testClients.length)];
          await DBProvider.db.newClient(rnd);
          setState(() {});
        },
      ),
    );
  }
Notes:
1. FutureBuilder is used to retrieve data from the database
2. FAB to initialize test clients
List<Client> testClients = [
    Client(firstName: "Raouf", lastName: "Rahiche", blocked: false),
    Client(firstName: "Zaki", lastName: "oun", blocked: true),
    Client(firstName: "oussama", lastName: "ali", blocked: false),
  ];
3. CircularProgressIndicator is shown when there is no data
4. When a user clicks on the client’s checkboxes is locked / unlocked
Now it’s very easy to add new features, for example, if we want to delete a client, when he’s tapping, just wrap the ListTile in the Dismissible widget like this:
return Dismissible(
   key: UniqueKey(),
   background: Container(color: Colors.red),
   onDismissed: (direction) {
    DBProvider.db.deleteClient(item.id);
   },
    child: ListTile(...),
  );
Refactoring to use the BLoC pattern
We have done a lot in this article, but in applications in the real world, initializing states in the UI layer is not a good idea. Separate the logic from the UI.
There are many patterns in Flutter, but we will use BLoC as it is the most flexible to configure.
Create a BLoC
class ClientsBloc {
  ClientsBloc() {
    getClients();
  }
  final _clientController =     StreamController<List<Client>>.broadcast();
  get clients => _clientController.stream;
  dispose() {
    _clientController.close();
  }
  getClients() async {
    _clientController.sink.add(await DBProvider.db.getAllClients());
  }
}
Notes:
Notes:
1. getClients retrieves data from the database (Client table) asynchronously. We will use this method whenever we need to update the table, therefore it is worth putting it into the body of the constructor.
2. We created StreamController.broadcast, in order to listen to broadcast events more than once. In our example, this does not really matter, since we listen to them only once, but it would be nice to implement this for the future.
3. Do not forget to close the threads. This way we prevent the memory of the faces. In our example, we close them using the dispose method in StatefulWidget.
Now let's look at the code.
blockUnblock(Client client) {
  DBProvider.db.blockOrUnblock(client);
  getClients();
}
delete(int id) {
  DBProvider.db.deleteClient(id);
  getClients();
}
add(Client client) {
  DBProvider.db.newClient(client);
  getClients();
}
Finally, the final result

Sources can be viewed here - Github
