DotVVM - First Look
I would like to start a series of articles on Habré about the DotVVM framework. To get started, let's start with a simple TODO list.
The framework is developed on the basis of ASP.NET. It is easy to learn and allows you to create business applications and SPA without JavaScript code. All due to the large number of ready-made controls.
The following articles will be devoted to how it all began, what it was like to write your own framework and its support in Visual Studio, as well as what features are in the latest release, which was released earlier this year.
For the first project, I will use Visual Studio 2017 as an extension for DotVVM. After installing the extension, new types of projects should appear during creation. Let's choose the new DotVVM .NET Core project.

After creating a new DotVVM project, the following file structure will appear.
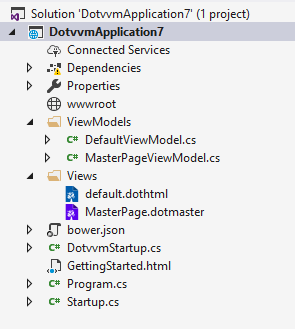
Core files
In addition, the project contains the Views and ViewModels folders. The first folder contains a file called default.dothtml, the second folder ViewModel class DefaultViewModel.cs . These two files together create the DotVVM web page.
DotVVM uses the Model-View-ViewModel (MVVM) pattern.
View is a file with the extension .dothtml. Basically, it is an HTML file with several syntactic attributes: directives, controls and data bindings.
ViewModel is a C # class with two goals:
It contains the state of the page. In other words, everything that can be changed by the user on the page. If you have a TextBox on the page, you need to save its value somewhere. In DotVVMyou just need to declare a property of type string in the ViewModel class and bind it to the TextBox using the Text property .
To process a command, you just need to declare a public method in the ViewModel .
We can add current affairs to our list as regular text and check their validity when adding. Also, cases can be marked as done.
First, add the ToDoItem.cs class.
Since we don’t want to add empty cases without text, we will use DataAnnotations [Required] .
Add code to View and ViewModel
ViewModel - DefaultViewModel.cs
View - Default.dothml
In DotVVM operates with integrated control elements and their properties. For work with lists it is used
ViewModel - DefaultViewModel.cs
It remains to add functions. One to add and one to mark the case on the list. Add them to the ViewModel .
Add two buttons to the View
It remains to add a button to each case in the list that will mark the case as done. “Done” should appear and the button should disappear. To make a binding in the context of DefaultViewModel of Elements of the Repeater , add _parent . To pass the entire object from the list, pass it to the _this method .
The last property we will use in this tutorial is Validation.Enabled . By default, validation works so that any postback is blocked if validation fails. In our case, a situation may arise when we want to mark the case as done, but the text box will remain empty. To enable postback and ignore validation when a button is clicked, changeValidation.Enabled to false .
There are also advanced controls such as GridView or FileUpload , as well as the SpaContentPlaceHolder control , which turns the web application into a Single Page application.
You can also use different types of bindings, localization of RESX and Action filters , but more on that in the following articles.
Thanks for attention.
Links:
DotVVM on GitHub
Final Project
The framework is developed on the basis of ASP.NET. It is easy to learn and allows you to create business applications and SPA without JavaScript code. All due to the large number of ready-made controls.
The following articles will be devoted to how it all began, what it was like to write your own framework and its support in Visual Studio, as well as what features are in the latest release, which was released earlier this year.
For the first project, I will use Visual Studio 2017 as an extension for DotVVM. After installing the extension, new types of projects should appear during creation. Let's choose the new DotVVM .NET Core project.
After creating a new DotVVM project, the following file structure will appear.
Core files
- Program.cs is the main entry point for the application, which is present in all .NET Core .NET applications. If you look inside this file, you will see that it configures Kestrel, IIS integration, installs the contents of the root directory and starts the web host.
- DotvvmStartup.cs is a class that contains the configuration for DotVVM. You can find the ConfigureRoutes method with a line that registers the default route:
config.RouteTable.Add ("Default", "", "Views/default.dothtml");
If the user visits the homepage, DotVVM displays the Views /default.dothtml page. - Startup.cs contains two methods that are called when the application starts. The ConfigureServices method is used to register services in the IServiceCollection object. You will need to call services.AddDotVVM to register the services required by DotVVM. The Configure method configures all the ASP.NET middleware. Also need to call
app.UseDotVVM
to register an intermediate layer of DotVVM that will handle HTTP requests.
In addition, the project contains the Views and ViewModels folders. The first folder contains a file called default.dothtml, the second folder ViewModel class DefaultViewModel.cs . These two files together create the DotVVM web page.
DotVVM uses the Model-View-ViewModel (MVVM) pattern.
View is a file with the extension .dothtml. Basically, it is an HTML file with several syntactic attributes: directives, controls and data bindings.
ViewModel is a C # class with two goals:
It contains the state of the page. In other words, everything that can be changed by the user on the page. If you have a TextBox on the page, you need to save its value somewhere. In DotVVMyou just need to declare a property of type string in the ViewModel class and bind it to the TextBox using the Text property .
To process a command, you just need to declare a public method in the ViewModel .
We can add current affairs to our list as regular text and check their validity when adding. Also, cases can be marked as done.
First, add the ToDoItem.cs class.
    public class ToDoItem
    {
        [Required]
        public string Text { get; set; }
        public bool IsDone { get; set; }
    }
Since we don’t want to add empty cases without text, we will use DataAnnotations [Required] .
Add code to View and ViewModel
ViewModel - DefaultViewModel.cs
public class DefaultViewModel : MasterPageViewModel
    {
//ToDoItem, который мы будем добавлять
        public ToDoItem ToDoItem { get; set; } = new ToDoItem();
        public DefaultViewModel()
        {
        }
View - Default.dothml
//привязка к тексту ToDoItem
In DotVVM operates with integrated control elements and their properties. For work with lists it is used
ViewModel - DefaultViewModel.cs
public class DefaultViewModel : MasterPageViewModel
    {
        //ToDoItem, который мы будем добавлять
        public ToDoItem ToDoItem { get; set; } = new ToDoItem();
        public List ToDoItems { get; set; } = new List();
        public DefaultViewModel()
        {
        }
    }
//привязка к тексту ToDoItem
{{value: Text}}Done! It remains to add functions. One to add and one to mark the case on the list. Add them to the ViewModel .
    public class DefaultViewModel : MasterPageViewModel
        {
            //ToDoItem, который мы будем добавлять
            public ToDoItem ToDoItem { get; set; } = new ToDoItem();
            public List ToDoItems { get; set; } = new List();
            public DefaultViewModel()
            {
            }
            public void AddTodoItem(ToDoItem item)
            {
                ToDoItems.Add(ToDoItem);
                ToDoItem = new ToDoItem();
            }
            public void MarkAsDone(ToDoItem item)
            {
                item.IsDone = true;
            }
        }
Add two buttons to the View
//привязка к тексту ToDoItem
{{value: Text}}Done! It remains to add a button to each case in the list that will mark the case as done. “Done” should appear and the button should disappear. To make a binding in the context of DefaultViewModel of Elements of the Repeater , add _parent . To pass the entire object from the list, pass it to the _this method .
The last property we will use in this tutorial is Validation.Enabled . By default, validation works so that any postback is blocked if validation fails. In our case, a situation may arise when we want to mark the case as done, but the text box will remain empty. To enable postback and ignore validation when a button is clicked, changeValidation.Enabled to false .
//привязка к тексту ToDoItem
{{value: Text}}
There are also advanced controls such as GridView or FileUpload , as well as the SpaContentPlaceHolder control , which turns the web application into a Single Page application.
You can also use different types of bindings, localization of RESX and Action filters , but more on that in the following articles.
Thanks for attention.
Links:
DotVVM on GitHub
Final Project