Create TUI in python
- Tutorial
Hello, Habr! In this article I will talk about npyscreen , a library for creating text interfaces for terminal and console applications.
Installation
The package is available for download through PyPI.
sudo pip3 install npyscreenObject Types
Npyscreen uses 3 main types of objects:
- Application objects - provide launch and completion of the application, creating forms, processing events.
Mostly used are NPSAppManaged and StandardApp (with event support). - Form objects - the area of the screen that contains the widgets.
The main forms:- FormBaseNew is an empty form.
- Form - the form with the ok button.
- ActionForm - a form with two buttons: “ok” and “cancel”.
- FormWithMenus - a form that supports working with the menu.
- Widget Objects - various elements located on forms.
Some widgets:- Textfield , PasswordEntry , MultiLineEdit , FilenameCombo * - data entry forms.
- DateCombo , ComboBox , FilenameCombo - drop-down lists.
- MultiSelect , MultiSelect , BufferPager - widgets with a choice.
- Slider , TitleSlider - sliders.
More information can be found on the official website with documentation .
Write hello world
It is convenient to create forms, inheriting them from the built-in classes. Thus, you can override the built-in methods to extend the functionality of the application.
#!/usr/bin/env python3
import npyscreen
class App(npyscreen.StandardApp):
    def onStart(self):
        self.addForm("MAIN", MainForm, name="Hello Habr!")
class MainForm(npyscreen.ActionForm):
    # Конструктор
    def create(self):
        # Добавляем виджет TitleText на форму
        self.title = self.add(npyscreen.TitleText, name="TitleText", value="Hello World!")
    # переопределенный метод, срабатывающий при нажатии на кнопку «ok»
    def on_ok(self):
        self.parentApp.setNextForm(None)
    # переопределенный метод, срабатывающий при нажатии на кнопку «cancel»
    def on_cancel(self):
        self.title.value = "Hello World!"
MyApp = App()
MyApp.run()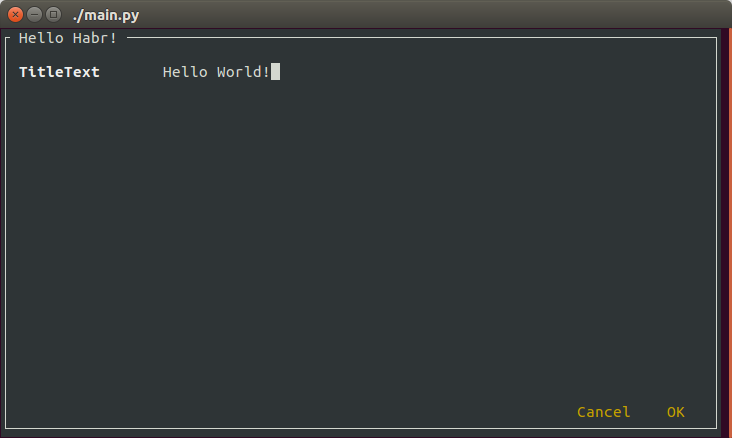
Arrangement of elements
By default, widgets take up as much space as possible.
To set the exact coordinates, you need to set the parameters:
- relx , rely - widget position relative to the origin of the form.
- width , height , max_width , max_height - widget size limits.
#!/usr/bin/env python3
import npyscreen
class App(npyscreen.StandardApp):
    def onStart(self):
        self.addForm("MAIN", MainForm, name="Hello Habr!")
class MainForm(npyscreen.FormBaseNew):
    def create(self):
        # Узнаем используемое формой пространство
        y, x = self.useable_space()
        self.add(npyscreen.TitleDateCombo, name="Date:", max_width=x // 2)
        self.add(npyscreen.TitleMultiSelect, relx=x // 2 + 1, rely=2, value=[1, 2], name="Pick Several", values=["Option1", "Option2", "Option3"], scroll_exit=True)
        # Можно использовать отицательные координаты
        self.add(npyscreen.TitleFilename, name="Filename:", rely=-5)
MyApp = App()
MyApp.run()
Boxes and custom colors
To make a wrapper in the form of a box is simple - you need to create a class inherited from BoxTitle and redefine the _contained_widget attribute by putting the widget inside it.
In npyscreen available several built-in color themes. If you wish, you can add your own. You can install them using the setTheme method .
Adjusting the color of the text is a little more complicated. I had to expand the functionality of the library for this to work.
#!/usr/bin/env python3
from src import npyscreen
import random
class App(npyscreen.StandardApp):
    def onStart(self):
        # Устанавливаем тему. По умолчанию используется DefaultTheme
        npyscreen.setTheme(npyscreen.Themes.ColorfulTheme)
        self.addForm("MAIN", MainForm, name="Hello Habr!")
class InputBox(npyscreen.BoxTitle):
    # MultiLineEdit теперь будет окружен боксом
    _contained_widget = npyscreen.MultiLineEdit
class MainForm(npyscreen.FormBaseNew):
    def create(self):
        y, x = self.useable_space()
        obj = self.add(npyscreen.BoxTitle, name="BoxTitle",
              custom_highlighting=True, values=["first line", "second line"],
              rely=y // 4, max_width=x // 2 - 5, max_height=y // 2)
        self.add(InputBox, name="Boxed MultiLineEdit", footer="footer",
              relx=x // 2, rely=2)
        color1 = self.theme_manager.findPair(self, 'GOOD')
        color2 = self.theme_manager.findPair(self, 'WARNING')
        color3 = self.theme_manager.findPair(self, 'NO_EDIT')
        color_list = [color1, color2, color3]
        first_line_colors = [random.choice(color_list) for i in range(len("first line"))]
        second_line_colors = [random.choice(color_list) for i in range(len("second"))]
        # Заполняем строки кастомными цветами
        obj.entry_widget.highlighting_arr_color_data = [first_line_colors, second_line_colors]
MyApp = App()
MyApp.run()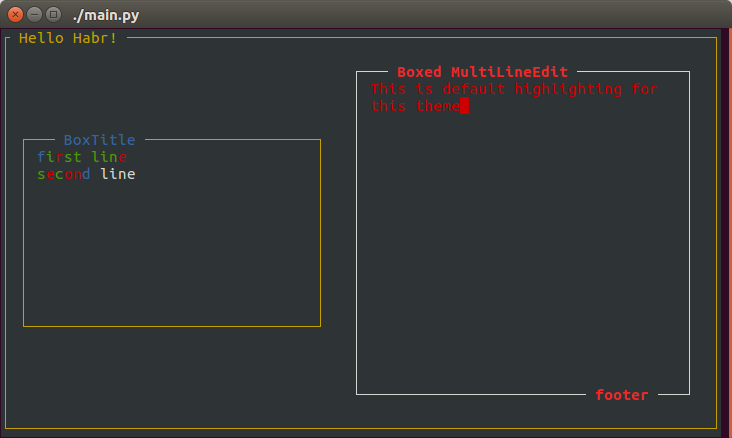
Events and Handlers
The StandardApp class in npyscreen supports the event queue.
As processing of clicks the add_handlers method is used .
#!/usr/bin/env python3
import npyscreen
import curses
class App(npyscreen.StandardApp):
    def onStart(self):
        self.addForm("MAIN", MainForm, name="Hello Habr!")
class InputBox1(npyscreen.BoxTitle):
    _contained_widget = npyscreen.MultiLineEdit
    def when_value_edited(self):
        self.parent.parentApp.queue_event(npyscreen.Event("event_value_edited"))
class InputBox2(npyscreen.BoxTitle):
    _contained_widget = npyscreen.MultiLineEdit
class MainForm(npyscreen.FormBaseNew):
    def create(self):
        self.add_event_hander("event_value_edited", self.event_value_edited)
        new_handlers = {
            # Устанавливаем ctrl+Q для выхода
            "^Q": self.exit_func,
            # Устанавливаем alt+enter для очистки inputbox
            curses.ascii.alt(curses.ascii.NL): self.inputbox_clear
        }
        self.add_handlers(new_handlers)
        y, x = self.useable_space()
        self.InputBox1 = self.add(InputBox1, name="Editable", max_height=y // 2)
        self.InputBox2 = self.add(InputBox2, footer="No editable", editable=False)
    def event_value_edited(self, event):
        self.InputBox2.value = self.InputBox1.value
        self.InputBox2.display()
    def inputbox_clear(self, _input):
        self.InputBox1.value = self.InputBox2.value = ""
        self.InputBox1.display()
        self.InputBox2.display()
    def exit_func(self, _input):
        exit(0)
MyApp = App()
MyApp.run()
References:
Official documentation
Original source codes
Updated by me repository (the main github seems to have died)
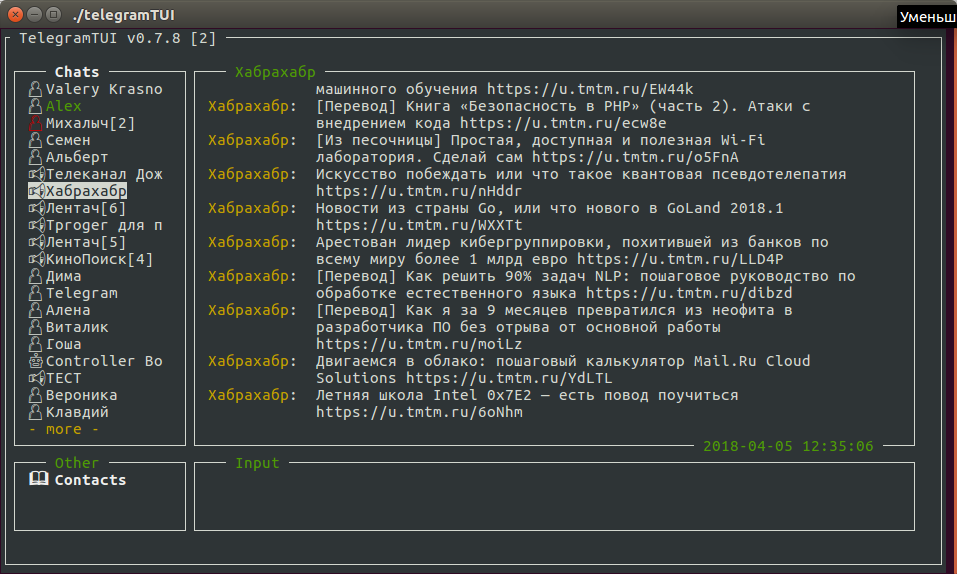
Telegram client on npyscreen (which is on the first screenshot)