Web-Based Devices

Posted by Nikolai Khabarov, IoT Google Developer Expert, Embedded Expert, DataArt.
In this article I will tell you how to create your own device with a web interface, which will be available on the local network. The web interface will show the current data from the Si7021 sensor : temperature and humidity.
The device operates on the basis of the ESP8266 microcontroller (with Wi-Fi ) and DeviceHive firmware .
1. Installation and firmware settings
First of all, you need to fill in DeviceHive firmware into the debug board. You can use any ESP8266 card with a 4 Mbit flash memory (for example, with the ESP-12E module ). Quite popular motherboards are NodeMCU Development Kit and Adafruit HUZZAH ESP8266 Breakout .
You can use these or any other boards with similar specifications. We took NodeMCU devkit as an example , as this is the easiest way to use the ESP8266 chip .
- Download the latest binary firmware release from GitHub .
- Unzip the downloaded archive.
- Connect the NodeMCU to your computer using a micro USB cable (for some operating systems, you may need to install drivers).
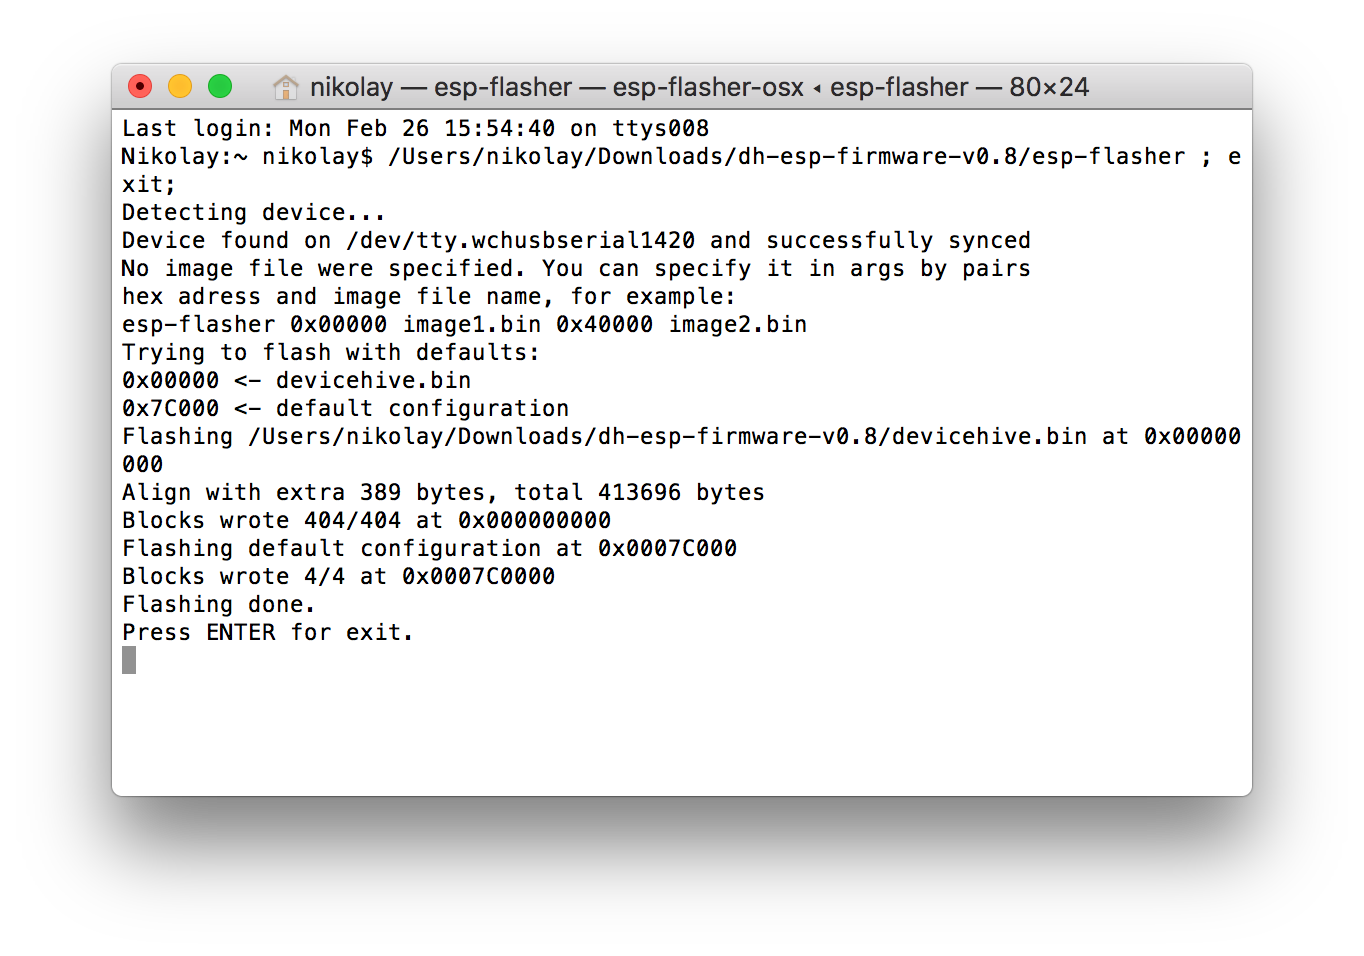
- Run esp-flasher (from the archive, for your OS) to install the firmware.
Board NodeMCU not required to use any buttons or connectors to be installed firmware.
The following screenshot illustrates the successful upload of the firmware:
After installing the firmware, reboot the board (to do this, reconnect the board via the USB port). If the firmware is poured for the first time, the blue LED should light up on the module. If the firmware has already been installed before, slowly press the RESET button on the module three times , the blue LED should turn on.

Then grab a mobile phone or laptop (with Wi-Fi) and connect to DeviceHive’s open wireless network .
The microcontroller settings dialog should appear on the screen automatically (otherwise, use this linkin the browser).
In the dialog box, specify the Wi-Fi network name ( SSID ) and password. In the DeviceID field, enter climate - this ID will serve as the domain address for the device’s web interface.
Leave the fields empty: DeviceHipe API URL and Key .
If the key was entered ( Key field ), authorization in the web interface will be required (for simplicity of presentation and code in the article, we do not consider this case).
An example of the settings dialog is shown below:

After applying the settings ( Apply button ), connect some device with a web browser and mDNS support(for Windows OS, mDNS support can be added through a third-party application, for example, you can use this application ).
If mDNS is not supported , use the IP address of the microcontroller instead of the local URL.
Open a web browser at this link: http: //climate.local . The web browser should show the default page.

2. Sensor connection
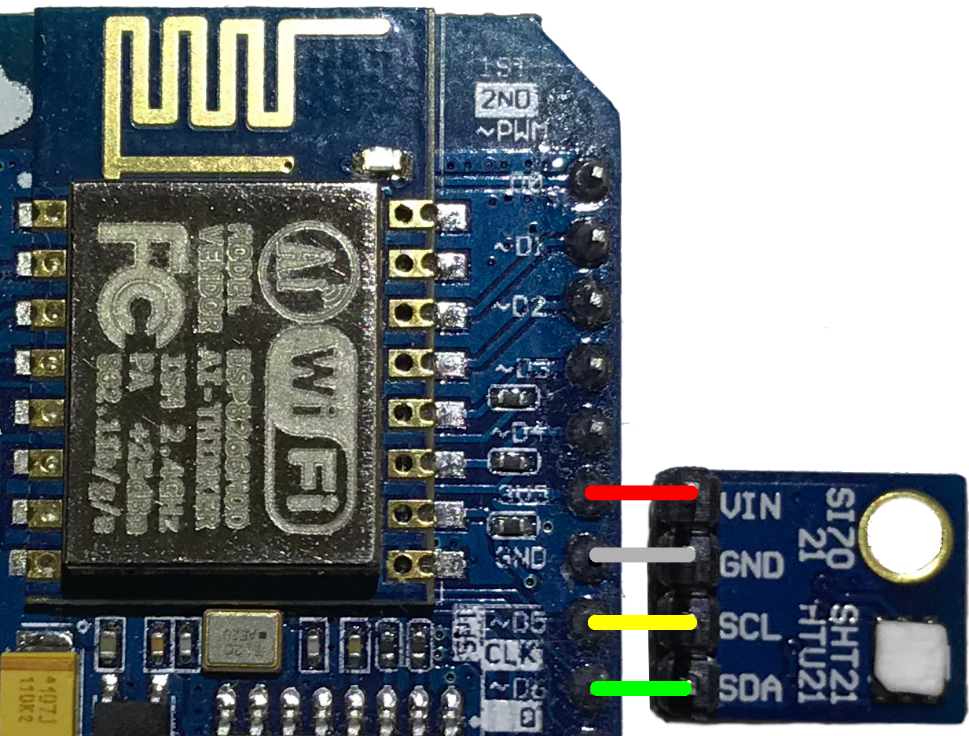
Since the Si7021 uses the I2C interface , it is connected to the board via four wires. The firmware of the board allows you to use any GPIO connectors (for I2C- lines SDA and SCL ). Thus, the sensor can be connected very simply.
Connect the sensor as shown in the photo:
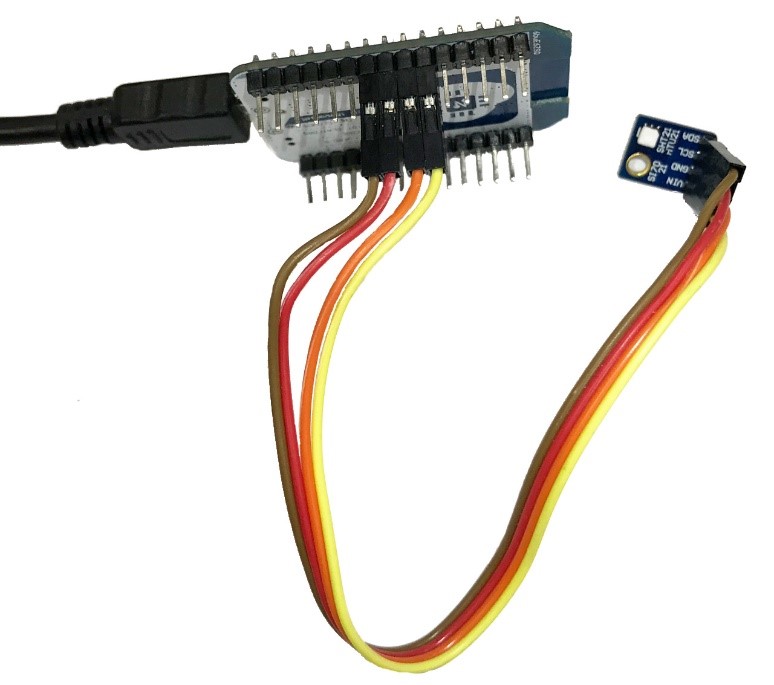
You can also use the connecting wires (for surface mounting) to connect the sensor to the board (as shown in the photo).
Please note that the findings of the board NodeMCU marked with the prefix D . For example, the marking D5 corresponds to the GPIO14 pin of the microcontrollerESP8266 , and D6 corresponds to the GPIO12 pin of the ESP8266 microcontroller .
3. Software
Now it's time to develop a custom web interface for our device. We already mentioned that the firmware has a web page ( http: //climate.local ). There is a very simple web server with a help page, demo pages and a RESTful API. We have a great opportunity to load a custom web page into flash memory and use our device with our own custom web interface.
Below we provide a code that allows you to read and display sensor data.
Although the code is pretty simple, let's parse it line by line.
Lines 1–6:
File headers, viewport settings for mobile devices, CSS connectivity, and JavaScript import. The microprocessor's embedded pages contain CSS and a small JavaScript library. Our example uses these resources. Source code is available here .
Lines 7–22:
A simple script that runs the send_command () method from the built-in JavaScript library ( libs.js ) in a loop (loop) at intervals of one second. This method performs a simple POST request to the following URL: http: //climate.local/api/devices/si7021/read. This URL is part of the local RESTful API (microprocessor).
The same data can be obtained using a GET request in a normal browser. The response is given in the form of JSON , which contains the sensor data. Temperature and humidity values are displayed on pages using JavaScript.
Lines 24–40:
The HTML code for the web page itself. Individual page elements, such as the DeviceHive logo , are taken from inline styles.
Copy the code to the clipboard and open the page editor: http: //climate.local/editor.html .
Paste the code in the editor from the clipboard.
Click the Flash button - now our code is included in the microprocessor firmware.
Open the http: //climate.local link on any device on the Wi-Fi DeviceHive network . Sensor data will be displayed on the page.

Conclusion
DeviceHive firmware allows you to create simple devices connected to the cloud. Additionally, you can easily add a local web interface, which can be used both separately and together with the connection to the cloud service. The content of this page may be arbitrary. You can add third-party components to the page (for example, D3.js ), as was done in this example , or display data from several sensors on the local network.
Detailed documentation on DeviceHive firmware is available at this link .