Quick Start Guide: Binding ASP.NET Core Web API + Angular 5
- From the sandbox
- Tutorial
The story of making two separate ASP.NET Core Web API and Angular 5 projects and getting them to work as one.
This article is intended for beginners who take the first steps in learning Angular in conjunction with .NET Core.
If you use Visual Studio for development, then you probably have already come across ready-made project templates with Angular connected. These templates allow you to create an application in a couple of clicks that already has a configured router and several ready-made components. You do not need to spend time minimizing the configuration of a working application: you already have a working WebPack, a separate module for common components, a configured router, and Bootstrap connected. You might think: “Super! Cool! Half the work is done! " . But in fact, everything is a little more complicated ...
The complexity and pitfalls lie in the fact that this approach and the standard templates have several significantdisadvantages :
So what will we use? We will need the following things:
Now we need to check whether everything is installed and ready to go. To do this, open a command prompt (terminal) and execute in a row the commands listed below:
In this article, I will perform all the actions through the command line and VS Code, since it supports .NET Core. However, if you prefer Visual Studio 2017 for working with .NET projects, you can safely create and edit a project through it.
Create the root folder of the Project project , open it in VS Code, launch the terminal by pressing Ctrl + ~ (tilde, letter ё). Nothing complicated so far :)
Now we need to create a project. To do this, run the command:
Check if everything works. Through the terminal, go to the folder with the newly created project, after which we execute the command:
If everything went well in the last step and Now listening on: localhost : 5000 was displayed in the console , then the server was started successfully. We will go to localhost : 5000 / api / values (a test controller that is created automatically). You should see JSON with test data.
We return to VS Code and in the terminal press Ctrl + C to stop the server.
Now create an Angular project. For this, we will use the Angular CLI, VS Code commands and the built-in terminal.
In the terminal, go to the root folder of our Project project and create a new project called Project.Angular (you have to wait a bit):
In the terminal, we’ll go to the folder of the newly created project and run it:
If at the last step everything went well and NG Live Development Server is listening on localhost: 4200 was displayed in the console , then the server was started successfully. Go to localhost : 4200 . You should see the Angular test page.
We return to VS Code and in the terminal press Ctrl + C , enter Y to stop the server.
Now we need to configure two things: proxy.config.json to redirect requests to the server to the desired port, and most importantly, configure the assembly in the wwwroot folder.
Create a file called proxy.config.json in the root of the Project.Angular project and add the following contents to it:
This setting indicates that all requests starting with / api / ... will go to localhost : 5000 /. That is, the resulting query will be localhost : 5000 / api / ...
We tell Angular that in development mode we need to use this proxy.config. To do this, open the package.json file (which is located in the same root), find the scripts -> start command and replace the value with:
In the future, to start the Angular project, we will use the npm start command together with ng serve . The npm start command is a shorthand for the command that you specify in package.json.
The final step will be to simply configure the build (on command) of the project in the wwwroot .NET Core Web API of the project. In the open package.json file, we find the scripts -> build command and replace the value with the following:
To perform this action, run the npm run build command in the terminal . The result will be the collected project files in the wwwroot folder.
It remains to teach the server to work with static files and allow requests from another port.
Open Startup.cs and add lines to the Configure method that allow the server to process static files:
In Startup.cs , in the Configure method, add a line that allows the server to accept requests from port 4200:
In the ConfigureServices method, add the CORS support:
Ultimately, the Startup.cs file should have the content that is presented below:
Done! Now you can safely access your API controllers from the Angular project. Also, by calling the npm run build command for the Angular project, you will have a version of the Web API application ready for deployment.
This was a short guide on what needs to be done in order to have two separate projects, and make them work as a whole.
Configuring CORS and building automation does not even pretend to be a production version. However, you now know where to look and dig. I hope my article will be useful to someone. Personally, I just didn’t have enough when I tried to establish communication between these two technologies.
In this article, I did not cover several points related to routing in a Web API project, more flexible CORS configuration, automatic assembly, etc. The plans are to write a more detailed article on how to assemble a production version of such an application variant. If you suddenly have questions, then write in the comments or on any of the contacts specified in the profile, I will try to help you.
Introduction
This article is intended for beginners who take the first steps in learning Angular in conjunction with .NET Core.
If you use Visual Studio for development, then you probably have already come across ready-made project templates with Angular connected. These templates allow you to create an application in a couple of clicks that already has a configured router and several ready-made components. You do not need to spend time minimizing the configuration of a working application: you already have a working WebPack, a separate module for common components, a configured router, and Bootstrap connected. You might think: “Super! Cool! Half the work is done! " . But in fact, everything is a little more complicated ...
The complexity and pitfalls lie in the fact that this approach and the standard templates have several significantdisadvantages :
Various best-practices advise us to split the application into two separate projects , which in our case is the .NET Core Web API and Angular projects. The main advantages of this approach will be the following:
- Hard connection of the web interface with the server part
- Heavily complicated minimally working version of the application
- Lack of ability to use Angular CLI
- Extra pre-installed packages
- Violation of some principles from the Angular Style Guide
In this scenario, there are two production scenarios:
- Two independent projects, which will allow us to further implement an alternative interface without touching the project with the server side
- Narrowed global search scope , making search more efficient and easier
- Abstracting from the working environment in which the server part is developed, Visual Studio for example - we can use VS Code, Sublime Text, Atom or another editor convenient for you
My task was just the second scenario , so it was more preferable for economic reasons. And so, when I was trying to figure out how to make friends with the .NET Core Web API project and the Angular project, so that during development we had two separate projects, and in production - only one , and specifically. NET Core website, then I could not find a complete guide "from scratch to a working application." I had to piece together solutions from English-speaking forums and blogs. If you suddenly have the same problem, then it will be enough to read my article.
- You host the web interface on one address and the server on another
- Or magically collect projects into one and host only it
Go!
So what will we use? We will need the following things:
If you already have Visual Studio 2017 installed and during installation you selected .NET Core Development , then you already have the .NET Core SDK and you do not need to install it. However, Node.js will have to be installed separately even if Node.js Development has been selected . Npm installs with Node.js. Angular CLI is installed globally from the command line via npm (the instruction is at the link above).
- .NET Core SDK - 2.0 version or higher
- Node.js - 8.9.0 version or higher
- npm - 5.5.0 version or higher
- Angular CLI - 1.6.5 version or higher
- Visual studio code
Now we need to check whether everything is installed and ready to go. To do this, open a command prompt (terminal) and execute in a row the commands listed below:
dotnet --version #Версия .NET Core
node --version   #Версия Node.js
npm --version    #Версия npm
ng --version     #Версия Angular CLI
Command line result (versions may vary, no big deal)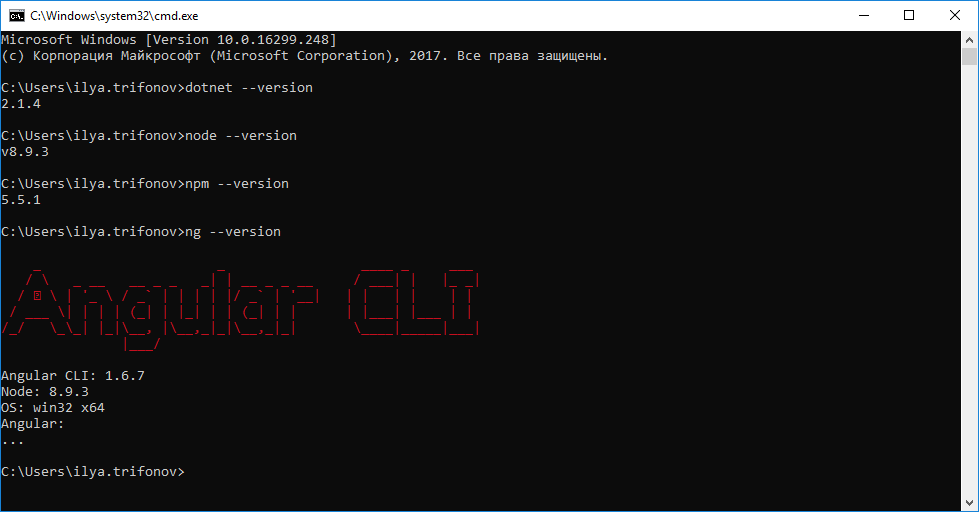
Creating a .NET Core Web API Project
In this article, I will perform all the actions through the command line and VS Code, since it supports .NET Core. However, if you prefer Visual Studio 2017 for working with .NET projects, you can safely create and edit a project through it.
Step one
Create the root folder of the Project project , open it in VS Code, launch the terminal by pressing Ctrl + ~ (tilde, letter ё). Nothing complicated so far :)
VS Code window and running terminal
Second step
Now we need to create a project. To do this, run the command:
dotnet new webapi -n Project.WebApi
VS Code window with open project and running terminal
Third step
Check if everything works. Through the terminal, go to the folder with the newly created project, after which we execute the command:
dotnet run
VS Code window with open project and running terminal
Fourth step
If everything went well in the last step and Now listening on: localhost : 5000 was displayed in the console , then the server was started successfully. We will go to localhost : 5000 / api / values (a test controller that is created automatically). You should see JSON with test data.
Result in browser
Fifth step
We return to VS Code and in the terminal press Ctrl + C to stop the server.
VS Code window with open project and running terminal
Creating an Angular Project
Now create an Angular project. For this, we will use the Angular CLI, VS Code commands and the built-in terminal.
Step one
In the terminal, go to the root folder of our Project project and create a new project called Project.Angular (you have to wait a bit):
cd ..\
ng new Project.Angular
VS Code window with open project and running terminal
Second step
In the terminal, we’ll go to the folder of the newly created project and run it:
cd ./Project.Angular
ng serve --open
VS Code window with open project and running terminal
Third step
If at the last step everything went well and NG Live Development Server is listening on localhost: 4200 was displayed in the console , then the server was started successfully. Go to localhost : 4200 . You should see the Angular test page.
Result in browser
Fourth step
We return to VS Code and in the terminal press Ctrl + C , enter Y to stop the server.
VS Code window with open project and running terminal
Set up an Angular project
Now we need to configure two things: proxy.config.json to redirect requests to the server to the desired port, and most importantly, configure the assembly in the wwwroot folder.
Step one
Create a file called proxy.config.json in the root of the Project.Angular project and add the following contents to it:
{
    "/api/*": {
        "target": "http://localhost:5000/",
        "secure": false,
        "logLevel": "debug"
    }
}
proxy.config.json
{
    "/api/*": {
        "target": "http://localhost:5000/",
        "secure": false,
        "logLevel": "debug"
    }
}
This setting indicates that all requests starting with / api / ... will go to localhost : 5000 /. That is, the resulting query will be localhost : 5000 / api / ...
Second step
We tell Angular that in development mode we need to use this proxy.config. To do this, open the package.json file (which is located in the same root), find the scripts -> start command and replace the value with:
{
    ...
    scripts: {
        ...
        "start": "ng serve --proxy-config proxy.config.json",
    }
}
package.json
{
    {
        "name": "project.angular",
        "version": "0.0.0",
        "license": "MIT",
        "scripts": {
            "ng": "ng",
            "start": "ng serve --proxy-config proxy.config.json",
            "build": "ng build --prod",
            "test": "ng test",
            "lint": "ng lint",
            "e2e": "ng e2e"
        },
        "private": true,
        "dependencies": {
            "@angular/animations": "^5.2.0",
            "@angular/common": "^5.2.0",
            "@angular/compiler": "^5.2.0",
            "@angular/core": "^5.2.0",
            "@angular/forms": "^5.2.0",
            "@angular/http": "^5.2.0",
            "@angular/platform-browser": "^5.2.0",
            "@angular/platform-browser-dynamic": "^5.2.0",
            "@angular/router": "^5.2.0",
            "core-js": "^2.4.1",
            "rxjs": "^5.5.6",
            "zone.js": "^0.8.19"
        },
        "devDependencies": {
            "@angular/cli": "1.6.7",
            "@angular/compiler-cli": "^5.2.0",
            "@angular/language-service": "^5.2.0",
            "@types/jasmine": "~2.8.3",
            "@types/jasminewd2": "~2.0.2",
            "@types/node": "~6.0.60",
            "codelyzer": "^4.0.1",
            "jasmine-core": "~2.8.0",
            "jasmine-spec-reporter": "~4.2.1",
            "karma": "~2.0.0",
            "karma-chrome-launcher": "~2.2.0",
            "karma-coverage-istanbul-reporter": "^1.2.1",
            "karma-jasmine": "~1.1.0",
            "karma-jasmine-html-reporter": "^0.2.2",
            "protractor": "~5.1.2",
            "ts-node": "~4.1.0",
            "tslint": "~5.9.1",
            "typescript": "~2.5.3"
        }
    }
}
In the future, to start the Angular project, we will use the npm start command together with ng serve . The npm start command is a shorthand for the command that you specify in package.json.
Third step
The final step will be to simply configure the build (on command) of the project in the wwwroot .NET Core Web API of the project. In the open package.json file, we find the scripts -> build command and replace the value with the following:
{
    ...
    scripts: {
        ...
        "build": "ng build --prod --output-path ../Project.WebApi/wwwroot",
    }
}
package.json
{
    {
        "name": "project.angular",
        "version": "0.0.0",
        "license": "MIT",
        "scripts": {
            "ng": "ng",
            "start": "ng serve --proxy-config proxy.config.json",
            "build": "ng build --prod --output-path ../Project.WebApi/wwwroot",
            "test": "ng test",
            "lint": "ng lint",
            "e2e": "ng e2e"
        },
        "private": true,
        "dependencies": {
            "@angular/animations": "^5.2.0",
            "@angular/common": "^5.2.0",
            "@angular/compiler": "^5.2.0",
            "@angular/core": "^5.2.0",
            "@angular/forms": "^5.2.0",
            "@angular/http": "^5.2.0",
            "@angular/platform-browser": "^5.2.0",
            "@angular/platform-browser-dynamic": "^5.2.0",
            "@angular/router": "^5.2.0",
            "core-js": "^2.4.1",
            "rxjs": "^5.5.6",
            "zone.js": "^0.8.19"
        },
        "devDependencies": {
            "@angular/cli": "1.6.7",
            "@angular/compiler-cli": "^5.2.0",
            "@angular/language-service": "^5.2.0",
            "@types/jasmine": "~2.8.3",
            "@types/jasminewd2": "~2.0.2",
            "@types/node": "~6.0.60",
            "codelyzer": "^4.0.1",
            "jasmine-core": "~2.8.0",
            "jasmine-spec-reporter": "~4.2.1",
            "karma": "~2.0.0",
            "karma-chrome-launcher": "~2.2.0",
            "karma-coverage-istanbul-reporter": "^1.2.1",
            "karma-jasmine": "~1.1.0",
            "karma-jasmine-html-reporter": "^0.2.2",
            "protractor": "~5.1.2",
            "ts-node": "~4.1.0",
            "tslint": "~5.9.1",
            "typescript": "~2.5.3"
        }
    }
}
To perform this action, run the npm run build command in the terminal . The result will be the collected project files in the wwwroot folder.
Set up the .NET Core Web API project
It remains to teach the server to work with static files and allow requests from another port.
Step one
Open Startup.cs and add lines to the Configure method that allow the server to process static files:
app.UseDefaultFiles();
app.UseStaticFiles();
Configure Method in Startup.cs
    public void Configure(IApplicationBuilder app, IHostingEnvironment env)
    {
        if (env.IsDevelopment())
        {
            app.UseDeveloperExceptionPage();
        }
        app.UseDefaultFiles();
        app.UseStaticFiles();
        app.UseMvc();
    }
Second step
In Startup.cs , in the Configure method, add a line that allows the server to accept requests from port 4200:
app.UseCors(builder => builder.WithOrigins("http://localhost:4200"));
Configure Method in Startup.cs
public void Configure(IApplicationBuilder app, IHostingEnvironment env)
{
    if (env.IsDevelopment())
    {
        app.UseDeveloperExceptionPage();
    }
    app.UseDefaultFiles();
    app.UseStaticFiles();
    app.UseCors(builder => builder.WithOrigins("http://localhost:4200"));
    app.UseMvc();
}
Third step
In the ConfigureServices method, add the CORS support:
services.AddCors();
ConfigureServices Method in Startup.cs
public void ConfigureServices(IServiceCollection services)
{
    services.AddCors();
    services.AddMvc();
}
Ultimately, the Startup.cs file should have the content that is presented below:
using System;
using System.Collections.Generic;
using System.Linq;
using System.Threading.Tasks;
using Microsoft.AspNetCore.Builder;
using Microsoft.AspNetCore.Hosting;
using Microsoft.Extensions.Configuration;
using Microsoft.Extensions.DependencyInjection;
using Microsoft.Extensions.Logging;
using Microsoft.Extensions.Options;
namespace Project.WebApi
{
    public class Startup
    {
        public Startup(IConfiguration configuration)
        {
            Configuration = configuration;
        }
        public IConfiguration Configuration { get; }
        public void ConfigureServices(IServiceCollection services)
        {
            services.AddMvc();
            services.AddCors(); // <-- Добавили это
        }
        public void Configure(IApplicationBuilder app, IHostingEnvironment env)
        {
            if (env.IsDevelopment())
            {
                app.UseDeveloperExceptionPage();
            }
            app.UseDefaultFiles(); // <-- Это
            app.UseStaticFiles(); // <-- Вот это
            app.UseCors(builder => builder.WithOrigins("http://localhost:4200")); // <-- И вот так:)
            app.UseMvc();
        }
    }
}
Done! Now you can safely access your API controllers from the Angular project. Also, by calling the npm run build command for the Angular project, you will have a version of the Web API application ready for deployment.
Conclusion
This was a short guide on what needs to be done in order to have two separate projects, and make them work as a whole.
Configuring CORS and building automation does not even pretend to be a production version. However, you now know where to look and dig. I hope my article will be useful to someone. Personally, I just didn’t have enough when I tried to establish communication between these two technologies.
In this article, I did not cover several points related to routing in a Web API project, more flexible CORS configuration, automatic assembly, etc. The plans are to write a more detailed article on how to assemble a production version of such an application variant. If you suddenly have questions, then write in the comments or on any of the contacts specified in the profile, I will try to help you.