Super-Complete Guide to Publishing in the Microsoft Store
- Tutorial
Hi, Habr! I often have situations like this: I’m doing something complicated and at some point an error comes out. I begin to look for a problem in, respectively, confused things, often doing what is not necessary. And so the problems are growing. And in the end it turns out that the problem was in something simple, for example, the program had to be run on behalf of the administrator. Am I the only one? In any case, below we share a super-complete guide to publishing an application in the Microsoft Store using the example of a game. Look under the cat to save your time!
I give the floor to the author.
Once I got the idea to create a mini-game. No claim to "AAA and to the graphics in real life." Inspired by minimalism and low-poly, as well as the difficulty of passing like in old games, I wanted to create a small game. The result is a game in which you need to make decisions quickly, and the whole environment works against the player - speed, camera placement and terrain. As you probably already understood, in addition to the development itself, I also had to face other difficulties, for example, choosing a site for the game. I'll try to describe how I came to the choice of Microsoft Store.
Since I chose a PC as my target platform, and decided to make the first game completely free (and generally decided not to profit from it), for placement I needed a site with the best ratio of the following parameters:price + convenience + audience + availability . Without going into details, I checked dozens of sites with this characteristic (both well-known and not so well known), and also examined several indie publishers (who were engaged in the distribution of mini-games like mine, and not larger indie projects) , and then came to the conclusion that the Microsoft Store suits me the most.
The registration fee is 626 rubles (For individual developers. Companies need to pay 3000 r. By the way, as far as I know, MS now has free ways to obtain developer rights - for example, students can get a developer account for free) and a large audience (Microsoft Store is “ out of the box ”, starting with Windows 8 and, judging by various data, the service is not deprived of popularity, so stereotypes can be forgotten) are very attractive. Especially for a beginner. As for convenience - subjectively, but everything suits me.
Let's get down to business- This article will be of interest to those who want to release their game in the Microsoft Store or just to see how it is done. In this article I will try in detail, step by step, to illuminate the publication guide, as well as to focus on the points with which you need to be very careful, since errors most often occur here.
1. Decide on the name of the project and reserve it (if you have not reserved it before).
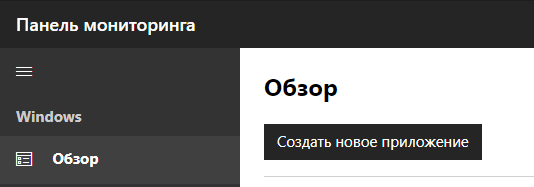
To reserve a product name, go to the dashboard of the development center. You should automatically be taken to the Overview page. If for some reason this did not happen, then you should use the side menu.
On the "Overview" page, click on the "Create a new application" button.
After that, you will be prompted to enter the name of the application, as well as check its availability and make a reservation.

If the check is successful, you will see a green checkmark:

But if the name is unavailable (for example, reserved by someone), then when checking or trying to reserve, you will see the following:

If the reservation is successful with you, then you will be redirected to the application overview page:

2. Fill in the information about the assembly and the game. To do this, go to File -> Build Settings.

In the window that opens, you need to add scenes for the assembly (for this, use Add Open Scenes or just drag them with the mouse from Assets to the Scenes In Build window ), then change the platform to the Windows Store (select the Windows Store in the Platform list, and then click Switch Platform), View the assembly parameters - SDK, Target device, UWP Build Type, etc., after which, either leave it as is or change them if necessary. When you're done with this, click the Player Settings button .

Next, Player Settings opens , in which you need to fill out information about the company and the game.

When you are done with Player Settings, return to the build window (File -> Build Settings) and boldly click Build , select the folder for the build and wait for the build to complete.
After you have built the project in Unity, you should see something like this in the build folder:

Now you need to open the file with the extension .sln (also known as Microsoft Visual Studio Solution) in Visual Studio.
After the file is opened, you should pay attention to “Solution Configuration” and “Solution Explorer”.
In the configuration you should install Master :

And in the browser you should reproduce the following procedure: RMB on (in my case) New Unity Project (Universal Windows) -> Store -> Create application packages :
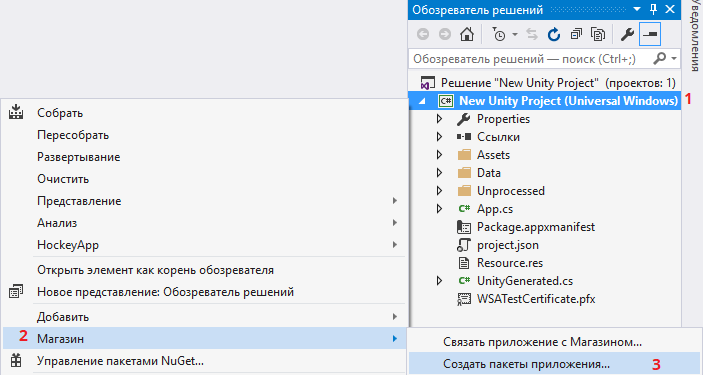
Either: Project -> Store -> Create application packages :

After which the following window should appear:

In it you need to leave everything as it is (that is, click on "Yes") and proceed further by clicking "Next".
After that, you will be asked to select or reserve the name of the application. If it is already reserved for you, then select it and click "Next":

If not, just enter the name in the appropriate window and click "Reserve":

After that, the list will automatically update and you will see the name of your application there.
Next, you will be offered a choice of settings. The main thing is to make sure once again that each configuration has a Master, and everything else can be left as is and click "Create". Assembly may take some time, so don’t worry.

Next you need to make a choice. Or run a certification set and find out if your game will go through the Microsoft Store. Or try to send it immediately to the Microsoft Store. But the choice here is relative, because if your game cannot be certified, then they will not be allowed to publish it. The difference is only in time. You can either spend a few minutes on certification, or up to three days (the process of publishing a product with all the checks takes so much).

If you still decide to start the certification set, then after a couple of seconds you will see the following window:

In it, you just need to click "Next", after which the certification process will begin. Once the verification is complete, you will see the result. If everything goes well, there will be a beautiful green inscription “Passed”: e

If you see "Not Passed", then do not be discouraged - this happens. Just click "Click here to view the results" and find the points that have difficulties, then either solve the problems yourself, or use the help in the thematic communities.
For example, in this case, the verification did not pass due to the fact that I chose Release instead of Master during the assembly, which prevented me from passing the API verification.

Upon completion of the verification by the certification set, go to the APPXUPLOAD file.

This file must be sent to the store. To do this, we must go to the Development Center on the "Overview" page and click "Start Submission":

After that, the submission page will open and you will need to click " Start Submission " again .

Formed "Sending 1". To send to the store, you must make sure that the first 5 points are “Completed”.

In order not to stretch the article at all, I will briefly describe some points:
“ Prices and availability ” - this is mainly the choice of markets (countries in which the game is available), prices, publication dates and the creation of a trial version (example: a free trial version with a validity period )
" Properties"- category and subcategory of the game, system requirements, parameters, etc..
" Age categories "- a small test form of the International Age Rating Coalition (IARC) to determine the age category of the game. Also, if the game you want to publish in the Microsoft Store is already was published on another site and received the International Age Rating Coalition, then you can use the import of ratings.The test itself consists of several questions, which boils down to choosing “Yes” or “No.”
After passing the test you will be presented with ratings (ESRB, PEGI, RSVR and others).
" P chum "- in this section, it is time to recall the harvested APPXUPLOAD-file and upload it.

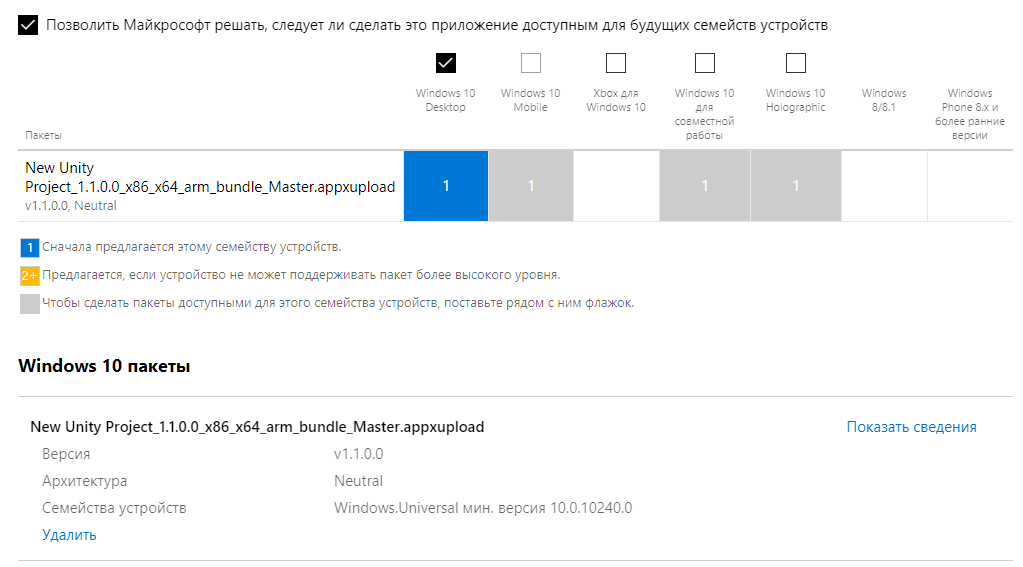
At the end of the download, the available platforms will be presented on the same page. Since I decided to release the project only on a PC with Windows 10, I unchecked the extra boxes:
“ Descriptions in the Store ” - I’ll have to tinker a bit with this. I will quote additional Information in this section:
“Provide the text and images that customers will see in the description in the Store in each supported language. You can enter this information individually or export a CSV file with all the description data, make changes to it and import it to enter all the new information at once . ”
In my first publication, I decided to make a description through a CSV file. In this article, I will describe the method easier, but slightly more boring. If someone also wants to do it through a CSV file, check out this article.
Click on " Add / Remove Languages ".

After that, click on " Manage additional languages ."

And we select the languages of interest to describe.

After that, click " Save " and return to the " Submit 1" page. In the “Descriptions in the Store” section, in my case, two languages are visible - English, which the system automatically detected at the stage of downloading the packages, as well as Russian, which I chose myself.

To add a description, you need to click on the selected language and fill out all the information on the page (in the case of Russian in Russian, English in English, etc.)

As a result, you should get something like this:

" Note about certification " - information for testers, to help testers use and understand shipping. For example, the name and password for the test account, actions to access hidden or blocked functions, and more. This item is optional, not mandatory.
Now it remains only to click on " Send to the Store ", after which the hours of waiting for publication will begin.

At the end, the status of the " Certification Process " in the review of the application

will change to pleasant "Placement in the Store ", which will mean that your publication path is finally completed!

In the future, if you want to change something in your game, you just need to click" Update "opposite to sending in the application review.
In conclusion, I want to wish all developers to make good games and not be afraid to try to experiment and open new horizons!
 Lev Bulanov is a student at Tchaikovsky Industrial College and Udmurt State University, Microsoft Student Partner, C # -developer, CF2.5-developer, Unity-developer, computer operator (5th category). The main area of interest is the development of mini-games, utilities and MR projects.
I give the floor to the author.
Introduction
Once I got the idea to create a mini-game. No claim to "AAA and to the graphics in real life." Inspired by minimalism and low-poly, as well as the difficulty of passing like in old games, I wanted to create a small game. The result is a game in which you need to make decisions quickly, and the whole environment works against the player - speed, camera placement and terrain. As you probably already understood, in addition to the development itself, I also had to face other difficulties, for example, choosing a site for the game. I'll try to describe how I came to the choice of Microsoft Store.
Since I chose a PC as my target platform, and decided to make the first game completely free (and generally decided not to profit from it), for placement I needed a site with the best ratio of the following parameters:price + convenience + audience + availability . Without going into details, I checked dozens of sites with this characteristic (both well-known and not so well known), and also examined several indie publishers (who were engaged in the distribution of mini-games like mine, and not larger indie projects) , and then came to the conclusion that the Microsoft Store suits me the most.
The registration fee is 626 rubles (For individual developers. Companies need to pay 3000 r. By the way, as far as I know, MS now has free ways to obtain developer rights - for example, students can get a developer account for free) and a large audience (Microsoft Store is “ out of the box ”, starting with Windows 8 and, judging by various data, the service is not deprived of popularity, so stereotypes can be forgotten) are very attractive. Especially for a beginner. As for convenience - subjectively, but everything suits me.
Let's get down to business- This article will be of interest to those who want to release their game in the Microsoft Store or just to see how it is done. In this article I will try in detail, step by step, to illuminate the publication guide, as well as to focus on the points with which you need to be very careful, since errors most often occur here.
Tools, materials and more:
- Unity Personal 5.6.1f1
- Visual Studio Community 2015
- UWP SDK Universal 10 (10.0.10240.0)
- Ready project made in Unity
- Developer account in the "Development Center for Windows"
- The reserved name of the product in the development center (This can be done during the publication. I will describe it. But if you did it in advance, you can accrue yourself 10 points. In the future, these points will not be needed)
- I also recommend that when working, have the developer mode turned on in Windows 10, which will allow you to use additional functions (Options -> Update and Security -> For Developers)
Beginning of work
Step 0. Highlights before starting the publishing process.
1. Decide on the name of the project and reserve it (if you have not reserved it before).
To reserve a product name, go to the dashboard of the development center. You should automatically be taken to the Overview page. If for some reason this did not happen, then you should use the side menu.
On the "Overview" page, click on the "Create a new application" button.
After that, you will be prompted to enter the name of the application, as well as check its availability and make a reservation.
If the check is successful, you will see a green checkmark:
But if the name is unavailable (for example, reserved by someone), then when checking or trying to reserve, you will see the following:
If the reservation is successful with you, then you will be redirected to the application overview page:
2. Fill in the information about the assembly and the game. To do this, go to File -> Build Settings.
In the window that opens, you need to add scenes for the assembly (for this, use Add Open Scenes or just drag them with the mouse from Assets to the Scenes In Build window ), then change the platform to the Windows Store (select the Windows Store in the Platform list, and then click Switch Platform), View the assembly parameters - SDK, Target device, UWP Build Type, etc., after which, either leave it as is or change them if necessary. When you're done with this, click the Player Settings button .
Next, Player Settings opens , in which you need to fill out information about the company and the game.
Note
At the time of writing, there were restrictions on the weight of the icons at 204800 bytes. So if your icons exceed this size, then when creating application packages in Visual Studio, expect something like this:

When you are done with Player Settings, return to the build window (File -> Build Settings) and boldly click Build , select the folder for the build and wait for the build to complete.
Stage 1. Assembly and certification in Visual Studio
After you have built the project in Unity, you should see something like this in the build folder:
Now you need to open the file with the extension .sln (also known as Microsoft Visual Studio Solution) in Visual Studio.
After the file is opened, you should pay attention to “Solution Configuration” and “Solution Explorer”.
In the configuration you should install Master :
And in the browser you should reproduce the following procedure: RMB on (in my case) New Unity Project (Universal Windows) -> Store -> Create application packages :
Either: Project -> Store -> Create application packages :
After which the following window should appear:
In it you need to leave everything as it is (that is, click on "Yes") and proceed further by clicking "Next".
After that, you will be asked to select or reserve the name of the application. If it is already reserved for you, then select it and click "Next":
If not, just enter the name in the appropriate window and click "Reserve":
After that, the list will automatically update and you will see the name of your application there.
Next, you will be offered a choice of settings. The main thing is to make sure once again that each configuration has a Master, and everything else can be left as is and click "Create". Assembly may take some time, so don’t worry.
Next you need to make a choice. Or run a certification set and find out if your game will go through the Microsoft Store. Or try to send it immediately to the Microsoft Store. But the choice here is relative, because if your game cannot be certified, then they will not be allowed to publish it. The difference is only in time. You can either spend a few minutes on certification, or up to three days (the process of publishing a product with all the checks takes so much).
If you still decide to start the certification set, then after a couple of seconds you will see the following window:
In it, you just need to click "Next", after which the certification process will begin. Once the verification is complete, you will see the result. If everything goes well, there will be a beautiful green inscription “Passed”: e
If you see "Not Passed", then do not be discouraged - this happens. Just click "Click here to view the results" and find the points that have difficulties, then either solve the problems yourself, or use the help in the thematic communities.
For example, in this case, the verification did not pass due to the fact that I chose Release instead of Master during the assembly, which prevented me from passing the API verification.
Stage 2. Shop
Upon completion of the verification by the certification set, go to the APPXUPLOAD file.
This file must be sent to the store. To do this, we must go to the Development Center on the "Overview" page and click "Start Submission":
After that, the submission page will open and you will need to click " Start Submission " again .
Formed "Sending 1". To send to the store, you must make sure that the first 5 points are “Completed”.
In order not to stretch the article at all, I will briefly describe some points:
“ Prices and availability ” - this is mainly the choice of markets (countries in which the game is available), prices, publication dates and the creation of a trial version (example: a free trial version with a validity period )
" Properties"- category and subcategory of the game, system requirements, parameters, etc..
" Age categories "- a small test form of the International Age Rating Coalition (IARC) to determine the age category of the game. Also, if the game you want to publish in the Microsoft Store is already was published on another site and received the International Age Rating Coalition, then you can use the import of ratings.The test itself consists of several questions, which boils down to choosing “Yes” or “No.”
After passing the test you will be presented with ratings (ESRB, PEGI, RSVR and others).
" P chum "- in this section, it is time to recall the harvested APPXUPLOAD-file and upload it.
At the end of the download, the available platforms will be presented on the same page. Since I decided to release the project only on a PC with Windows 10, I unchecked the extra boxes:
“ Descriptions in the Store ” - I’ll have to tinker a bit with this. I will quote additional Information in this section:
“Provide the text and images that customers will see in the description in the Store in each supported language. You can enter this information individually or export a CSV file with all the description data, make changes to it and import it to enter all the new information at once . ”
In my first publication, I decided to make a description through a CSV file. In this article, I will describe the method easier, but slightly more boring. If someone also wants to do it through a CSV file, check out this article.
Click on " Add / Remove Languages ".
After that, click on " Manage additional languages ."
And we select the languages of interest to describe.
After that, click " Save " and return to the " Submit 1" page. In the “Descriptions in the Store” section, in my case, two languages are visible - English, which the system automatically detected at the stage of downloading the packages, as well as Russian, which I chose myself.
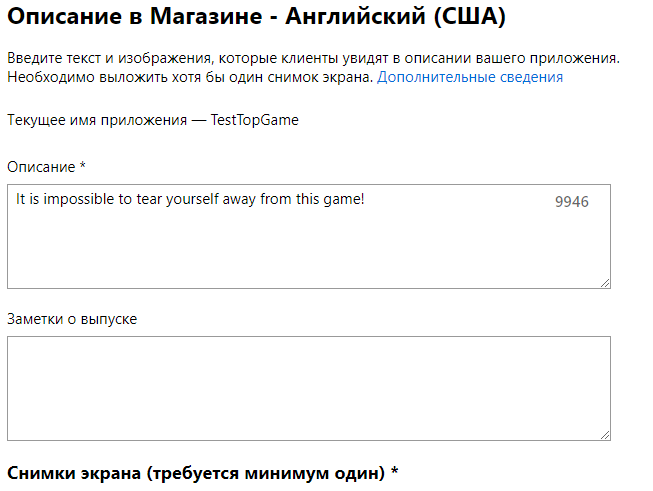
To add a description, you need to click on the selected language and fill out all the information on the page (in the case of Russian in Russian, English in English, etc.)
As a result, you should get something like this:
" Note about certification " - information for testers, to help testers use and understand shipping. For example, the name and password for the test account, actions to access hidden or blocked functions, and more. This item is optional, not mandatory.
Now it remains only to click on " Send to the Store ", after which the hours of waiting for publication will begin.
At the end, the status of the " Certification Process " in the review of the application
will change to pleasant "Placement in the Store ", which will mean that your publication path is finally completed!
In the future, if you want to change something in your game, you just need to click" Update "opposite to sending in the application review.
Conclusion
In conclusion, I want to wish all developers to make good games and not be afraid to try to experiment and open new horizons!
about the author
Lev Bulanov is a student at Tchaikovsky Industrial College and Udmurt State University, Microsoft Student Partner, C # -developer, CF2.5-developer, Unity-developer, computer operator (5th category). The main area of interest is the development of mini-games, utilities and MR projects.