3CX Server Integration with Bitrix24
- Tutorial
- Recovery mode
In this article, we will look at how to integrate 3CX with Bitrix24 CRM using the webhook mechanism .
A webhook is a subscription to some event in the system, for example, to an incoming call. When a call comes in from the client, 3CX sends information about it to the subscribing system using an HTTP request. Then, the CRM system determines how to use this information.
3CX offers an integration module with Bitrix24 directly out of the box, however, this requires a 3CX Pro or Enterprise edition. The whole process takes no more than 5 minutes!
When a call comes in, 3CX Web Clientshows a small contact card with a link to the full card of this contact in Bitrix24 CRM. This section discusses the integration of 3CX with Bitrix24 exclusively on the server side, without using a local module on the client side. This approach has a big advantage - you do not need to bypass all users and manually install CRM integration plugins in 3CX desktop clients . In addition, now you can use CRM integration not only on Windows and Mac, but also on Linux, since the web client works as a browser application. Another advantage - the new web client is designed with the possibility of expanding the capabilities of the interface. This means that in the future tighter CRM integration is possible directly in the web client interface.
Making outgoing calls from the Bitrix24 interface is performed using the special browser plug-in for Chrome Click2Call .
For successful integration work with an incoming call, the incoming Caller ID must completely match the number of the corresponding contact in Bitrix24. For example, contacts in your country (local) should be saved in Bitrix24 in the national format - without the international prefix of the country, as well as without brackets, periods, commas, dashes and spaces.
Go to your Bitrix24 portal, open the menu in the upper left corner and go to Applications> Webhooks .

Click Add webhook> Inbound webhook .

Indicate the name and description of the webhook. Set permissions - CRM and Lists , and save the changes.

After clicking Save , the Secret key will appear , which is then specified in the interface of the integration module from the 3CX side.

If server CRM integration with Bitrix24 does not work for you or causes difficulties, use the client CRM integration , which we described earlier. We suggest leaving your questions and wishes regarding integration work on our application integration forum .
A webhook is a subscription to some event in the system, for example, to an incoming call. When a call comes in from the client, 3CX sends information about it to the subscribing system using an HTTP request. Then, the CRM system determines how to use this information.
3CX offers an integration module with Bitrix24 directly out of the box, however, this requires a 3CX Pro or Enterprise edition. The whole process takes no more than 5 minutes!
When a call comes in, 3CX Web Clientshows a small contact card with a link to the full card of this contact in Bitrix24 CRM. This section discusses the integration of 3CX with Bitrix24 exclusively on the server side, without using a local module on the client side. This approach has a big advantage - you do not need to bypass all users and manually install CRM integration plugins in 3CX desktop clients . In addition, now you can use CRM integration not only on Windows and Mac, but also on Linux, since the web client works as a browser application. Another advantage - the new web client is designed with the possibility of expanding the capabilities of the interface. This means that in the future tighter CRM integration is possible directly in the web client interface.
Making outgoing calls from the Bitrix24 interface is performed using the special browser plug-in for Chrome Click2Call .
For successful integration work with an incoming call, the incoming Caller ID must completely match the number of the corresponding contact in Bitrix24. For example, contacts in your country (local) should be saved in Bitrix24 in the national format - without the international prefix of the country, as well as without brackets, periods, commas, dashes and spaces.
Setting up a webhook in Bitrix24
Go to your Bitrix24 portal, open the menu in the upper left corner and go to Applications> Webhooks .
Click Add webhook> Inbound webhook .
Indicate the name and description of the webhook. Set permissions - CRM and Lists , and save the changes.
After clicking Save , the Secret key will appear , which is then specified in the interface of the integration module from the 3CX side.
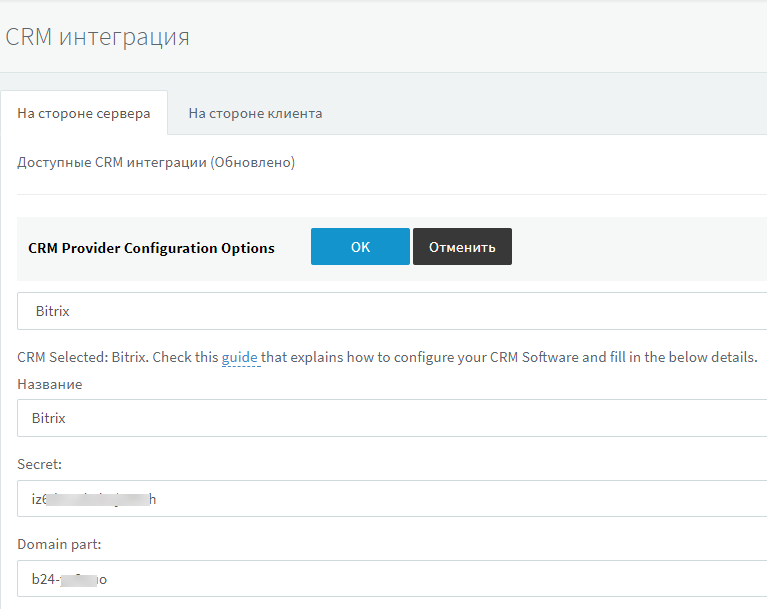
Configuring CRM Integration on a 3CX Server
- Go to the 3CX management interface under Settings> CRM Integration , the Server-side tab .
- From the drop-down list, select Bitrix .
- In the Secret field, specify the WebHook secret key generated above.
- In the Domain Part field, enter the name of your Bitrix24 portal. For example, if the full Bitrix24 portal URL is b24-n58e22fcd2f37d.bitrix24.com , specify b24-n58e22fcd2f37d .
- Click OK and the integration is complete.
Remarks
If server CRM integration with Bitrix24 does not work for you or causes difficulties, use the client CRM integration , which we described earlier. We suggest leaving your questions and wishes regarding integration work on our application integration forum .