Dagger 2 for beginner Android developers. Dagger 2. Advanced. Part 2
- Transfer
This article is the seventh part of a series of articles intended, according to the author, for those who can not figure out the implementation of dependencies and the Dagger 2 framework , or are just going to do it. The original was written on December 30, 2017. Free translation.

This is the seventh article in the Dagger 2 series for beginner Android developers. . If you have not read the previous ones, then here you are .
We looked at an example project and tried to get rid of strong ties with dependency injection using Dagger 2 and annotations.
Also studied three new annotations.
Create multiple
In the previous article, we created application-level dependencies. But what if dependencies are only required for a level
The best solution is to create separate modules and components for objects whose life cycles differ.
To explain this, I do not want to add new objects to the previously considered project. Instead, we will consider ours
Take a look at the branch
Step 1. Create a level area
For the upcoming changes, I created a separate package with the name
Create a new area (Scope) for
Step 2. Creating a component for
Next, create a separate component (Component) for
You must allow
In this example, at the level,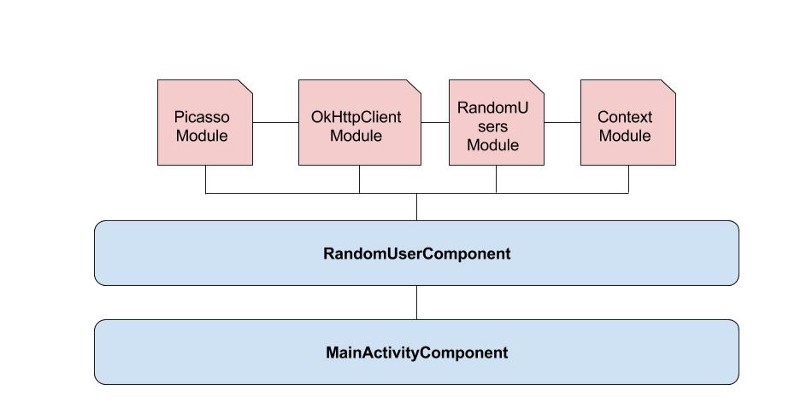
Step 3. Creating a module for
Now create a module that will provide the adapter.
Note: Deployment
Note the annotation
It is also necessary to map this module to the corresponding component. We will use the attribute
Step 4. Creating a class
This class, inherited from
Step 5. Finalization
If you build a project, Dagger 2 will generate a class for you
Note: take a look at the method
We have created a fairly supported code. Made level dependencies
If there are really many dependencies, do we need to constantly write expressions like the one below? You can decide that this is not important for you, but there is a solution to this problem.
Using annotations
Instead of telling Dagger 2 what you need
By changing the classes as below, we can start using the annotation
Completion
We remove the methods
Completion
How it works? When Dagger 2 finds a method without a return value (
Exactly what is needed! Now the code can be run.
We looked at an example of dependency injection at a level
Thanks for your time reading and supporting this series of articles. I hope you got some insight into the dependencies and Dagger 2. The reason I wrote this series of articles is because I improved my knowledge of Dagger 2 by reading a lot of articles on different blogs, but gained even more knowledge while writing these articles for you. Therefore, I urge all readers to share their knowledge in any possible way. I am not an expert in Dagger 2, I consider myself only a student.
Now you can continue to study Dagger 2 further, this series of articles should have formed you enough understanding of how it works.
This is the seventh article in the Dagger 2 series for beginner Android developers. . If you have not read the previous ones, then here you are .
Series of articles
- Dagger 2 for beginner Android developers. Introduction
- Dagger 2 for beginner Android developers. Dependency Injection Part 1 .
- Dagger 2 for beginner Android developers. Dependency Injection Part 2 .
- Dagger 2 for beginner Android developers. Dagger 2. Part 1 .
- Dagger 2 for beginner Android developers. Dagger 2. Part 2 .
- Dagger 2 for beginner Android developers. Dagger 2. Advanced.
Part 1 . - Dagger 2 for beginner Android developers. Dagger 2. Advanced.
Part 2 (you are here) .
Earlier in the series of articles
We looked at an example project and tried to get rid of strong ties with dependency injection using Dagger 2 and annotations.
Also studied three new annotations.
@Scopeto create objects in a single copy (singleton) . @Namedto separate methods that provide objects of the same type. @Qualifieras an alternative @Named.Create multiple Component
In the previous article, we created application-level dependencies. But what if dependencies are only required for a level
Activity? Activitycreated and destroyed in its life cycle, and what happens to dependencies? Dependencies created inside are Activitydestroyed along with Activity. The best solution is to create separate modules and components for objects whose life cycles differ.
To explain this, I do not want to add new objects to the previously considered project. Instead, we will consider ours
MainActivityas a separate object and create our own module and component for it. Take a look at the branch
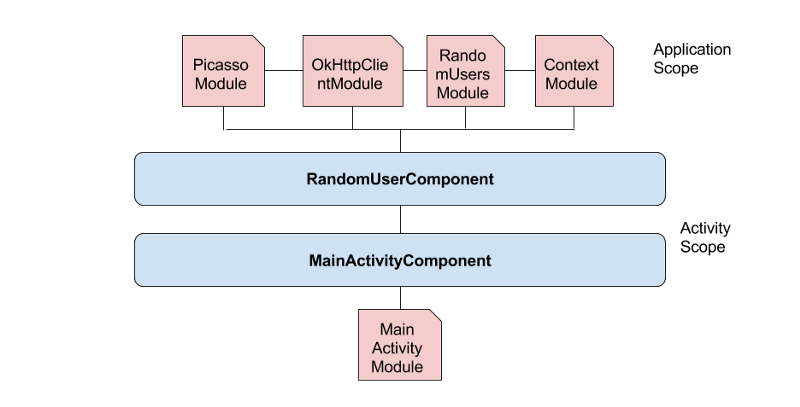
Dagger2Part2 .Step 1. Create a level area Activity
For the upcoming changes, I created a separate package with the name
MainActivityFeature. Create a new area (Scope) for
MainActivity.@Scope
public @interface MainActivityScope {}
Step 2. Creating a component for MainActivity
Next, create a separate component (Component) for
MainActivityand mark it with the just created annotation.@Component(dependencies = RandomUserComponent.class)
@MainActivityScope
public interface MainActivityComponent {
RandomUserAdapter getRandomUserAdapter();
RandomUsersApi getRandomUserService();
}
You must allow
MainActivityComponentreference RandomUserComponentto what the attribute is used for dependencies. In other words, this attribute tells Dagger 2 to contact RandomUserComponentif additional dependencies are required. In this example, at the level,
Activitywe need an adapter for the API and an object to make calls to RandomUsersAPI. Therefore, we implement the methods getRandomUserAdapter()and getRandomUserService().Step 3. Creating a module for MainActivity
Now create a module that will provide the adapter.
@Module
public class MainActivityModule {
    private final MainActivity mainActivity;
    public MainActivityModule(MainActivity mainActivity) {
        this.mainActivity = mainActivity;
    }
    @Provides
    @MainActivityScope
    public RandomUserAdapter randomUserAdapter(Picasso picasso){
        return new RandomUserAdapter(mainActivity, picasso);
    }
}
Note: Deployment
MainActivitythrough the adapter is not necessary, I did this as an example. If you need context for Picasso, then you can use holder.imageView.getContext(). Note the annotation
@MainActivityScopethat is added to the method randomUserAdapter()to limit the scope of the dependency to a level Activity. It is also necessary to map this module to the corresponding component. We will use the attribute
modules.@Component(modules = MainActivityModule.class, dependencies = RandomUserComponent.class)
@MainActivityScope
public interface MainActivityComponent {
RandomUserAdapter getRandomUserAdapter();
RandomUsersApi getRandomUserService();
}
Step 4. Creating a class Application
public class RandomUserApplication extends Application {
    // добавьте имя этого класса в манифест
    private RandomUserComponent randomUserApplicationComponent;
    public static RandomUserApplication get(Activity activity){
        return (RandomUserApplication) activity.getApplication();
    }
    @Override
    public void onCreate() {
        super.onCreate();
        Timber.plant(new Timber.DebugTree());
        randomUserApplicationComponent = DaggerRandomUserComponent.builder()
                .contextModule(new ContextModule(this))
                .build();
    }
    public RandomUserComponent getRandomUserApplicationComponent(){
        return randomUserApplicationComponent;
    }
This class, inherited from
Application, contains all the application level dependencies - RandomUserApplicationComponent.Step 5. Finalization MainActivity
If you build a project, Dagger 2 will generate a class for you
DaggerMainActivityComponent. To use level dependencies, Activitywe need to get some application level dependencies.public class MainActivity extends AppCompatActivity {
...
@Override
protected void onCreate(Bundle savedInstanceState) {
....
MainActivityComponent mainActivityComponent = DaggerMainActivityComponent.builder()
.mainActivityModule(new MainActivityModule(this))
.randomUserComponent(RandomUserApplication.get(this).getRandomUserApplicationComponent())
.build();
randomUsersApi = mainActivityComponent.getRandomUserService();
mAdapter = mainActivityComponent.getRandomUserAdapter();
....
}
}
Note: take a look at the method
afterActivityLevelComponent()in the project branch.Step 6. Congratulate yourself
We have created a fairly supported code. Made level dependencies
Activity. Congratulate yourself.But what if there are 50 dependencies in a component?
If there are really many dependencies, do we need to constantly write expressions like the one below? You can decide that this is not important for you, but there is a solution to this problem.
randomUserApi = mainActivityComponent.getRandomUserService();

mAdapter = mainActivityComponent.getRandomUserAdapter();

…
Using annotations @Inject
Instead of telling Dagger 2 what you need
RandomUserServiceand RandomUserAdapterlet Dagger 2 handle the field that we will annotate @Inject. By changing the classes as below, we can start using the annotation
@Injectas soon as possible. You can view the full example in the next thread .Completion MainActivityComponent
We remove the methods
getRandomUserService()and getRandomUserAdapter()add the method for implementation MainActivity.@Component(modules = MainActivityModule.class, dependencies = RandomUserComponent.class)
@MainActivityScope
public interface MainActivityComponent {
void injectMainActivity(MainActivity mainActivity);
}
Completion MainActivity
public class MainActivity extends AppCompatActivity {
  ....
  @Inject
    RandomUsersApi randomUsersApi;
  @Inject
    RandomUserAdapter mAdapter;
  ....
   @Override
    protected void onCreate(Bundle savedInstanceState) {
        super.onCreate(savedInstanceState);
        setContentView(R.layout.activity_main);
        .....
        MainActivityComponent mainActivityComponent = DaggerMainActivityComponent.builder()
                .mainActivityModule(new MainActivityModule(this))
                .randomUserComponent(RandomUserApplication.get(this).getRandomUserApplicationComponent())
                .build();
        mainActivityComponent.injectMainActivity(this);
        ....
  }
}
How it works? When Dagger 2 finds a method without a return value (
void), it realizes that there must be something that it needs in the class, that is, it will initialize in the class the fields marked with annotation @Inject. Exactly what is needed! Now the code can be run.
GIF
Summary
We looked at an example of dependency injection at a level
Activity. Also saw an example of using annotations @Inject.Finally
Thanks for your time reading and supporting this series of articles. I hope you got some insight into the dependencies and Dagger 2. The reason I wrote this series of articles is because I improved my knowledge of Dagger 2 by reading a lot of articles on different blogs, but gained even more knowledge while writing these articles for you. Therefore, I urge all readers to share their knowledge in any possible way. I am not an expert in Dagger 2, I consider myself only a student.
Now you can continue to study Dagger 2 further, this series of articles should have formed you enough understanding of how it works.
Links to other resources (in English)
- https://blog.mindorks.com/introduction-to-dagger-2-using-dependency-injection-in-android-part-1-223289c2a01b
- https://blog.mindorks.com/introduction-to-dagger-2-using-dependency-injection-in-android-part-2-b55857911bcd
- https://blog.mindorks.com/the-new-dagger-2-android-injector-cbe7d55afa6a
- https://blog.mindorks.com/android-dagger2-critical-things-to-know-before-you-implement-275663aecc3e
- https://blog.mindorks.com/a-complete-guide-to-learn-dagger-2-b4c7a570d99c
- http://www.vogella.com/tutorials/Dagger/article.html
- https://medium.com/@iammert/new-android-injector-with-dagger-2-part-1-8baa60152abe