Installing 1C Fresh from scratch using Linux and PostgreSQL
In this article with pictures, the Button will talk about how to deploy your own fresh blackjack with PostgreSQL and Linux. We hope that it will help those who are trying to install 1C Fresh and drowned a little in the volume of official documentation. When deploying, we will make the most of free software.

1C Fresh is a technology for publishing solutions. That is, this is a service that allows you to publish access to various solutions based on 1C to a mass user, to connect these solutions into a single system with common administration and maintenance.
The central element is the Service Manager, the control configuration that links the remaining elements. It stores all the information about the components of the service, about configuration versions, about users, data areas, gives out commands to perform various operations.
The Service Agent is the right hand of the Service Manager, it is a service configuration that handles application configurations. Typical tasks of a Service Agent are:
The Service Agent does these tasks using the configurator. Until recently, this was the only service element requiring a Windows platform. But in the new version of 1C Fresh 1.0.19 technology, the developers removed this restriction, now the Service Agent can also work on Linux.
Infobases are application configurations published through the Service Manager. Configurations that currently support operation in service mode:
There is an opportunity to publish your own decisions, there are recommendations for improvement on ITS.
These elements are basic and necessary for deployment. There are also others that provide additional functionality, but they are not necessary:
There are other components of the service, you can read about them on the site
We briefly describe the hosts and services that will work on them. We will deploy the entire infrastructure on a virtualization server, so we will distribute the services across different virtual machines. When using CORP licensing, you can also share functionality, for example, move the processing of background jobs to a separate application server. In a minimal configuration, it can be assembled on two hosts: host the database and application server on Linux, and give the Service Agent to Windows.
We use PostgreSQL as the database server. For the convenience of updating, we will connect the PostgresPro repositories. 1C also provides a distribution, you can safely use it.
For each database we will create a cluster that will serve a separate instance of PostgreSQL. This will allow you to manage each database and do replication.
< clustername > - the name of our cluster, we will call the database similarly serviced in the cluster;
< dir > - the directory in which the cluster will be created.
The next free port will be used after 5432, unless explicitly specified during creation. You can check the list of clusters as follows:
Connect to the cluster (with the port on which it works) and create a role (you need a superuser) under which the administration server will interact with the database:
Be sure to do the initial setup. Each cluster has its own configuration files. For simplicity, you can use PgTune . Set the environment parameters and get the recommended settings at the output:

Immediately, we note that the recommended ones do not mean optimal ones; during the work, you may need to make adjustments. In one of the previous articles, we examined the configuration of PostgreSQL, you can learn something useful from there.
Install the necessary packages:
We activate fonts and overload the server:
Download the archive with the packages of the server 1C: Enterprise and unpack it into a separate directory, then install:
We give the user usr1cv8 rights to the / opt / 1C directory:
We’ll configure the technology logbook, at the installation stage it will be useful if something goes wrong. We will collect exceptional events that may not be processed, but at the same time cause the application to crash, as well as write server requests and responses. We will keep dumps as a bonus. To do this, create a directory:
And put the logcfg.xml file with the following contents:
Create directories for logs and dumps, and give usr1cv8 user rights:
We launch:
Let's create a unit for starting the remote administration server (ras). Create the file /etc/systemd/system/ras.service with the contents:
We activate our unit and start the service:
To update, the service agent will need to start the Configurator. We already wrote that in the new version the restriction on the use of Linux is removed, but for an example we will use Windows, so that it is clear how the work in this environment works.
To start the administration server (ras), you need to register it as a service. Create a reg-ras.bat file with the following contents:
We change the username and password to those from which the service will be launched. If Description will be in Russian, do not forget to create the file in the desired encoding. Let's run the file, as a parameter we pass the platform version:
Then we start the service.
Install apache:
Download the archive with the 1C: Enterprise server and unpack it into a separate directory, then install:
Let's create a configuration file for loading the module when apache starts and restart the service:
We’ll configure the technology journal, for this we’ll create a directory:
And put the logcfg.xml file with the following contents:
Create directories for logs and dumps, and give rights so that apache can write there:
Installation of new versions of the platform occurs in new directories containing the version number, for example,
C: \ Program Files \ 1cv8 \ 8.3.11.2899 \. To automate the update process a little, we will create the SetCurrent1CVersion.cmd script, which we will run during the update so that the symbolic link it creates is relevant:
In our case, execute:
Thus, we will always have a permanent path to the current version of C: \ Program Files \ 1cv8 \ current \
We start the administration console of the 1C: Enterprise server and add a new central server. For authorized access, add the central server administrator:
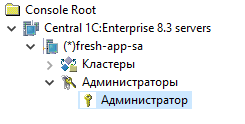
In the same way, add the cluster administrator:

First of all, prepare the cluster for the database using pg_createcluster, get the user unoconnector in it.
In the server administration snap-in, we will create a base for the service manager. Connection to a non-standard port is performed by the line fresh-app-02.knopka.int port = 5433.

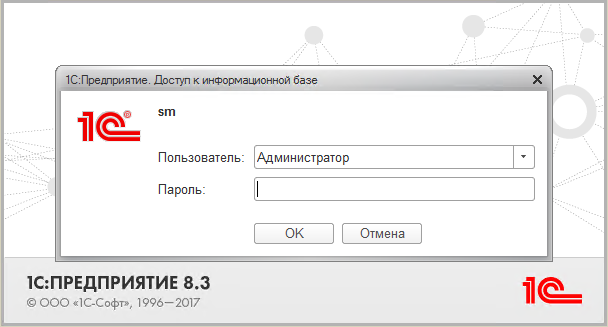
After creating the database, go to the configurator, fill in the configuration of the service manager. Then we enter the service manager under the username Administrator without a password. At the first start, default values and creation of predefined users will be performed.
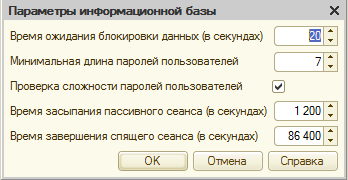
Turn on the complexity of passwords:
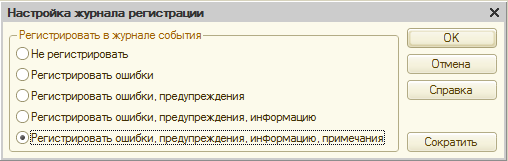
Set the log details:
Set passwords for service users except Anonymous (ProtectedUser, RemoteAccess, Administrator, Operator), set the parameters:
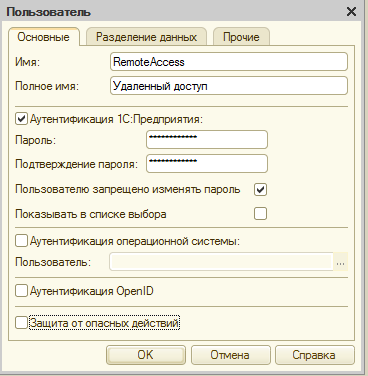
Now you need to publish the service manager so that it can be accessed through web services or a web client.
On the server fapache.knopka.int, in the / etc / apache2 / sites-available directory, place the sm.conf file with the following contents:
and enable the use of this site:
Now we need to create directories in which we will place default.vrd files:
default.vrd for external publication:
default.vrd for internal publication:
Reread apache settings:
Let's check how the publication works. In the web client, enter fapache.knopka.int/ext/sm in the address bar.
If everything was done correctly, a user authentication window will appear in the window. We will log in as Administrator and see the administrator’s desktop:

For the proper functioning of the service, its structure must be described.
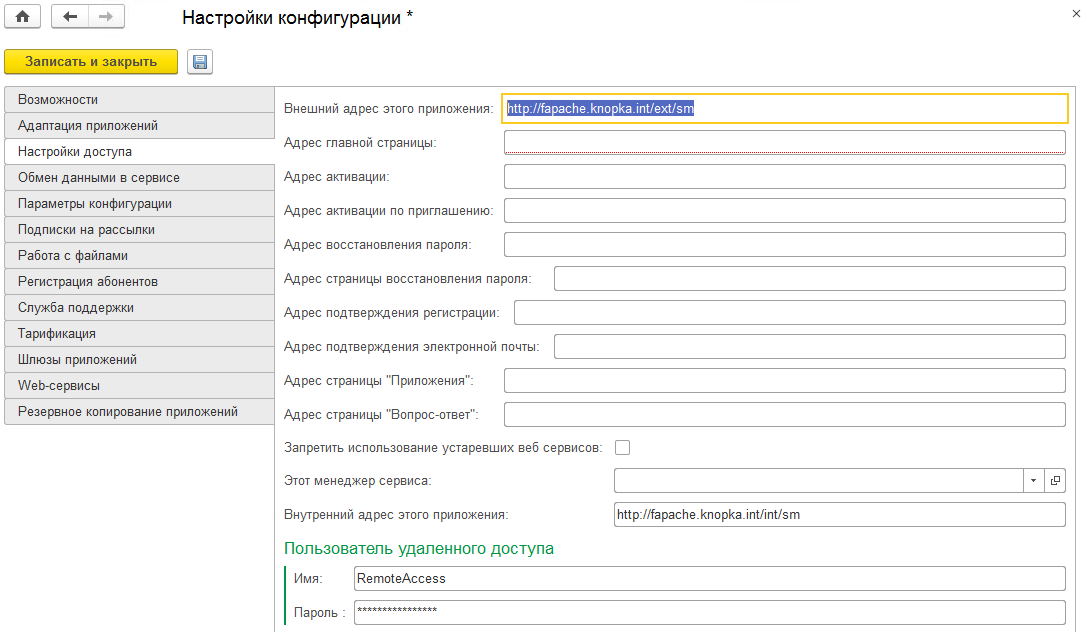
On the “Administration” tab, open “Configuration Settings” → “Access Settings”, write the external and internal addresses of the service manager and password for the RemoteAccess user. Fapache.knopka.int/ext/sm
will be used as the external address. Fapache.knopka.int/int/sm will be used
as the internal address.
For a start, this will be enough, we will return to the settings of the remaining fields later.
On the “Administration” tab, open “Service Segments” and create a new segment. Let's call it "Local Area Network."
The service allows the use of several server clusters using different platforms. Each version of the platform must be registered in the service manager.
“Administration” → “Versions of the 1C: Enterprise platform”
“Administration” → “Administration Servers (ras)”. Add all the servers where ras is raised, for example:

“Administration” → “Production servers”. Add all of our production servers and the production server administrator account:

"Administration → Clusters". Add the clusters and the cluster administrator account:

“Administration → Configurations”. We create a new configuration, the type of configuration for the service manager is “Manager”. The configuration name must exactly match the configuration name in the Configurator.

In the same window on the left side, select "Configuration Versions" and create a new entry by selecting "Enter version information manually." Now the configuration file can be omitted, it is only necessary to update the configuration for this version. We fill in the remaining fields as follows:

Now you need to register the information base of the service manager: “Administration → Information Databases”. We fill in as in the screenshot, do not forget to put a checkmark “on support”.
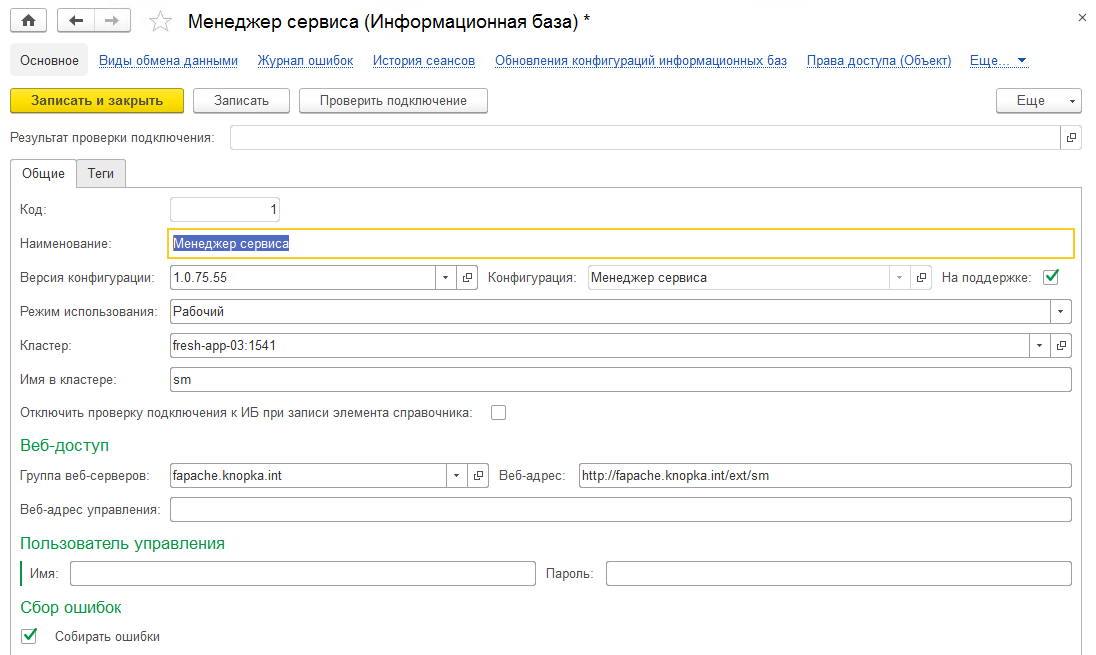
Next, go to “Administration → Service Managers” and add the entry:

Go back to “Administration”, open “Configuration Settings” → “Access Settings” and select our service manager in the “This service manager” field.

At the moment, the description of the structure of the service can be completed, we will return to the additional settings of the web servers and their groups later, when the application gateway will function.
The process of creating and adding a service agent is similar to adding a service manager. We prepare a cluster for the new database on the fresh-db.knopka.int database server using pg_createcluster, we start the user to connect.
In the server administration console 1C, add the server fresh-app-sa.knopka.int, create the fresh-app-sa cluster of the same name, add the administrators of the central server and the cluster, create the sa database with connection parameters fresh-db.knopka.int port = 5434 .
We go into the Configurator and load the configuration of the service agent. After loading the configuration, we will perform an interactive launch. If everything is correct, then we will see this window:

Go to "Settings and Administration" → "Launch the configurator" and prescribe the path. Recall that current is a symbolic link to the current version of the platform.

We publish our service agent on the web publishing server fapache.knopka.int.
In the / etc / apache2 / sites-available directory, put the sa.conf file with the following contents:
A service agent only needs internal publication. Turn on the use of this site:
Now we need to create a directory in which we will place the default.vrd files.
default.vrd:
We restart apache and check the address in the browser:
fapache.knopka.int/int/sa/ws/InterfaceVersion?wsdl
If everything was done correctly, a WSDL description of the web service provided by the service agent database will appear.
To begin, register the configuration and its version. In the service manager, open “Administration” → “Configurations” and create a new entry. The name coincides with the configuration name in the Configurator, type - “Service”:
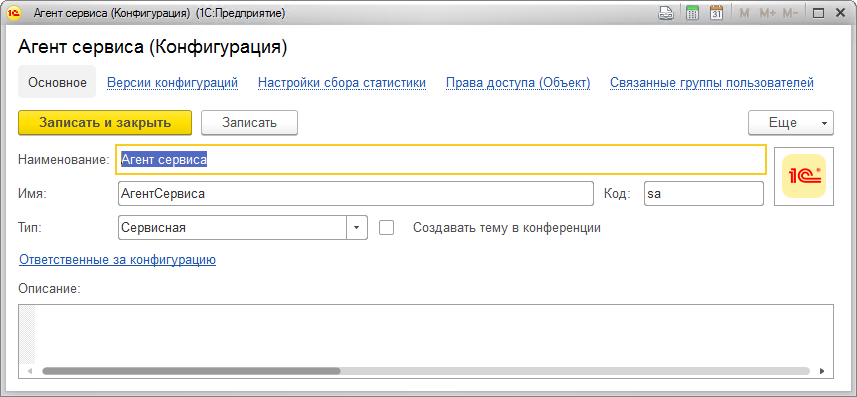
Go to the “Configuration version”, add a new entry manually.
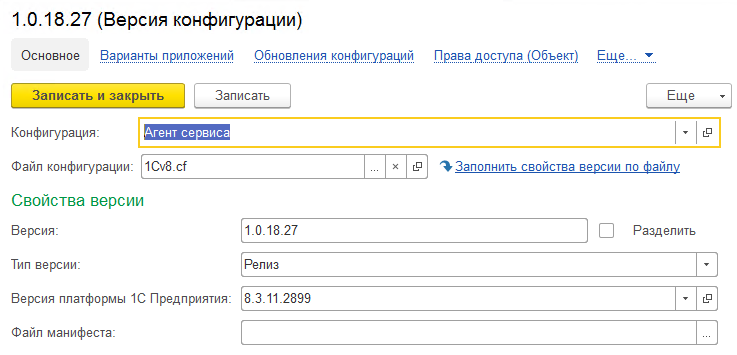
We register the information base. Open "Administration" → "Infobases" and create a new entry with the name "Service Agent". The connection to the database will be checked immediately.
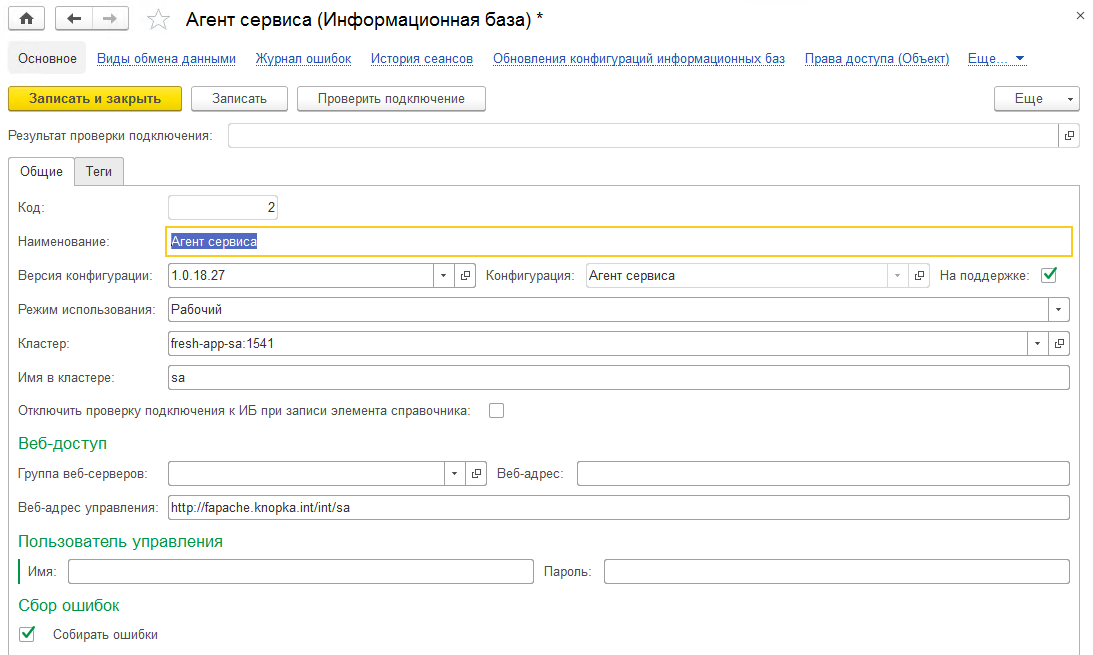
Next, “Administration → Service Agents”, add the entry:

Everything, the service agent is ready for use.
And again the familiar process of creating a base. Deploy the cluster to the database server. In the administration console, connect the server fresh-app-01.knopka.int, create the database ea_01 data on fresh-db.knopka.int port = 5435.
We load the configuration of Enterprise Accounting 3.0.52.42, perform an interactive launch.
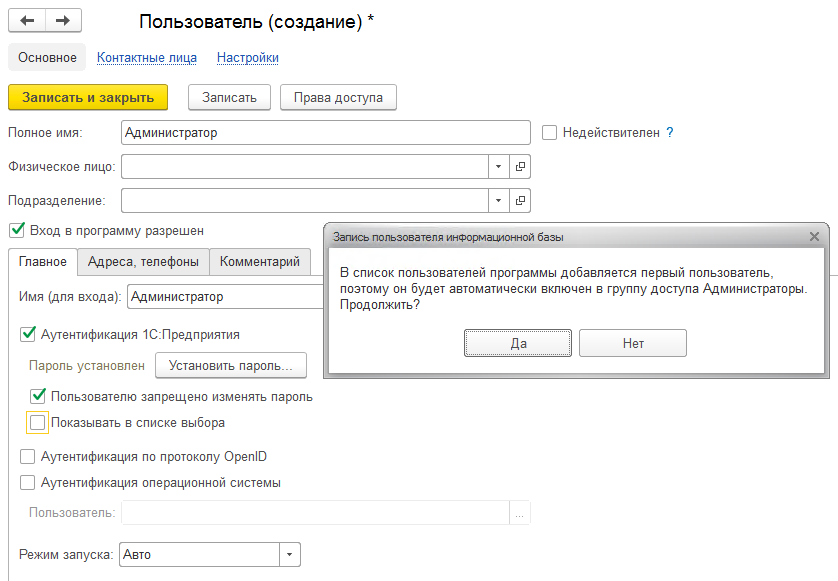
Create an Administrator user, set a password for him, prohibit changing him and displaying the login in the selection list. When saving, we agree to enter the user in the Administrators group:
In the official documentation, setting constants is described only for information databases of applied solutions, but they must also be installed in the service manager. Turn on the option “All functions”:
Main menu → Tools → Options → Display the command “All functions”
and set the following values for the constants:
Detail update information security in the logbook On
Use offline work in the service model On
Use data synchronization On
Use data synchronization in local mode Off
Use data synchronization in the service model. On
Use data synchronization in the service model with the local program. Off
Use data synchronization in the service model with the application on the Internet On
You also need to create the RemoteAccess user, do this in the Configurator, after enabling the password verification complexity in the parameters of the infobase. We set the password, prohibit changing it, remove the display in the selection list.
We expose the following roles to the RemoteAccess user:
This time we finish with the Configurator and close it.
Create the configuration file /etc/apache2/sites-available/ea_01.conf on the server fapache.knopka.int:
and enable the use of this site:
Now we need to create directories in which we will place default.vrd files:
default.vrd for external publication:
default.vrd for internal publication:
Reread apache settings:
We go into the service manager and register a new configuration in "Administration" → "Configurations". This time the name will be "Accounting", and the type - "Applied".
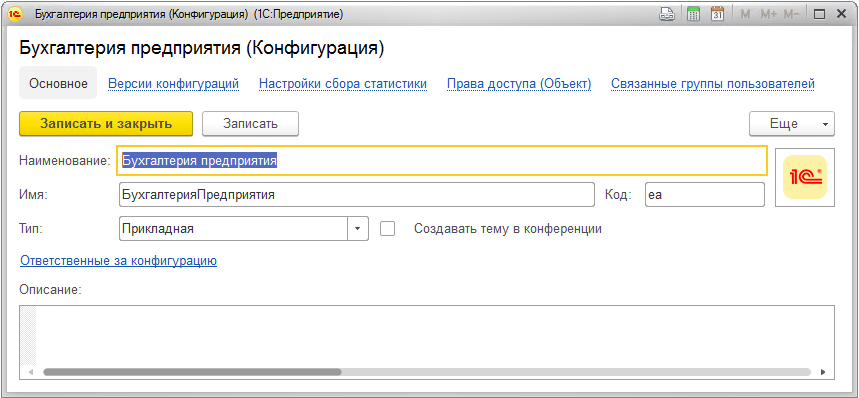
In the “Configuration Versions” section, create a new entry in which we indicate the current version, the release version type and the current platform version.
Open “Administration” → “Infobases” and register the infobase:
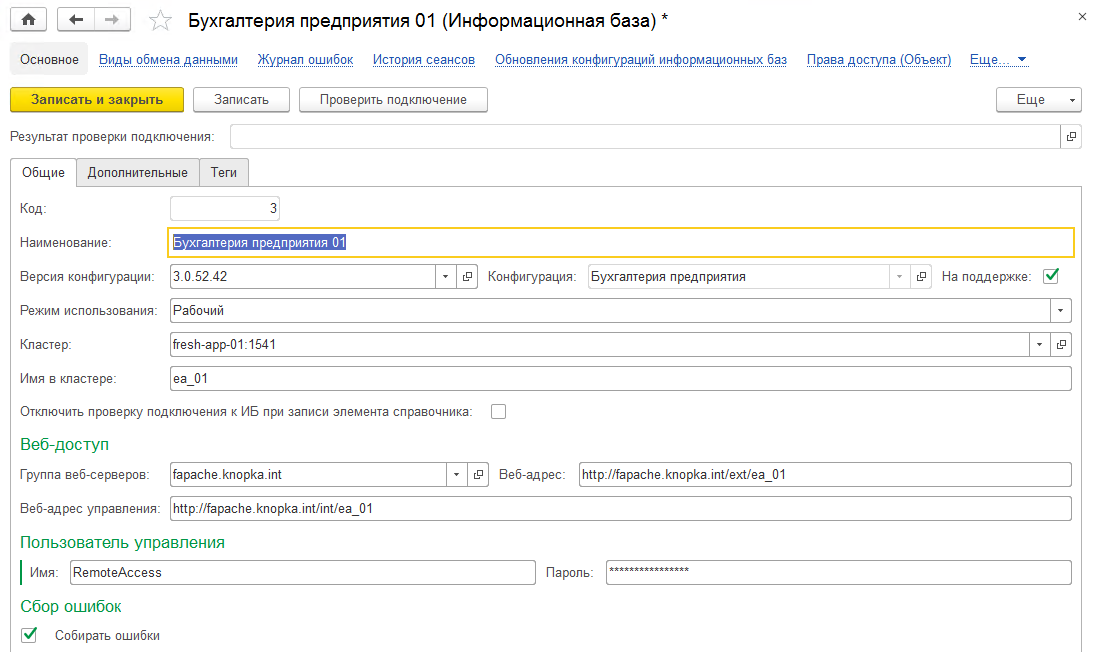
Now for this infobase you need to register an administration account. This is necessary for the service agent so that it can connect to the database with administrator rights, update and manage it. This is done here, in the infobase window in the "Administration Accounts" section.

In the application information base, we will create data areas. To do this, in the main section of the infobase window, go to the "Advanced" tab, check the "Add new areas" checkbox and uncheck "Fill areas with initial data." We did not prepare the initial data, so they simply do not exist.

Messages are used to exchange information between an agent, a service manager, and also applied information databases. For example, you can see the list in the service manager in the section "Administration" → "Messaging". We will not dwell on the messages in detail; information on working with them can be found in the official 1C Fresh documentation.
You can check the preparedness of areas in the window "Desktop" → "Applications". Uncheck “Only used” and you will see three areas with the status of “New”. As soon as all operations to prepare the area are over, it will change the state to “Finish”.
In order to be able to use application applications in the service model, it is necessary to register the user of the service, to give him the right to work in his data area. The very scheme of the service-subscriber relationship is as follows: The user is registered in the service, a subscriber is created for him, users of this subscriber who are also users of the service are added to the subscriber.
User registration requires setting up an email account to send an activation code. You can configure it in the service manager in the section "Administration" → "Email Accounts". We will not dwell on this in detail, since each setting has its own and everything is intuitively clear. You can do without it and get the activation code in another way, we will talk about it below.
We go into the service manager on behalf of the user Anonymous without a password, after a successful login click "Register" and enter the data on a new user of the service. The email address must be valid:
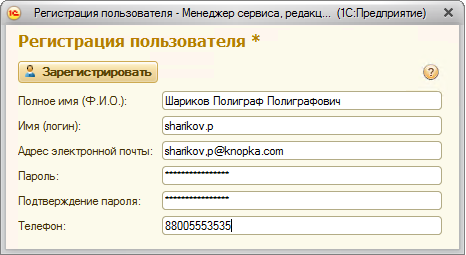
When you click the "Register" button, a window appears asking if you want to activate the created user, to which we will respond positively.
Next, we need to enter the activation code sent to the e-mail specified during registration, but we will take it in the section “Maintenance” → “Requests for registration”. Open the request and copy the request code from the form 0414fb84-cf59-11e7-f094-00155d003608 from there, this is the activation code we need.
After creating a service user, the service manager will also automatically create a subscriber and add the owner rights of this subscriber to the user. He can manage his applications, invite new users to work together with them in the subscriber’s applications.
We will enter the service manager using the sharikov.p login:

Press the Add button and add the Enterprise Accounting application. It is enough to select only the type of application and wait for “Used” in the “Availability” column.

When you click the "Enter the application" button, the browser will open the address fapache.knopka.int/ext/ea_01/1 , where the last unit is the number of the area. The user has no rights and cannot enter other areas.
From now on, we have a minimum working 1C Fresh service. As you can see, deploying it is quite simple.
This is far from all the functionality. You can configure the planned configuration updates, data synchronization in the service. Adding an application gateway ensures scalability of the service instance by adding new infobases to it and maintaining a single external address for the same infobases. The site and the forum of the service, inaccessibility monitoring and others can be put into operation without problems together with the 1C Fresh service, which gives flexibility in the choice of functionality depending on your needs.
What 1C Fresh consists of
1C Fresh is a technology for publishing solutions. That is, this is a service that allows you to publish access to various solutions based on 1C to a mass user, to connect these solutions into a single system with common administration and maintenance.
The central element is the Service Manager, the control configuration that links the remaining elements. It stores all the information about the components of the service, about configuration versions, about users, data areas, gives out commands to perform various operations.
The Service Agent is the right hand of the Service Manager, it is a service configuration that handles application configurations. Typical tasks of a Service Agent are:
- Update application database configuration;
- Update unloading (dump) to the current version of the application configuration;
- Prepare the initial data for the new version of the configuration;
- Collect statistics and errors from application databases.
The Service Agent does these tasks using the configurator. Until recently, this was the only service element requiring a Windows platform. But in the new version of 1C Fresh 1.0.19 technology, the developers removed this restriction, now the Service Agent can also work on Linux.
Infobases are application configurations published through the Service Manager. Configurations that currently support operation in service mode:
- 1C: ERP Enterprise Management 2;
- 1C: BusinessStart;
- 1C: Accounting of a state institution, version 2.0;
- 1C: Accounting, revision 3.0;
- 1C: Accounting of the enterprise KORP, edition 3.0;
- 1C: Accounting of the enterprise (basic), edition 3.0;
- 1C: Enterprise Accounting (basic for 1), revision 3.0;
- 1C: Goods allowance 8;
- 1C: Salary and personnel of a state institution;
- 1C: Salary and personnel management ”, edition 3;
- 1C: Salary and personnel management of KORP, edition 3;
- 1C: Integrated Automation, revision 2.0;
- 1C: Reporting of the entrepreneur, version 2.0;
- 1C: Entrepreneur 2015;
- 1C: Management of our company, version 1.6;
- 1C: Trade Management, revision 11;
- 1C: Cashier.
There is an opportunity to publish your own decisions, there are recommendations for improvement on ITS.
These elements are basic and necessary for deployment. There are also others that provide additional functionality, but they are not necessary:
- Application gateway - a service that allows you to "hide" the internal structure of the service. It proxies and redirects requests to information security. All addresses look the same;
- Service site - provides a simple and convenient user interface for interacting with the service, launching applications, providing access to their applications;
- Availability Manager - stores information about the unavailability of service resources and allows you to display messages about inaccessibility to users of the site and forum, even if all other components of the service do not work.
There are other components of the service, you can read about them on the site
Input data
We briefly describe the hosts and services that will work on them. We will deploy the entire infrastructure on a virtualization server, so we will distribute the services across different virtual machines. When using CORP licensing, you can also share functionality, for example, move the processing of background jobs to a separate application server. In a minimal configuration, it can be assembled on two hosts: host the database and application server on Linux, and give the Service Agent to Windows.
| Hostname | Software and functionality | VM Resources |
|---|---|---|
| fresh-db.knopka.int | Debian 9, PostgreSQL 9.6 DBMS | 4 core \ 10Gb |
| fresh-app-01.knopka.int | Debian 9, 1C: Enterprise Server, Application Configurations | 4-6 core \ 12-16Gb |
| fresh-app-02.knopka.int | Debian 9, server 1C: Enterprise, Service Manager | 4 core \ 8Gb |
| fresh-app-sa.knopka.int | Windows, server 1C: Enterprise, Service Agent | 4 core \ 8Gb |
| fresh-app-sa.knopka.int | Debian 9, Apache 2.4, server 1C: Enterprise, web-module | 2 core \ 4Gb |
Initial machine preparation
There will be databases: fresh-db.knopka.int
We use PostgreSQL as the database server. For the convenience of updating, we will connect the PostgresPro repositories. 1C also provides a distribution, you can safely use it.
sh -c 'echo "deb http://1c.postgrespro.ru/deb/ $(lsb_release -cs) main" > /etc/apt/sources.list.d/postgrespro-1c.list'
wget --no-verbose -O - http://1c.postgrespro.ru/keys/GPG-KEY-POSTGRESPRO-1C | apt-key add - && apt-get update
apt-get install postgresql-pro-1c-9.6
For each database we will create a cluster that will serve a separate instance of PostgreSQL. This will allow you to manage each database and do replication.
pg_createcluster 9.6-d systemctl daemon-reload
< clustername > - the name of our cluster, we will call the database similarly serviced in the cluster;
< dir > - the directory in which the cluster will be created.
The next free port will be used after 5432, unless explicitly specified during creation. You can check the list of clusters as follows:
pg_lsclustersConnect to the cluster (with the port on which it works) and create a role (you need a superuser) under which the administration server will interact with the database:
su postgres
psql -p 5433
create role unoconnector with login superuser;
alter role unoconnector with encrypted password 'password';Be sure to do the initial setup. Each cluster has its own configuration files. For simplicity, you can use PgTune . Set the environment parameters and get the recommended settings at the output:
Immediately, we note that the recommended ones do not mean optimal ones; during the work, you may need to make adjustments. In one of the previous articles, we examined the configuration of PostgreSQL, you can learn something useful from there.
Linux application servers will be here: fresh-app- [01-02] .knopka.int
Install the necessary packages:
apt-get install libperl5.24 libxslt1.1 libicu57 tcl8.5 libpython3.5 libpython2.7 libssl-dev krb5-multidev ssl-cert libssl-dev libgsf-1-114 imagemagick libgsf-1-dev ttf-mscorefonts-installerWe activate fonts and overload the server:
fc-cache -fv
reboot
Download the archive with the packages of the server 1C: Enterprise and unpack it into a separate directory, then install:
dpkg -i 1c-enterprise83-common_*_amd64.deb 1c-enterprise83-server_*_amd64.deb 1c-enterprise83-ws_*_amd64.deb 1c-enterprise83-common-nls_*_amd64.deb 1c-enterprise83-server-nls_*_amd64.deb 1c-enterprise83-ws-nls_*_amd64.debWe give the user usr1cv8 rights to the / opt / 1C directory:
chown -R usr1cv8:grp1cv8 /opt/1CWe’ll configure the technology logbook, at the installation stage it will be useful if something goes wrong. We will collect exceptional events that may not be processed, but at the same time cause the application to crash, as well as write server requests and responses. We will keep dumps as a bonus. To do this, create a directory:
mkdir -p /opt/1C/v8.3/x86_64/confAnd put the logcfg.xml file with the following contents:
Create directories for logs and dumps, and give usr1cv8 user rights:
mkdir -p /var/log/1c/excp /var/log/1c/vrs /var/log/1c/dumps
chown -R usr1cv8:grp1cv8 /var/log/1c
We launch:
/etc/init.d/srv1cv83 startLet's create a unit for starting the remote administration server (ras). Create the file /etc/systemd/system/ras.service with the contents:
[Unit]
Description=RAS
After=syslog.target
After=network.target
[Service]
Type=forking
WorkingDirectory=/opt/1C/v8.3/x86_64
User=usr1cv8
Group=grp1cv8
OOMScoreAdjust=-100
ExecStart=/opt/1C/v8.3/x86_64/ras cluster --daemon -p 1545
ExecReload=/bin/kill -s HUP $MAINPID
ExecStop=/bin/kill -s QUIT $MAINPID
TimeoutSec=300
Restart=always
[Install]
WantedBy=multi-user.target
We activate our unit and start the service:
systemctl daemon-reload
systemctl enable ras
systemctl start ras
There will be an application server on Windows: fresh-app-sa.knopka.int
To update, the service agent will need to start the Configurator. We already wrote that in the new version the restriction on the use of Linux is removed, but for an example we will use Windows, so that it is clear how the work in this environment works.
To start the administration server (ras), you need to register it as a service. Create a reg-ras.bat file with the following contents:
@echo off
rem %1 - полный номер версии 1С:Предприятия
set SrvUserName=<имя пользователя>
set SrvUserPwd=<пароль пользователя>
set CtrlPort=1540
set AgentName=localhost
set RASPort=1454
set SrvcName="1C:Enterprise 8.3 Remote Server"
set BinPath="\"C:\Program Files\1cv8\%1\bin\ras.exe\" cluster --service --port=%RASPort% %AgentName%:%CtrlPort%"
set Description="Сервер администрирования 1С:Предприятия 8.3"
sc stop %SrvcName%
sc delete %SrvcName%
sc create %SrvcName% binPath= %BinPath% start= auto obj= %SrvUserName% password= %SrvUserPwd% displayname= %Description%
We change the username and password to those from which the service will be launched. If Description will be in Russian, do not forget to create the file in the desired encoding. Let's run the file, as a parameter we pass the platform version:
reg-ras.bat 8.3.11.2899Then we start the service.
Here will be the publication web server: fapache.knopka.int
Install apache:
apt-get install apache2Download the archive with the 1C: Enterprise server and unpack it into a separate directory, then install:
dpkg -i 1c-enterprise83-common_*_amd64.deb 1c-enterprise83-server_*_amd64.deb 1c-enterprise83-ws_*_amd64.deb 1c-enterprise83-common-nls_*_amd64.deb 1c-enterprise83-server-nls_*_amd64.deb 1c-enterprise83-ws-nls_*_amd64.debLet's create a configuration file for loading the module when apache starts and restart the service:
echo "LoadModule _1cws_module \"/opt/1C/v8.3/x86_64/wsap24.so\"" > /etc/apache2/conf-available/1cws_module.conf
ln -s /etc/apache2/conf-available/1cws_module.conf /etc/apache2/conf-enabled/1cws_module.conf
/etc/init.d/apache2 restart
We’ll configure the technology journal, for this we’ll create a directory:
mkdir -p /opt/1C/v8.3/x86_64/confAnd put the logcfg.xml file with the following contents:
Create directories for logs and dumps, and give rights so that apache can write there:
mkdir -p /var/log/1c/excp /var/log/1c/vrs /var/log/1c/dumps
chown -R www-data:www-data /var/log/1c
Creating a symbolic link to platform directories
Installation of new versions of the platform occurs in new directories containing the version number, for example,
C: \ Program Files \ 1cv8 \ 8.3.11.2899 \. To automate the update process a little, we will create the SetCurrent1CVersion.cmd script, which we will run during the update so that the symbolic link it creates is relevant:
@echo off
if /%1 == / goto help
pushd "C:\Program Files\1cv8"
if exist current\ rmdir current
mklink /j current %1
popd
goto end
:help
echo Usage: SetCurrent1CVersion.cmd
:end
In our case, execute:
SetCurrent1CVersion.cmd 8.3.11.2899Thus, we will always have a permanent path to the current version of C: \ Program Files \ 1cv8 \ current \
Adding a cluster and production servers to the administration console
We start the administration console of the 1C: Enterprise server and add a new central server. For authorized access, add the central server administrator:
In the same way, add the cluster administrator:
Service Manager Setup
Expand the base
First of all, prepare the cluster for the database using pg_createcluster, get the user unoconnector in it.
In the server administration snap-in, we will create a base for the service manager. Connection to a non-standard port is performed by the line fresh-app-02.knopka.int port = 5433.
After creating the database, go to the configurator, fill in the configuration of the service manager. Then we enter the service manager under the username Administrator without a password. At the first start, default values and creation of predefined users will be performed.
Turn on the complexity of passwords:
Set the log details:
Set passwords for service users except Anonymous (ProtectedUser, RemoteAccess, Administrator, Operator), set the parameters:
Create a publication
Now you need to publish the service manager so that it can be accessed through web services or a web client.
On the server fapache.knopka.int, in the / etc / apache2 / sites-available directory, place the sm.conf file with the following contents:
# sm внешняя публикация
Alias /ext/sm /var/www/1cfresh/ext/sm

    AllowOverride All
    Options None
    Order allow,deny
    Allow from all
    SetHandler 1c-application
    ManagedApplicationDescriptor /var/www/1cfresh/ext/sm/default.vrd

# sm внутренняя публикация
Alias /int/sm /var/www/1cfresh/int/sm

    AllowOverride All
    Options None
    Order allow,deny
    Allow from all
    SetHandler 1c-application
    ManagedApplicationDescriptor /var/www/1cfresh/int/sm/default.vrd
and enable the use of this site:
a2ensite smNow we need to create directories in which we will place default.vrd files:
mkdir -p /var/www/1cfresh/ext/sm /var/www/1cfresh/int/smdefault.vrd for external publication:
default.vrd for internal publication:
Reread apache settings:
systemctl reload apache2Let's check how the publication works. In the web client, enter fapache.knopka.int/ext/sm in the address bar.
If everything was done correctly, a user authentication window will appear in the window. We will log in as Administrator and see the administrator’s desktop:
Service structure description
For the proper functioning of the service, its structure must be described.
Access settings
On the “Administration” tab, open “Configuration Settings” → “Access Settings”, write the external and internal addresses of the service manager and password for the RemoteAccess user. Fapache.knopka.int/ext/sm
will be used as the external address. Fapache.knopka.int/int/sm will be used
as the internal address.
For a start, this will be enough, we will return to the settings of the remaining fields later.
Service Segments
On the “Administration” tab, open “Service Segments” and create a new segment. Let's call it "Local Area Network."
Registration of versions of the 1C: Enterprise platform
The service allows the use of several server clusters using different platforms. Each version of the platform must be registered in the service manager.
“Administration” → “Versions of the 1C: Enterprise platform”
Registering Administration Servers (ras)
“Administration” → “Administration Servers (ras)”. Add all the servers where ras is raised, for example:
Registration of production servers
“Administration” → “Production servers”. Add all of our production servers and the production server administrator account:
Server Cluster Registration
"Administration → Clusters". Add the clusters and the cluster administrator account:
Service Manager Registration
“Administration → Configurations”. We create a new configuration, the type of configuration for the service manager is “Manager”. The configuration name must exactly match the configuration name in the Configurator.
In the same window on the left side, select "Configuration Versions" and create a new entry by selecting "Enter version information manually." Now the configuration file can be omitted, it is only necessary to update the configuration for this version. We fill in the remaining fields as follows:
Now you need to register the information base of the service manager: “Administration → Information Databases”. We fill in as in the screenshot, do not forget to put a checkmark “on support”.
Next, go to “Administration → Service Managers” and add the entry:
Go back to “Administration”, open “Configuration Settings” → “Access Settings” and select our service manager in the “This service manager” field.
At the moment, the description of the structure of the service can be completed, we will return to the additional settings of the web servers and their groups later, when the application gateway will function.
Service Agent Setup
Expand
The process of creating and adding a service agent is similar to adding a service manager. We prepare a cluster for the new database on the fresh-db.knopka.int database server using pg_createcluster, we start the user to connect.
In the server administration console 1C, add the server fresh-app-sa.knopka.int, create the fresh-app-sa cluster of the same name, add the administrators of the central server and the cluster, create the sa database with connection parameters fresh-db.knopka.int port = 5434 .
We go into the Configurator and load the configuration of the service agent. After loading the configuration, we will perform an interactive launch. If everything is correct, then we will see this window:
Go to "Settings and Administration" → "Launch the configurator" and prescribe the path. Recall that current is a symbolic link to the current version of the platform.
We will publish
We publish our service agent on the web publishing server fapache.knopka.int.
In the / etc / apache2 / sites-available directory, put the sa.conf file with the following contents:
# sa внутренняя публикация
Alias /int/sa /var/www/1cfresh/int/sa

    AllowOverride All
    Options None
    Order allow,deny
    Allow from all
    SetHandler 1c-application
    ManagedApplicationDescriptor /var/www/1cfresh/int/sa/default.vrd
A service agent only needs internal publication. Turn on the use of this site:
a2ensite saNow we need to create a directory in which we will place the default.vrd files.
mkdir -p /var/www/1cfresh/int/sadefault.vrd:
We restart apache and check the address in the browser:
fapache.knopka.int/int/sa/ws/InterfaceVersion?wsdl
If everything was done correctly, a WSDL description of the web service provided by the service agent database will appear.
Register
To begin, register the configuration and its version. In the service manager, open “Administration” → “Configurations” and create a new entry. The name coincides with the configuration name in the Configurator, type - “Service”:
Go to the “Configuration version”, add a new entry manually.
We register the information base. Open "Administration" → "Infobases" and create a new entry with the name "Service Agent". The connection to the database will be checked immediately.
Next, “Administration → Service Agents”, add the entry:
Everything, the service agent is ready for use.
Setting up the information base of the applied solution using the example of “Enterprise Accounting”
Expand
And again the familiar process of creating a base. Deploy the cluster to the database server. In the administration console, connect the server fresh-app-01.knopka.int, create the database ea_01 data on fresh-db.knopka.int port = 5435.
We load the configuration of Enterprise Accounting 3.0.52.42, perform an interactive launch.
Create an Administrator user, set a password for him, prohibit changing him and displaying the login in the selection list. When saving, we agree to enter the user in the Administrators group:
Set constants
In the official documentation, setting constants is described only for information databases of applied solutions, but they must also be installed in the service manager. Turn on the option “All functions”:
Main menu → Tools → Options → Display the command “All functions”
and set the following values for the constants:
Detail update information security in the logbook On
Use offline work in the service model On
Use data synchronization On
Use data synchronization in local mode Off
Use data synchronization in the service model. On
Use data synchronization in the service model with the local program. Off
Use data synchronization in the service model with the application on the Internet On
You also need to create the RemoteAccess user, do this in the Configurator, after enabling the password verification complexity in the parameters of the infobase. We set the password, prohibit changing it, remove the display in the selection list.
We expose the following roles to the RemoteAccess user:
- Perform data synchronization
- Remote access (administration of the information base in the service model);
- Remote access (Basic functionality);
- Remote access (data exchange in the service model);
- Remote Access (Messaging);
- Remote access (standard OData interface)
This time we finish with the Configurator and close it.
We will publish
Create the configuration file /etc/apache2/sites-available/ea_01.conf on the server fapache.knopka.int:
# ea_01 внешняя публикация
Alias /ext/ea_01 /var/www/1cfresh/ext/ea_01

    AllowOverride All
    Options None
    Order allow,deny
    Allow from all
    SetHandler 1c-application
    ManagedApplicationDescriptor /var/www/1cfresh/ext/ea_01/default.vrd

# ea_01 внутренняя публикация
Alias /int/ea_01 /var/www/1cfresh/int/ea_01

    AllowOverride All
    Options None
    Order allow,deny
    Allow from all
    SetHandler 1c-application
    ManagedApplicationDescriptor /var/www/1cfresh/int/ea_01/default.vrd
and enable the use of this site:
a2ensite ea_01Now we need to create directories in which we will place default.vrd files:
mkdir -p /var/www/1cfresh/ext/ea_01 /var/www/1cfresh/int/ea_01default.vrd for external publication:
default.vrd for internal publication:
Reread apache settings:
systemctl reload apache2Register
We go into the service manager and register a new configuration in "Administration" → "Configurations". This time the name will be "Accounting", and the type - "Applied".
In the “Configuration Versions” section, create a new entry in which we indicate the current version, the release version type and the current platform version.
Open “Administration” → “Infobases” and register the infobase:
Now for this infobase you need to register an administration account. This is necessary for the service agent so that it can connect to the database with administrator rights, update and manage it. This is done here, in the infobase window in the "Administration Accounts" section.
In the application information base, we will create data areas. To do this, in the main section of the infobase window, go to the "Advanced" tab, check the "Add new areas" checkbox and uncheck "Fill areas with initial data." We did not prepare the initial data, so they simply do not exist.
Messages are used to exchange information between an agent, a service manager, and also applied information databases. For example, you can see the list in the service manager in the section "Administration" → "Messaging". We will not dwell on the messages in detail; information on working with them can be found in the official 1C Fresh documentation.
You can check the preparedness of areas in the window "Desktop" → "Applications". Uncheck “Only used” and you will see three areas with the status of “New”. As soon as all operations to prepare the area are over, it will change the state to “Finish”.
Service user and subscriber user
In order to be able to use application applications in the service model, it is necessary to register the user of the service, to give him the right to work in his data area. The very scheme of the service-subscriber relationship is as follows: The user is registered in the service, a subscriber is created for him, users of this subscriber who are also users of the service are added to the subscriber.
User registration requires setting up an email account to send an activation code. You can configure it in the service manager in the section "Administration" → "Email Accounts". We will not dwell on this in detail, since each setting has its own and everything is intuitively clear. You can do without it and get the activation code in another way, we will talk about it below.
We go into the service manager on behalf of the user Anonymous without a password, after a successful login click "Register" and enter the data on a new user of the service. The email address must be valid:
When you click the "Register" button, a window appears asking if you want to activate the created user, to which we will respond positively.
Next, we need to enter the activation code sent to the e-mail specified during registration, but we will take it in the section “Maintenance” → “Requests for registration”. Open the request and copy the request code from the form 0414fb84-cf59-11e7-f094-00155d003608 from there, this is the activation code we need.
After creating a service user, the service manager will also automatically create a subscriber and add the owner rights of this subscriber to the user. He can manage his applications, invite new users to work together with them in the subscriber’s applications.
Adding an application to a subscriber
We will enter the service manager using the sharikov.p login:
Press the Add button and add the Enterprise Accounting application. It is enough to select only the type of application and wait for “Used” in the “Availability” column.
When you click the "Enter the application" button, the browser will open the address fapache.knopka.int/ext/ea_01/1 , where the last unit is the number of the area. The user has no rights and cannot enter other areas.
From now on, we have a minimum working 1C Fresh service. As you can see, deploying it is quite simple.
Conclusion
This is far from all the functionality. You can configure the planned configuration updates, data synchronization in the service. Adding an application gateway ensures scalability of the service instance by adding new infobases to it and maintaining a single external address for the same infobases. The site and the forum of the service, inaccessibility monitoring and others can be put into operation without problems together with the 1C Fresh service, which gives flexibility in the choice of functionality depending on your needs.









