December 12, 2017 at 12:01
Face recognition. We create and try on masks

While the community of iOS developers is arguing how to write projects, while trying to decide whether to use MVVM or VIPER, while trying to SOLID the project or add a jet turbine there, I will try to break away from this and consider how another technology works under the hood from the Hype chart- Driven-Development .
In 2017, machine learning was at the top of the hype schedule. And it’s clear why:
- More open datasets have appeared.
- Appropriate hardware has appeared. Including cloud solutions.
- Technologies from this area began to be applied in production projects.
Machine learning is a wide topic, I will focus on face recognition and try to figure out what technologies were before Christmas christ CoreML, and what appeared after the release of the Apple framework.
Face recognition theory
Face recognition is part of the practical application of pattern recognition theory. It consists of two subtasks: identification and classification ( here in detail about the differences ). Identity is actively used in modern services such as Facebook, iPhoto. Face recognition is used everywhere, starting from FaceID in the iPhone X, ending with use in targeting in military equipment.
A person recognizes the faces of other people thanks to the area of the brain at the border of the occipital and temporal lobes - the fusiform gyrus. We recognize different people from 4 months. The key features that the brain exudes for identification are its eyes, nose, mouth and eyebrows. The human brain also restores the whole face even by half and can determine a person only by part of the face. The brain averages all the faces seen, and then finds differences from this averaged version. Therefore, it seems to people of the Caucasian race that everyone who belongs to the Mongoloid race is on the same face. And it is difficult for the Mongoloids to distinguish Europeans. Internal recognition is tuned to the spectral range of faces in the head, therefore, if some part of the spectrum does not have enough data, the face is considered one and the same.
Face recognition problems have been solved for over 40 years. They include:
- Search and recognition of several faces in the video stream.
- Resistance to changes in the face, hairstyle, beard, glasses, age and face rotation.
- Scalability of data for human identification.
- Work in real time.
One of the optimal algorithms for finding a face in a picture and its selection is a histogram of directional gradients .
There are other algorithms. It describes in detail how a zone with a face is searched according to the Viola-Jones algorithm . It is less accurate and works worse with face twists.
A brief tour of technology and pattern recognition solutions
There are many solutions that include algorithms for pattern recognition. List of popular libraries that are used in iOS:

Figure 1. DLIB library structure
- Pros:
- Open source solution, you can participate in the development and watch current trends.
- Written in C ++. Has support for iOS in the form of cocoapods: pod 'dlib'.
- It can also be integrated as a C ++ library. It works on Windows, Linux, MacOS. You can work in swift applications by writing a wrapper in objective-c ++. - Cons:
- Large size of the connected library. 40 megabytes as a pod.
- High entry threshold. A large number of internal algorithms, each of which will write a wrapper in Objective-C.

Figure 2. OpenCV Library Structure
OpenCV (Open Source Computer Vision Library)
- Pros:
- The largest community regularly participating in support.
- Written in C ++. Has support for iOS in the form of cocoapods: pod 'OpenCV'. - Cons:
- High entry threshold.
- Large size of the connected library. 77 megabytes as a pod, 180 megabytes as a C ++ library.

Figure 3. CoreML structure
- Pros:
- Easy integration into the application.
- Contains a convenient converter that supports several different models of other frameworks (Keras, Caffe, scikit-learn).
- Boxed solution with small size.
- Powered by GPU. - Cons:
- It is part of CoreML, therefore it supports a limited number of model types of other existing frameworks.
- No support for TensorFlow, one of the most popular machine learning solutions. You will have to spend a lot of time on self-made converters.
- Is a high-level abstraction. All implementation is closed, hence the impossibility of control.
- iOS 11+.
There are paid platforms that provide solutions for the problem of pattern recognition. Most develop their own algorithms and technologies. Of course, these technologies are actively developed and used by the military, so some solutions are classified and do not have open source.
What are landmarks

Figure 4. Visual display of facial structures.
The purpose of identifying landmarks is to find face points. The first step in the algorithm is determining the location of the face in the picture. After receiving the location, people look for key contours :
- Face contour.
- Left eye.
- Right eye.
- Left eyebrow.
- Right eyebrow.
- Left pupil.
- Right pupil.
- Nose.
- Lips.
Each of these contours is an array of points on the plane.
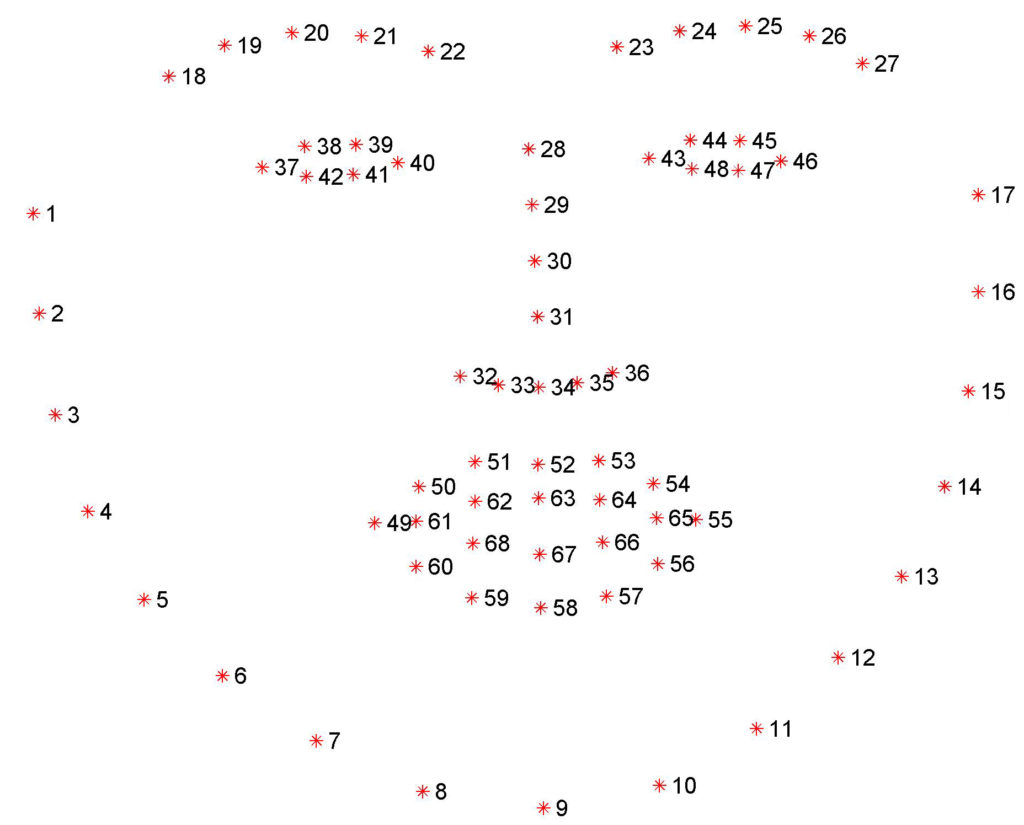
Figure 5. dlib 68 landmarks
In the picture you can clearly see the structure of the face. Moreover, depending on the selected library, the number of landmarks is different. Developed solutions for 4 landmarks, 16, 64, 124 and more.
Delaunay triangulation to build a mask
Let's move on to the practical part. Let's try to build the simplest face mask based on the obtained landmarks. The expected result will be a mask of the form:
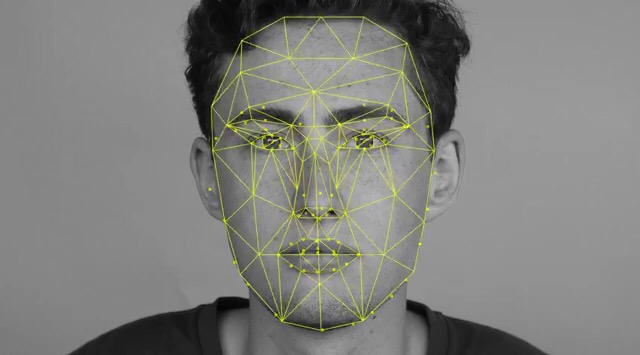
Figure 6. Mask visualizing the Delaunay triangulation algorithm.
Delaunay triangulation is a triangulation for a set of points S on a plane, for which for any triangle all points from S, with the exception of points that are its vertices, lie outside the circle circumscribed around the triangle. First described in 1934 by the Soviet mathematician Boris Delaunay.
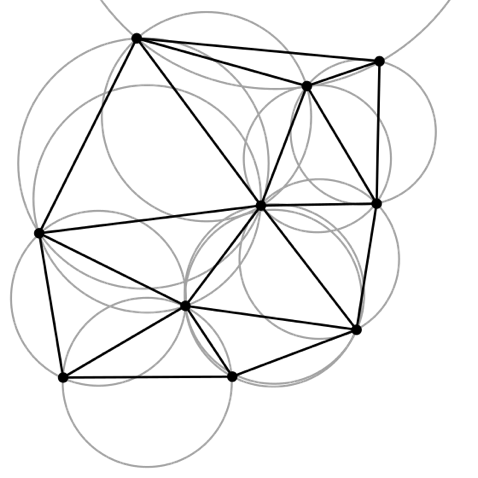
Figure 7. Example of Delaunay triangulation. From each point a circle is generated passing through the two nearest in the Euclidean metric
Practical implementation of the algorithm
We implement the Delaunay triangulation algorithm for our face in the camera.
Step 1. Inside you will see a wrapper that takes an array of points in two-dimensional space and returns an array of triangles.
public final class Triangle {
    public var vertex1: Vertex
    public var vertex2: Vertex
    public var vertex3: Vertex
    public init(vertex1: Vertex, vertex2: Vertex, vertex3: Vertex) {
        self.vertex1 = vertex1
        self.vertex2 = vertex2
        self.vertex3 = vertex3
    }
}
And vertex is a wrapper for CGPoint, additionally containing the number of a specific landmark.
public final class Vertex {
    public let point: CGPoint
    // Идентификатор точки. От 0 до 67. Всего 68 значений для dlib. Либо 65 для vision
    public let identifier: Int
    public init(point: CGPoint, id: Int) {
        self.point = point
        self.identifier = id
    }
}
Step 2. Let's move on to drawing polygons on the face. Turn on the camera and display the camera image on the screen:
final class ViewController: UIViewController {
    private var session: AVCaptureSession?
    private let faceDetection = VNDetectFaceRectanglesRequest()
    private let faceLandmarks = VNDetectFaceLandmarksRequest()
    private let faceLandmarksDetectionRequest = VNSequenceRequestHandler()
    private let faceDetectionRequest = VNSequenceRequestHandler()
    private lazy var previewLayer: AVCaptureVideoPreviewLayer? = {
        guard let session = self.session else {
            return nil
        }
        var previewLayer = AVCaptureVideoPreviewLayer(session: session)
        previewLayer.videoGravity = .resizeAspectFill
        return previewLayer
    }()
    private lazy var triangleView: TriangleView = {
        TriangleView(frame: view.bounds)
    }()
    private var frontCamera: AVCaptureDevice? = {
        AVCaptureDevice.default(AVCaptureDevice.DeviceType.builtInWideAngleCamera,
                                for: AVMediaType.video, position: .front)
    }()
    override func viewDidLoad() {
        super.viewDidLoad()
        sessionPrepare()
        session?.startRunning()
        guard let previewLayer = previewLayer else {
            return
        }
        view.layer.addSublayer(previewLayer)
        view.insertSubview(triangleView, at: Int.max)
    }
    override func viewDidLayoutSubviews() {
        super.viewDidLayoutSubviews()
        previewLayer?.frame = view.frame
    }
    private func sessionPrepare() {
        session = AVCaptureSession()
        guard let session = session, let captureDevice = frontCamera else {
            return
        }
        do {
            let deviceInput = try AVCaptureDeviceInput(device: captureDevice)
            session.beginConfiguration()
            if session.canAddInput(deviceInput) {
                session.addInput(deviceInput)
            }
            let output = AVCaptureVideoDataOutput()
            output.videoSettings = [
            String(kCVPixelBufferPixelFormatTypeKey): Int(kCVPixelFormatType_420YpCbCr8BiPlanarFullRange)
            ]
            output.alwaysDiscardsLateVideoFrames = true
            if session.canAddOutput(output) {
                session.addOutput(output)
            }
            session.commitConfiguration()
            let queue = DispatchQueue(label: "output.queue")
            output.setSampleBufferDelegate(self, queue: queue)
            print("setup delegate")
        } catch {
            print("can't setup session")
        }
    }
}
Step 3. Next we get the frames from the camera

Fig 8. An example of the received frame from the camera
extension ViewController: AVCaptureVideoDataOutputSampleBufferDelegate {
    func captureOutput(_ output: AVCaptureOutput,
                       didOutput sampleBuffer: CMSampleBuffer,
                       from connection: AVCaptureConnection) {
        guard let pixelBuffer = CMSampleBufferGetImageBuffer(sampleBuffer) else {
            return
        }
        guard let attachments = CMCopyDictionaryOfAttachments(kCFAllocatorDefault,
                                                              sampleBuffer,
                                                              kCMAttachmentMode_ShouldPropagate)
            as? [String: Any] else {
            return
        }
        let ciImage = CIImage(cvImageBuffer: pixelBuffer,
                              options: attachments)
        // leftMirrored for front camera
        let ciImageWithOrientation = ciImage.oriented(forExifOrientation: Int32(UIImageOrientation.leftMirrored.rawValue))
        detectFace(on: ciImageWithOrientation)
    }
}
Step 4. We are looking for faces on the frame
     fileprivate func detectFace(on image: CIImage) {
        try? faceDetectionRequest.perform([faceDetection], on: image)
        if let results = faceDetection.results as? [VNFaceObservation] {
            if !results.isEmpty {
                faceLandmarks.inputFaceObservations = results
                detectLandmarks(on: image)
            }
        }
    }
Step 5. Looking for landmarks on the face
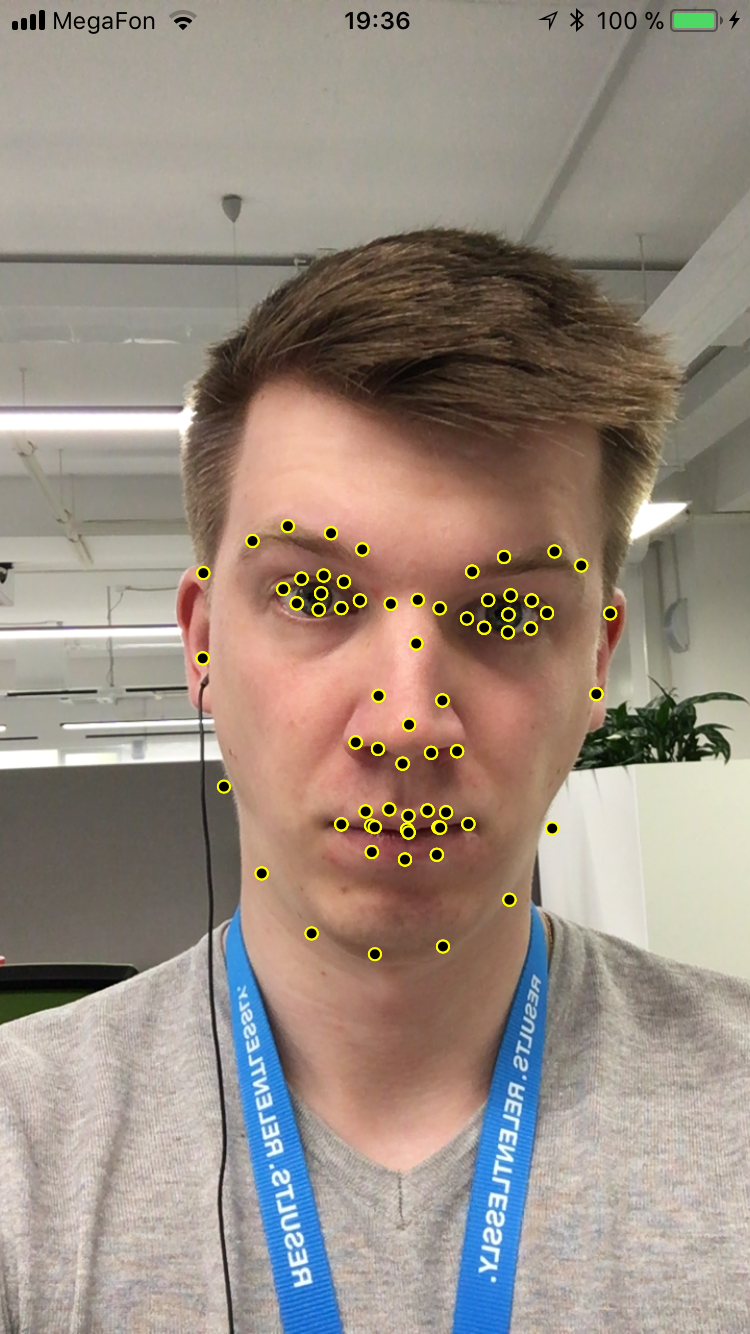
Figure 9. An example of found landmarks on the face.
    private func detectLandmarks(on image: CIImage) {
        try? faceLandmarksDetectionRequest.perform([faceLandmarks], on: image)
        guard let landmarksResults = faceLandmarks.results as? [VNFaceObservation] else {
            return
        }
        for observation in landmarksResults {
            if let boundingBox = faceLandmarks.inputFaceObservations?.first?.boundingBox {
                let faceBoundingBox = boundingBox.scaled(to: UIScreen.main.bounds.size)
                var maparr = [Vertex]()
                for (index, element) in convertPointsForFace(observation.landmarks?.allPoints,
                                                                  faceBoundingBox).enumerated() {
                    let point = CGPoint(x: (Double(UIScreen.main.bounds.size.width - element.point.x)),
                                        y: (Double(UIScreen.main.bounds.size.height - element.point.y)))
                    maparr.append(Vertex(point: point, id: index))
                }
                triangleView.recalculate(vertexes: maparr)
            }
        }
    }
        private func convertPointsForFace(_ landmark: VNFaceLandmarkRegion2D?,
                                      _ boundingBox: CGRect) -> [Vertex] {
        guard let points = landmark?.normalizedPoints else {
            return []
        }
        let faceLandmarkPoints = points.map { (point: CGPoint) -> Vertex in
            let pointX = point.x * boundingBox.width + boundingBox.origin.x
            let pointY = point.y * boundingBox.height + boundingBox.origin.y
            return Vertex(point: CGPoint(x: Double(pointX), y: Double(pointY)), id: 0)
        }
        return faceLandmarkPoints
    }
Step 6. Next, draw our mask on top. We take the obtained triangles from the Delaunay algorithm and draw in the form of layers.
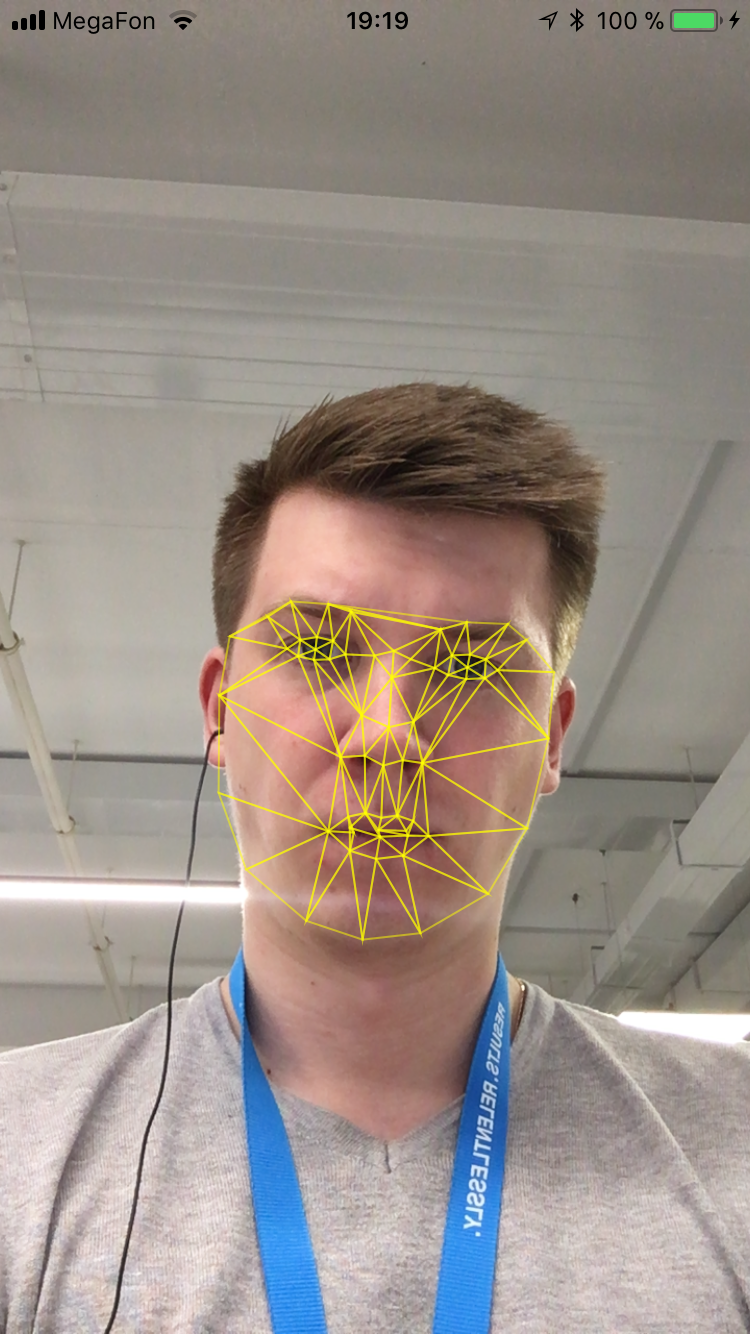
Figure 10. The final result - the simplest mask over the face.
The full implementation of the Delaunay triangulation algorithm on Swift is here .
And a couple of optimization tips for the sophisticated. Drawing new layers every time is an expensive operation. Constantly calculating the coordinates of triangles using the Delaunay algorithm is also expensive. Therefore, we take a face in high resolution and good quality that looks at the camera, and once we run the Delaunay triangulation algorithm in this photo. The resulting triangles are saved in a text file, and then we use this triangles and change their coordinates.
What are masks
MSQRD, Snapchat, VK, even Avito - all use masks.

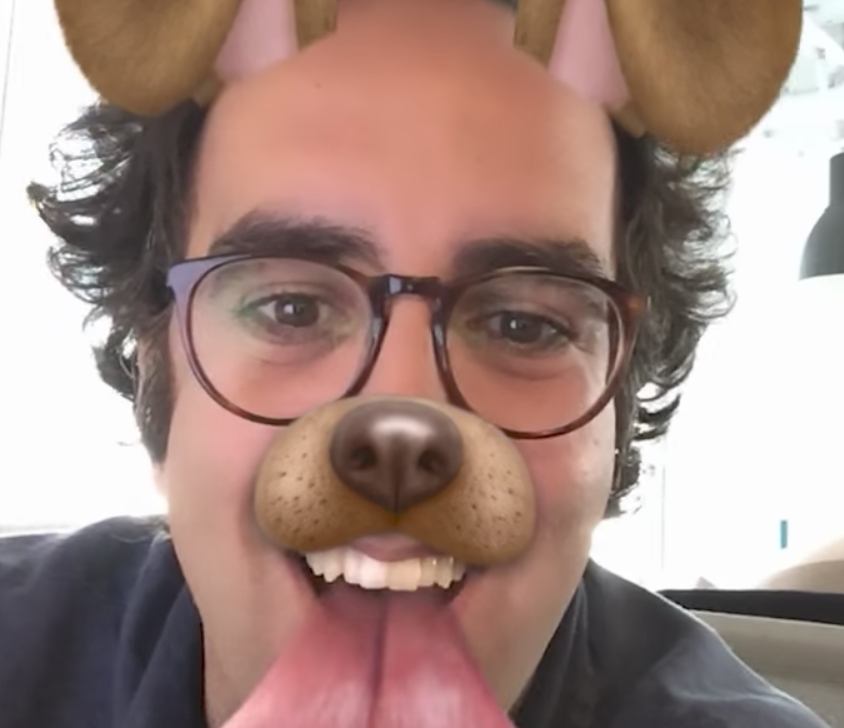
Figure 11. Examples of masks in snapchat
It’s easy to implement the simplest version of the mask . Take the landmarks that got higher. Select the mask you want to apply and place our landmarks on it. At the same time, there are simple 2D projections, and there are more complex 3D masks. For them, the transformation of points is calculated, which will translate the vertices of the mask onto the frame. So that the landmarks in charge of the ears are responsible for the ears of our mask. Next, just track the new position of the landmarks of the face and change our mask.

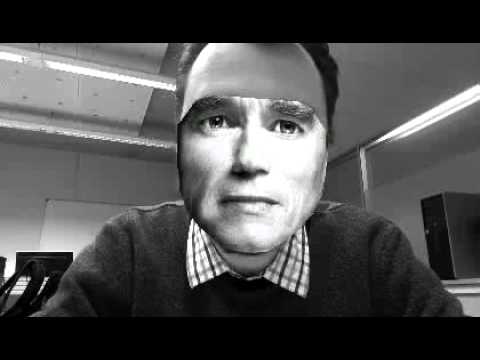
In this area there are difficult tasks that are solved when creating masks. For example, the complexity of rendering. The moment of jumps of landmarks complicates the task even more, since in this case the masks are distorted and will behave unpredictably. And since capturing frames from a mobile phone’s camera is a chaotic process, which includes a quick change of light, shadows, sharp jerking, and so on, the task becomes very time-consuming. Another challenge is building complex masks.
How to entertain or solve a simple problem is interesting. But as in other areas, if you want to solve tough tasks, you will have to spend time learning.
In the next article
Solving the problems of pattern recognition, faces, license plates, gender, age is becoming more and more popular. IT companies in this market introduce technologies to solve such problems gradually and invisibly to the user. China will invest 150 billion in machine learning over the coming years to become the first in this area.
In the next article I’ll tell you how to identify a specific person by a distinguished person and filter fuzzy photos before identification.