Running / debugging Python scripts in LXC / LXD containers from under VS Code
Hello, Habr!
In this article, I would like to share with you the configuration of the development environment for developing Python scripts and running them in an isolated environment, almost in a couple of clicks in the VS Code editor .
As an isolated environment, we will consider the initial setup and creation of a container based on LXC running Ubuntu 17.10. Why not Docker? It is difficult to answer, to give out some arguments. From part, the concept of OS virtualization is subjectively closer in spirit than process virtualization, but the principle that will be described here, with some amendments, will be suitable for running code in Docker containers.
Before installing LXD, you need to decide what type of backend storage for containers will be used. It will not be possible to change later. Several options are available: ZFS, btrfs, LVM, or host file system. For comparison, a comparison table is available in the official documentation. I suggest choosing ZFS which will make it easy in the future to create COW (copy-on-write) snapshots of containers. Install the package of utilities for working with ZFS in the system:
There are no difficulties, the package is included in the standard delivery of the system, so we command in the console:
After installing LXD, the current user will be added to the lxd system group , but in order to continue the configuration with the necessary privileges in the system, you must now re-activate the user session . Just log out and re-enter your Desktop Meneger's session or reboot completely. You can check if the current user session is in the lxd group through the id command:
If you see the lxd group , then everything is all right, you can continue on.
Initialization of LXD takes place interactively on behalf of the current user who is a member of the lxd group . Run the command and follow the instructions and comments below:
If you do not configure the network now, but start creating containers, then when they are created, we will receive a warning that the container is not connected to any of the networks. This will not be a mistake, they simply will not have network access through interfaces. At the beginning, you can create the required number of containers, and then configure the network and attach containers to it using the lxc network attach command . Now we need to decide what type of network to build. There are several options for building LXC networks, but we will choose the bridge option (a simple software switch between the host and containers) and build a network based on it.
When creating a network bridge, we can immediately set properties after specifying its name or rely on auto-configuration which will set the IPv4 and IPv6 subnets to be a random choice. By default, the parameter is ipv4.nat = false and for some reason packets of transit traffic from containers will not be routed beyond the host to other local network segments even when explicitly enabling IP forwarding in the host kernel. Apparently NAT in LXD is more than a translator of addresses from local network segments to global, since when this option is activated, IP forwarding on the host is also activated, so we will explicitly enable it:
The configuration of the container is conditionally divided into two levels, global and local. The global configuration is specified in the configuration profile, which is attached to a specific container or group of containers, and the local configuration is applied only to a specific container. That is, all settings in the profile are inherited by the container, and local settings take precedence over the profile. You can attach multiple profiles to one container.
Let's create an LXD profile so that in the newly created containers, by default there is an interface of type nic that will be linked to the lxdbr0 switch (network bridge) on the host:
For example, create a container and call it pytest , which will be accessible from the host by this name. Run the launch command which will download the image from the ubuntu repository : version 17.10 and the amd64 architecture and create a container from this image. Additionally, the option will indicate that this container needs to be configured from the network0 profile :
Next, download the image from the network. We will wait a bit, and a little later we can see the available containers in the system and their status:
Here we will install the necessary software in the container. Run the package manager inside the container that updates the system:
Next, install the pip package manager (Python package installer), as well as the ptvsd python module (Visual Studio remote debugging server for Python). The ptvsd module must be installed necessarily version 3.0.0, on more recent versions (current 3.2.1.0) I received an error, which is indicated in the issue on github.com . The author of the Python extension to VS Code, which interacts with ptvsd as a temporary solution, recommends using version 3.0.0.
In terms of LXD, we have completed the setup.
Application installation options are described on the official page at code.visualstudio.com/docs/setup/linux , but we modify the commands a bit:
After execution, VS Code of the latest version from the Microsoft repository will appear on our system.
PS At the time of writing, a new version 1.18.0 was released in which, in my opinion, some of the most anticipated (2 years) community features “Multi-root workspaces” and “Git indicators in the Explorer” were included in the stable assembly. You can read about all the changes on this page .
We proceed to install the extensions. If you are installing VS Code for the first time, for example, after using Atom (as the author), then I recommend paying attention to the extensions in the list below, and to achieve the goal of this article, it will be enough to install only Python and Code Runner. Extensions are installed from the marketplace on the left side of the editor.
The following settings are optional, they do not directly relate to running Python scripts in containers, but this will bring you closer if you want it to be visual like in Atom.
In the open editor, open the editor’s settings: file-> Preferences-> Settings. In the window that opens, on the right, in USER_SETTINGS, make the following changes and save (Ctrl + S):
We have already done a great job and it is time for the final part. Now we have almost everything ready to run scripts in the container.
Create the projects directory , for example, at / home / user1 / projects . It will host our future python projects. We will link this directory with the container, i.e., in the container we will create a disk device and associate this directory with the internal / mnt / hostfs . We execute the following commands:
If we locally create a directory or file in the directory / home / user1 / projects , then it will immediately be reflected in the container at the address / mnt / hostfs . You can verify this by running the BASH shell in the container interactively and issuing the ls command:
You will see that the files and directories in the container will be read-only and will have a UID: GID equal to nobody: nogroup . This is enough to run the scripts, but if you need to make the files and directories in the container writable, read the " Direct user / group mapping " chapter in this article .
And so, now we can return to our editor, if you closed it, then reopen it. Click on the menu File -> New File . A new tab will be created in which you need to make the following python-code, which we will run in the container. Save it in the directory / home / user1 / projects / pytest / test.py , and then you can close the file (tab).
VS Code will “say” that you do not have the pylint module installed, but we don’t need it now, you can install it later, on your own, through the pip module manager. Now you need to open the workspace in VS Code, for this, on the left in File Explorer, click the Open Folder button and select the directory / home / user1 / projects / pytest / :
VS Code will be reinitialized, all windows will be completely closed and a workspace will open in which test.py will be visible . Open it by double-clicking on the name on the left in File Explorer VS Code.
Call the settings of the workspace by clicking on the menu File -> Preferences -> Setting, then in the window in the upper right instead of USER_SETTINGS select WORKSPACE_SETTINGS from the drop-down list:
Make and save the following settings so that you get it like this:
In the file explorer, you can find the settings.json file in the .vscode directory, the workspace settings (of the current project) are saved there.
Go back to the open test.py file and run it through the command from the Run code context menu :
In the output of the integrated terminal, you will see information in which you can verify that the code was executed on the remote machine (container). Now, whenever you need to run a project in a container, just make the settings in WORKSPACE_SETTINGS or create a .vscode / settings.json file for each project and then tweak the paths in the settings a little.
Uncomment the lines in the test.py file and save this file:
Whenever there is a need for remote debugging, these lines of code must be inserted into the file that is launched for execution. The ptvsd module on the container side opens port 3000 and expects an external debugger to connect. If desired, you can configure ptvsd in your own way.
Run the code by calling the Run Code context menu. In the integrated terminal, you will see a message that the script is waiting for connection on port 3000. Go to the debugger and create a new configuration for this project:
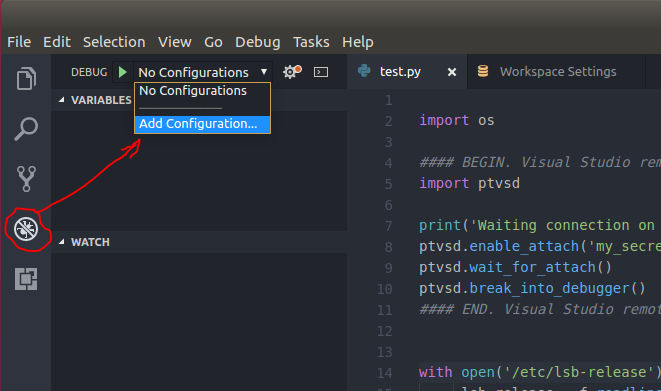
You will open the launch.json file for editing, which will already have presets. Paste the following code block into it:
Save it, it will appear in the .vscode / launch.json directory next to the setting.json file . Then, select on the left in the Python LXC drop-down list , this is the debugger configuration that we just made:
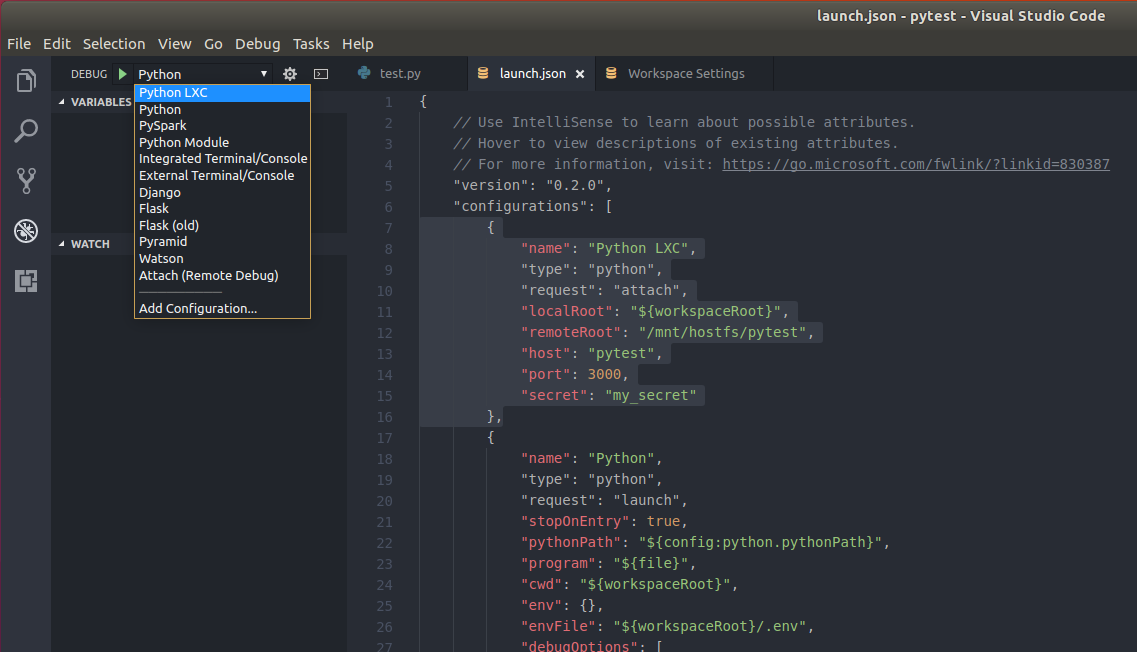
Click Start Debugging. In the window with the file test.py you will see a working debugger and confirmation that the code has been started remotely:
That's all. Setup completed. All that is needed in the future for a new python project is to configure two .vscode / settings.json and .vscode / launche.json config files . If you have questions about the topic, please ask in the comments. Thank you for your attention, successful projects to you!
UPD from 11/10/2017 21:35 MSK.
In the comments, user SirEdvin asked about the possibility of auto-completion (or IntelliSense in Microsoft terms) in the editor of those python modules that are installed only in the container, i.e. these modules are not on the local machine on which VS Code is running.
This point was missed in the article, so I am glad to supplement it with a small chapter:
For example, your project uses a module that is not supplied in the default box with python, and you installed this module only in the container. How to make VS Code “understand”, auto-complete, display prompts in the editor without installing the module on the host, but get it from the module in the container?
To resolve this issue, open the WORKSPACE_SETTINGS settings at YOUR_path_to_project / .vscode / settings.json and add the python.autoComplete.extraPaths parameter , and specify the list of container directories containing the python modules as keys.
For example, our container is available on the host file system at: / var / lib / lxd / containers / pytest / rootfs / . This is the container root file system.pytest . Knowing where Python installs external libraries, we can easily add this path to get the full path to external libraries. For modules like numpy, the full path would be: /var/lib/lxd/containers/pytest/rootfs/usr/local/lib/python3.6/dist-packages . We will add this path to the python.autoComplete.extraPaths setting , like this:
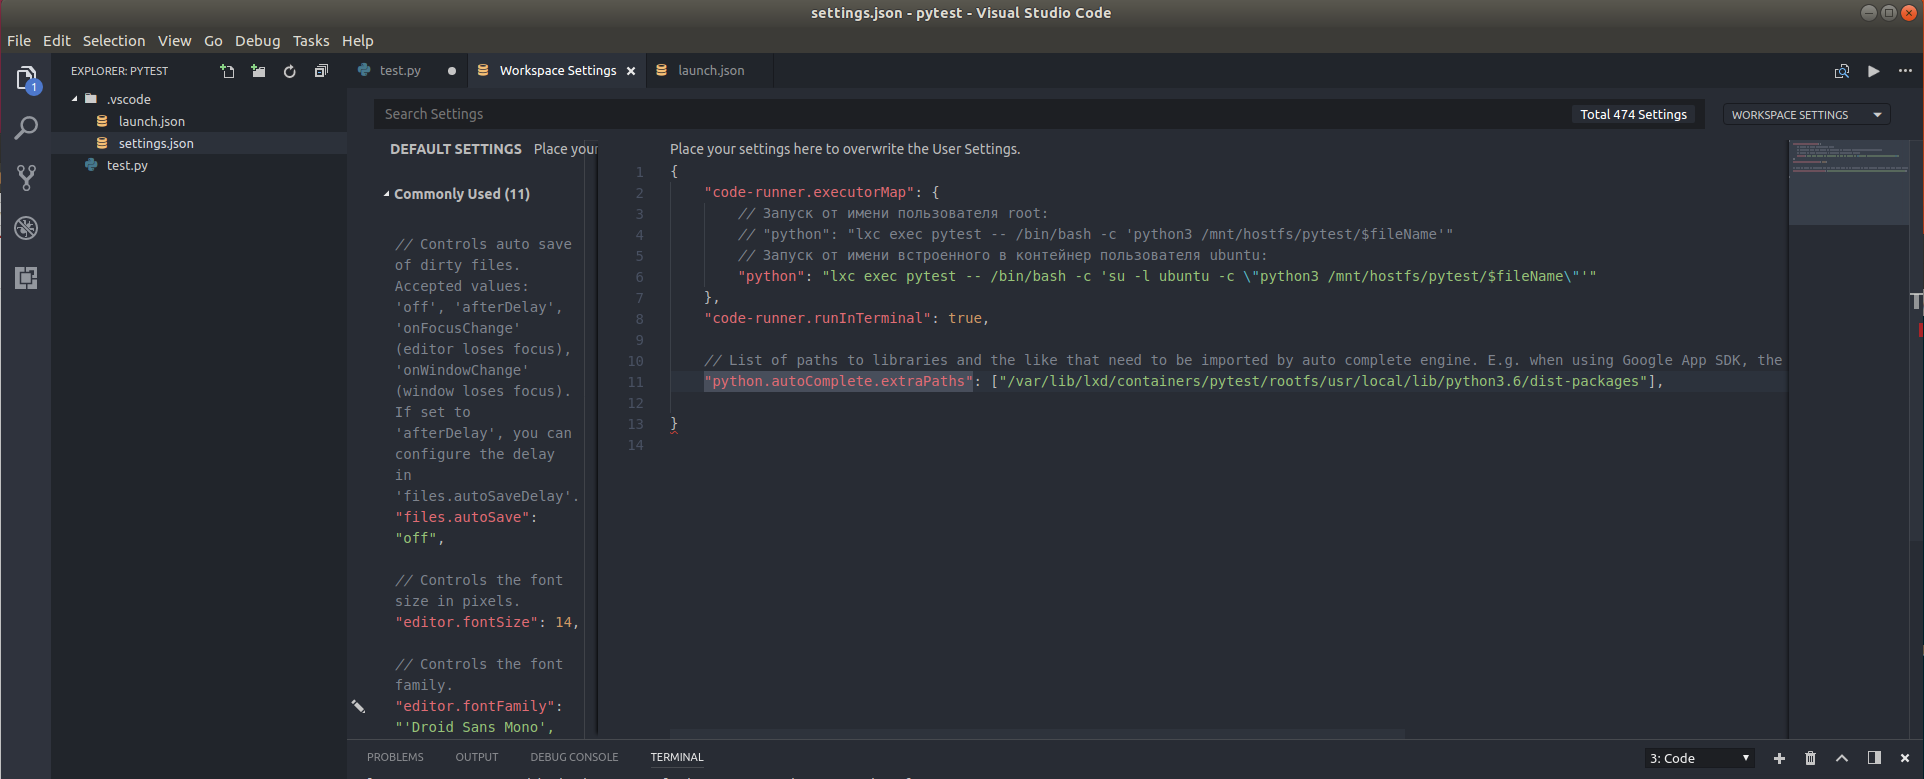
Save the settings and return to your project. Try importing the numpy module and invoke auto-completion with the CTRL + SPACE key. You should be able to do it like this on the screen:
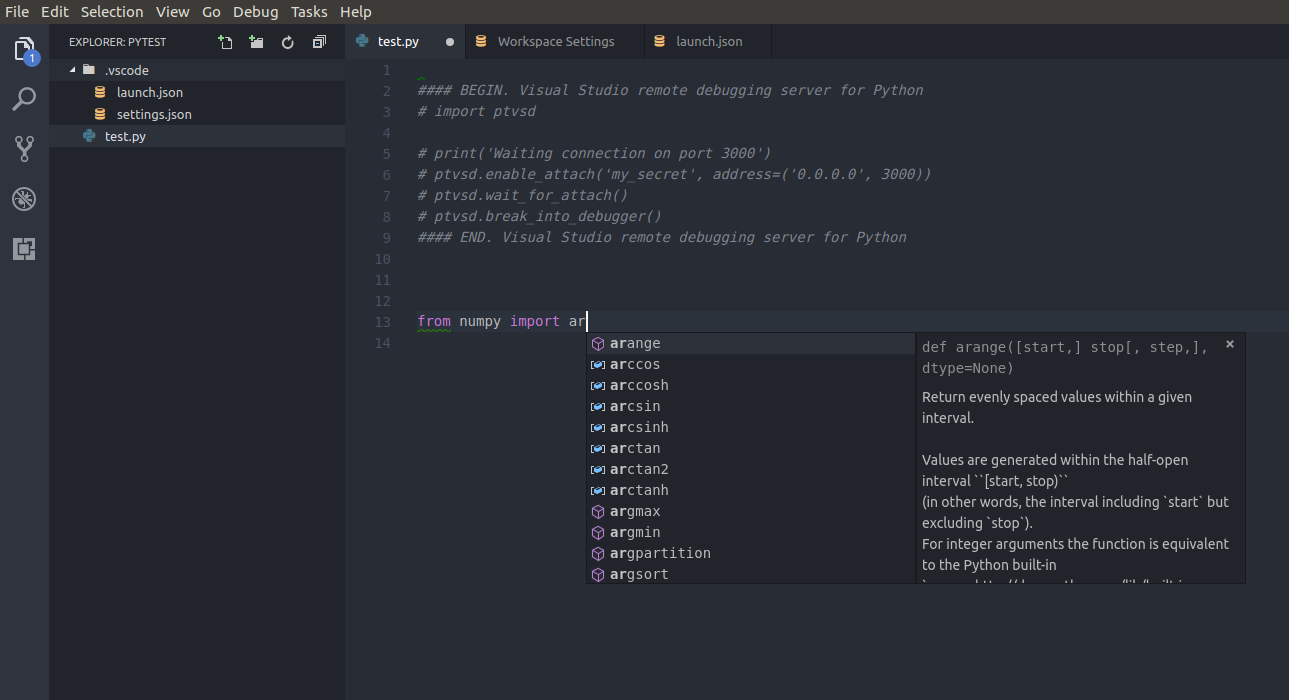
If it doesn’t work right away, don’t be upset, VS Code caches the results and it may not work right away, try closing and opening the editor, playing with the CTRL + SPACE keys after the from ... import keyword.
That's all :)
In this article, I would like to share with you the configuration of the development environment for developing Python scripts and running them in an isolated environment, almost in a couple of clicks in the VS Code editor .
As an isolated environment, we will consider the initial setup and creation of a container based on LXC running Ubuntu 17.10. Why not Docker? It is difficult to answer, to give out some arguments. From part, the concept of OS virtualization is subjectively closer in spirit than process virtualization, but the principle that will be described here, with some amendments, will be suitable for running code in Docker containers.
What do you get?
- Learn how to run one-click python scripts in a container, as well as remote debug from VS Code
- Learn how to install LXD, configure the network and start the first container
- Check out the installation and configuration of the source code editor VS Code, a set of extensions that will allow you to comfortably write and debug code.
What will not be here?
- There will not be a complete review of LXC / LXD, you will have to find additional information about Linux containers yourself.
- The python virtualenv module for creating a virtual environment on the developer's host will not be considered as an alternative to containers.
- There will be no comparison in the spirit of Docker vs LXD, you will draw conclusions yourself based on your experience.
Content:
- Choosing a backend repository
- Install LXD Package
- Initialize LXD
- LXC Network Configuration
- Creating a container configuration profile
- Container creation
- Install software in a container
- Install VS Code and Extensions
- Configure VS Code
- Directory Link Host <-> Container
- Configuring VS Code to run scripts in a container
- Remote Debug in VS Code
- IntelliSense for external Python libraries
Choosing a backend repository
Before installing LXD, you need to decide what type of backend storage for containers will be used. It will not be possible to change later. Several options are available: ZFS, btrfs, LVM, or host file system. For comparison, a comparison table is available in the official documentation. I suggest choosing ZFS which will make it easy in the future to create COW (copy-on-write) snapshots of containers. Install the package of utilities for working with ZFS in the system:
$ sudo apt install zfsutils-linuxInstall LXD Package
There are no difficulties, the package is included in the standard delivery of the system, so we command in the console:
$ sudo apt install lxd
After installing LXD, the current user will be added to the lxd system group , but in order to continue the configuration with the necessary privileges in the system, you must now re-activate the user session . Just log out and re-enter your Desktop Meneger's session or reboot completely. You can check if the current user session is in the lxd group through the id command:
$ id
uid=1000(user1) gid=1000(user1) groups=1000(user1),4(adm),24(cdrom),27(sudo),30(dip),46(plugdev),118(lpadmin),128(sambashare),129(lxd)
If you see the lxd group , then everything is all right, you can continue on.
Initialize LXD
Initialization of LXD takes place interactively on behalf of the current user who is a member of the lxd group . Run the command and follow the instructions and comments below:
$ lxd init
# Здесь нас спрашивают, хотим ли мы сейчас создать пул хранилища? Не путать с пулом ZFS!
# По умолчанию ответ , нажимаем
Do you want to configure a new storage pool (yes/no) [default=yes]?
# Задаем желаемое имя для пула хранилища и нажимаем
Name of the new storage pool [default=default]: lxdpool
# Здесь нам нужно определить тип пула хранилища, выбираем ZFS
Name of the storage backend to use (dir, lvm, zfs) [default=zfs]: zfs
# Создать сейчас ZFS пул? Т.е. в пуле хранилища lxdpool создастся ZFS пул.
# Соглашаемся и нажимаем
Create a new ZFS pool (yes/no) [default=yes]?
# Здесь спрашивают, хотим ли мы использовать существующее блочное устройство?
# Например, это может быть ранее нами подготовленный файл созданный через утилиту dd
# или это может быть отдельный жеский диск или партиция.
# По умолчанию ответ равен , жмем
Would you like to use an existing block device (yes/no) [default=no]?
# Каким размером создать loop-устройство (zfs pool)?
# Указываем число в GB, минимально 1GB
Size in GB of the new loop device (1GB minimum) [default=15GB]: 5
# Желаете сделать LXD доступным по сети?
# По умолчанию LXD не слушает сеть, единственный способ говорить с ним - через локальный unix сокет /var/lib/lxd/unix.socket
# Отвечаем , жмем :
Would you like LXD to be available over the network (yes/no) [default=no]?
# Желаете чтобы образы в локальном репозитории автоматически обновлялись?
Would you like stale cached images to be updated automatically (yes/no) [default=yes]? no
# Желаете сейчас создать сетевой мост? Отвечаем , мы его позже создадим и настроим
Would you like to create a new network bridge (yes/no) [default=yes]? no
# LXD has been successfully configured.
LXC Network Configuration
If you do not configure the network now, but start creating containers, then when they are created, we will receive a warning that the container is not connected to any of the networks. This will not be a mistake, they simply will not have network access through interfaces. At the beginning, you can create the required number of containers, and then configure the network and attach containers to it using the lxc network attach command . Now we need to decide what type of network to build. There are several options for building LXC networks, but we will choose the bridge option (a simple software switch between the host and containers) and build a network based on it.
When creating a network bridge, we can immediately set properties after specifying its name or rely on auto-configuration which will set the IPv4 and IPv6 subnets to be a random choice. By default, the parameter is ipv4.nat = false and for some reason packets of transit traffic from containers will not be routed beyond the host to other local network segments even when explicitly enabling IP forwarding in the host kernel. Apparently NAT in LXD is more than a translator of addresses from local network segments to global, since when this option is activated, IP forwarding on the host is also activated, so we will explicitly enable it:
$ lxc network create lxdbr0 ipv6.address=none ipv4.address=10.0.3.1/24 ipv4.nat=true
Network lxdbr0 created
$ lxc network list
+--------+----------+---------+-------------+---------+
|  NAME  |   TYPE   | MANAGED | DESCRIPTION | USED BY |
+--------+----------+---------+-------------+---------+
| ens33  | physical | NO      |             | 0       |
+--------+----------+---------+-------------+---------+
| lxdbr0 | bridge   | YES     |             | 0       |
+--------+----------+---------+-------------+---------+
Creating a container configuration profile
The configuration of the container is conditionally divided into two levels, global and local. The global configuration is specified in the configuration profile, which is attached to a specific container or group of containers, and the local configuration is applied only to a specific container. That is, all settings in the profile are inherited by the container, and local settings take precedence over the profile. You can attach multiple profiles to one container.
Let's create an LXD profile so that in the newly created containers, by default there is an interface of type nic that will be linked to the lxdbr0 switch (network bridge) on the host:
$ lxc profile copy default network0
$ lxc profile device add network0 eth0 nic parent=lxdbr0 nictype=bridged
Container creation
For example, create a container and call it pytest , which will be accessible from the host by this name. Run the launch command which will download the image from the ubuntu repository : version 17.10 and the amd64 architecture and create a container from this image. Additionally, the option will indicate that this container needs to be configured from the network0 profile :
$ lxc launch ubuntu:17.10/amd64 --profile network0 pytest
Next, download the image from the network. We will wait a bit, and a little later we can see the available containers in the system and their status:
$ lxc list
+--------+---------+------------------+------+------------+-----------+
|  NAME  |  STATE  |       IPV4       | IPV6 |    TYPE    | SNAPSHOTS |
+--------+---------+------------------+------+------------+-----------+
| pytest | RUNNING | 10.0.3.13 (eth0) |      | PERSISTENT | 0         |
+--------+---------+------------------+------+------------+-----------+
Install software in a container
Here we will install the necessary software in the container. Run the package manager inside the container that updates the system:
$ lxc exec pytest -- /bin/bash -c 'apt update && apt upgrade -y'
Next, install the pip package manager (Python package installer), as well as the ptvsd python module (Visual Studio remote debugging server for Python). The ptvsd module must be installed necessarily version 3.0.0, on more recent versions (current 3.2.1.0) I received an error, which is indicated in the issue on github.com . The author of the Python extension to VS Code, which interacts with ptvsd as a temporary solution, recommends using version 3.0.0.
$ lxc exec pytest -- /bin/bash -c 'apt install python3-pip -y'
$ lxc exec pytest -- /bin/bash -c 'pip3 install ptvsd==3.0.0'
In terms of LXD, we have completed the setup.
Install VS Code and Extensions
Application installation options are described on the official page at code.visualstudio.com/docs/setup/linux , but we modify the commands a bit:
$ cd ~
$ wget -c https://packages.microsoft.com/keys/microsoft.asc
$ cat microsoft.asc | gpg --dearmor > microsoft.gpg
$ sudo mv microsoft.gpg /etc/apt/trusted.gpg.d/microsoft.gpg
$ sudo sh -c 'echo "deb [arch=amd64] https://packages.microsoft.com/repos/vscode stable main" > /etc/apt/sources.list.d/vscode.list'
$ sudo apt update
$ sudo apt install code
After execution, VS Code of the latest version from the Microsoft repository will appear on our system.
PS At the time of writing, a new version 1.18.0 was released in which, in my opinion, some of the most anticipated (2 years) community features “Multi-root workspaces” and “Git indicators in the Explorer” were included in the stable assembly. You can read about all the changes on this page .
We proceed to install the extensions. If you are installing VS Code for the first time, for example, after using Atom (as the author), then I recommend paying attention to the extensions in the list below, and to achieve the goal of this article, it will be enough to install only Python and Code Runner. Extensions are installed from the marketplace on the left side of the editor.
- IntelliSense for CSS class names
- Python
- Jinja
- Django template
- file-icons
- One dark pro
- Subtle match brackets
- Todo highlight
- Code runner
Configure VS Code
The following settings are optional, they do not directly relate to running Python scripts in containers, but this will bring you closer if you want it to be visual like in Atom.
In the open editor, open the editor’s settings: file-> Preferences-> Settings. In the window that opens, on the right, in USER_SETTINGS, make the following changes and save (Ctrl + S):
{
    // Общие настройки
    "telemetry.enableTelemetry": false,
    "editor.fontFamily": "Menlo, Consolas, 'DejaVu Sans Mono', monospace",
    "editor.lineHeight": 21,
    "editor.minimap.enabled": true,
    "editor.minimap.showSlider": "always",
    "editor.minimap.renderCharacters": false,
    "files.insertFinalNewline": true,
    "files.trimFinalNewlines": true,
    "explorer.openEditors.visible": 0,
    // Настройка интегрированного терминала:
    "terminal.integrated.lineHeight": 1.25,
    "terminal.integrated.scrollback": 2000,
    // Настройка темы:
    "workbench.iconTheme": "file-icons",
    "workbench.colorTheme": "One Dark Pro",
    "workbench.colorCustomizations": {
        // https://code.visualstudio.com/docs/getstarted/theme-color-reference
        "editor.lineHighlightBackground": "#2C323C"
    },
    // Настройка подсветки скобок
    "editor.matchBrackets": false,
    "subtleBrackets.styles": {
        "global": {
            "color": "#61afef",
            "borderColor": "#61afef",
            "borderWidth": "1px",
            "borderStyle": "none none solid none"
        }
    },
    // Python
    "python.pythonPath": "python3",
    // Настройка кодо-запускателя:
    "code-runner.executorMap": {
        "python": "python3 $fileName"
    }
}
Directory Link Host <-> Container
We have already done a great job and it is time for the final part. Now we have almost everything ready to run scripts in the container.
Create the projects directory , for example, at / home / user1 / projects . It will host our future python projects. We will link this directory with the container, i.e., in the container we will create a disk device and associate this directory with the internal / mnt / hostfs . We execute the following commands:
$ mkdir ~/projects
$ lxc config device add pytest hostfs disk path=/mnt/hostfs source=/home/user1/projects/
If we locally create a directory or file in the directory / home / user1 / projects , then it will immediately be reflected in the container at the address / mnt / hostfs . You can verify this by running the BASH shell in the container interactively and issuing the ls command:
$ lxc exec pytest -- /bin/bash
$ ls -l /mnt/hostfs/
You will see that the files and directories in the container will be read-only and will have a UID: GID equal to nobody: nogroup . This is enough to run the scripts, but if you need to make the files and directories in the container writable, read the " Direct user / group mapping " chapter in this article .
Configuring VS Code to run scripts in a container
And so, now we can return to our editor, if you closed it, then reopen it. Click on the menu File -> New File . A new tab will be created in which you need to make the following python-code, which we will run in the container. Save it in the directory / home / user1 / projects / pytest / test.py , and then you can close the file (tab).
import os
#### BEGIN. Visual Studio remote debugging server for Python
# import ptvsd
# print('Waiting connection on port 3000')
# ptvsd.enable_attach('my_secret', address=('0.0.0.0', 3000))
# ptvsd.wait_for_attach()
# ptvsd.break_into_debugger()
#### END. Visual Studio remote debugging server for Python
with open('/etc/lsb-release') as f:
     lsb_release = f.readlines()
info = {
    'HOSTNAME': os.uname().nodename,
    'DISTRIB': lsb_release[3][21:-2],
    'USER': os.environ['USER'],
    'LOGNAME': os.environ['LOGNAME'],
    'HOME': os.environ['HOME'],
    'PWD': os.environ['PWD']
}
print(info)
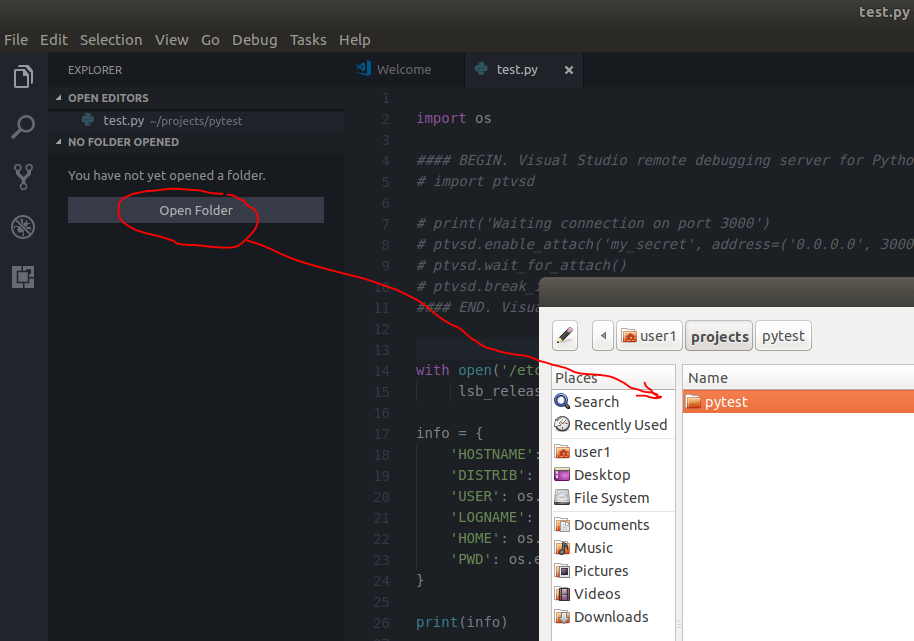
VS Code will “say” that you do not have the pylint module installed, but we don’t need it now, you can install it later, on your own, through the pip module manager. Now you need to open the workspace in VS Code, for this, on the left in File Explorer, click the Open Folder button and select the directory / home / user1 / projects / pytest / :
VS Code will be reinitialized, all windows will be completely closed and a workspace will open in which test.py will be visible . Open it by double-clicking on the name on the left in File Explorer VS Code.
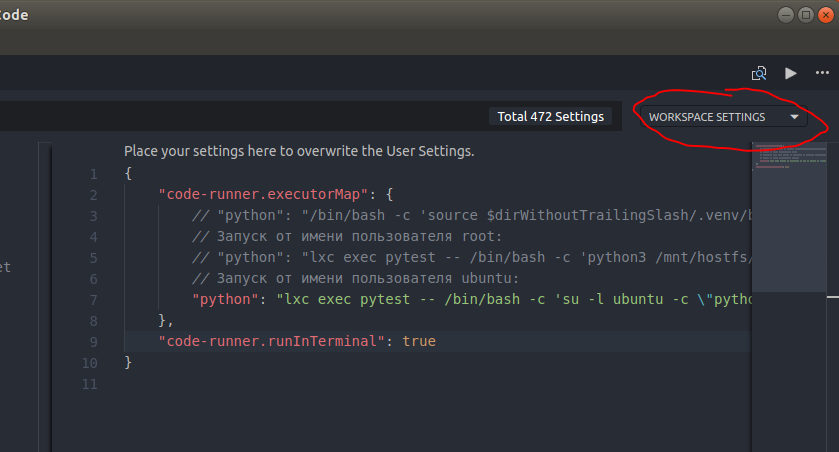
Call the settings of the workspace by clicking on the menu File -> Preferences -> Setting, then in the window in the upper right instead of USER_SETTINGS select WORKSPACE_SETTINGS from the drop-down list:
Make and save the following settings so that you get it like this:
{
    "code-runner.executorMap": {
        // Запуск от имени пользователя root:
        // "python": "lxc exec pytest -- /bin/bash -c 'cd /mnt/hostfs/pytest && python3 $fileName'"
        // Запуск от имени встроенного в контейнер пользователя ubuntu:
        "python": "lxc exec pytest -- /bin/bash -c 'su -l ubuntu -c \"cd /mnt/hostfs/pytest && python3 $fileName\"'"
    },
    "code-runner.runInTerminal": true
}
In the file explorer, you can find the settings.json file in the .vscode directory, the workspace settings (of the current project) are saved there.
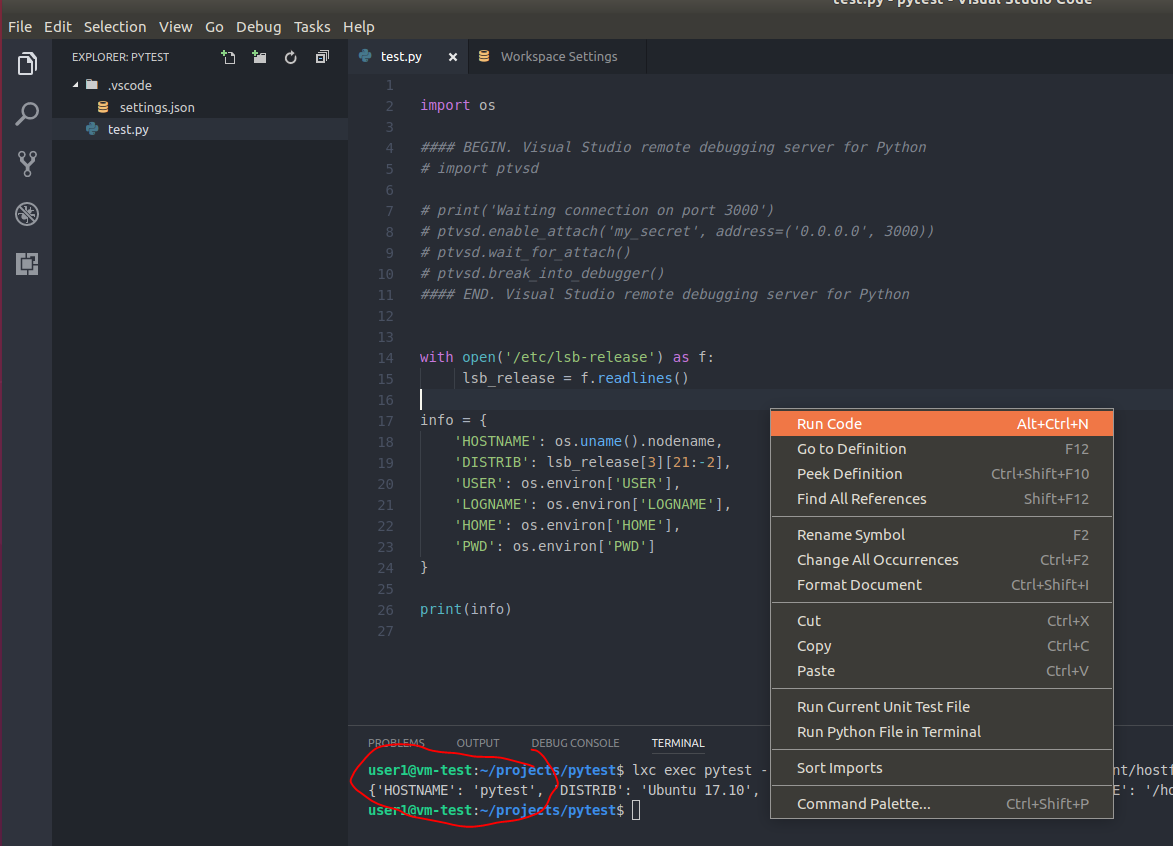
Go back to the open test.py file and run it through the command from the Run code context menu :
In the output of the integrated terminal, you will see information in which you can verify that the code was executed on the remote machine (container). Now, whenever you need to run a project in a container, just make the settings in WORKSPACE_SETTINGS or create a .vscode / settings.json file for each project and then tweak the paths in the settings a little.
Remote Debug in VS Code
Uncomment the lines in the test.py file and save this file:
#### BEGIN. Visual Studio remote debugging server for Python
import ptvsd
print('Waiting connection on port 3000')
ptvsd.enable_attach('my_secret', address=('0.0.0.0', 3000))
ptvsd.wait_for_attach()
ptvsd.break_into_debugger()
#### END. Visual Studio remote debugging server for Python
Whenever there is a need for remote debugging, these lines of code must be inserted into the file that is launched for execution. The ptvsd module on the container side opens port 3000 and expects an external debugger to connect. If desired, you can configure ptvsd in your own way.
Run the code by calling the Run Code context menu. In the integrated terminal, you will see a message that the script is waiting for connection on port 3000. Go to the debugger and create a new configuration for this project:
You will open the launch.json file for editing, which will already have presets. Paste the following code block into it:
        {
            "name": "Python LXC",
            "type": "python",
            "request": "attach",
            "localRoot": "${workspaceRoot}",
            "remoteRoot": "/mnt/hostfs/pytest",
            "host": "pytest",
            "port": 3000,
            "secret": "my_secret"
        }
Save it, it will appear in the .vscode / launch.json directory next to the setting.json file . Then, select on the left in the Python LXC drop-down list , this is the debugger configuration that we just made:
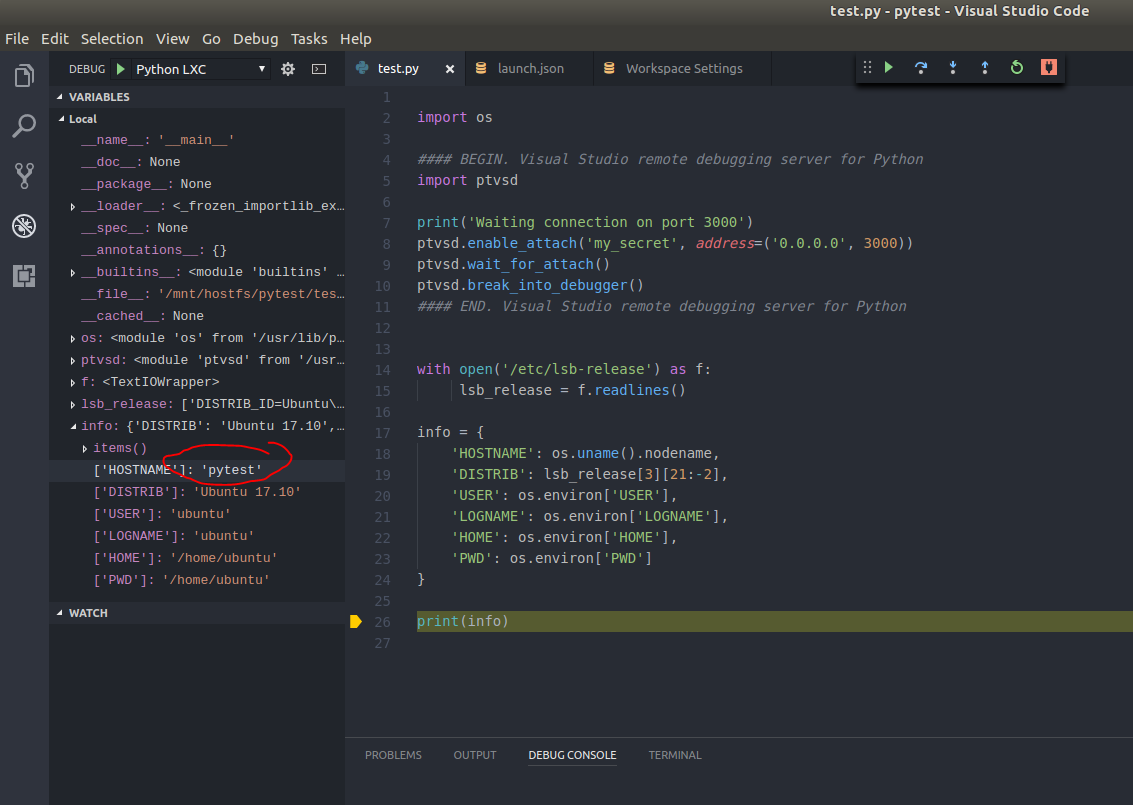
Click Start Debugging. In the window with the file test.py you will see a working debugger and confirmation that the code has been started remotely:
That's all. Setup completed. All that is needed in the future for a new python project is to configure two .vscode / settings.json and .vscode / launche.json config files . If you have questions about the topic, please ask in the comments. Thank you for your attention, successful projects to you!
UPD from 11/10/2017 21:35 MSK.
In the comments, user SirEdvin asked about the possibility of auto-completion (or IntelliSense in Microsoft terms) in the editor of those python modules that are installed only in the container, i.e. these modules are not on the local machine on which VS Code is running.
This point was missed in the article, so I am glad to supplement it with a small chapter:
Auto-completion setup (IntelliSense) for external python libraries
For example, your project uses a module that is not supplied in the default box with python, and you installed this module only in the container. How to make VS Code “understand”, auto-complete, display prompts in the editor without installing the module on the host, but get it from the module in the container?
To resolve this issue, open the WORKSPACE_SETTINGS settings at YOUR_path_to_project / .vscode / settings.json and add the python.autoComplete.extraPaths parameter , and specify the list of container directories containing the python modules as keys.
For example, our container is available on the host file system at: / var / lib / lxd / containers / pytest / rootfs / . This is the container root file system.pytest . Knowing where Python installs external libraries, we can easily add this path to get the full path to external libraries. For modules like numpy, the full path would be: /var/lib/lxd/containers/pytest/rootfs/usr/local/lib/python3.6/dist-packages . We will add this path to the python.autoComplete.extraPaths setting , like this:
Save the settings and return to your project. Try importing the numpy module and invoke auto-completion with the CTRL + SPACE key. You should be able to do it like this on the screen:
If it doesn’t work right away, don’t be upset, VS Code caches the results and it may not work right away, try closing and opening the editor, playing with the CTRL + SPACE keys after the from ... import keyword.
That's all :)









